Dynamic lights and shadows in my 2d game
I am working on a game in the genre of stes-action, where shadows will play a big role in the gameplay. So I did dynamic lighting / shading using WebGL shaders.
I was inspired to create it by a post on reddit, where aionskull used normal maps in Unity to dynamically illuminate their sprites. And the user with the nickname gpillow posted in the comments that he did something similar in Love2D. Here is an 8-mb gif with results. For her, thanks to jusksmit.
So what is dynamic lighting? This is a technique in 3D graphics, where the light source illuminates objects on the scene. Dynamic because it is updated in real time when the source moves. Pretty standard thing in the 3D world and easily applicable to 2D, of course, if you can take advantage of shaders.
You can make dynamic lighting knowing that the angle of incidence of light on the plane determines its illumination, and you can determine the illumination by recognizing the normal vector, which shows where the plane “looks”.
')
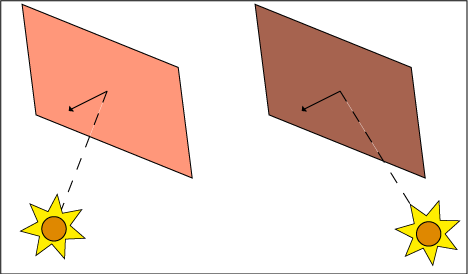
In the picture above, this is an arrow sticking out from the center of the panel. You can see that when the rays of light go at a large angle (to the normal), the panel is lit much worse. So, in the end, the algorithm is quite simple - the larger the angle, the less light the panel receives. The easiest way to calculate illumination is to calculate the scalar product between the vector from the light source and the normal vector.
Ok, everything is very cool, but how to get the normal vectors in a 2d game? Here, in general, there are no volumetric objects ... However, here additional textures (the same normal maps) can help us, in which the necessary information will be recorded. I created 2 such maps for two houses in the video above and used them to calculate the lighting, here is an example:

In the beginning, you see a normal house sprite without shading. On the second part of the picture is his normal map, encoding the normal vector in the texture color. The vector has (x, y, z) coordinates, and the pixel of the texture has r, g, and b components, so it's normal to encode the normal: Take the front of the house, which faces south. Its normal will be a vector with coordinates [x: 0, y: 0.5, z: 0]. (For good, the normal should be equal to (0, 1, 0), but since we define the vector from -1 to +1, and it is necessary to encode in the range from 0 to 1, then, apparently, the author decided not to steam and immediately count normals from -0.5 to +0.5. approx. transl.)
RGB values cannot be negative, so we move all values to 0.5: [x: 0.5, y: 1, z: 0.5]. Well, RGB is usually represented in the number from 0 to 255, so we multiply by 255 and get [x: 128, y: 255, z: 128], or, in other words, the “south” vector will be this light green on the normal map.
Now that we have normals, we can let the graphics card do its magic.
I use ImpactJS , it has good compatibility with WebGL2D . (It is paid, I recommend pixi.js or any other graphics library with a webgl renderer. If you know more analogs - write in comments! Comment. Transl.) Using WebGL2D we can easily add a pixel shader for lighting:
A couple of notes: We get pixel-by-pixel lighting, which is slightly different from the vertex lighting (usually in 3d). There is no special choice, since the vertices in 2d are meaningless (there are only 4 of them to display the plane on the stage). But, in general, this is not a problem, per-pixel lighting is much more accurate. It should also be noted that the shader renders only the lighting, without the main sprite. I’ll have to admit, I’m cheating a little, because in fact I don’t light up my sprite, but rather shade it and in lightColor I give it a dark gray color. True pixel illumination, namely increased brightness, looks worse; pixels appear to be wiped out. This problem has solutions, but now it is not fundamental.

Dropping shadows in 3D is a well-studied problem with well-known solutions, such as ray tracing or shadow-mapping . However, I found it difficult to find any acceptable ready-made solution for 2d, I had to do it myself, I think it turned out fine, although it also has a couple of flaws.
In short, we will draw a line from the pixel on the stage to the sun and check if there is any obstacle. If there is - then a pixel in the shadow, if not - in the sun, so, in principle, nothing complicated.
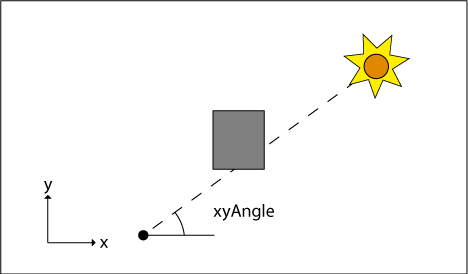
The shader takes xyAngle and zAngle , which are responsible for where the sun is. Since it is very far away, the rays of light will be parallel, and, accordingly, these two angles will be the same for all pixels. Also, the shader will receive a map of the heights of the world. It will show the height of all objects, buildings, trees, etc. If the pixel belongs to the building, then the pixel value will be approximately 10, and it means that the height of the building at this point is 10 pixels.
So, the shader will start in the pixel that needs to be illuminated and, using the xyAngle vector, will move towards the sun in small steps. On each of them we will check if there is anything in this pixel of the height map.
As soon as we find an obstacle, we will determine its height, and how high it must be at a given point in order to block the sun (using zAngle ).
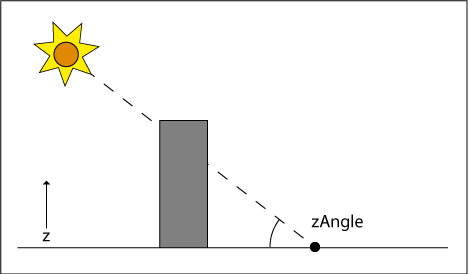
If the value in the height map is larger, then everything is a pixel in the shadow. If not, we will continue to search. But sooner or later we will give up and declare that the pixel is lit by the sun. In the example, I zahardkodil 100 steps, while it works fine.
Here is the shader code in simplified / pseudo form:
And here is the whole code:
In uTexStep recorded the length of the step to check the pixels. Usually, 1 / heightMap.width or 1 / heightMap.height is enough, because in OpenGL the texture coordinates are from 0 to 1, so 1 / resolution will give us the size of one pixel.
In truth, there are a few small details that I omitted in the code above, but the basic idea should be clear. (For example, the idea that the height map! = The normal map reached me only now. Approx. Transl.). In this method there is a big drawback associated with the fact that each pixel on the scene can have only one height. Therefore, for example, there are difficulties with trees. The engine will not be able to correctly display the shadow from them in the form of a thin trunk and a magnificent crown - there will be either thick cylindrical shadows or thin sticks from the trunks, because the void between the leaves and the ground is not recorded in the height map.


Part One: Dynamic Lighting
I was inspired to create it by a post on reddit, where aionskull used normal maps in Unity to dynamically illuminate their sprites. And the user with the nickname gpillow posted in the comments that he did something similar in Love2D. Here is an 8-mb gif with results. For her, thanks to jusksmit.
So what is dynamic lighting? This is a technique in 3D graphics, where the light source illuminates objects on the scene. Dynamic because it is updated in real time when the source moves. Pretty standard thing in the 3D world and easily applicable to 2D, of course, if you can take advantage of shaders.
You can make dynamic lighting knowing that the angle of incidence of light on the plane determines its illumination, and you can determine the illumination by recognizing the normal vector, which shows where the plane “looks”.
')
In the picture above, this is an arrow sticking out from the center of the panel. You can see that when the rays of light go at a large angle (to the normal), the panel is lit much worse. So, in the end, the algorithm is quite simple - the larger the angle, the less light the panel receives. The easiest way to calculate illumination is to calculate the scalar product between the vector from the light source and the normal vector.
Ok, everything is very cool, but how to get the normal vectors in a 2d game? Here, in general, there are no volumetric objects ... However, here additional textures (the same normal maps) can help us, in which the necessary information will be recorded. I created 2 such maps for two houses in the video above and used them to calculate the lighting, here is an example:
In the beginning, you see a normal house sprite without shading. On the second part of the picture is his normal map, encoding the normal vector in the texture color. The vector has (x, y, z) coordinates, and the pixel of the texture has r, g, and b components, so it's normal to encode the normal: Take the front of the house, which faces south. Its normal will be a vector with coordinates [x: 0, y: 0.5, z: 0]. (For good, the normal should be equal to (0, 1, 0), but since we define the vector from -1 to +1, and it is necessary to encode in the range from 0 to 1, then, apparently, the author decided not to steam and immediately count normals from -0.5 to +0.5. approx. transl.)
RGB values cannot be negative, so we move all values to 0.5: [x: 0.5, y: 1, z: 0.5]. Well, RGB is usually represented in the number from 0 to 255, so we multiply by 255 and get [x: 128, y: 255, z: 128], or, in other words, the “south” vector will be this light green on the normal map.
Now that we have normals, we can let the graphics card do its magic.
I use ImpactJS , it has good compatibility with WebGL2D . (It is paid, I recommend pixi.js or any other graphics library with a webgl renderer. If you know more analogs - write in comments! Comment. Transl.) Using WebGL2D we can easily add a pixel shader for lighting:
#ifdef GL_ES precision highp float; #endif varying vec2 vTextureCoord; uniform sampler2D uSampler; uniform vec3 lightDirection; uniform vec4 lightColor; void main(void) { // vec4 rawNormal = texture2D(uSampler, vTextureCoord); // - , : if(rawNormal.a == 0.0) { gl_FragColor = vec4(0, 0, 0, 0); } else { // RGB , 0..1 -0.5..+0.5 rawNormal -= 0.5; // float lightWeight = dot(normalize(rawNormal.xyz), normalize(lightDirection)); lightWeight = max(lightWeight, 0.0); // gl_FragColor = lightColor * lightWeight; } } A couple of notes: We get pixel-by-pixel lighting, which is slightly different from the vertex lighting (usually in 3d). There is no special choice, since the vertices in 2d are meaningless (there are only 4 of them to display the plane on the stage). But, in general, this is not a problem, per-pixel lighting is much more accurate. It should also be noted that the shader renders only the lighting, without the main sprite. I’ll have to admit, I’m cheating a little, because in fact I don’t light up my sprite, but rather shade it and in lightColor I give it a dark gray color. True pixel illumination, namely increased brightness, looks worse; pixels appear to be wiped out. This problem has solutions, but now it is not fundamental.
Part two: drawing shadows.
Dropping shadows in 3D is a well-studied problem with well-known solutions, such as ray tracing or shadow-mapping . However, I found it difficult to find any acceptable ready-made solution for 2d, I had to do it myself, I think it turned out fine, although it also has a couple of flaws.
In short, we will draw a line from the pixel on the stage to the sun and check if there is any obstacle. If there is - then a pixel in the shadow, if not - in the sun, so, in principle, nothing complicated.
The shader takes xyAngle and zAngle , which are responsible for where the sun is. Since it is very far away, the rays of light will be parallel, and, accordingly, these two angles will be the same for all pixels. Also, the shader will receive a map of the heights of the world. It will show the height of all objects, buildings, trees, etc. If the pixel belongs to the building, then the pixel value will be approximately 10, and it means that the height of the building at this point is 10 pixels.
So, the shader will start in the pixel that needs to be illuminated and, using the xyAngle vector, will move towards the sun in small steps. On each of them we will check if there is anything in this pixel of the height map.
As soon as we find an obstacle, we will determine its height, and how high it must be at a given point in order to block the sun (using zAngle ).
If the value in the height map is larger, then everything is a pixel in the shadow. If not, we will continue to search. But sooner or later we will give up and declare that the pixel is lit by the sun. In the example, I zahardkodil 100 steps, while it works fine.
Here is the shader code in simplified / pseudo form:
void main(void) { float alpha = 0.0; if(isInShadow()) { alpha = 0.5; } gl_FragColor = vec4(0, 0, 0, alpha); } bool isInShadow() { float height = getHeight(currentPixel); float distance = 0; for(int i = 0; i < 100; ++i) { distance += moveALittle(); vec2 otherPixel = getPixelAt(distance); float otherHeight = getHeight(otherPixel); if(otherHeight > height) { float traceHeight = getTraceHeightAt(distance); if(traceHeight <= otherHeight) { return true; } } } return false; } And here is the whole code:
#ifdef GL_ES precision highp float; #endif vec2 extrude(vec2 other, float angle, float length) { float x = length * cos(angle); float y = length * sin(angle); return vec2(other.x + x, other.y + y); } float getHeightAt(vec2 texCoord, float xyAngle, float distance, sampler2D heightMap) { vec2 newTexCoord = extrude(texCoord, xyAngle, distance); return texture2D(heightMap, newTexCoord).r; } float getTraceHeight(float height, float zAngle, float distance) { return distance * tan(zAngle) + height; } bool isInShadow(float xyAngle, float zAngle, sampler2D heightMap, vec2 texCoord, float step) { float distance; float height; float otherHeight; float traceHeight; height = texture2D(heightMap, texCoord).r; for(int i = 0; i < 100; ++i) { distance = step * float(i); otherHeight = getHeightAt(texCoord, xyAngle, distance, heightMap); if(otherHeight > height) { traceHeight = getTraceHeight(height, zAngle, distance); if(traceHeight <= otherHeight) { return true; } } } return false; } varying vec2 vTextureCoord; uniform sampler2D uHeightMap; uniform float uXYAngle; uniform float uZAngle; uniform int uMaxShadowSteps; uniform float uTexStep; void main(void) { float alpha = 0.0; if(isInShadow(uXYAngle, uZAngle, uHeightMap, uMaxShadowSteps, vTextureCoord, uTexStep)) { alpha = 0.5; } gl_FragColor = vec4(0, 0, 0, alpha); } In uTexStep recorded the length of the step to check the pixels. Usually, 1 / heightMap.width or 1 / heightMap.height is enough, because in OpenGL the texture coordinates are from 0 to 1, so 1 / resolution will give us the size of one pixel.
Conclusion
In truth, there are a few small details that I omitted in the code above, but the basic idea should be clear. (For example, the idea that the height map! = The normal map reached me only now. Approx. Transl.). In this method there is a big drawback associated with the fact that each pixel on the scene can have only one height. Therefore, for example, there are difficulties with trees. The engine will not be able to correctly display the shadow from them in the form of a thin trunk and a magnificent crown - there will be either thick cylindrical shadows or thin sticks from the trunks, because the void between the leaves and the ground is not recorded in the height map.
Source: https://habr.com/ru/post/272427/
All Articles