Creating a ToDo application with Realm and Swift
With the development of smartphones in recent years, many tools have been developed to simplify the lives of developers, ensuring their maximum performance and quality. Taking a leading position in the App Store today is not an easy task. And to teach your application to scale even harder. When the application is used by millions of users, you should monitor the application and, if necessary, perform all operations instantly. Therefore, one of the problems faced by many developers is Database. It really causes a headache for each of us, and I think that today you have only two options: SQLite and Core Data. I was a big fan of Core Data and its ability to work with records and persistent data, but I realized that I wasted a lot of time working with it when developing applications. Recently, I ran into Realm , the new best replacement for SQLite and Core Data.

Realm is a cross-platform mobile database for iOS (available in Swift & Objective-C) and Android. Realm was created to be better and faster than SQLite and Core Data. It is not only better and faster, but also easy to use, so you can do a lot with just a few lines of code. Realm is completely free and you can use it without any restrictions. Realm was created for mobile applications, and this is new, since in the last decade, we have not noticed innovations in mobile databases. Now, to work with a mobile database, you have only one option, which is SQLite or any wrapper that uses SQLite. Realm is designed to be easy to use, as it is not ORM, and it uses its own persistence mechanism for greater performance and speed.
Realm is incredibly fast and easy to use, you only need a couple of lines of code to perform any task, regardless of whether it reads or writes to the database. Here I will try to collect all the advantages and reasons why using Realm is the best choice when working with a database in a mobile application:
')
Let's get started with Realm, use it to create a simple iPhone application using Swift. The demo project will be a simple todo application. The user can add Task to Task Lists (Task Lists), each list can contain several tasks. The task has a title, notes, a date, an image, and a boolean value that indicate its completion or vice versa. Before you start working with a project in Xcode. We must first configure Xcode and install the necessary tools for working with Realm.
Please consider the following requirements:
Before you start setting up a project in Xcode, please make sure that you install CocoaPods on your computer, since we will use it to install Realm in an Xcode project. If you are not familiar with CocoaPods , you can familiarize yourself with a few tutorials online, and learn more about getting started.
Now, create a new project in Xcode with the “Single View Application” template and name it “RealmTasks” or whatever. Make sure Swift is selected as a development language. Now go to the project directory in the terminal and run the following command to initialize CocoaPods.
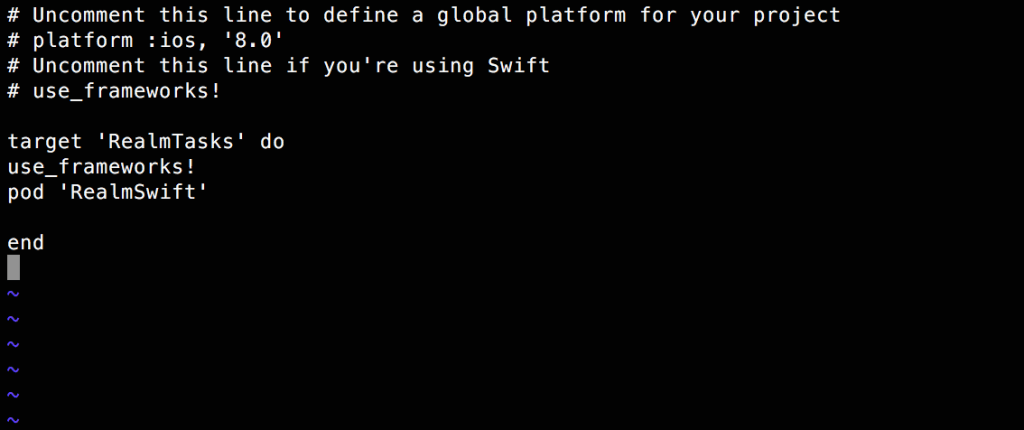
Then open the pod file generated by the Xcode program and edit it to add the pod 'RealmSwift' right after the target object, so it should look like this:
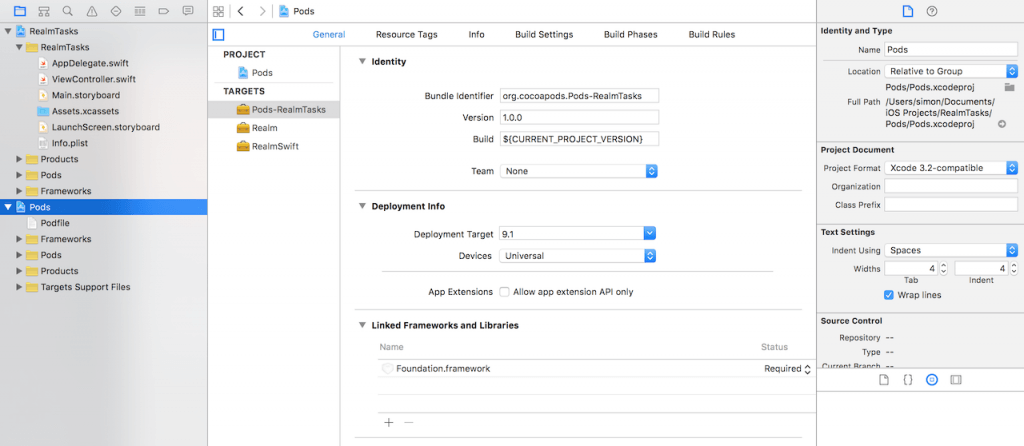
Next, run the “pod install” command to load the Realm into the project. After finishing, you will see a new workspace for Xcode, created next to the project file. Please open the workspace, RealmTasks.xcworkspace you no longer have to open xcodeproj. After you open the workspace, you will see something like this:
Now Xcode is ready to work with Realm, but you need to install some more tools to make it even easier to work with Realm.
The Realm team provided a very useful plug-in for Xcode, which you can use to create Realm models. To install the plugin, we will use Alcatraz . For people who do not know what Alcatraz is, this is a very simple and useful open source package manager for automatically installing plugins, templates in Xcode. To install Alcatraz, simply paste the following command into the terminal and then restart Xcode.
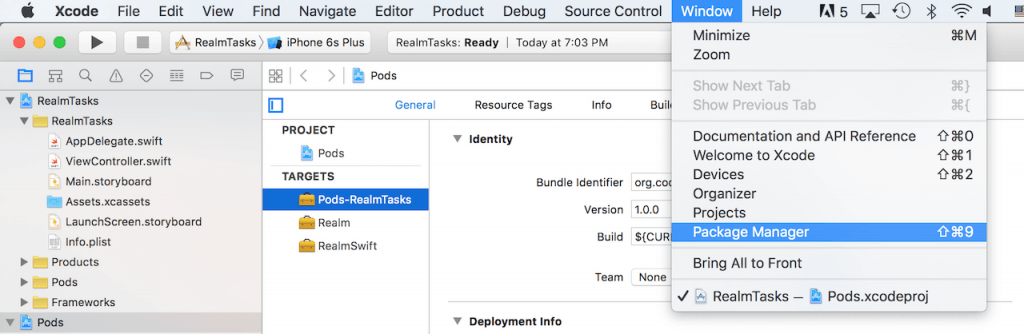
Then in Xcode, select Window and select Package Manager, as in the following image:
Then a pop-up window will open, select which plugin or template to install for Xcode in it, in the search panel you can search for any plug-ins or templates to customize your Xcode. Enter “Realm” in the search bar and the “RealmPlugin” plugin will appear, then click Install .

The last tool I want to mention is the Realm browser. This browser helps you read and edit your .realm database files. These files are created in your application with all the information about the entities, attributes, and records in the database tables. We have already said that these files can be shared among various platforms like iOS or Android. To download the scope browser tool, visit the iTunes store to download the latest version. Open the application, then select Tools -> Generate demo database. This will create a test realm database file, and you can open and view its contents using a browser. It will look like this when you open your demo database:
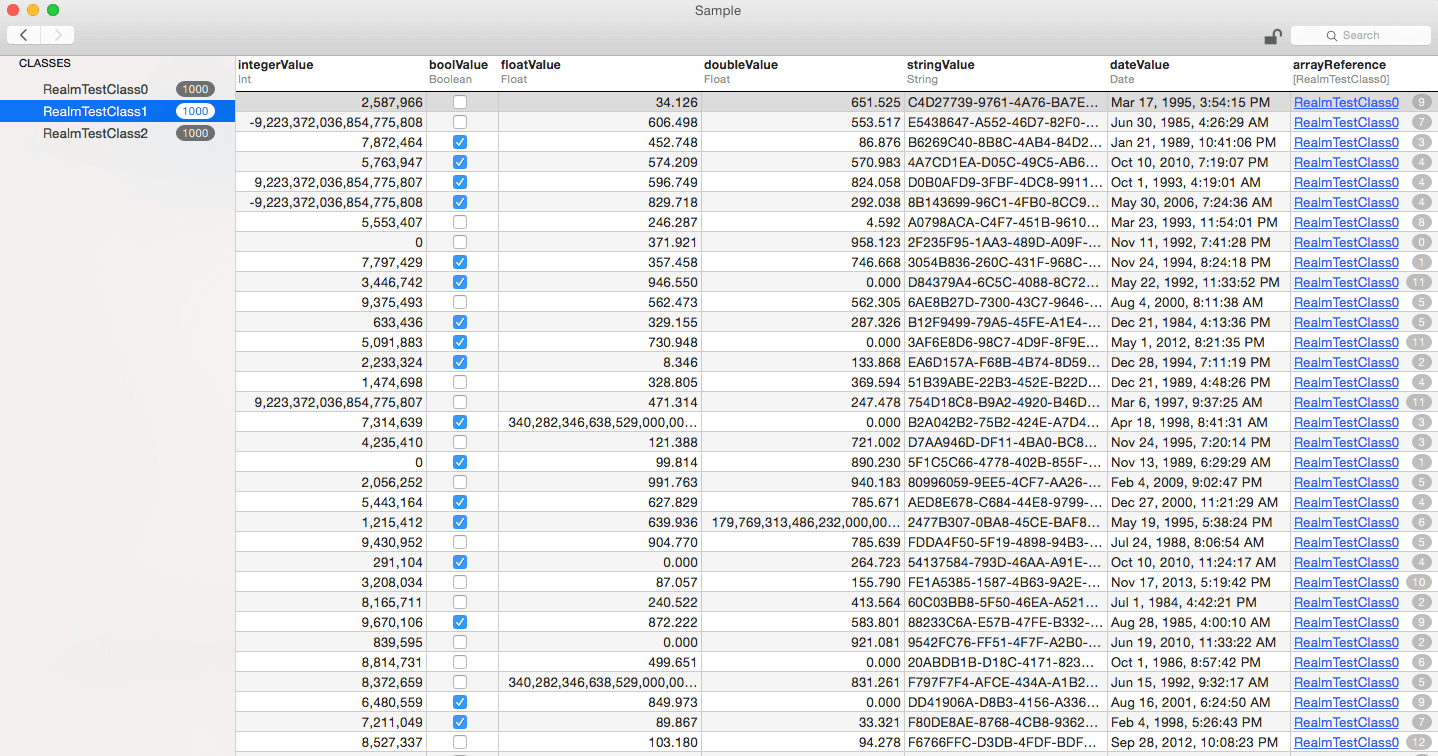
As you can see in the RealmTestClass1 class, there are 1000 entries, and it shows the various types of parameters (columns) of this class. We will burn about the types of support properties in the following sections.
Now everything is ready to work with Realm. Let's start.
Now the game has begun! First we will create model classes or our database. To create model classes in Realm, simply create ordinary Swift classes that extend the object class. Think of an Object as the base class for all classes of the Realm model, you can also extend any class that extends the Object at the end. Once you create your class, you will need properties. Realm supports various types of properties as follows:
The List, like the Realm class, contains a collection of object instances; see a screenshot of the demo database; the last column was just an array of pointers for existing records in another table. When working with Realm classes, you should know that you can cope with them, as with any other Swift classes. For example, you can add methods or protocols and use them like any other Swift class.
To chat is not tossing the bags, show me the code!
Ok, now let's use the Realm plugin that we installed in Xcode to create the Realm class. Go to Xcode and create a new file. On the right sidebar, select Realm:
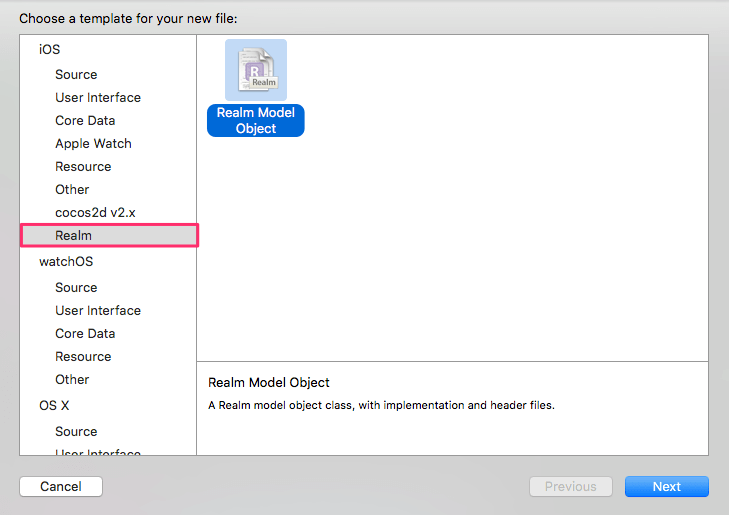
Then select Swift and enter the class name as Task. Now you will see something like this:
Now the Task class is ready to add new properties.
Of course, we have to add properties to the Task class. The task will have a name (String), createdAt (NSDate), notes (String) and isCompleted (Bool). After adding properties, the class will look like this:
We added properties for the Task class and added the var prefix to all properties.
Then, let's create a TaskList class that will be used to save the task:
The TaskList class has a name, createdAt and List is a task list. Here we have some comments:
Creating relationships in Realm is quite simple, as you saw in previous implementations for one-to-many relationships. And as we said for one-to-one relationships instead of a list, we will use an object type. Consider the following example:
In the previous example, the owner property acts as a one-to-one relationship to the Person data model.
Now that the main classes have been created, I will continue to discuss with you about Realm, creating a simple ToDo application. First download the app and watch it. Run it in Xcode 7 (or higher), and you will see the following:
In the project, I added two view controllers: TasksViewController and TaskListViewController. The first controller is used to display the task item, while the second controller is used to display all available tasks. In the list view, click the + button to add a task list. The selection of the task list will continue on the next screen. There you can add several tasks.
With the main idea of the demo application, now let's see how to add a new task list to the Realm database. To do this, you will need to process several elements:
To save objects to Realm, all you need to do is create a subclass of the object model, and then write the object to Realm. Here is an example of a snippet of code you need:
We create a task list by creating an instance of the TaskList class and then setting its properties. Then we create 3 Task type objects (wish1, wish2 and wish3). Here I demonstrated 3 ways to create Realm objects:
Another feature when creating objects in Realm is nested objects. This function can be used when you have a one-to-one or one-to-many relationship, which means that you have properties of type Object or List <Object>. In this case, when you use approach # 2 or # 3, you can replace an object with an array or a dictionary representing its properties. Here is an example of nested objects:
In the above code, we create a movie list and set the name, createAt, and an array of tasks. Each task is created using an array of properties. For example, [“The Maze Runner”, NSDate (), “”, are true] represents a task with the name, createAt, notes, and the Boolean variable isCompleted or vice versa.
Now you need to know how to create Realm objects and use them at any time, you must save them to the Realm database with write transactions. When you save data to Realm, you can access these objects in any stream as long as they are stored in Realm. To complete a write transaction, you must have a Realm object. An instance of Realm (also referred to as scope) represents the Realm database. You can create an instance as follows:
We use to add this line at the top of AppDelegate.swift to share the object across all Swift files. Later you can easily call a write method like this:
First, the uiRealm object is created in the AppDelegate class and will be shared by the application. The Realm object must be created only once, because it is not multi-threaded and cannot be shared between threads. If you want to perform a write operation on another thread, then you must create a new Realm object. I named it as “uiRealm”, because this instance is defined for the UI stream.
Now let's go back to our application, we save the task lists after the user clicks the Create button. In the TasksViewController displayAlertToAddTask method, we have a createAction object:
In the above code, we get the task name from the text field and call the Realm write method to save the task list.
Please note that when performing multiple entries at the same time, they block each other and block the flow in which they were executed. Thus, you should consider running it in a separate thread, not in the UI thread. Another feature is that, reads are not blocked while you are performing write transactions. This is useful because your application can perform many read operations.
Now that you have learned how to write data to Realm, but it is useless, not knowing how to get it back! Querying a Realm database is easy. You have many options for setting and filtering data. When executing the query in Realm, it returns a list of the Results object. Just think of Results as a Swift array, because its interface is very similar to an array.
When you have a copy of Results, you get the data directly from the disk. Any data changes (in transactions) will result in data changes on the disk. In Realm, to query objects, simply call the method of the object with the name of the class as a parameter. Let's see how to use it to read TaskLists and update the UI:
We defined this property in TasksListsViewController:
And we implement the readTasksAndUpdateUI method as follows:
And in the tableView method (_: cellForRowAtIndexPath: _), we display a list of names and the number of tasks inside this list:
Pretty simple, isn't it? The last thing to do is to call the readTasksAndUpdateUI function in the viewWillAppear method to make sure that the view is always updated when it is opened.
This is how we read and write task lists using Realm. Next, you will learn how to perform an update or delete operation in Realm. Before we begin, let's go through some code fragments in the project template to edit / delete operations from lists.
First we have a Boolean value in TaskListsViewController, called isEditingMode, which is used to switch between edit and normal modes:
When you click on the Edit button, the didClickOnEditButton method will be called:
This action will enable / disable UITableView editing mode using the setEditing method in UITableView. In UITableView, a standard action in edit mode will show a “delete” action in cells, but starting with iOS 8.0, a new method called editActionsForRowAtIndexPath has been added to UITableViewDelegate to customize the actions that will appear in the cells when the user swipes over them.
We implement this method to add two actions: delete and edit as follows:
Here we have added two ways to use UITableViewRowAction actions, which takes an action style, a name, and a handler for handling actions. Currently, actions will look like this when you slide your finger over a cell or when you click on a destructive button in edit mode:
This is what the application interface looks like for deleting and updating.
To delete objects and data from the Realm database, you can simply call the delete method of the Realm object, passing the object for deletion. And, of course, this needs to be done in a write transaction. Take a look at the following code, which shows how we delete the task list from the database:
After the deletion, we called the readTasksAndUpdateUI function to get new data and update the UI.
Instead of deleting one object, there is another function called deleteAll, which allows you to delete all the data for all classes in the database. This method is very useful when you save data for the current user, and you want to clear the database when it logs out.
In Realm, there are many ways to update objects, but all of them must be executed inside a write transaction. Below we consider some approaches for updating objects.
You can update any Realm object simply with a set of properties with a new value inside the record block. For example, in TasksViewController, we simply change the state of the task by setting the property:
Realm supports marking a single string or int property on an object as a primary key. When creating a Realm object using the add () function, if the key already exists, then the object will be updated with new values.
Here is an example:
The identifier is set as the primary key. If a user with id 1 exists, Realm will update the object accordingly. Otherwise, Realm will insert the object into the database.
If you are an experienced iOS developer, you should be familiar with key-value coding. Realm classes like Object, Results, and List are KVC compliant. It helps to set / update properties at runtime. Another interesting feature of matching KVC in List and Results, is that you can update collection objects as a whole without having to iterate over each object and update them. I know that you cannot fully understand this. Let's look at this example:
In the code above, I made a request to get all the Task objects, and set isCompleted to true for all returned objects. This means that I have marked all tasks in the database as completed with just one line of code.
Let's go back to our ToDo app. If you look again at the displayAlertToAddTaskList method, you will find the following code fragment:
It is executed when the user edits the list of names. We simply update the list of names by setting the name property.
I introduced you to most of the code in TaskListViewController. Now let's take a look at TasksViewController, which is used to display the task item in the task list. The controller has a UITableView, which is divided into two sections: completed and open tasks. In TasksViewController, we have these properties:
The selectedList is used to store the selected task list passed to TaskListsViewController. To filter tasks by state: open or completed, we declare two variables: openTasks and completedTask. For filtering, we will use the magic function filter () with Realm. Let's see what it looks like in the code before I explain to you how filtering works:
In the method, we call the filter method to filter the results. Realm provides an easy way to filter your request using the filter () method. A method can be invoked by instances of a list, result, and object. It returns specific objects based on the condition specified in the filter string. You can think of a filter as NSPredicate.In general, we can say that they are absolutely the same. You can create an NSPredicate with a predicate string and pass it to filter the method as if you were filtering completed tasks.
Let's look at another example:
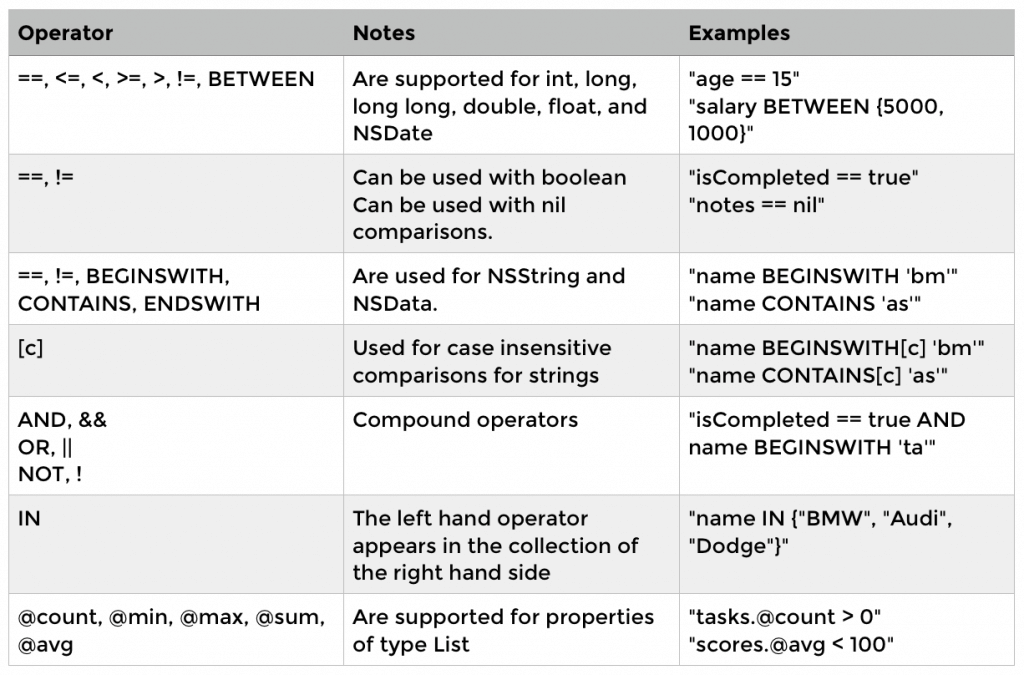
In the above code, we filter these cars by red color, and whose name begins with “BMW”. The first line of code simply uses the filter strings to perform the filtering. Alternatively, you can use NSPredicate to achieve the same results. Here is a table that briefly describes the most common filter comparison operators:
, Realm, , . — , Realm. List Results, , . , , . UI , :
, , :
Realm is a very easy and simple solution for managing local data storage and databases. Realm gives you the ability to scale and simplifies work by writing just a few lines of code. For most applications and even for games, I think you need to use this database, so give it a chance.
Realm , , , , . Realm , . , — Realm, .
Todo app .
What is Realm?
Realm is a cross-platform mobile database for iOS (available in Swift & Objective-C) and Android. Realm was created to be better and faster than SQLite and Core Data. It is not only better and faster, but also easy to use, so you can do a lot with just a few lines of code. Realm is completely free and you can use it without any restrictions. Realm was created for mobile applications, and this is new, since in the last decade, we have not noticed innovations in mobile databases. Now, to work with a mobile database, you have only one option, which is SQLite or any wrapper that uses SQLite. Realm is designed to be easy to use, as it is not ORM, and it uses its own persistence mechanism for greater performance and speed.
Why Realm?
Realm is incredibly fast and easy to use, you only need a couple of lines of code to perform any task, regardless of whether it reads or writes to the database. Here I will try to collect all the advantages and reasons why using Realm is the best choice when working with a database in a mobile application:
')
- Easy to install: you will learn about this in the next section about working with Realm. Install Realm more easily than you can imagine. Using a simple command in Cocoapods, you will be taken to work with Realm.
- Fast: Realm is an incredibly fast library for working with a database. Realm is faster than SQLite and CoreData, and the benchmarks here are the best proof for this.
- Cross-platform: Realm database files are cross-platform and can be shared between iOS and Android. Regardless of whether you are working with Java, Objective-C, or Swift, you will use high-level models.
- Scalable: scalability is very important to consider when developing a mobile application, if the application works with a large number of users and a large number of entries. You should consider this from the very beginning when designing and choosing tools. Realm is ready for scalability and work with large amounts of data in the shortest possible time. You will add speed and anti-aliasing to your application when using Realm.
- Well documented and have excellent support: The Realm team provided readable, well-organized documentation about Realm. If you have problems, you can contact them via Twitter, Github or Stackoverflow.
- Reliable: Realm is used by companies in mobile applications like Pinterest, Dubsmash, and Hipmunk ..
- Free: with all these amazing features Realm is completely free.
let's start
Let's get started with Realm, use it to create a simple iPhone application using Swift. The demo project will be a simple todo application. The user can add Task to Task Lists (Task Lists), each list can contain several tasks. The task has a title, notes, a date, an image, and a boolean value that indicate its completion or vice versa. Before you start working with a project in Xcode. We must first configure Xcode and install the necessary tools for working with Realm.
Requirements
Please consider the following requirements:
- iOS 8 or higher, OS X 10.9 or higher.
- Xcode 6.3 or higher.
- Realm has two versions, one for Swift 2.0 and the other for Swift 1.2. We recommend using Realm for Swift 2.0. You can use it for Swift 1.2, but it will no longer be supported by the Realm team in the future, so for security it's better to use Swift 2.0.
Configuring Xcode and Required Tools
Before you start setting up a project in Xcode, please make sure that you install CocoaPods on your computer, since we will use it to install Realm in an Xcode project. If you are not familiar with CocoaPods , you can familiarize yourself with a few tutorials online, and learn more about getting started.
Now, create a new project in Xcode with the “Single View Application” template and name it “RealmTasks” or whatever. Make sure Swift is selected as a development language. Now go to the project directory in the terminal and run the following command to initialize CocoaPods.
pod init Then open the pod file generated by the Xcode program and edit it to add the pod 'RealmSwift' right after the target object, so it should look like this:
Next, run the “pod install” command to load the Realm into the project. After finishing, you will see a new workspace for Xcode, created next to the project file. Please open the workspace, RealmTasks.xcworkspace you no longer have to open xcodeproj. After you open the workspace, you will see something like this:
Now Xcode is ready to work with Realm, but you need to install some more tools to make it even easier to work with Realm.
Installing Realm plugin for Xcode
The Realm team provided a very useful plug-in for Xcode, which you can use to create Realm models. To install the plugin, we will use Alcatraz . For people who do not know what Alcatraz is, this is a very simple and useful open source package manager for automatically installing plugins, templates in Xcode. To install Alcatraz, simply paste the following command into the terminal and then restart Xcode.
curl -fsSL https://raw.githubusercontent.com/supermarin/Alcatraz/master/Scripts/install.sh | sh Then in Xcode, select Window and select Package Manager, as in the following image:
Then a pop-up window will open, select which plugin or template to install for Xcode in it, in the search panel you can search for any plug-ins or templates to customize your Xcode. Enter “Realm” in the search bar and the “RealmPlugin” plugin will appear, then click Install .
Realm browser
The last tool I want to mention is the Realm browser. This browser helps you read and edit your .realm database files. These files are created in your application with all the information about the entities, attributes, and records in the database tables. We have already said that these files can be shared among various platforms like iOS or Android. To download the scope browser tool, visit the iTunes store to download the latest version. Open the application, then select Tools -> Generate demo database. This will create a test realm database file, and you can open and view its contents using a browser. It will look like this when you open your demo database:
As you can see in the RealmTestClass1 class, there are 1000 entries, and it shows the various types of parameters (columns) of this class. We will burn about the types of support properties in the following sections.
Now everything is ready to work with Realm. Let's start.
Database Model Classes
Now the game has begun! First we will create model classes or our database. To create model classes in Realm, simply create ordinary Swift classes that extend the object class. Think of an Object as the base class for all classes of the Realm model, you can also extend any class that extends the Object at the end. Once you create your class, you will need properties. Realm supports various types of properties as follows:
– Int, Int8, Int16, Int32, and Int64 – Boolean – Float – String – NSDate – NSData – Class Object - ' ' – List <Object> - ' ' The List, like the Realm class, contains a collection of object instances; see a screenshot of the demo database; the last column was just an array of pointers for existing records in another table. When working with Realm classes, you should know that you can cope with them, as with any other Swift classes. For example, you can add methods or protocols and use them like any other Swift class.
To chat is not tossing the bags, show me the code!
Ok, now let's use the Realm plugin that we installed in Xcode to create the Realm class. Go to Xcode and create a new file. On the right sidebar, select Realm:
Then select Swift and enter the class name as Task. Now you will see something like this:
Now the Task class is ready to add new properties.
Properties
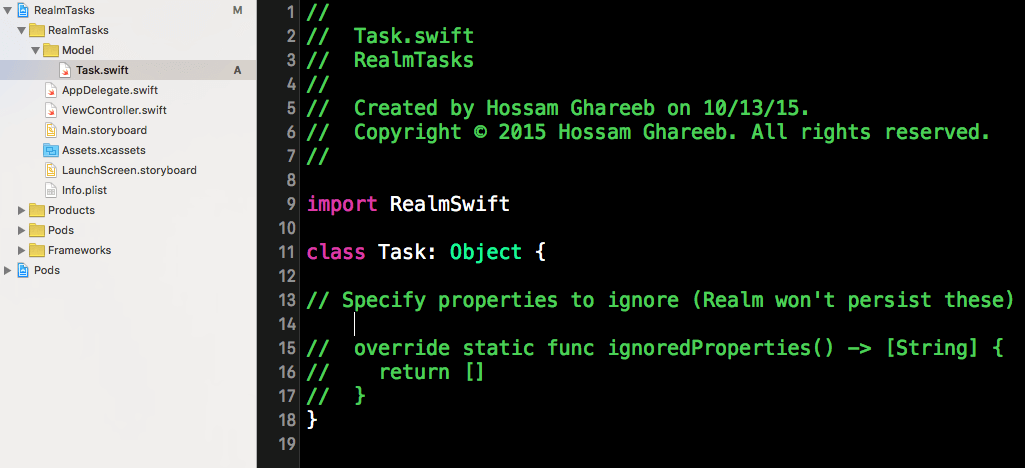
Of course, we have to add properties to the Task class. The task will have a name (String), createdAt (NSDate), notes (String) and isCompleted (Bool). After adding properties, the class will look like this:
class Task: Object { dynamic var name = "" dynamic var createdAt = NSDate() dynamic var notes = "" dynamic var isCompleted = false // Specify properties to ignore (Realm won't persist these) // override static func ignoredProperties() -> [String] { // return [] // } } We added properties for the Task class and added the var prefix to all properties.
Then, let's create a TaskList class that will be used to save the task:
class TaskList: Object { dynamic var name = "" dynamic var createdAt = NSDate() let tasks = List<Task>() // Specify properties to ignore (Realm won't persist these) // override static func ignoredProperties() -> [String] { // return [] // } } The TaskList class has a name, createdAt and List is a task list. Here we have some comments:
- List <Object> is used for one-to-many relationships, because TaskList has many tasks.
- The list is very similar to the array created in the methods and accesses objects using an indexed subscript conversion. List, as you can see, is typed and all objects must be of the same type.
- List <T> is a generic data type, and this is why we did not add a dynamic property before declaring a task property, because generic properties cannot be represented in Objective-C during the execution of a task.
Creating relationships in Realm is quite simple, as you saw in previous implementations for one-to-many relationships. And as we said for one-to-one relationships instead of a list, we will use an object type. Consider the following example:
class Person: Object{ dynamic var name = "" } class Car: Object{ dynamic var owner:Person? } In the previous example, the owner property acts as a one-to-one relationship to the Person data model.
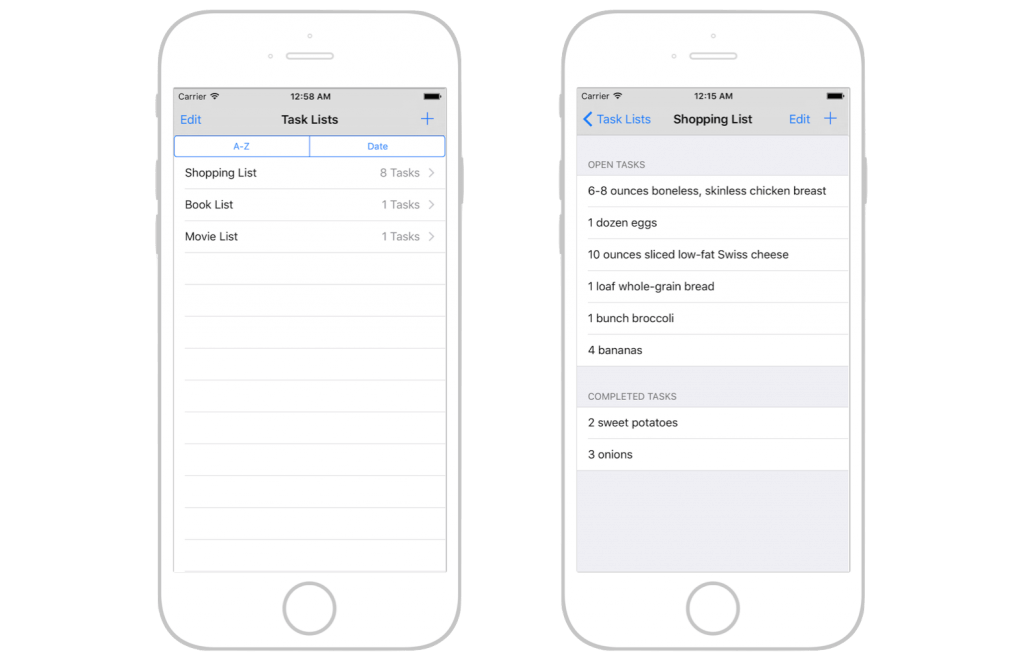
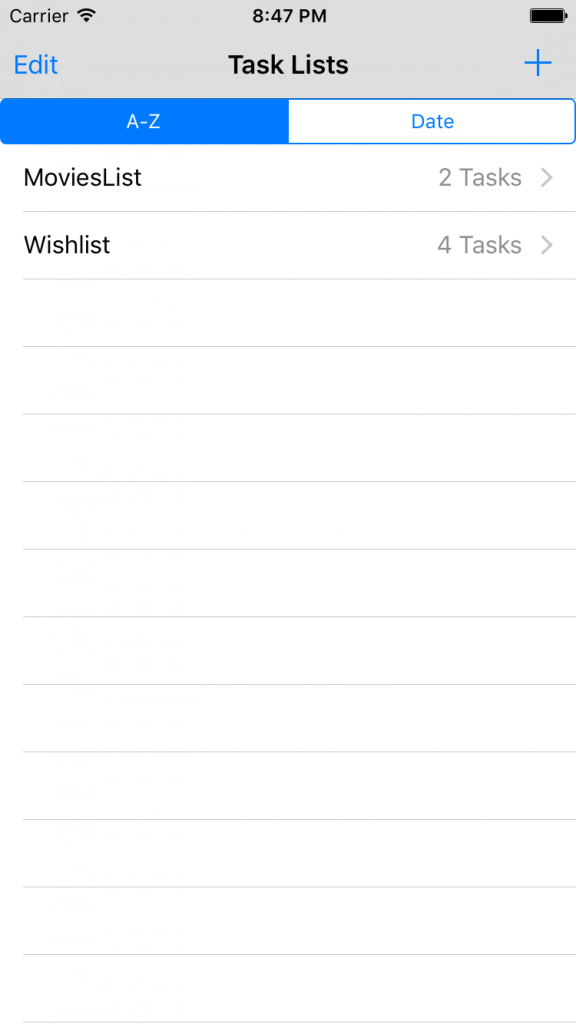
Now that the main classes have been created, I will continue to discuss with you about Realm, creating a simple ToDo application. First download the app and watch it. Run it in Xcode 7 (or higher), and you will see the following:
In the project, I added two view controllers: TasksViewController and TaskListViewController. The first controller is used to display the task item, while the second controller is used to display all available tasks. In the list view, click the + button to add a task list. The selection of the task list will continue on the next screen. There you can add several tasks.
With the main idea of the demo application, now let's see how to add a new task list to the Realm database. To do this, you will need to process several elements:
- Create a new TaskList model object, and save to Realm.
- Make a request to read the list from the database to update the user interface
To save objects to Realm, all you need to do is create a subclass of the object model, and then write the object to Realm. Here is an example of a snippet of code you need:
let taskListA = TaskList() taskListA.name = "Wishlist" let wish1 = Task() wish1.name = "iPhone6s" wish1.notes = "64 GB, Gold" let wish2 = Task(value: ["name": "Game Console", "notes": "Playstation 4, 1 TB"]) let wish3 = Task(value: ["Car", NSDate(), "Auto R8", false]) taskListA.tasks.appendContentsOf([wish1, wish2, wish3]) We create a task list by creating an instance of the TaskList class and then setting its properties. Then we create 3 Task type objects (wish1, wish2 and wish3). Here I demonstrated 3 ways to create Realm objects:
- In the object wish1: just create a class Realm and set properties.
- In the object wish2: You can pass properties to the dictionary with keys (property names) and values.
- In the object wish3: You can pass properties using arrays. The values in the array must be in the same order as the corresponding properties in the class model declarations.
Nested objects
Another feature when creating objects in Realm is nested objects. This function can be used when you have a one-to-one or one-to-many relationship, which means that you have properties of type Object or List <Object>. In this case, when you use approach # 2 or # 3, you can replace an object with an array or a dictionary representing its properties. Here is an example of nested objects:
let taskListB = TaskList(value: ["MoviesList", NSDate(), [["The Martian", NSDate(), "", false], ["The Maze Runner", NSDate(), "", true]]]) In the above code, we create a movie list and set the name, createAt, and an array of tasks. Each task is created using an array of properties. For example, [“The Maze Runner”, NSDate (), “”, are true] represents a task with the name, createAt, notes, and the Boolean variable isCompleted or vice versa.
Saving objects in Realm
Now you need to know how to create Realm objects and use them at any time, you must save them to the Realm database with write transactions. When you save data to Realm, you can access these objects in any stream as long as they are stored in Realm. To complete a write transaction, you must have a Realm object. An instance of Realm (also referred to as scope) represents the Realm database. You can create an instance as follows:
let uiRealm = try! Realm() We use to add this line at the top of AppDelegate.swift to share the object across all Swift files. Later you can easily call a write method like this:
uiRealm.write { () -> Void in uiRealm.add([taskListA, taskListB]) } First, the uiRealm object is created in the AppDelegate class and will be shared by the application. The Realm object must be created only once, because it is not multi-threaded and cannot be shared between threads. If you want to perform a write operation on another thread, then you must create a new Realm object. I named it as “uiRealm”, because this instance is defined for the UI stream.
Now let's go back to our application, we save the task lists after the user clicks the Create button. In the TasksViewController displayAlertToAddTask method, we have a createAction object:
let createAction = UIAlertAction(title: doneTitle, style: UIAlertActionStyle.Default) { (action) -> Void in let taskName = alertController.textFields?.first?.text if updatedTask != nil{ // update mode uiRealm.write({ () -> Void in updatedTask.name = taskName! self.readTasksAndUpateUI() }) } else{ let newTask = Task() newTask.name = taskName! uiRealm.write({ () -> Void in self.selectedList.tasks.append(newTask) self.readTasksAndUpateUI() }) } } In the above code, we get the task name from the text field and call the Realm write method to save the task list.
Please note that when performing multiple entries at the same time, they block each other and block the flow in which they were executed. Thus, you should consider running it in a separate thread, not in the UI thread. Another feature is that, reads are not blocked while you are performing write transactions. This is useful because your application can perform many read operations.
Retrieving Objects
Now that you have learned how to write data to Realm, but it is useless, not knowing how to get it back! Querying a Realm database is easy. You have many options for setting and filtering data. When executing the query in Realm, it returns a list of the Results object. Just think of Results as a Swift array, because its interface is very similar to an array.
When you have a copy of Results, you get the data directly from the disk. Any data changes (in transactions) will result in data changes on the disk. In Realm, to query objects, simply call the method of the object with the name of the class as a parameter. Let's see how to use it to read TaskLists and update the UI:
We defined this property in TasksListsViewController:
var lists : Results<TaskList>! And we implement the readTasksAndUpdateUI method as follows:
func readTasksAndUpdateUI() { lists = uiRealm.objects(TaskList) self.taskListsTableView.setEditing(false, animated: true) self.taskListsTableView.reloadData() } And in the tableView method (_: cellForRowAtIndexPath: _), we display a list of names and the number of tasks inside this list:
func tableView(tableView: UITableView, cellForRowAtIndexPath indexPath: NSIndexPath) -> UITableViewCell{ let cell = tableView.dequeueReusableCellWithIdentifier("listCell") let list = lists[indexPath.row] cell?.textLabel?.text = list.name cell?.detailTextLabel?.text = "\(list.tasks.count) Tasks" return cell! } Pretty simple, isn't it? The last thing to do is to call the readTasksAndUpdateUI function in the viewWillAppear method to make sure that the view is always updated when it is opened.
override func viewWillAppear(animated: Bool) { readTasksAndUpdateUI() } This is how we read and write task lists using Realm. Next, you will learn how to perform an update or delete operation in Realm. Before we begin, let's go through some code fragments in the project template to edit / delete operations from lists.
First we have a Boolean value in TaskListsViewController, called isEditingMode, which is used to switch between edit and normal modes:
var isEditingMode = false When you click on the Edit button, the didClickOnEditButton method will be called:
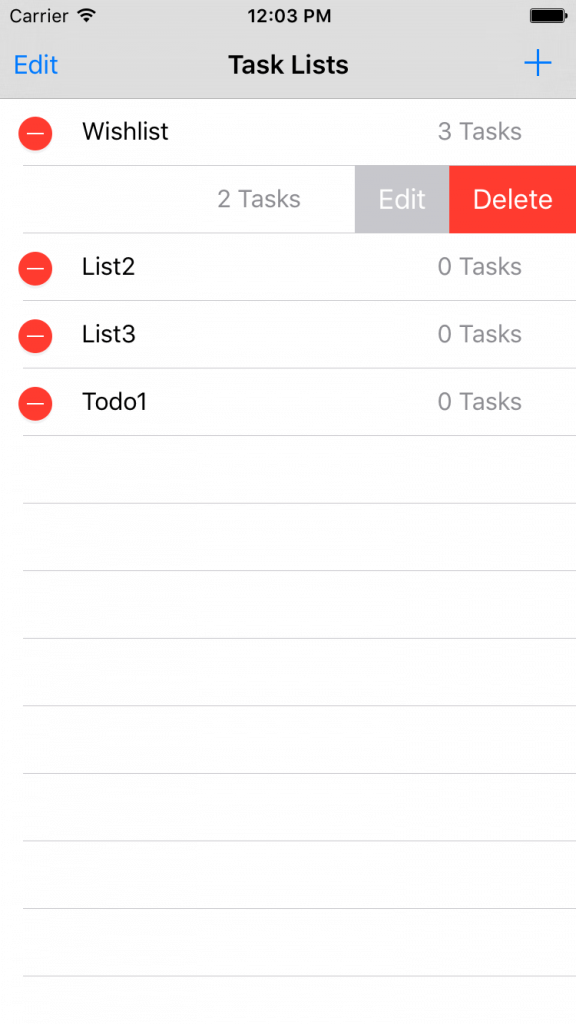
@IBAction func didClickOnEditButton(sender: UIBarButtonItem) { isEditingMode = !isEditingMode self.taskListsTableView.setEditing(isEditingMode, animated: true) } This action will enable / disable UITableView editing mode using the setEditing method in UITableView. In UITableView, a standard action in edit mode will show a “delete” action in cells, but starting with iOS 8.0, a new method called editActionsForRowAtIndexPath has been added to UITableViewDelegate to customize the actions that will appear in the cells when the user swipes over them.
We implement this method to add two actions: delete and edit as follows:
func tableView(tableView: UITableView, editActionsForRowAtIndexPath indexPath: NSIndexPath) -> [UITableViewRowAction]? { let deleteAction = UITableViewRowAction(style: UITableViewRowActionStyle.Destructive, title: "Delete") { (deleteAction, indexPath) -> Void in //Deletion will go here let listToBeDeleted = self.lists[indexPath.row] uiRealm.write({ () -> Void in uiRealm.delete(listToBeDeleted) self.readTasksAndUpdateUI() }) } let editAction = UITableViewRowAction(style: UITableViewRowActionStyle.Normal, title: "Edit") { (editAction, indexPath) -> Void in // Editing will go here let listToBeUpdated = self.lists[indexPath.row] self.displayAlertToAddTaskList(listToBeUpdated) } return [deleteAction, editAction] } Here we have added two ways to use UITableViewRowAction actions, which takes an action style, a name, and a handler for handling actions. Currently, actions will look like this when you slide your finger over a cell or when you click on a destructive button in edit mode:
This is what the application interface looks like for deleting and updating.
Deleting Objects
To delete objects and data from the Realm database, you can simply call the delete method of the Realm object, passing the object for deletion. And, of course, this needs to be done in a write transaction. Take a look at the following code, which shows how we delete the task list from the database:
let listToBeDeleted = self.lists[indexPath.row] uiRealm.write({ () -> Void in uiRealm.delete(listToBeDeleted) self.readTasksAndUpdateUI() }) After the deletion, we called the readTasksAndUpdateUI function to get new data and update the UI.
Instead of deleting one object, there is another function called deleteAll, which allows you to delete all the data for all classes in the database. This method is very useful when you save data for the current user, and you want to clear the database when it logs out.
uiRealm.write({ () -> Void in uiRealm.deleteAll() }) Upgrade Objects
In Realm, there are many ways to update objects, but all of them must be executed inside a write transaction. Below we consider some approaches for updating objects.
Use of properties
You can update any Realm object simply with a set of properties with a new value inside the record block. For example, in TasksViewController, we simply change the state of the task by setting the property:
uiRealm.write({ () -> Void in task.isCompleted = true }) Using primary keys
Realm supports marking a single string or int property on an object as a primary key. When creating a Realm object using the add () function, if the key already exists, then the object will be updated with new values.
Here is an example:
let user = User() user.firstName = "John" user.lastName = "Smith" user.email = "example@example.com" user.id = 1 // Updating User with id = 1 realm.write { realm.add(user, update: true) } The identifier is set as the primary key. If a user with id 1 exists, Realm will update the object accordingly. Otherwise, Realm will insert the object into the database.
Using KVC (Key-Value Coding)
If you are an experienced iOS developer, you should be familiar with key-value coding. Realm classes like Object, Results, and List are KVC compliant. It helps to set / update properties at runtime. Another interesting feature of matching KVC in List and Results, is that you can update collection objects as a whole without having to iterate over each object and update them. I know that you cannot fully understand this. Let's look at this example:
let tasks = uiRealm.objects(Task) uiRealm.write { () -> Void in tasks.setValue(true, forKeyPath: "isCompleted") } In the code above, I made a request to get all the Task objects, and set isCompleted to true for all returned objects. This means that I have marked all tasks in the database as completed with just one line of code.
Let's go back to our ToDo app. If you look again at the displayAlertToAddTaskList method, you will find the following code fragment:
// update mode uiRealm.write({ () -> Void in updatedList.name = listName! self.readTasksAndUpdateUI() }) It is executed when the user edits the list of names. We simply update the list of names by setting the name property.
Task mapping
I introduced you to most of the code in TaskListViewController. Now let's take a look at TasksViewController, which is used to display the task item in the task list. The controller has a UITableView, which is divided into two sections: completed and open tasks. In TasksViewController, we have these properties:
var selectedList : TaskList! var openTasks : Results<Task>! var completedTasks : Results<Task>! The selectedList is used to store the selected task list passed to TaskListsViewController. To filter tasks by state: open or completed, we declare two variables: openTasks and completedTask. For filtering, we will use the magic function filter () with Realm. Let's see what it looks like in the code before I explain to you how filtering works:
func readTasksAndUpateUI(){ completedTasks = self.selectedList.tasks.filter("isCompleted = true") openTasks = self.selectedList.tasks.filter("isCompleted = false") self.tasksTableView.reloadData() } In the method, we call the filter method to filter the results. Realm provides an easy way to filter your request using the filter () method. A method can be invoked by instances of a list, result, and object. It returns specific objects based on the condition specified in the filter string. You can think of a filter as NSPredicate.In general, we can say that they are absolutely the same. You can create an NSPredicate with a predicate string and pass it to filter the method as if you were filtering completed tasks.
Let's look at another example:
// using predicate string var redCars = realm.objects(Car).filter("color = 'red' AND name BEGINSWITH 'BMW'") // using NSPredicate let aPredicate = NSPredicate(format: "color = %@ AND name BEGINSWITH %@", "red", "BMW") redCars = realm.objects(Car).filter(aPredicate) In the above code, we filter these cars by red color, and whose name begins with “BMW”. The first line of code simply uses the filter strings to perform the filtering. Alternatively, you can use NSPredicate to achieve the same results. Here is a table that briefly describes the most common filter comparison operators:
Sorting
, Realm, , . — , Realm. List Results, , . , , . UI , :
, , :
@IBAction func didSelectSortCriteria(sender: UISegmentedControl) { if sender.selectedSegmentIndex == 0{ // AZ self.lists = self.lists.sorted("name") } else{ // date self.lists = self.lists.sorted("createdAt", ascending:false) } self.taskListsTableView.reloadData() } Conclusion
Realm is a very easy and simple solution for managing local data storage and databases. Realm gives you the ability to scale and simplifies work by writing just a few lines of code. For most applications and even for games, I think you need to use this database, so give it a chance.
What's next?
Realm , , , , . Realm , . , — Realm, .
Todo app .
Source: https://habr.com/ru/post/272393/
All Articles