Desktop JavaScript applications. Part 1
It's no secret that in our time JavaScript has become one of the most popular programming languages. In the distant 90s, at the time of the birth of the language, when it was created for the sole purpose of adding interactivity to web pages and improving the process of user interaction, who would have thought that it would reach such unprecedented heights. After all, now you can do almost anything on it. Want to write a website: both backend and frontend in javascript? you are welcome! Want to write a mobile application in javascript? no problems. You program a microcontroller - and then JavaScript will come to your aid.
Of course, there are some minor drawbacks in the approach of using JavaScript everywhere, but if you think about it, how much time and effort you can save by learning only one language, especially if the same application should work on different platforms. Different platforms say? Hmm ... Exactly - different platforms - now JS can afford desktop applications for Windows, Linux, Mac, how can you ask? The answer is simple: meet - NW.js.
You can read the first letters - Node.js + Webkit , if these concepts are not yet familiar to you, then soon you will understand what is being said.
')
Node.js is a software platform based on the V8 engine, which translates our script into machine code. This platform was created in 2009 mainly to work with the backend sites.
WebKit is a free engine developed by Apple. First announced as part of Safari in 2003
So, the code written in JS for this technology will be available to both the Node.js modules and the standard browser API (respectively, WebKit)
All this is nice, but where do you start? On github you can find and download the source repository . Also here you can find direct download links for the platform on which the development will be carried out. Among other things, we will need an installed node.js.
After the necessary software was downloaded and installed, you wrote your application on your favorite JS (how to do this, read below) and localize everything into one folder. Half the battle is done, now it remains the most difficult and long - to pack everything into one file and prepare for distribution . For simplicity, you can use ready-made libraries, such as nw-builder . Installing the library is easy if you have already worked with node.js. As you know, node.js includes the package manager npm , with which you need to work from the command line. In order to install any library, you need to run the command:
Please note that the library can be installed, both locally and globally, for local installation use the option --save-dev , for the global -g . Thus, we put our collector for NW.js globally by running the command:
In order to build our application, you need to execute the command (you can find more options in the documentation ):
The following values can be used as the platform name: win32, win64, osx32, osx64, linux32, linux64 .
During development, there is no need to build the application each time, you can simply launch it as it is and it will open in a separate window. To do this, run the nw.exe application from the command line and pass the path to the folder with your application as parameters. In addition, if you are working under Windows, you can simply drag-and-drop the folder with the source code of the application on the JS (note that it is the entire folder) into nw.exe using the drag-n-drop method.
Now that you know how to run the application, how to build it into one file, let's write something. By tradition, familiarity with the new platform begins with the writing of the application Hello, world.
For this application, we do not even need JavaScript , only HTML . Create a folder called HelloWorld . Place the index.html file inside with the following markup:
In addition, for each application under NW.js, a file is needed, which must necessarily be called package.json . Information will be taken from it to build the application. Create a simple version of the file and put it in the HelloWorld folder. So:
The contents of the file are understandable without explanation (note that the required fields are only main and name ). In main, you need to write a markup file that will be the entry point to the application. The window section adjusts the window parameters (in this case, we disable the toolbar and set the window size to 500x200).
In addition, you can configure such fields as (for a full list of options, refer to the documentation ):
The application is created and you can run it. After launching (about how to do this, see the section above) you should get the following window:

The application is written, but there is only one div element in it and there is no logic at all, but what if we have markup rich in elements and complex logic? We are come to the rescue by an element of the toolbar configuration file, which we set to false. To make debugging tools available, you need to set the toolbar to true . Doing this when you start the application, we get the following window:
After clicking on the button in the upper right corner, another window will open, which will display the familiar developer tools:
NW.js allows you to work with native controls. Consider the work on the example menu . To work with the native UI controls in nw.js, you must use the nw.gui module, which can be connected as follows:
General template for using controls:
Thus, to create menu items, you can use the following construction:
In addition, any properties of the object created by us can be easily changed with standard JS constructions, for example:
The menu has been created, now you need to fill it, there are methods for manipulating the child elements:
In addition, for a more flexible addition of items to the menu, you can use the insert method, in the parameters of which you need to pass the MenuItem and the position number where to insert it (the position before the first item corresponds to 0 ).
To access the created items you can use the items property:
Please note that you cannot directly create elements:
The most important thing when working with native controls is to remember that any mistake when working with them can lead to the collapse of the entire application , so you need to be extremely careful and, if possible, when deleting elements, also set the variable to null. Thus, to remove the control , you can do the following:
For more convenient work with controls, they are inherited from EventEmitter , so the good news is that we can easily work with events, like this:
The menu was created, but if you start the application, you will not see any menu. To display the menu, there is a popup method, in the parameters of which you need to pass coordinates to display the menu.
To demonstrate the basic features of the menu, add the following script to the Hello, world project created earlier:
After starting the application, we can see the created context menu for the body. Thus, we can define a context menu for any item.
So, now everyone can create cross-platform applications, but you have to pay for everything. In this case, we sacrifice both the speed and the occupied memory (the collected application is quite large, more than 50 MB). A list of applications created using this technology can be found on github .
In the second part of the article, we will look at technology in more detail.
Of course, there are some minor drawbacks in the approach of using JavaScript everywhere, but if you think about it, how much time and effort you can save by learning only one language, especially if the same application should work on different platforms. Different platforms say? Hmm ... Exactly - different platforms - now JS can afford desktop applications for Windows, Linux, Mac, how can you ask? The answer is simple: meet - NW.js.
You can read the first letters - Node.js + Webkit , if these concepts are not yet familiar to you, then soon you will understand what is being said.
')
Node.js is a software platform based on the V8 engine, which translates our script into machine code. This platform was created in 2009 mainly to work with the backend sites.
WebKit is a free engine developed by Apple. First announced as part of Safari in 2003
So, the code written in JS for this technology will be available to both the Node.js modules and the standard browser API (respectively, WebKit)
Fast start
All this is nice, but where do you start? On github you can find and download the source repository . Also here you can find direct download links for the platform on which the development will be carried out. Among other things, we will need an installed node.js.
After the necessary software was downloaded and installed, you wrote your application on your favorite JS (how to do this, read below) and localize everything into one folder. Half the battle is done, now it remains the most difficult and long - to pack everything into one file and prepare for distribution . For simplicity, you can use ready-made libraries, such as nw-builder . Installing the library is easy if you have already worked with node.js. As you know, node.js includes the package manager npm , with which you need to work from the command line. In order to install any library, you need to run the command:
> npm install [_] [] Please note that the library can be installed, both locally and globally, for local installation use the option --save-dev , for the global -g . Thus, we put our collector for NW.js globally by running the command:
> npm install nw-builder -g In order to build our application, you need to execute the command (you can find more options in the documentation ):
> nwbuild -p [_] -o [_____] [__] The following values can be used as the platform name: win32, win64, osx32, osx64, linux32, linux64 .
During development, there is no need to build the application each time, you can simply launch it as it is and it will open in a separate window. To do this, run the nw.exe application from the command line and pass the path to the folder with your application as parameters. In addition, if you are working under Windows, you can simply drag-and-drop the folder with the source code of the application on the JS (note that it is the entire folder) into nw.exe using the drag-n-drop method.
Hello, world!
Now that you know how to run the application, how to build it into one file, let's write something. By tradition, familiarity with the new platform begins with the writing of the application Hello, world.
For this application, we do not even need JavaScript , only HTML . Create a folder called HelloWorld . Place the index.html file inside with the following markup:
<html> <head> <title> Hello, world </title> </head> <body> <div> Hello, world, from NW.js </div> </body> </html> In addition, for each application under NW.js, a file is needed, which must necessarily be called package.json . Information will be taken from it to build the application. Create a simple version of the file and put it in the HelloWorld folder. So:
{ "name": "hello-world", "version": "1.0.0", "description": "First application", "main": "index.html", "author": "Developer", "window": { "toolbar": false, "width": 500, "height": 200 } } The contents of the file are understandable without explanation (note that the required fields are only main and name ). In main, you need to write a markup file that will be the entry point to the application. The window section adjusts the window parameters (in this case, we disable the toolbar and set the window size to 500x200).
In addition, you can configure such fields as (for a full list of options, refer to the documentation ):
- icon - specify the path to the icon (override the standard one)
- position - you can specify the position of the window when loading ( null , center or mouse )
- min_width , min_height , max_width , max_height - limit the size of the window
- resizable - a boolean value that shows whether the user can resize the window
- fullscreen - enable fullscreen mode
- kiosk - enable kiosk mode
- transparent - make the window transparent
The application is created and you can run it. After launching (about how to do this, see the section above) you should get the following window:
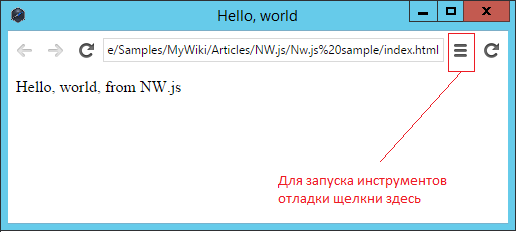
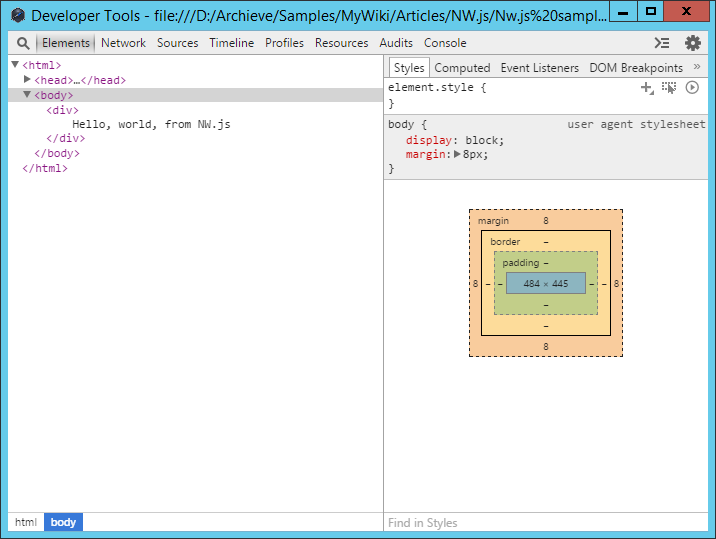
The application is written, but there is only one div element in it and there is no logic at all, but what if we have markup rich in elements and complex logic? We are come to the rescue by an element of the toolbar configuration file, which we set to false. To make debugging tools available, you need to set the toolbar to true . Doing this when you start the application, we get the following window:
After clicking on the button in the upper right corner, another window will open, which will display the familiar developer tools:
Work with native controls
NW.js allows you to work with native controls. Consider the work on the example menu . To work with the native UI controls in nw.js, you must use the nw.gui module, which can be connected as follows:
var gui = require('nw.gui'); General template for using controls:
var element = new gui.ElementName(option); Thus, to create menu items, you can use the following construction:
var menu = new gui.Menu(); In addition, any properties of the object created by us can be easily changed with standard JS constructions, for example:
menu.title = 'New Title'; The menu has been created, now you need to fill it, there are methods for manipulating the child elements:
menu.append(new gui.MenuItem({label: 'Label of menu item'})); menu.removeAt(0); In addition, for a more flexible addition of items to the menu, you can use the insert method, in the parameters of which you need to pass the MenuItem and the position number where to insert it (the position before the first item corresponds to 0 ).
To access the created items you can use the items property:
menu.items[0].title = "New title" Please note that you cannot directly create elements:
menu.items[2] = new gui.MenuItem(); // The most important thing when working with native controls is to remember that any mistake when working with them can lead to the collapse of the entire application , so you need to be extremely careful and, if possible, when deleting elements, also set the variable to null. Thus, to remove the control , you can do the following:
control.remove(); control = null; For more convenient work with controls, they are inherited from EventEmitter , so the good news is that we can easily work with events, like this:
menuitem.on('click', function() { // - }); The menu was created, but if you start the application, you will not see any menu. To display the menu, there is a popup method, in the parameters of which you need to pass coordinates to display the menu.
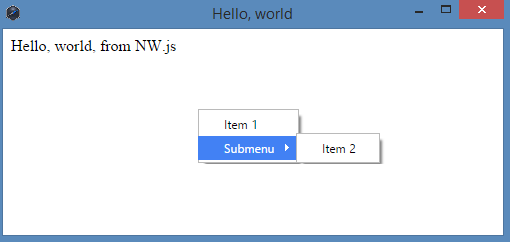
To demonstrate the basic features of the menu, add the following script to the Hello, world project created earlier:
var gui = require('nw.gui'); var menu1 = new gui.Menu(); menu1.append(new gui.MenuItem({label: 'Item 1'})); var subMenu1 = new gui.Menu(); subMenu1.append(new gui.MenuItem({label: 'Item 2'})); menu1.append(new gui.MenuItem({ label: "Submenu", submenu: subMenu1 })); document.body.addEventListener('contextmenu', function(ev) { ev.preventDefault(); menu1.popup(ev.x, ev.y); return false; }); After starting the application, we can see the created context menu for the body. Thus, we can define a context menu for any item.
So, now everyone can create cross-platform applications, but you have to pay for everything. In this case, we sacrifice both the speed and the occupied memory (the collected application is quite large, more than 50 MB). A list of applications created using this technology can be found on github .
In the second part of the article, we will look at technology in more detail.
Source: https://habr.com/ru/post/272389/
All Articles