Lori Timesheets - time tracking on the CUBA platform

“Time is the capital of a knowledge worker.”
Honore de Balzac
It often happens that people give preference to old and familiar things, ignoring new ones, even to their own detriment. So, for a long time, we persistently used the time accounting system, which did not meet our requirements and constantly created problems for literally everyone - from programmers to accounting.

The general torment of the time tracking system, due to the lack of time (see figure), did not become a weighty reason for developing its own system. The idea of saving a real application saved the situation to demonstrate the capabilities of our CUBA platform. Combining business with pleasure, time tracking system has become the first candidate.
')
At the moment, development is completed, the application is implemented in our company, and we are ready to share it with everyone.
In this article I will tell how we in a short time (<1 month), with limited forces (man and another half person) developed this application.
The first steps
According to the established practice, starting the development of the system, we describe the subject area, defining the entities that will appear in the system. Such an approach makes it possible to estimate in advance (albeit not accurately) the supposed complexity of the future system.
Let's think about what entities we need in the time tracking system.
- User - it is clear where to without a user. Fortunately, such an entity is already in the platform, we use it.
- The client is the one who pays the money.
- The project - for what they pay money.
- Task - a specific type of work.
- Record time - how much time the user spent on a specific task on a particular day.
It would seem that this is enough. This is the set of entities we had in the old system. For our convenience, we had to add something.
- The role on the project - there are many projects, the same user can be the manager of one project and the developer on another (this is how it happens with us).
- A project participant is a project and user connection; it contains references to them and a role in this project.
- Task type is a feature by which several tasks can be combined. For example, the type of tasks “Testing” will allow us to understand how much time we spend on testing within the company, and to compare this figure for different projects.
- Type of activity - a sign by which you can combine multiple time records. For example, as part of the task of developing a mobile application, we do analysis, write code, write tests, fix bugs. If necessary, adding to the project the appropriate types of activity, we will be able to track how much time was spent on each item.
- Non-working days - so that people do not make mistakes, filling in time-sheets on holidays, we highlight such days in the system using the specified non-working days.
- Tags are weakly structured tags that can be added to time entries.
- Tag types are a feature by which certain tags are grouped.
We will not describe the properties of each entity in the article; you can see them yourself by looking at the project code .
Having decided on the object model, we started working in the CUBA studio. To begin with, we created the corresponding entities. After that, we took advantage of the wonderful opportunity of code autogeneration in the studio, getting SQL scripts to create a database, as well as standard screens (entity list screen and individual entity editing screen) with CRUD actions. For 80% of entities, standard screens were enough. Those screens that needed improvement, we edited using the WYSIWYG screen editor.
Then we set up the main menu of the application so that users have convenient access to the necessary entities.
At that moment, the application could already start and work with entities of the object model (create / edit / delete).
In just a few hours, we created a really working, fully functional prototype of the time tracking system.
Making the interface more friendly
We got a working prototype, but it was very far from a working application.
Let's see what we wanted to achieve:
- The speed and convenience of filling timeshits
- Easy system setup
- Nice appearance
Entering timeshits per week
The first thing we needed was a convenient weekly fill in of timesheets. In the old system there was such a screen and we decided to make a similar one. That's what we did.
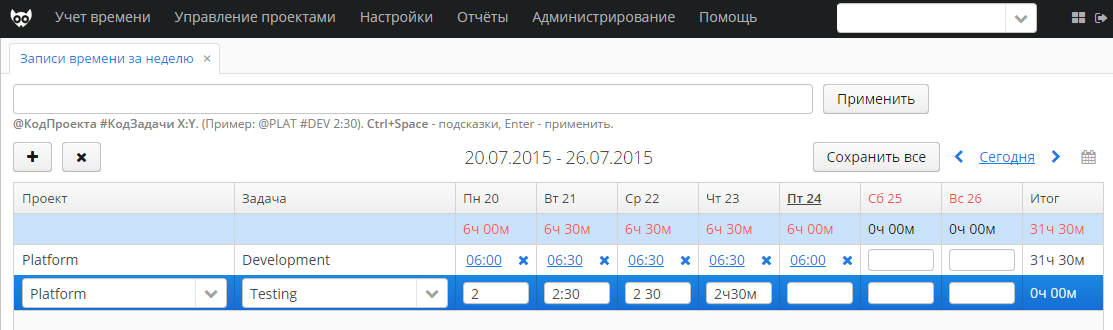
As you may remember, there is no “Weekly Report” entity in the object model. It would be possible to implement this screen without any bindings to entities at all, but it is much more convenient to create an intermediate non-persistent entity that is not connected to the database directly, but the entire set of components works with it as with a conventional entity. This technique allows you to abstract from the structure of the database and create screens that are more understandable to the user. Such an entity looks very simple:
@MetaClass(name = "ts$WeeklyReportEntry") public class WeeklyReportEntry extends AbstractNotPersistentEntity { ..... @MetaProperty(mandatory = true) protected Project project; @MetaProperty(mandatory = true) protected Task task; ..... } In this case, the WeeklyReportEntry is 1 row in the table.
We made the table editable to make it easier to fill in the clock for each day of the week. In addition, we added counting the hours in the columns, as well as highlighting the potentially incorrectly filled days. Then, at the request of users, we added the ability to group records in a table by project and by task. All this was done using the standard mechanisms of the CUBA platform.
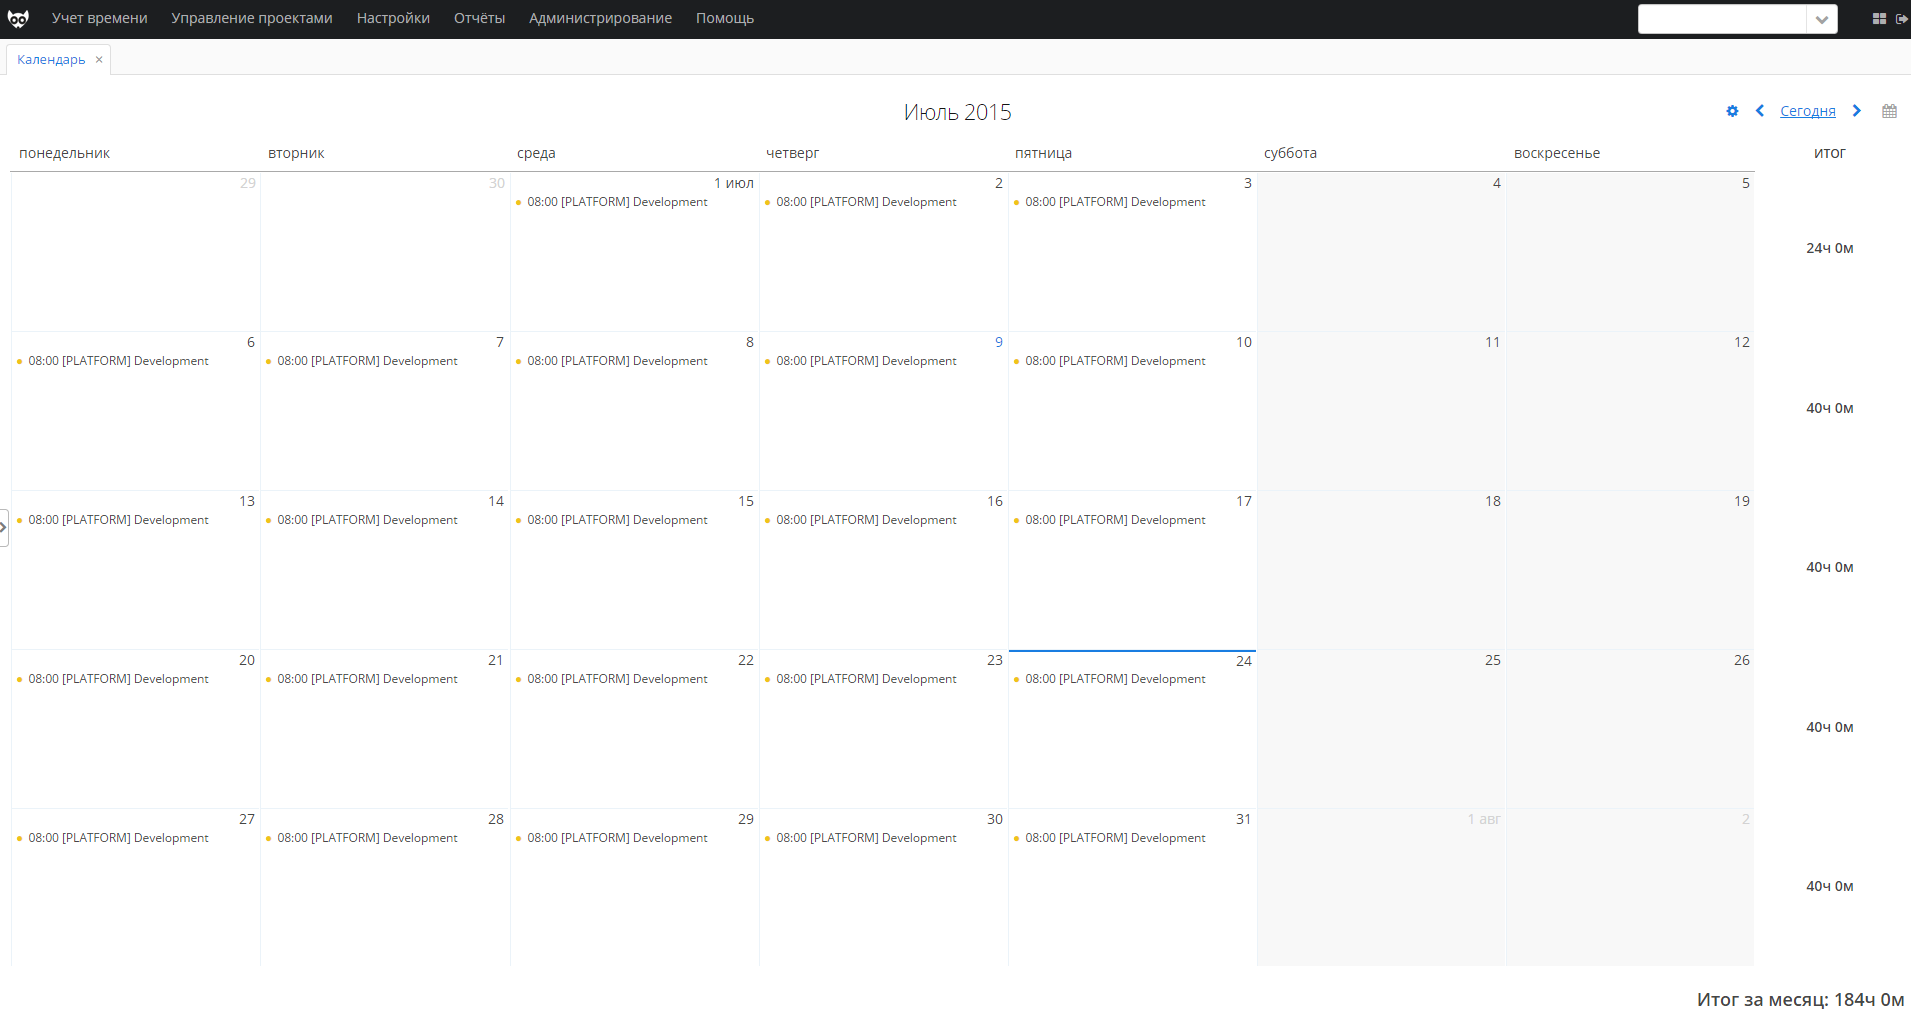
Entering timesheets from the calendar
The next most important for us was the screen for entering timesheets from the calendar. Unfortunately, at the moment there is no “Calendar” component in the platform. However, it is in the Vaadin framework, which we use to render the web client. Having inherited it and slightly modified it (described below), we used it in our application. In the calendar, we also added the validation of potentially incorrectly filled timesheets, highlighting holidays and weekends, summing up hours by week and month.
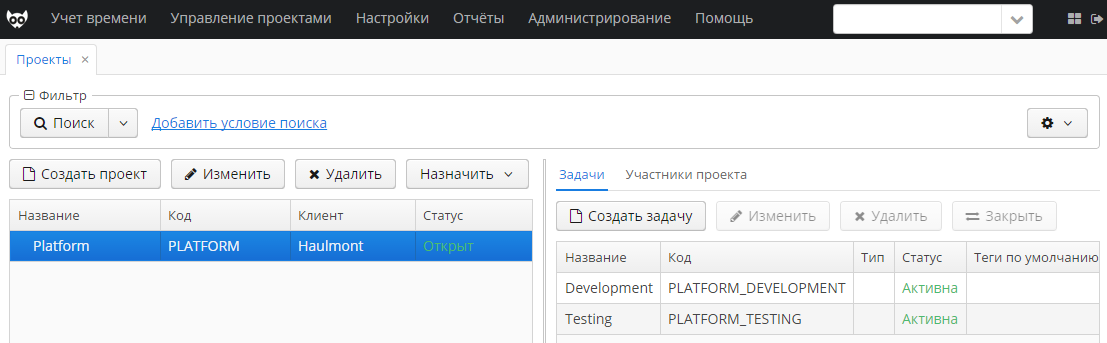
Setting up projects and tasks
Another goal for us was the simplicity of setting up projects and tasks. Despite the fact that we had basic project screens and tasks, we decided to make a special screen that would make the tincture easy and enjoyable. The key requirements were: the ability to quickly switch between projects, the ability to quickly add people and tasks to different projects. It was decided to make the screen in the form of 3 related tables: projects, tasks and project participants.
When a project is selected, the records corresponding to this project are shown in the tables of tasks and participants. The CUBA platform allows you to create related data sources for tables, so no special code was required for this. In fact, from 3 standard screens (list of projects, list of tasks, list of project participants), we collected one, replacing all 3.
"Command line"
Another innovation that we decided to implement was the so-called command line. It allows you to fill in the timesheets in a week or even a whole month by entering a simple text command. It looks like this:

Also, using the Vaadin component, which is called AceEditor , we taught the command line to do hints. We will tell about it below.
It should be noted that we have seen this remarkable concept in the Everhour system, slightly modifying it to fit our needs.
Rapid development
Naturally, all these screens were not developed by us at one time.
As usual, bringing the UI to the mind took much longer than creating its first version. Here we were greatly helped by the mechanism of “hot loading” of changes to the server implemented in the CUBA platform. Thanks to him, about 90% (~) of changes in the UI do not need to restart the server. Moreover, it is possible to reboot the core logic (services and bins). This mechanism is described in more detail in our article .
Expanding client-side components
Add a calendar
As mentioned above, we needed a calendar. Fortunately, it was found in the Vaadin component list. Now I will tell you how we added it.
Vaadin is built on GWT, but the Vaadin component exists on both the client and the server. Usually, there is also an intermediate part that is used to connect the client and the server. Thus, in order to expand the calendar, we will have to work with both server and GWT code.
The calendar has a com.vaadin.shared.ui.calendar.CalendarState state. We want the state to keep, among other things, the days that are considered days off (this is configured in the system), and holidays. For this, we inherit this class.
public class TimeSheetsCalendarState extends CalendarState { ..... public Set<Integer> weekends = new HashSet<>(); public Set<String> holidays = new HashSet<>(); .... } Now we need to inherit the com.vaadin.ui.Calendar server class to populate new properties.
public class TimeSheetsCalendar extends Calendar { .... public TimeSheetsCalendar(CalendarEventProvider eventProvider) { super(eventProvider); getState().weekends = getWeekends(); } @Override public void beforeClientResponse(boolean initial) { super.beforeClientResponse(initial); getState().holidays = getHolidays(); } .... } After that, we can inherit the widget com.vaadin.client.ui.VCalendar and make it change the style of the cell depending on whether it is a holiday or not.
public class TimeSheetsCalendarWidget extends VCalendar { protected Set<Integer> weekends = new HashSet<Integer>(); protected Set<String> holidays = new HashSet<String>(); protected boolean isWeekend(int dayNumber) { return weekends.contains(dayNumber); } protected boolean isHoliday(String date) { return holidays.contains(date); } @Override protected void setCellStyle(Date today, List<CalendarDay> days, String date, SimpleDayCell cell, int columns, int pos) { CalendarDay day = days.get(pos); if (isWeekend(day.getDayOfWeek()) || isHoliday(date)) { cell.addStyleName("holiday"); cell.setTitle(date); } } It remains only to extend the com.vaadin.client.ui.calendar.CalendarConnector class so that it copies the holiday and weekend data from the state to the widget.
@Connect(value = TimeSheetsCalendar.class, loadStyle = Connect.LoadStyle.LAZY) public class TimeSheetsCalendarConnector extends CalendarConnector { @Override public TimeSheetsCalendarWidget getWidget() { return (TimeSheetsCalendarWidget) super.getWidget(); } @Override public TimeSheetsCalendarState getState() { return (TimeSheetsCalendarState) super.getState(); } @Override public void onStateChanged(StateChangeEvent stateChangeEvent) { getWidget().setWeekends(getState().weekends); getWidget().setHolidays(getState().holidays); super.onStateChanged(stateChangeEvent); } } As a result, we can add TimeSheetsCalendar to any screen created on the CUBA platform.
public class CalendarScreen extends AbstractWindow { @Inject protected BoxLayout calBox; protected TimeSheetsCalendar calendar; .... protected void initCalendar() { .... calendar = new TimeSheetsCalendar(dataSource); .... AbstractOrderedLayout calendarLayout = WebComponentsHelper.unwrap(calBox); calendarLayout.addComponent(calendar); } Add hints to the “command line”
To make it convenient for users to use the “command line”, we decided that it should suggest input options.
Vaadin has an AceEditor component that can do this. It is used in the platform (WebSourceCodeEditor) to give hints in JPQL queries (for example, when editing a query in a report).
We decided to simplify our life and instead of writing a new component based on AceEditor, we expanded WebSourceCodeEditor.
First of all, we expanded org.vaadin.aceeditor.SuggestionExtension, registering an RPC service in it that should process the command line application.
public class CommandLineSuggestionExtension extends SuggestionExtension { protected Runnable applyHandler; public CommandLineSuggestionExtension(Suggester suggester) { super(suggester); registerRpc(new CommandLineRpc() { @Override public void apply() { if (applyHandler != null) { applyHandler.run(); } } }); } public void setApplyHandler(Runnable applyHandler) { this.applyHandler = applyHandler; } public Runnable getApplyHandler() { return applyHandler; } } Then came the turn of the platform class com.haulmont.cuba.web.gui.components.WebSourceCodeEditor.
public class WebCommandLine extends WebSourceCodeEditor implements CommandLine { @Override public void setSuggester(Suggester suggester) { this.suggester = suggester; if (suggester != null && suggestionExtension == null) { suggestionExtension = new CommandLineSuggestionExtension(new CommandLineSourceCodeEditorSuggester()); suggestionExtension.extend(component); suggestionExtension.setShowDescriptions(false); } } protected class CommandLineSourceCodeEditorSuggester extends SourceCodeEditorSuggester { } public CommandLineSuggestionExtension getSuggestionExtension() { return (CommandLineSuggestionExtension) suggestionExtension; } } Finally, the client-side class is org.vaadin.aceeditor.client.SuggesterConnector.
@Connect(CommandLineSuggestionExtension.class) public class CommandLineSuggesterConnector extends SuggesterConnector { protected CommandLineRpc commandLineRpc = RpcProxy.create( CommandLineRpc.class, this); @Override public Command handleKeyboard(JavaScriptObject data, int hashId, String keyString, int keyCode, GwtAceKeyboardEvent e) { if (suggesting) { return keyPressWhileSuggesting(keyCode); } if (e == null) { return Command.DEFAULT; } if (keyCode == 13) {//Enter commandLineRpc.apply(); return Command.NULL;//ignore enter } else if ((keyCode == 32 && e.isCtrlKey())) {//Ctrl+Space startSuggesting(); return Command.NULL; } else if ((keyCode == 50 && e.isShiftKey())//@ || (keyCode == 51 && e.isShiftKey())//# || (keyCode == 52 && e.isShiftKey())//$ || (keyCode == 56 && e.isShiftKey())) {//* startSuggestingOnNextSelectionChange = true; widget.addSelectionChangeListener(this); return Command.DEFAULT; } return Command.DEFAULT; } } In it, we redefined the editor's behavior - hints should appear besides Ctrl-Space when pressing @, #, $, * (hint for projects, tasks, tags, activity types). Pressing Enter should use the command line (fill in the timesheets).
Expanding platform functionality
As you may remember, we decided to use the User class provided by the platform. We wanted the user to keep a record of the required working hours per week. This is necessary to validate the entered data (if a person has indicated in the timesheets more or less than it should). We had a choice - to create a new entity that would refer to a system user, or to expand the platform entity. In order to save effort, we decided to go through expansion, because this mechanism is quite simple (in terms of use) and works fine. Now I will show how we implemented this extension.
First, it was necessary to make the heir of the com.haulmont.cuba.security.entity.User class and add a new field there.
@Inheritance(strategy = InheritanceType.SINGLE_TABLE) @DiscriminatorValue("Ext") @Entity(name = "ts$ExtUser") @Extends(User.class) public class ExtUser extends User { .... @Column(name = "WORK_HOURS_FOR_WEEK", nullable = false) protected BigDecimal workHoursForWeek; public BigDecimal getWorkHoursForWeek() { return workHoursForWeek; } public void setWorkHoursForWeek(BigDecimal workHoursForWeek) { this.workHoursForWeek = workHoursForWeek; } .... } Then we created a screen that extends the user editing screen, and registered it in the system.
<?xml version="1.0" encoding="UTF-8" standalone="no"?> <window xmlns="http://schemas.haulmont.com/cuba/window.xsd" caption="msg://editCaption" class="com.haulmont.timesheets.gui.extuser.ExtUserEdit" extends="/com/haulmont/cuba/gui/app/security/user/edit/user-edit.xml" messagesPack="com.haulmont.timesheets.gui.extuser" xmlns:ext="http://schemas.haulmont.com/cuba/window-ext.xsd"> <layout> <groupBox id="propertiesBox"> <h4></h4> <grid id="propertiesGrid"> <rows> <row id="propertiesRow"> <fieldGroup id="fieldGroupRight"> <column> <field id="workHoursForWeek" caption="msg://com.haulmont.timesheets.entity/ExtUser.workHoursForWeek" ext:index="5"/> </column> </fieldGroup> </row> </rows> </grid> </groupBox> </layout> </window> Now, instead of the User entity, ExtUser is present in the system and the editing screen contains the workHoursForWeek field.
This is the simplest example of extending functionality, if you want to learn more about extensions - read our article .
Making a distribution kit with your own hands
From the very beginning we planned to make this system a product that will be used by other people. In order to install and start the system to be simple, we decided to do something like a distribution kit.
Our “distribution kit” is a zip-file that contains a folder with the Tomcat servlet container and scripts for starting / stopping the system.
Since Gradle is used to build projects on the platform, it is easy to build such a “distribution kit”.
def distribDir="./distrib" def scriptsDir="./scripts" task cleanTomcatLogs << { def dir = new File(tomcatDir, '/logs/') if (dir.isDirectory()) { ant.delete(includeemptydirs: true) { fileset(dir: dir, includes: '**/*') } } } task copyTomcat(type: Copy, dependsOn: ['setupTomcat',':app-core:deploy', ':app-web:deploy', ':app-web-toolkit:deploy', 'cleanTomcatLogs']) { from file("$tomcatDir/..") include "tomcat/**" into "$distribDir" } task copyLoriScripts(type: Copy) { from file("$scriptsDir") include "*lori.*" into "$distribDir" } task copyTomcatScripts(type: Copy, dependsOn: 'copyTomcat') { from file("$scriptsDir") include "*classpath.*" into "$distribDir/tomcat/bin/" } task buildDistributionZip(type: Zip, dependsOn: ['copyLoriScripts', 'copyTomcatScripts']) { from "$distribDir" exclude "*.zip" baseName = 'lori' version= "$artifactVersion" destinationDir = file("$distribDir") } task distribution(dependsOn: buildDistributionZip) << { } The only problem came with tomcat. He desperately did not want to start on a system where the JAVA_HOME system variable was not set.
To force it to ignore the absence of this variable, we had to replace the setclasspath.sh and setclasspath.bat scripts with simpler ones.
Conclusion
There are a lot of products for accounting of working time, so the question probably arises, why did we write another one? There are several reasons. The main thing is that we wanted the product to be as convenient as possible in our field of activity (software development). In addition, we needed to ensure ease of integration with other systems and improvements to changing processes. Well, finally, we wanted to create a useful application that would become a good example of development on the CUBA platform.
The application is free, its code is available on github. To modify Lori Timesheets, you need a commercial license CUBA Studio , because the application uses premium add-ons .
We hope that Lori Timesheets will benefit not only us, but also someone else. Open source and extension mechanism will allow you to easily adapt the application for yourself.
Source: https://habr.com/ru/post/272231/
All Articles