KeyCloak - JBOSS shield for WEB applications
From the dialogue of two programmers:
“It seems we have a security hole!”
- Thank God, at least something is safe here ...
1. Introduction
A couple of years ago, we already touched on the topic of security in web applications. At that time, as part of the research, an own Service Provider was implemented for integration with the Shibboleth product using the SAML 2.0 protocol.
In today's article we will talk again about the security of web applications. We will make a short review of the KeyCloak product (which has been left unattended by the Habr community).

')
As a practical value, an example will be disassembled, how to protect a simple JEE application with KeyCloak, as well as how to implement the interaction between two protected applications.
Quite a bit of authentication and authorization theory. When we say that an application is protected, it means that it has resources, access to which is limited by the presence of certain access rights. To get these rights, we must go through the authentication process (proof that the user is who he claims to be). The most basic example of authentication is the login and password entry form. Those. the user enters his ID (or login) and reinforces it with a password, thereby proving that this ID really belongs to him. Further, the system based on the user ID finds the rights that are assigned to this user. How these rules are set and where the system gets them is not so important. The options here can be a lot, among which is a simple text file, a relational database, LDAP or a separate authorization server.
The last step is to compare the required access rights of the resource with the rights of a particular user. It is called the authorization process.
2. KeyCloak and PicketLink - two products under one roof
Currently, JBoss is developing two web application security products: KeyCloak and PicketLink. Probably in the near future, both products will be merged into one, which has been talked about for quite a while: picketlink.org/news/2015/03/10/PicketLink-and-Keycloak-project-merge .
Today we will not dwell on a detailed comparison of the two products, although something on this topic can be viewed by clicking on the link: planet.jboss.org/post/what_is_the_difference_between_picketlink_and_keycloak .
Literally in a nutshell, I would like to note that PicketLink protects applications using the software configuration model. PicketLink provides a set of libraries, a well-documented API and a wide range of examples, designed in the form of quick start applications. All this you will find on the official website picketlink.org . You have to spend some time to figure out the API and learn how to use it correctly. About a year ago we had the experience of using PicketLink as an idP server for building SSO on the SAML 2.0 protocol. Also by means of PicketLink an STS service was configured to protect REST services. However, this is a separate topic that goes beyond the scope of this discussion.
KeyCloak, in turn, provides a simple administrative interface for setting the security level in web applications. You want to quickly protect the application through the login / password form, separate user and rights management from the application logic, organize SSO, raise the SAML 2.0 idP server - this is an occasion to look towards KeyCloak. Perhaps this is what you need.
3. KeyCloak - we take everything out of the box ...
Keycloak ( http://keycloak.jboss.org/ ) is an open-source JBoss authentication and account management (IDM) server built on the basis of OAuth 2.0, Open ID Connect, JSON Web Token (JWT) and SAML 2.0 specifications. .
The KeyCloak feature list is quite large and includes support for SSO, Social Login, integration with LDAP servers, user management, groups and roles, and many other features. A complete list of features can be found here: keycloak.imtqy.com/docs/userguide/keycloak-server/html_single/index.html#Overview .
3.1 How does the authentication in KeyCloak work?
After configuring the application and the KeyCloak server, the authorization scheme is as follows:
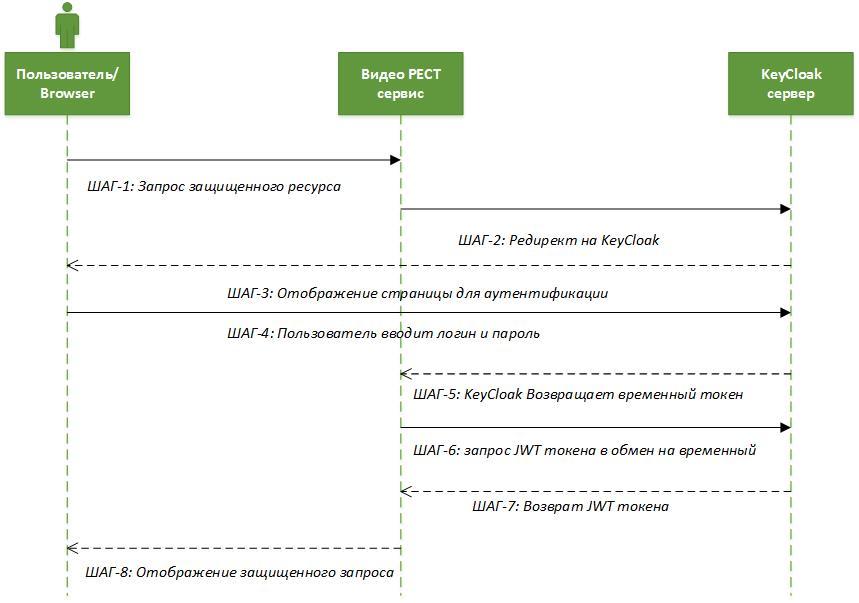
Step 1: Request a protected resource. The user in the browser accesses the URL to a closed resource.
Step 2: The closed application redirects the unauthorized user to the KeyCloak authentication server.
Step 3: KeyCloak displays the authentication page (login / password, social login, etc.).
Step 4: The user is authenticated. For simplicity, we assume that the username and password are entered.
Step 5: KeyCloak issues a temporary token (secret) and redirects to the page of the protected application.
Step 6 and Step 7: The application checks the validity of the temporary token and changes the temporary to permanent JWT token.
Step 8: On a secure application, the security context is generated. The user is shown a protected resource.
3.2 A little bit about JWT
JWT (JSON Web Token) is a young open standard ( https://tools.ietf.org/html/rfc7519 ), which defines a compact and autonomous way to securely transfer information between parties as a JSON object.
Basic properties:
- Compact. Indeed, unlike SAML messages (based on XML), the JWT format looks much simpler. It consists of three parts: a header, basic information and a digital signature.
- Capacious. Contains information on the authenticated user, including roles.
- Self-sufficient. To verify the token, you do not need to contact a single server (idP server, sts service). The application can carry out this check independently, having available a public key.
According to the standard, the token consists of three parts in base-64 format, separated by dots. The first part is called the header (header), which contains the type of token and the name of the hash algorithm for obtaining a digital signature. The second part stores basic information (user, attributes, roles, etc.). The third part is a digital signature. More detailed information can be found here: http://jwt.io/introduction/ . There were posts on this topic and on Habré (for example: http://habrahabr.ru/post/243427/ ).
3.3 Configuring SSO
Having received the JWT token, we essentially already have a ready-made SSO. A few simple configuration steps and we will be able to use the protected data of another application without the need for re-authentication.
4. Practical part
We will continue acquaintance with KeyCloak in the framework of the practical part, during which the following steps will be performed:
- First, create a simple web application (video-app) that displays a simple list of video objects.
- Next, install and configure KeyCloak.
- Protect the application with KeyCloak.
- We implement the REST service as a separate application (video-rest).
- Protect the REST service with KeyCloak. We will use a bearer token to access the REST service.
- Let's build SSO: update the video-app application to use the data from the video-rest application as data.
We will build applications from scratch with simple iterations. Already developed code can be taken from the public repository: github.com/EBTRussia/keycloak-demo.git
4.1 Technologies used
- Maven (since version 3.2) as a build tool.
- WildFly (version 9.0.1) as a server for deploying applications (including KeyCloak). You can take it here: http://wildfly.org/downloads/ .
- KeyCloak (version 1.6.1).
- RestEasy as a JAX-RS implementation for building a REST service. Comes complete with WildFly.
- JSP / JSTL - for view design.
- A bit of CSS and JS.
We assume that the reader has sufficient experience with these technologies and tools (with the exception of KeyCloak). Therefore, we will not comment on the moments in the series what JAX-RS or EJB is in this article.
4.2 Parent module - keycloak-demo
The parent module stores the shared library versions, the JVM version.
4.2.1 Dependency File - pom.xml
pom.xml
<?xml version="1.0" encoding="UTF-8"?> <project xmlns="http://maven.apache.org/POM/4.0.0" xmlns:xsi="http://www.w3.org/2001/XMLSchema-instance" xsi:schemaLocation="http://maven.apache.org/POM/4.0.0 http://maven.apache.org/xsd/maven-4.0.0.xsd"> <modelVersion>4.0.0</modelVersion> <groupId>com.ebt.ressearch.keycloak</groupId> <artifactId>keycloak-demo</artifactId> <version>1.0-SNAPSHOT</version> <packaging>pom</packaging> <modules> <module>common</module> <module>video-app</module> <module>video-rest</module> </modules> <properties> <version.java>1.8</version.java> <project.build.sourceEncoding>UTF-8</project.build.sourceEncoding> <version.wildfly.maven.plugin>1.0.2.Final</version.wildfly.maven.plugin> <version.compiler.plugin>3.1</version.compiler.plugin> <version.war.plugin>2.5</version.war.plugin> <version.jboss.bom>9.0.1.Final</version.jboss.bom> <version.keycloak>1.6.1.Final</version.keycloak> <version.jstl>1.2</version.jstl> </properties> <build> <plugins> <plugin> <groupId>org.apache.maven.plugins</groupId> <artifactId>maven-compiler-plugin</artifactId> <version>2.3.2</version> <configuration> <source>${version.java}</source> <target>${version.java}</target> </configuration> </plugin> </plugins> </build> <dependencyManagement> <dependencies> <dependency> <groupId>org.wildfly.bom</groupId> <artifactId>jboss-javaee-7.0-wildfly-with-tools</artifactId> <version>${version.jboss.bom}</version> <type>pom</type> <scope>import</scope> </dependency> <dependency> <groupId>org.keycloak</groupId> <artifactId>keycloak-core</artifactId> <version>${version.keycloak}</version> <scope>provided</scope> </dependency> <dependency> <groupId>org.keycloak</groupId> <artifactId>keycloak-adapter-core</artifactId> <version>${version.keycloak}</version> <scope>provided</scope> </dependency> <dependency> <groupId>org.keycloak</groupId> <artifactId>keycloak-services</artifactId> <version>${version.keycloak}</version> <scope>provided</scope> </dependency> <dependency> <groupId>org.keycloak</groupId> <artifactId>keycloak-jboss-adapter-core</artifactId> <version>${version.keycloak}</version> <scope>provided</scope> </dependency> <dependency> <groupId>javax.servlet</groupId> <artifactId>jstl</artifactId> <version>${version.jstl}</version> <scope>provided</scope> </dependency> </dependencies> </dependencyManagement> </project> 4.3 Common Resource Module
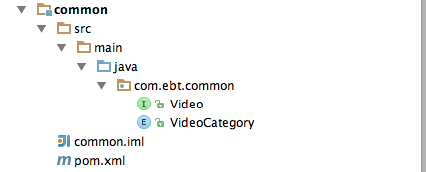
In this module, we will define common interfaces that will be used in the remaining modules / applications of our practical example.
4.3.1 Dependency File - pom.xml
Dependency File - pom.xml
<?xml version="1.0" encoding="UTF-8"?> <project xmlns="http://maven.apache.org/POM/4.0.0" xmlns:xsi="http://www.w3.org/2001/XMLSchema-instance" xsi:schemaLocation="http://maven.apache.org/POM/4.0.0 http://maven.apache.org/xsd/maven-4.0.0.xsd"> <modelVersion>4.0.0</modelVersion> <parent> <groupId>com.ebt.ressearch.keycloak</groupId> <artifactId>keycloak-demo</artifactId> <version>1.0-SNAPSHOT</version> </parent> <artifactId>common</artifactId> <version>1.0-SNAPSHOT</version> <packaging>jar</packaging> </project> 4.3.2 Video Object Interface - Video.java
Video.java
package com.ebt.common; /** * . * * @author EastBanc Technologies (http://eastbanctech.ru/) */ public interface Video { String getSource(); String getId(); String getTitle(); String getUrl(); Double getRating(); VideoCategory getCategory(); } 4.3.3 Video Category - VideoCategory.java
VideoCategory.java
package com.ebt.common; /** * . * * @author EastBanc Technologies (http://eastbanctech.ru/) */ public enum VideoCategory { SPORT, CARS, MUSIC, } 4.4 Application for displaying a video list (video-app)
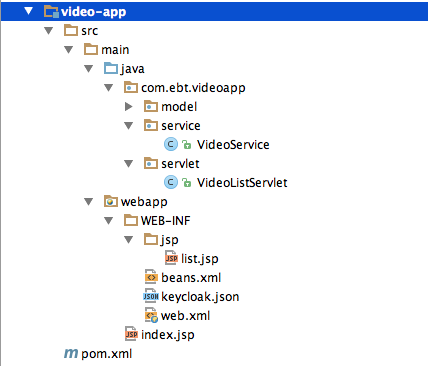
The structure of the finished application will look like this.
4.4.1 Dependency File - pom.xml
pom.xml
<?xml version="1.0" encoding="UTF-8"?> <project xmlns="http://maven.apache.org/POM/4.0.0" xmlns:xsi="http://www.w3.org/2001/XMLSchema-instance" xsi:schemaLocation="http://maven.apache.org/POM/4.0.0 http://maven.apache.org/xsd/maven-4.0.0.xsd"> <modelVersion>4.0.0</modelVersion> <parent> <groupId>com.ebt.ressearch.keycloak</groupId> <artifactId>keycloak-demo</artifactId> <version>1.0-SNAPSHOT</version> </parent> <artifactId>video-app</artifactId> <version>1.0-SNAPSHOT</version> <packaging>war</packaging> <build> <finalName>video-app</finalName> <plugins> <plugin> <groupId>org.wildfly.plugins</groupId> <artifactId>wildfly-maven-plugin</artifactId> <version>${version.wildfly.maven.plugin}</version> </plugin> </plugins> </build> <dependencies> <dependency> <groupId>com.ebt.ressearch.keycloak</groupId> <artifactId>common</artifactId> <version>${project.version}</version> </dependency> <dependency> <groupId>javax.enterprise</groupId> <artifactId>cdi-api</artifactId> <scope>provided</scope> </dependency> <dependency> <groupId>org.jboss.spec.javax.annotation</groupId> <artifactId>jboss-annotations-api_1.2_spec</artifactId> <scope>provided</scope> </dependency> <dependency> <groupId>org.jboss.resteasy</groupId> <artifactId>resteasy-jaxrs</artifactId> </dependency> <dependency> <groupId>javax.servlet</groupId> <artifactId>jstl</artifactId> </dependency> <dependency> <groupId>org.keycloak</groupId> <artifactId>keycloak-core</artifactId> </dependency> <dependency> <groupId>org.keycloak</groupId> <artifactId>keycloak-adapter-core</artifactId> </dependency> <dependency> <groupId>org.keycloak</groupId> <artifactId>keycloak-services</artifactId> </dependency> <dependency> <groupId>org.keycloak</groupId> <artifactId>keycloak-jboss-adapter-core</artifactId> </dependency> </dependencies> </project> 4.4.2 Model Implementation - VideoImpl.java
VideoImpl.java
To save space, get and set methods are not described.
package com.ebt.videoapp.model; import com.ebt.common.Video; import com.ebt.common.VideoCategory; /** * . * * @author EastBanc Technologies (http://eastbanctech.ru/) */ public class VideoImpl implements Video { private String id; private String title; private String url; private Double rating; private VideoCategory category; private String source; // get & set . } To save space, get and set methods are not described.
4.4.3 Service for working with video objects - VideoService.java
VideoService.java
package com.ebt.videoapp.service; import com.ebt.common.Video; import com.ebt.common.VideoCategory; import com.ebt.videoapp.model.VideoImpl; import java.util.Collections; import java.util.LinkedList; import java.util.List; /** * . * * @author EastBanc Technologies (http://eastbanctech.ru/) */ public class VideoService { private List<Video> list = new LinkedList<>(); public VideoService() { VideoImpl video = new VideoImpl(); video.setTitle(" "); video.setUrl("http://www.youtube.com/watch?v=YJDz2-tT8b4"); video.setCategory(VideoCategory.CARS); video.setRating(0.75); video.setSource("VIDEO-APP"); list.add(video); video = new VideoImpl(); video.setTitle("Lamborghini Aventador LP700-4"); video.setUrl("http://www.youtube.com/watch?v=ujn7jEQ4ib4"); video.setCategory(VideoCategory.CARS); video.setRating(0.65); video.setSource("VIDEO-APP"); list.add(video); video = new VideoImpl(); video.setTitle("Lady Gaga - Bad Romance"); video.setUrl("http://www.youtube.com/watch?v=qrO4YZeyl0I"); video.setCategory(VideoCategory.MUSIC); video.setRating(0.89); video.setSource("VIDEO-APP"); list.add(video); video = new VideoImpl(); video.setTitle("Shakira - La La La"); video.setUrl("http://www.youtube.com/watch?v=7-7knsP2n5w"); video.setCategory(VideoCategory.MUSIC); video.setRating(0.88); video.setSource("VIDEO-APP"); list.add(video); video = new VideoImpl(); video.setTitle("Zlatan Ibrahimovic Goals & Skills"); video.setUrl("http://www.youtube.com/watch?v=ijAuwXZnxXc"); video.setCategory(VideoCategory.SPORT); video.setRating(0.74); video.setSource("VIDEO-APP"); list.add(video); video = new VideoImpl(); video.setTitle("Goodbye Steven Gerrard - You're Irreplaceable"); video.setUrl("http://www.youtube.com/watch?v=bADTiAUWygA"); video.setCategory(VideoCategory.SPORT); video.setRating(0.90); video.setSource("VIDEO-APP"); list.add(video); Collections.sort(list, (o1, o2) -> Double.compare(o1.getRating(), o2.getRating())); } public List<Video> list() { return list; } } The service is built on a collection of objects. For simplicity, we create a collection right in the service. It is clear that in a real application there will be an intermediate DAO layer for working with a database or another data source.
4.4.4 Servlet to display a list of videos
Servlet to display a list of videos
A few comments:
package com.ebt.videoapp.servlet; import com.ebt.videoapp.service.VideoService; import org.keycloak.KeycloakSecurityContext; import javax.annotation.security.DeclareRoles; import javax.inject.Inject; import javax.servlet.ServletException; import javax.servlet.annotation.HttpConstraint; import javax.servlet.annotation.ServletSecurity; import javax.servlet.annotation.WebServlet; import javax.servlet.http.HttpServlet; import javax.servlet.http.HttpServletRequest; import javax.servlet.http.HttpServletResponse; import java.io.IOException; /** * , . * * @author EastBanc Technologies (http://eastbanctech.ru/) */ @WebServlet("/video-list-servlet") public class VideoListServlet extends HttpServlet { @Inject private VideoService videoService; @Override protected void doGet(HttpServletRequest req, HttpServletResponse resp) throws ServletException, IOException { req.setAttribute("list", videoService.list()); getServletContext().getRequestDispatcher("/WEB-INF/jsp/list.jsp").forward(req, resp); } } A few comments:
- We create the successor of class HttpServlet.
- We define the logic in the doGet () method.
- Use the @WebServlet annotation to bind a request to a servlet. This eliminates the need to define the servlet and set the mapping in the web.xml.
Note: The @WebServlet annotation appeared in the Servlet API 3.0 specification and allows you to configure servlets directly in Java code.
4.4.5 Displaying results - list.jsp
list.jsp
<%@ page contentType="text/html;charset=UTF-8" language="java" %> <%@ taglib uri="http://java.sun.com/jsp/jstl/core" prefix="c" %> <html> <head> <title> </title> <link rel="stylesheet" href="https://maxcdn.bootstrapcdn.com/bootstrap/3.3.5/css/bootstrap.min.css" integrity="sha512-dTfge/zgoMYpP7QbHy4gWMEGsbsdZeCXz7irItjcC3sPUFtf0kuFbDz/ixG7ArTxmDjLXDmezHubeNikyKGVyQ==" crossorigin="anonymous"> </head> <body> <h2></h2> <table class="table table-striped"> <thead> <tr> <th></th> <th></th> <th></th> <th></th> <th></th> </tr> </thead> <tbody> <c:forEach var="video" items="${list}"> <tr> <td>${video.source}</td> <td>${video.title}</td> <td>${video.category}</td> <td>${video.rating}</td> <td><a href="${video.url}" target="_new"></a></td> </tr> </c:forEach> </tbody> </table> </body> </html> 4.4.6 Include CDI support - beans.xml
beans.xml
<?xml version="1.0" encoding="UTF-8"?> <!-- enable CDI --> <beans xmlns="http://xmlns.jcp.org/xml/ns/javaee" xmlns:xsi="http://www.w3.org/2001/XMLSchema-instance" xsi:schemaLocation=" http://xmlns.jcp.org/xml/ns/javaee http://xmlns.jcp.org/xml/ns/javaee/beans_1_1.xsd" bean-discovery-mode="all"> </beans> 4.4.7 Default application file - index.jsp
index.jsp
<%@ page contentType="text/html;charset=UTF-8" language="java" %> <html> <body onload="document.location='<%=request.getContextPath()%>/video-list-servlet'"> </body> </html> 4.4.8 Web application configuration file - web.xml
web.xml
At the moment we make an empty file. Further, the content will be changed to configure the authentication method.
<web-app version="3.0" xmlns="http://java.sun.com/xml/ns/javaee" xmlns:xsi="http://www.w3.org/2001/XMLSchema-instance" xsi:schemaLocation="http://java.sun.com/xml/ns/javaee http://java.sun.com/xml/ns/javaee/web-app_3_0.xsd"> </web-app> 4.4.9 Build and Deploy
We build the project through maven: mvn clean install.
Deploy the assembled application to the WildFly application server. To do this, copy the collected video-app.war to <WILDFLY_HOME> / standalone / deployments.
In the browser, open the page: http: // localhost: 8080 / video-app / video-list-servlet and check that the page is displayed correctly.

4.5 Install and configure KeyCloak server
4.5.1 Installing KeyCloak in WildFly
The steps are taken from the instructions ( http://keycloak.imtqy.com/docs/userguide/keycloak-server/html_single/index.html ):
- On the KeyCloak website ( http://keycloak.jboss.org/keycloak/downloads ) we find the WildFly server patch file. Since we are using KeyCloak version 1.6.1, we need the file keycloak-overlay-1.6.1.Final.zip.
Download the file in <WILDFLY_HOME> and unpack it.
This step we installed the KeyCloak server in WildFly. The application will be accessible by root context / auth. - Install the adapter to support KeyCloak in web applications.
Download the adapter for wildfly, the file “keycloak-wf9-adapter-dist-1.6.1.Final.zip” from the KeyCloak website: keycloak.jboss.org/keycloak/downloads.html?dir=0%3Dadapters/keycloak-oidc%3B
Download the file in <WILDFLY_HOME> and unpack it.
We connect the ability to use KeyCloak in the application security settings (it will be clear a little later). - We connect KeyCloak to the WildFly default profile:
a. Run WildFly: <WILDFLY_HOME> /bin/standalone.sh
b. Go to the folder <WILDFLY_HOME> / bin and run the commands:
./jboss-cli.sh -c --file = keycloak-install.cli
./jboss-cli.sh -c --file = adapter-install.cli
c. Restart the WildFly server.
4.5.2 Creating a Realm
Realm is a security area that we define and configure in KeyCloak. Realms in KeyCloak allow you to create several different security configurations.
All settings will be made within the framework of the Realm created: how authentication will take place, which applications will use it, which users can authenticate, which attributes will be returned, etc.
Steps for creating Realm:
- Run the WildFly server (if it is stopped).
- Go to the administrative panel Keycloak:
http: // localhost: 8080 / auth / admin / index.html - Enter the username and password set. (The default is admin / admin, when you first start the system will ask you to change the password).
- We open the list of existing areas (a tick in the upper left corner):

- A list of existing Realms and a button to create a new one appears. Click on it.

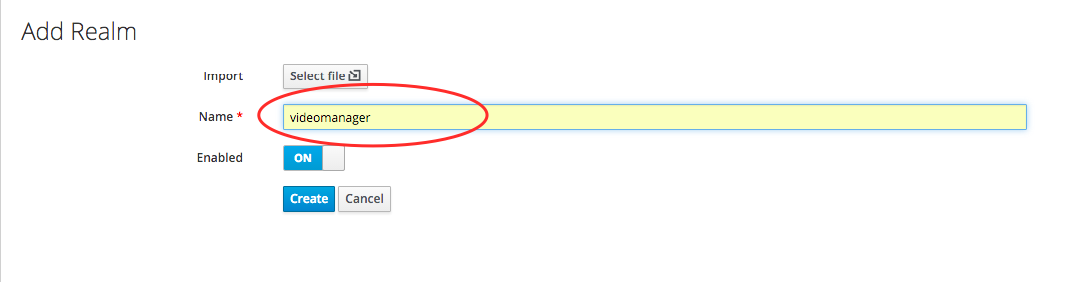
- Create a new Realm named videomanager and click the Create button.
4.5.3 Creating a new user
- Click on the Users item in the bottom left menu (Manage section)
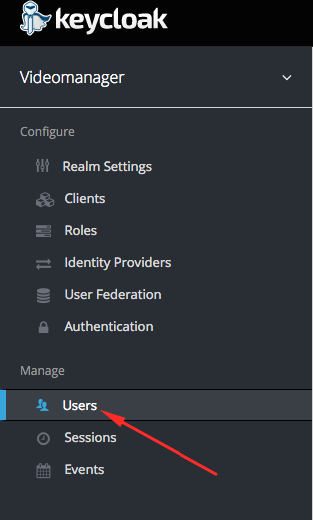
- Click the create user button

- Create a user appuser, define the basic properties (first name, last name, email) and click on the save button.

- Open the Credentials section. We put down the password, confirm the password for verification and click the Reset Password button.
Note: In our opinion, Reset Password is not the best name and can be somewhat confusing. It would be better to call Update Password or just Save.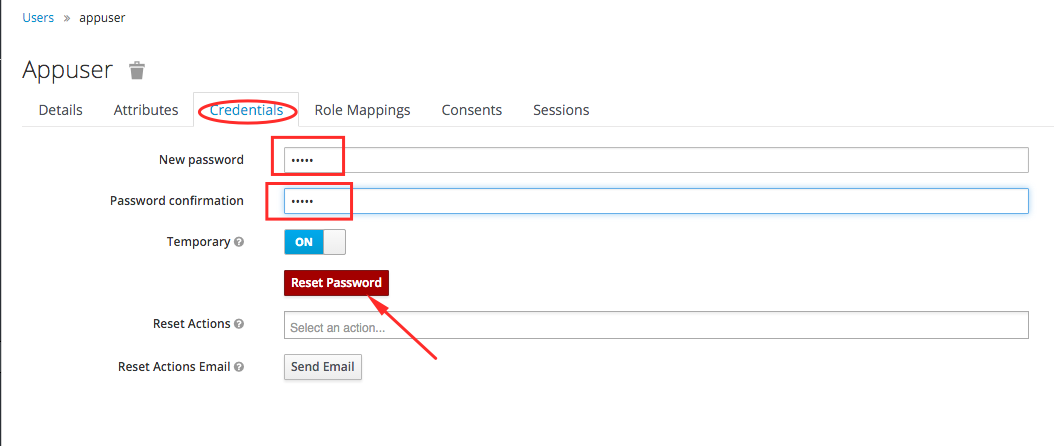
The system will display a message asking you to confirm the password change.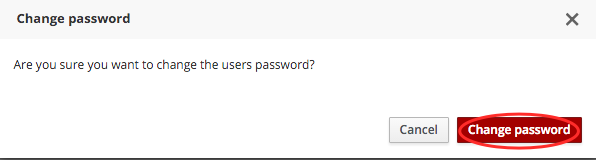
4.6 Protecting the video-app application via KeyCloak
1. Go to the Keycloak administration panel:
http: // localhost: 8080 / auth / admin / index.html
2. Open the Realm videomanager created by us. All further settings will be made for this Realm.
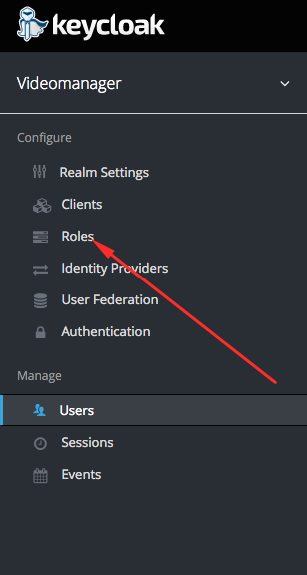
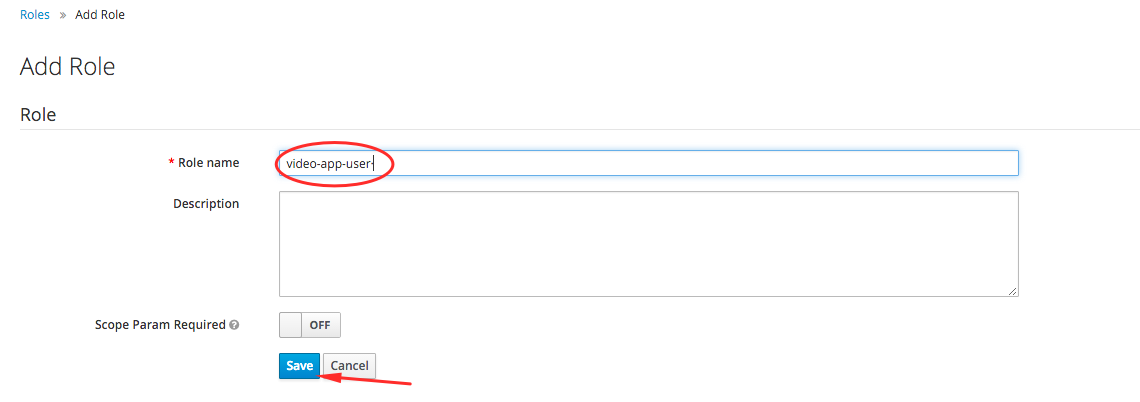
4.6.1 Adding a New Role
- Click on the Roles item in the left middle menu (section Configure).
- In the right part, click on the Add Role button.

- Create a video-app-user role and click the Save button.
4.6.2 Adding Role to User
- Open the user edit page appuser (which we created earlier).
- Go to the tab Role Mappings. In the Available Roles section, select the video-app-user role and click the Add Selected button.
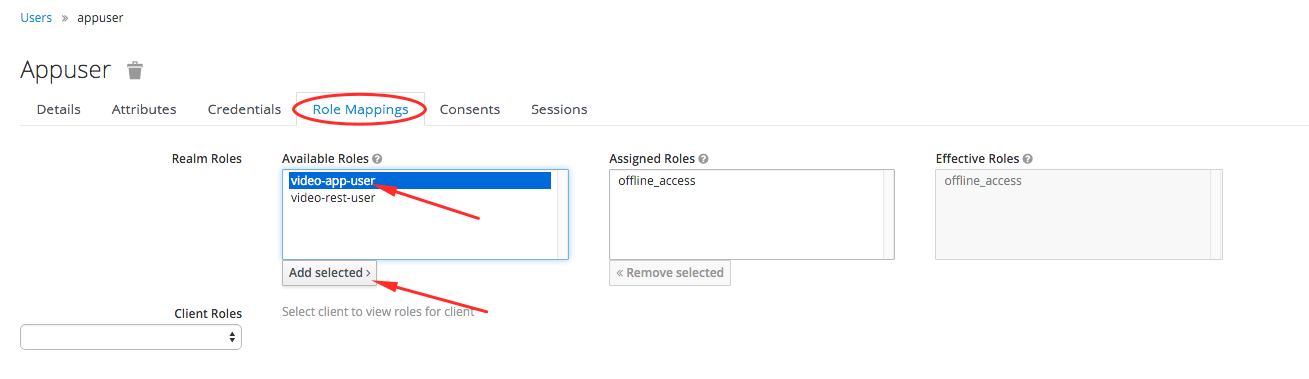
Saving will happen automatically.
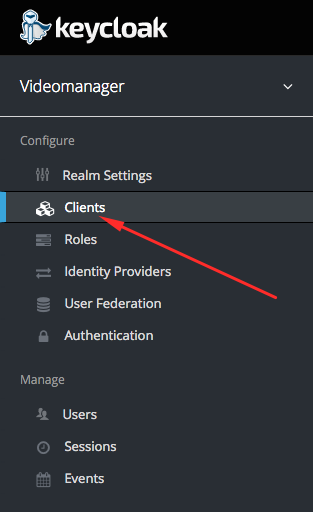
4.6.3 Define the video-app application in KeyCloak
Applications that we want to protect are described in the Clients section for the selected Realm. Here we will describe how authentication will take place in this application, where and what information to send to the application after successful authentication, etc.
- In the Configure section, click on the Clients item.
- A list of applications is displayed. In the upper right corner, click the Create button.
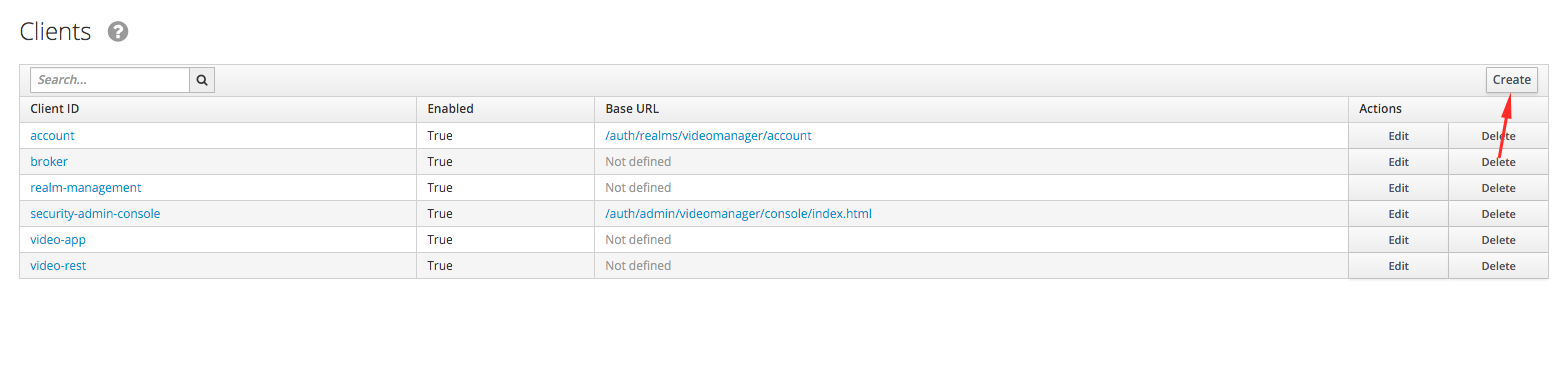
- We define the properties of the client. Currently you need to set the application ID and URL to return after authentication.
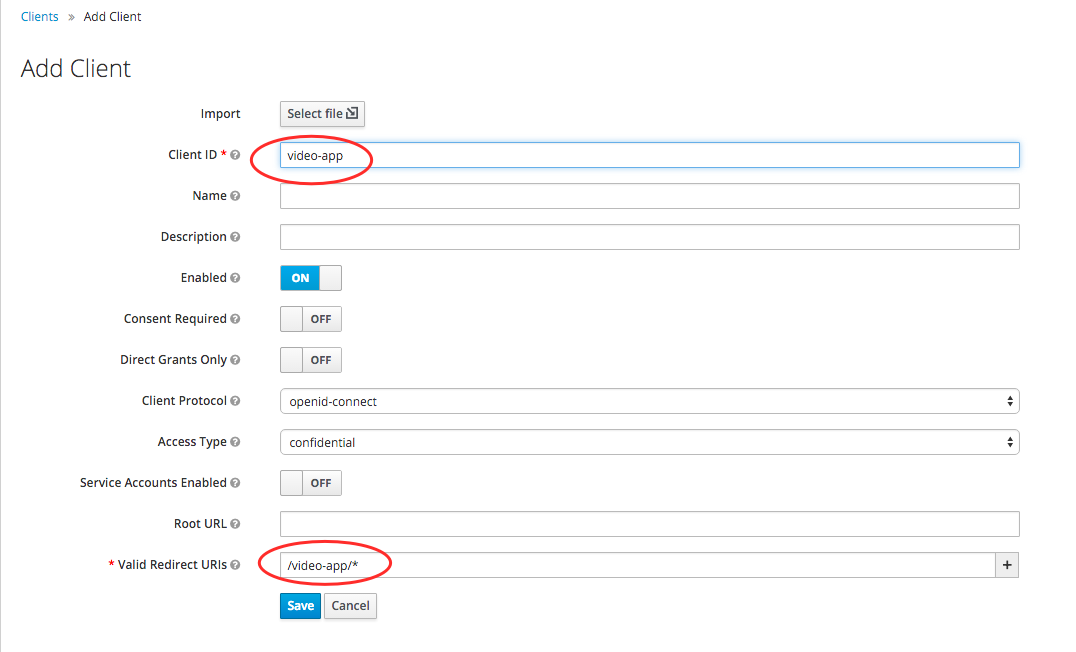
The Valid Redirect URIs field is needed to identify those application points where the result can be sent after authentication (JWT token). If you have several such points, all of them need to be listed here (using the "+" button). You can also set the mask: / video-app / *. This gives KeyCloak the right to redirect to any resource corresponding to this mask.
4.6.4 Add a security layer to the video-app
4.6.4.1 Protecting the VideoListServlet Servlet
To do this, simply add the annotations of DeclaredRoles, ServletSecurity to the VideoListServlet class.
@WebServlet("/video-list-servlet") @DeclareRoles("video-app-user") @ServletSecurity(@HttpConstraint(rolesAllowed = {"video-app-user"})) public class VideoListServlet extends HttpServlet { } Again, you can use the web.xml tool, but we decided to do with annotations.
4.6.4.2 Configuring Authentication Method
Open web.xml and add the following entry:
<login-config> <auth-method>KEYCLOAK</auth-method> <realm-name>videomanager</realm-name> </login-config> Annotations to configure the authentication method yet. Here we describe that
KEYCLOAK will be used for authentication. This authentication method was added to the WildFly application server in the Installation and Configuration steps of the KeyCloak server.
4.6.4.3 KeyCloak Integration
It remains to add data for integration with KeyCloak. This step is done very simply.
- Open the video-app client setting in KeyCloak. Go to the Installation tab, select the KeyCloak JSON format.
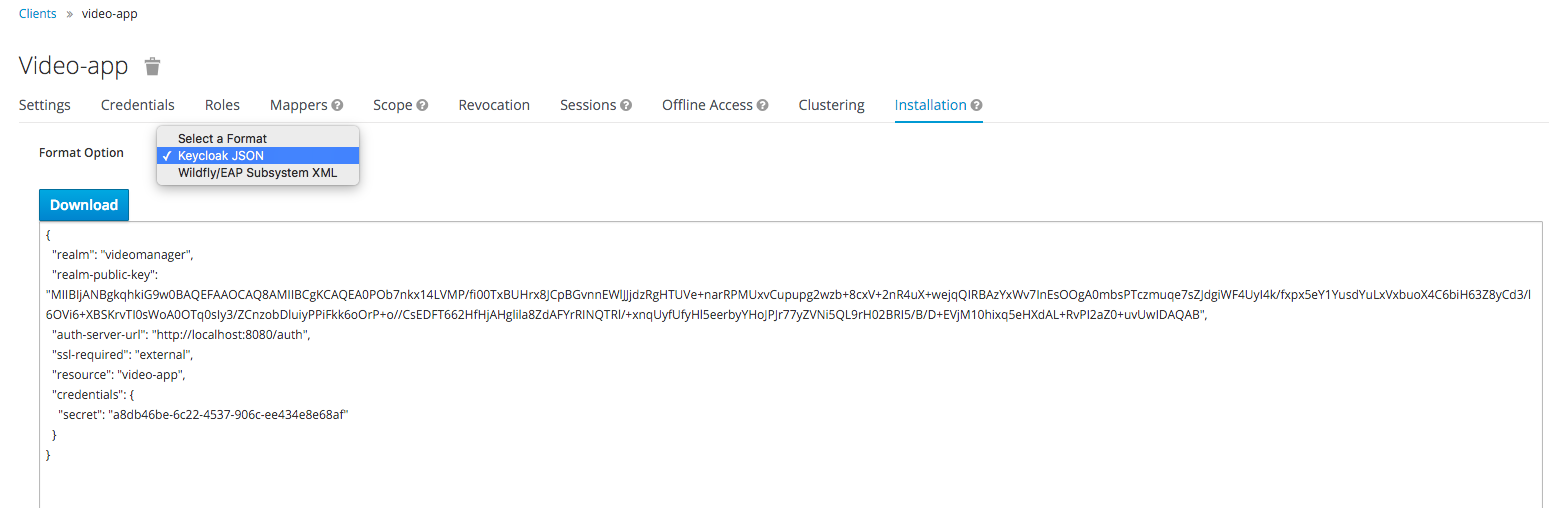
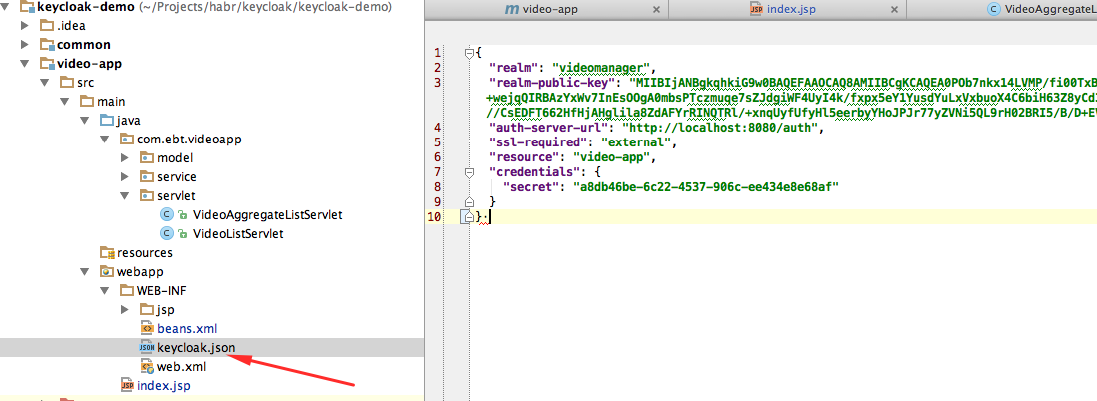
- The system will show the JSON that needs to be copied and placed in the web-app / WEB-INF / keycloak.json file of the video-app application.
4.6.5 Build and Deploy
Again we collect and deploy the application.
Open the page: http: // localhost: 8080 / video-app / video-list-servlet .
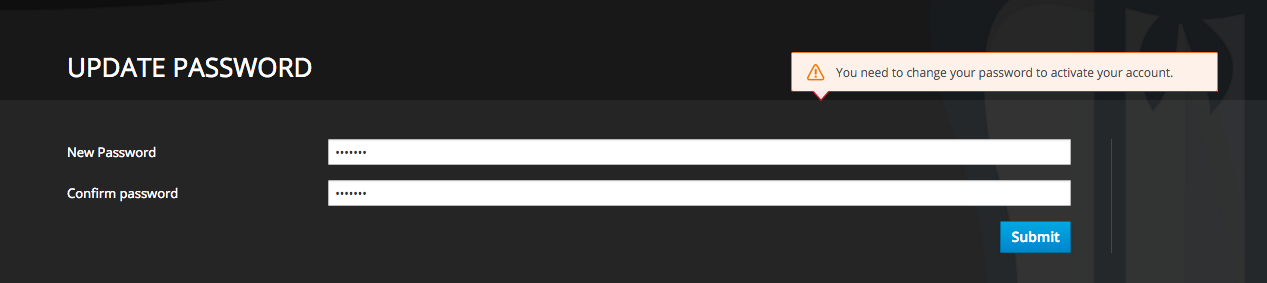
If everything is configured correctly, the system will redirect you to the authentication page from KeyCloak. Enter the username and password created for the Realm videomanager user.
Note: At the first login to the application, KeyCloak will ask you to update the password from the user. Change and click Submit.
If everything went well, you will see the video list again.
4.7 REST service as a video source - (video-rest)
Create a simple REST service that will return a list of videos.
The structure of the application will look like this.
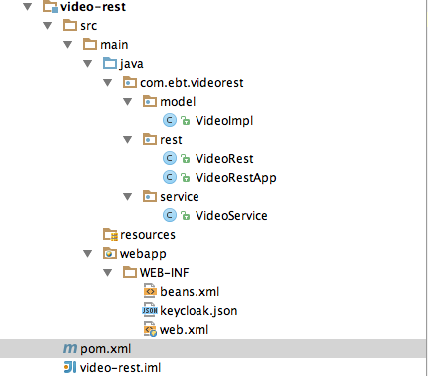
4.7.1 Dependency File - pom.xml
pom.xml
<?xml version="1.0" encoding="UTF-8"?> <project xmlns="http://maven.apache.org/POM/4.0.0" xmlns:xsi="http://www.w3.org/2001/XMLSchema-instance" xsi:schemaLocation="http://maven.apache.org/POM/4.0.0 http://maven.apache.org/xsd/maven-4.0.0.xsd"> <modelVersion>4.0.0</modelVersion> <parent> <groupId>com.ebt.ressearch.keycloak</groupId> <artifactId>keycloak-demo</artifactId> <version>1.0-SNAPSHOT</version> </parent> <artifactId>video-rest</artifactId> <version>1.0-SNAPSHOT</version> <packaging>war</packaging> <build> <finalName>video-rest</finalName> <plugins> <plugin> <groupId>org.wildfly.plugins</groupId> <artifactId>wildfly-maven-plugin</artifactId> <version>${version.wildfly.maven.plugin}</version> </plugin> </plugins> </build> <dependencies> <dependency> <groupId>com.ebt.ressearch.keycloak</groupId> <artifactId>common</artifactId> <version>${project.version}</version> </dependency> <dependency> <groupId>javax.enterprise</groupId> <artifactId>cdi-api</artifactId> <scope>provided</scope> </dependency> <dependency> <groupId>org.jboss.spec.javax.annotation</groupId> <artifactId>jboss-annotations-api_1.2_spec</artifactId> <scope>provided</scope> </dependency> <dependency> <groupId>org.jboss.spec.javax.ws.rs</groupId> <artifactId>jboss-jaxrs-api_2.0_spec</artifactId> <scope>provided</scope> </dependency> <dependency> <groupId>org.keycloak</groupId> <artifactId>keycloak-core</artifactId> <scope>provided</scope> </dependency> <dependency> <groupId>org.keycloak</groupId> <artifactId>keycloak-adapter-core</artifactId> <scope>provided</scope> </dependency> <dependency> <groupId>org.jboss.spec.javax.ejb</groupId> <artifactId>jboss-ejb-api_3.1_spec</artifactId> <version>1.0.2.Final</version> </dependency> </dependencies> </project> 4.7.2 Model Implementation - VideoImpl.java
Similar to the implementation in the video-app application (with accuracy to the package name).
4.7.3 Service for working with video objects - VideoService.java
Similar to the implementation in the video-app.
4.7.4 Creating a REST Application - VideoRest.java
package com.ebt.videorest.rest; import javax.ws.rs.ApplicationPath; import javax.ws.rs.core.Application; /** * JAX-RS . * * @author EastBanc Technologies (http://eastbanctech.ru/) */ @ApplicationPath("/") public class VideoRestApp extends Application { } The definition of the JAX-RS application, according to which WildFly application server will understand that we are announcing REST services.
4.7.5 Creating a REST Service - VideoRest.java
list.jsp
package com.ebt.videorest.rest; import com.ebt.common.Video; import com.ebt.videorest.service.VideoService; import javax.annotation.security.RolesAllowed; import javax.ejb.Stateless; import javax.inject.Inject; import javax.ws.rs.GET; import javax.ws.rs.Path; import javax.ws.rs.Produces; import java.util.List; /** * REST . * * @author EastBanc Technologies (http://eastbanctech.ru/) */ @Path("/") @Produces("application/json") public class VideoRest { @Inject private VideoService videoService; @GET @Path("/list") public List<Video> get() { return videoService.list(); } } 4.7.6 Include CDI support - beans.xml
Exactly the file from the video-app.
4.7.7 Web application configuration file - web.xml
<web-app version="3.0" xmlns="http://java.sun.com/xml/ns/javaee" xmlns:xsi="http://www.w3.org/2001/XMLSchema-instance" xsi:schemaLocation="http://java.sun.com/xml/ns/javaee http://java.sun.com/xml/ns/javaee/web-app_3_0.xsd"> </web-app> 4.7.8 Build and Deploy
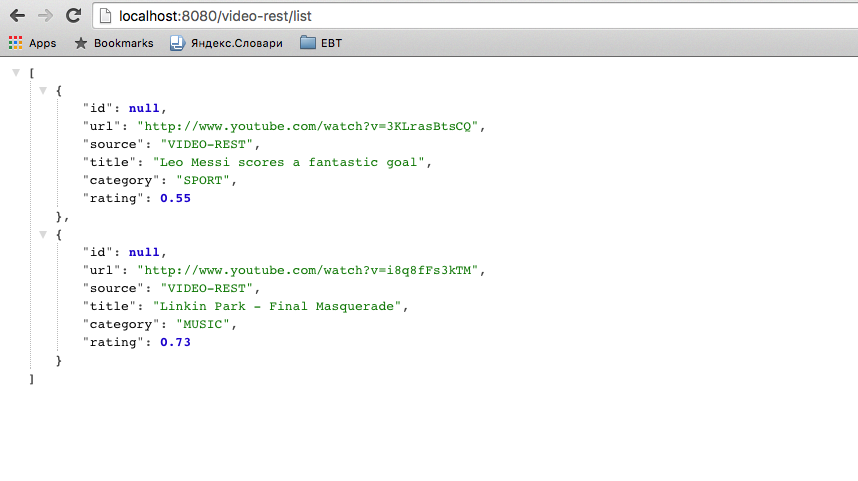
We collect application through maven and deploy to the server in WildFly.
Open the page http: // localhost: 8080 / video-rest / list . If everything is configured correctly, we will see a list of video objects in JSON format.
4.8 Protecting the video-rest application via KeyCloak
4.8.1 Adding a New Role
In the administrative panel KeyCloak add a new role video-rest-user.
4.8.2 Adding Roles to User
In the administrative panel, add the video-rest-user role to the user appuser.
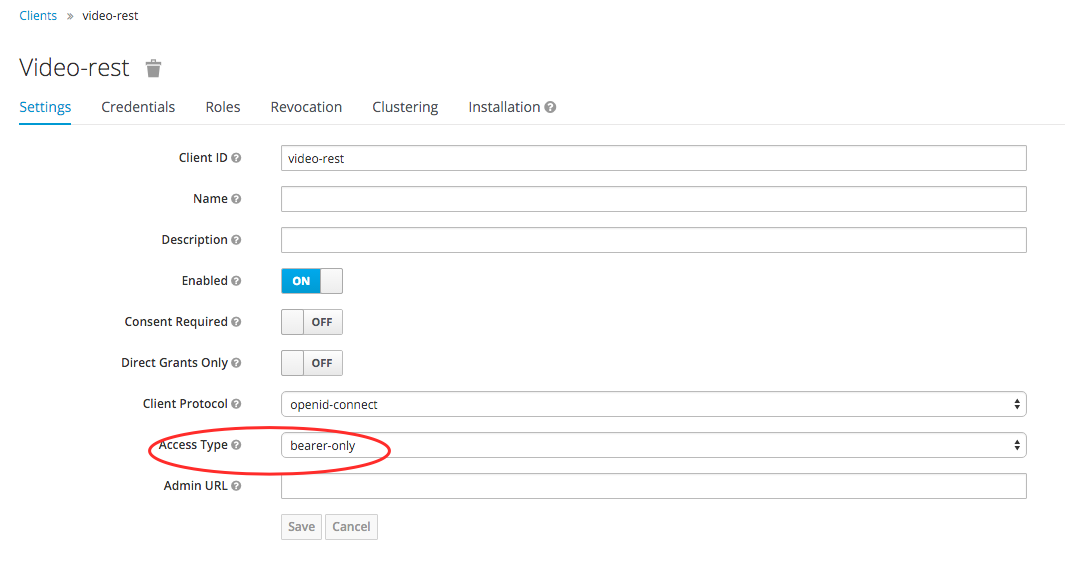
4.8.3 Define the video-rest application in KeyCloak
We define the video-rest in KeyCloak in the same way as “Define the video-app application in KeyCloak” with one note. In AccessType, select the value bearer-only.
This means that the application will not initiate the authentication process in KeyCloak and is awaiting receipt of the user and his attributes from the JWT token.
4.8.4 Add a security layer to the video-rest application
4.8.4.1 Protecting the service of returning a list of video objects - VideoRest.java
Mark the method annotation @RolesAllowed. We mark the service class itself with the @Stateless annotation to make it an EJB (the annotations from the javax.annotation.security package work only in EJB 3.0 bins).
As a result, we get this service:
service
package com.ebt.videorest.rest; import com.ebt.common.Video; import com.ebt.videorest.service.VideoService; import javax.annotation.security.RolesAllowed; import javax.ejb.Stateless; import javax.inject.Inject; import javax.ws.rs.GET; import javax.ws.rs.Path; import javax.ws.rs.Produces; import java.util.List; /** * REST . * * @author EastBanc Technologies (http://eastbanctech.ru/) */ @Path("/") @Produces("application/json") @Stateless public class VideoRest { @Inject private VideoService videoService; @GET @Path("/list") @RolesAllowed("video-rest-user") public List<Video> get() { return videoService.list(); } } 4.8.4.2 Configuring Authentication Method
Similar to the configuration of the video-app application.
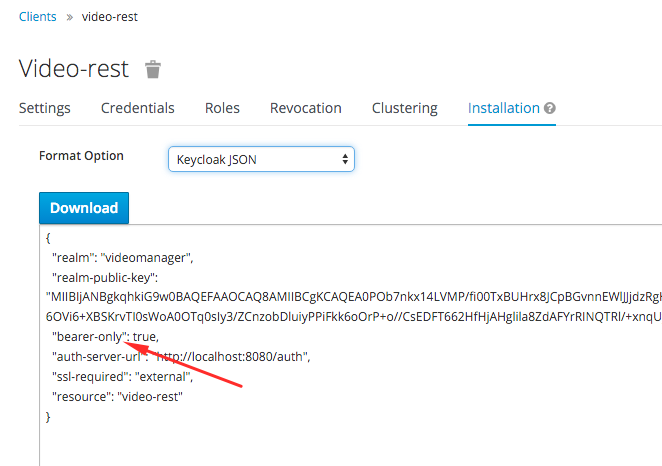
4.8.4.3 Integration with KeyCloak
Repeat the same steps for the video-rest application as for the configuration with KeyCloak for the video-app application.
Please note that in the configuration file the “bearer-only” parameter should be set to “true”.
4.8.5 Build and Deploy
We collect and deploy the application.
Open the application at http: // localhost: 8080 / video-rest / list
The system should display an error message and insufficient access rights.

If you use the client for REST requests, in which you specify the Authorization header with the value of Bearer $ {JWT token value}, we get the video list.
The JWT value can be obtained from the video-app application using the getTokenString () method of the KeycloakSecurityContext object. The class object is obtained from the request context.
KeycloakSecurityContext ksc = (KeycloakSecurityContext) req.getAttribute(KeycloakSecurityContext.class.getName()); String token = ksc.getTokenString(); 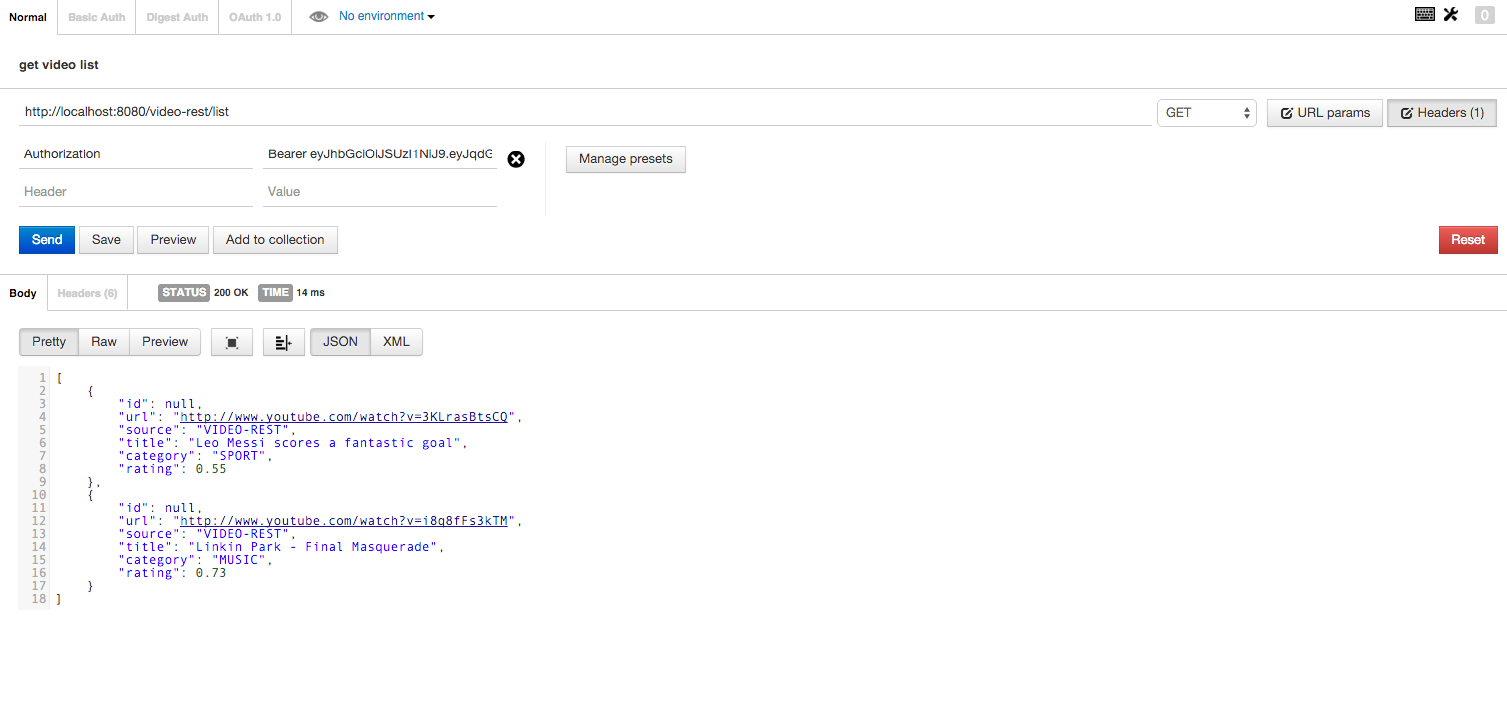
The screenshot shows the REST service call with the JWT token. As a client, the Postman extension for Chrome was used.
4.9 SSO - video-rest integration with video-rest
We change the logic of the VideoListServlet servlet in the video-app application to get data from the REST service. We will display a general list of videos based on two sources.
4.9.1 Modify the servlet VideoListServlet.java
VideoListServlet.java
@Override protected void doGet(HttpServletRequest req, HttpServletResponse resp) throws ServletException, IOException { Client client = ClientBuilder.newBuilder().build(); WebTarget target = client.target("http://localhost:8080/video-rest/list"); GenericType<List<VideoImpl>> listGenericType = new GenericType<List<VideoImpl>>() { }; KeycloakSecurityContext ksc = (KeycloakSecurityContext) req.getAttribute(KeycloakSecurityContext.class.getName()); List<VideoImpl> list = target.request().header("Authorization", "Bearer " + ksc.getTokenString()).get(listGenericType); // merge lists List<Video> mergeList = new ArrayList<>(); mergeList.addAll(list); mergeList.addAll(videoService.list()); req.setAttribute("list", mergeList); req.setAttribute("ksc", ksc); getServletContext().getRequestDispatcher("/WEB-INF/jsp/list.jsp").forward(req, resp); } In the code snippet, we get the security context created in the authorization process by means of KeyCloak.
KeycloakSecurityContext ksc = (KeycloakSecurityContext) req.getAttribute(KeycloakSecurityContext.class.getName()); Next, we access the protected resource using the JWT token:
List<VideoImpl> list = target.request().header("Authorization", "Bearer " + ksc.getTokenString()).get(listGenericType); 4.9.2 Build and Deploy
We collect and deploy the application.
Open the video list page http: // localhost: 8080 / video-app / video-list-servlet .
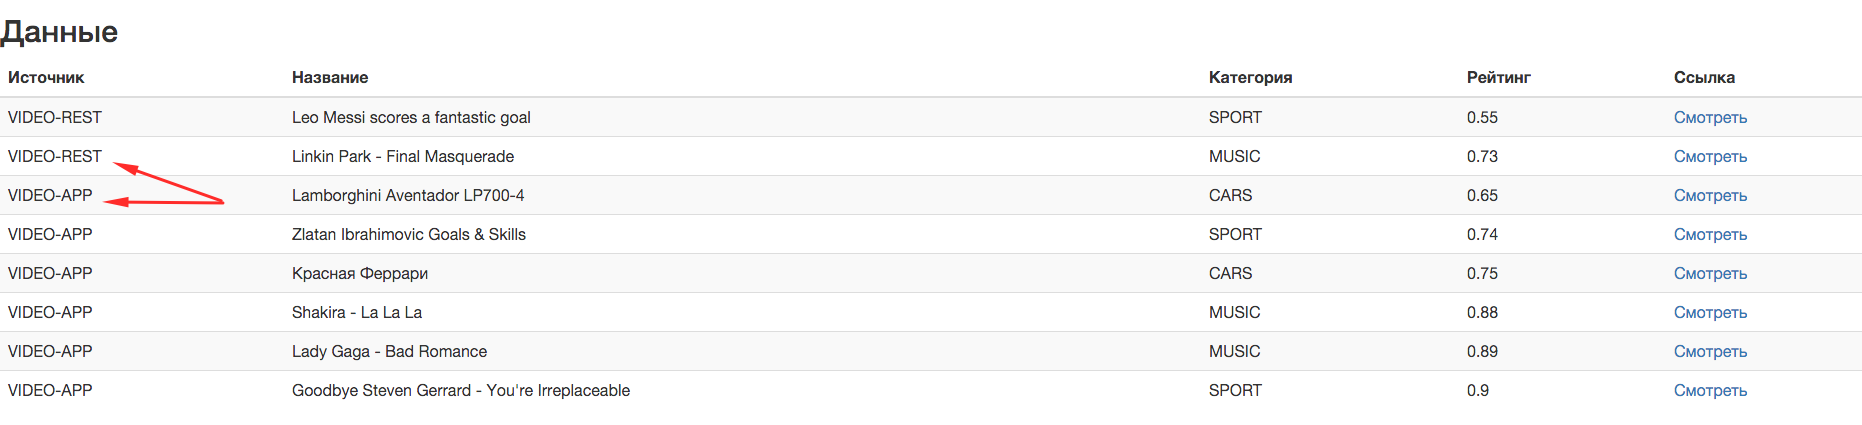
The screenshot shows that videos from different sources were aggregated into one list.
That's all, the practical part is complete. Two web applications were developed and secured, and interaction between these applications was organized using JWT tokens.
5. Conclusion
Today, we showed how KeyCloak can be used to protect web applications. Most of the article was devoted to the implementation of a practical example, in the course of which we covered the main stages of the configuration of KeyCloak. We hope that the material will be useful and will save time for those who want to connect KeyCloak to their projects or continue further research of this product.
In general, I would like to note that the superficial use of the product left in general very good impressions. In addition to the example described, we were fairly quickly able to configure the Liferay portal to use KeyCloak using the SAML 2.0 protocol (Microsoft ADFS was used as the data source for users).
Our research will definitely continue, and perhaps we will also share interesting results on working with KeyCloak.
Source: https://habr.com/ru/post/272149/
All Articles