Creating The Blacksmith: Staging, Shading and Lighting
In previous articles in this series, we talked about the team that created The Blacksmith video , as well as its artistic design . Now we will look at creating a video from a technical point of view and will address the aspects of scene preparation, shading and lighting in Unity 5.
Testing and working with different versions of the engine
We started to create a video on early alpha and beta versions of Unity, stabilized it on version 5.0.b22, and eventually we updated the entire project for the final version of Unity 5.
')
Using a raw engine at the development stage for creating content, you inevitably encounter instability and low efficiency of processes. Every week we had a choice: update the engine to the bug fix version or skip the update so as not to disrupt the work of the team.
For example, to streamline cameras and animations, we used the Director sequencer as part of the Storytelling toolkit, which at that time was at the initial stage of development. To add this functionality to the project, we had to regularly merge it with the main version of the engine right up to the release itself.
Our team, responsible for the release of content, reports errors and requests new functionality from the relevant departments. But then we can only hope that the developers will fix the bugs and add new features. Otherwise, we have to look for workarounds. The fact is that in addition to our feedback, Unity developers receive feedback from many users and, as a rule, determine the priority of tasks themselves.
Scene preparation
In one of the first stages of creating The Blacksmith, we sketched out the geometry of the scenes in gray material.

To create prototypes we were very useful packages from the Asset Store, for example, Better Rocks and Cliffs from Quantum Theory. Thanks to them, we immediately began work on the appearance of objects and very soon got good results:

On the basis of the storyboard made on preproduction, we performed the first iteration of the cameras, roughly identifying the necessary shots, and immediately made a list of the resources needed for each of them. At the same time, work on art for 3D character models was in full swing.
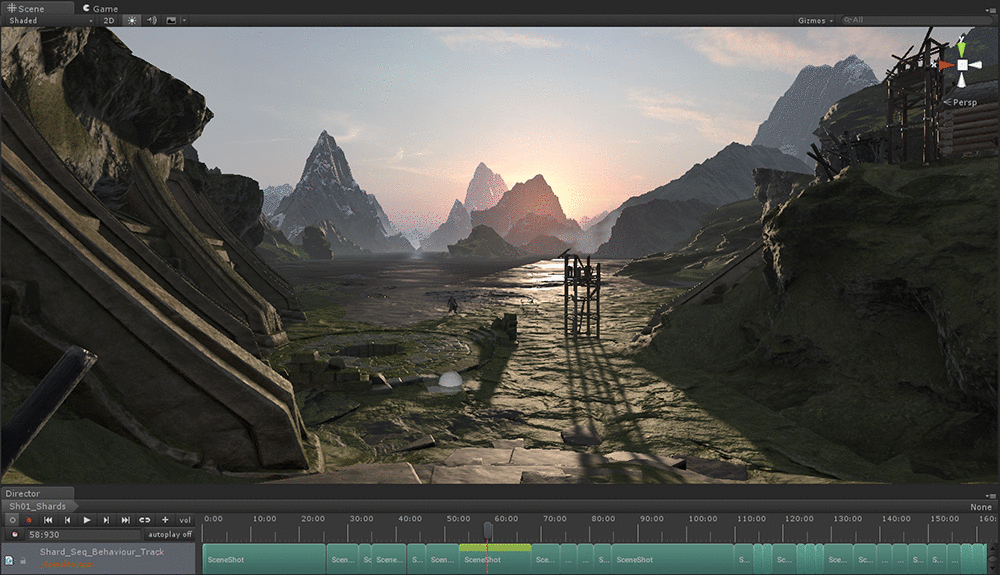
We needed ample opportunity to customize the artistic effects for each shot. Therefore, we have added the Scene Manager component to the Unity editor, which allows grouping objects by shots. With it, we were able to enable and disable objects for individual cameras, as well as change their properties: location, scale, material, etc. Moreover, for each shot unique parameters of light were set up, and Global Illumination provided an instant light change in real time.
Shading
Physically accurate shader (PBS) in Unity is quite easy to use and configure. We worked with him at all stages of the project. Writing a separate shader for the skin was not included in our list of tasks, so we limited ourselves to the standard shader:

Antagonist. Screenshot from Unity Editor
One of the main advantages of the built-in shader in Unity 5 is the possibility of flexible configuration and expansion in accordance with the specifics of the project. You can download it from the link: http://unity3d.com/get-unity/download/archive (in the Downloads menu, select “Embedded shaders” for your platform). Taking it as a basis, you can easily create unique shaders for your projects, as we do for our video. Below we present some examples.
We have added a unique shader recognition function to the built-in shader. For this modification, we made two versions: for the environment (for example, to take into account atmospheric scattering) and for characters, more complex (to take into account unique shadows and wrinkle maps). In the latter, we slightly improved the UI by adding sliders for the reflection map.

To make the antagonist's mimicry more realistic, we added blend-based wrinkle maps to the project. In each frame, our component determined the blend shampoo with the greatest influence and appropriately arranged the textures of the normals and shadows at the prerendor stage. Then the modified standard shader sampled and unpacked the normals and shadows from the screen space buffer instead of the usual material slots.

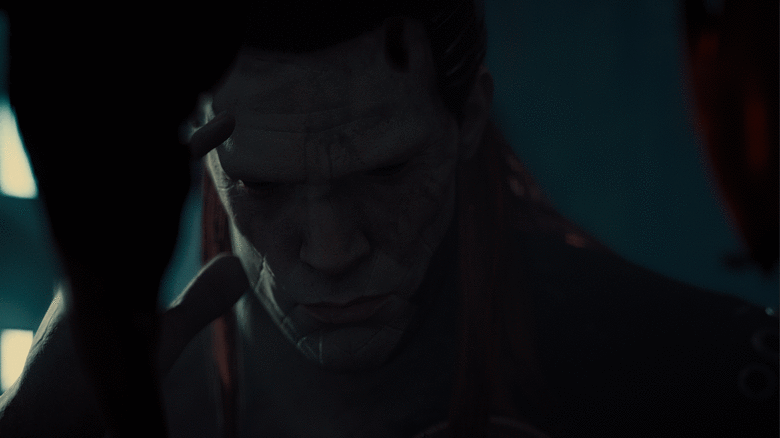
The standard Unity shader is well suited for a variety of real materials, but unfortunately, hair is not one of them. Despite the fact that hair rendering was not part of the project’s objectives, we wanted to provide characteristic anisotropic lighting while maintaining proper integration with the physical environment used by other materials. To do this, we modified the built-in shader by changing the reflection distribution model, but left the process of sampling reflections and lightning probes in its original form.

Hair shader Screenshot from Unity Editor .
For some shots, we wanted to make soft vegetation and find an easy way to diversify it. To this end, we have broken the whole process into 2 stages and expanded the vegetation creation functions built into Unity. Using the small PaintJob tool, we automated the process of adding any static geometry to a world with a temporary landscape. Combined with a set of simple rules that control the process, this allowed us to generate layers of vegetation on the meshes of the earth's surface, around objects and on the roofs of houses. For rendering, we collected all of this data in a unique component for sorting around the viewpoint, sampling the global illumination, and managing the sample rendering and level of detail.


Lighting
We divided the lighting for the characters and the surrounding world into several layers and assigned the appropriate culling-masks to the lamps. So we got more control over each layer. A similar approach is usually used in the film industry, adjusting the lighting depending on the location of the actors in the frame.
To improve the appearance of the characters, we used additional local light sources to soften the shadows (unlit areas) on their faces.
In the Blacksmith demo, we focused on the characters and used a lot of close-up shots. Therefore, it was very important that the shadows were in a sufficiently high resolution. Therefore, especially for the shadows of the characters, we added a separate texture.

According to the idea, the forge inside had to look as if it was illuminated by rays penetrating through holes in the walls and roof. To achieve this effect, we used a cookie with the appropriate pattern.

As for reflections in the ocean and puddles on the shore, we wanted them to look as sharp as possible at the point of contact of the object with the reflecting surface and gradually become blurry as the distance from the object. As a result, we added a convolution step to the shader taking into account the depth and the ability to adjust the data depending on the smoothness of the surface. The obtained data was then imported into a standard shader with the replacement of cubic textures of reflections with new unique textures.

Testing and working with different versions of the engine
We started to create a video on early alpha and beta versions of Unity, stabilized it on version 5.0.b22, and eventually we updated the entire project for the final version of Unity 5.
')
Using a raw engine at the development stage for creating content, you inevitably encounter instability and low efficiency of processes. Every week we had a choice: update the engine to the bug fix version or skip the update so as not to disrupt the work of the team.
For example, to streamline cameras and animations, we used the Director sequencer as part of the Storytelling toolkit, which at that time was at the initial stage of development. To add this functionality to the project, we had to regularly merge it with the main version of the engine right up to the release itself.
Our team, responsible for the release of content, reports errors and requests new functionality from the relevant departments. But then we can only hope that the developers will fix the bugs and add new features. Otherwise, we have to look for workarounds. The fact is that in addition to our feedback, Unity developers receive feedback from many users and, as a rule, determine the priority of tasks themselves.
Scene preparation
In one of the first stages of creating The Blacksmith, we sketched out the geometry of the scenes in gray material.
To create prototypes we were very useful packages from the Asset Store, for example, Better Rocks and Cliffs from Quantum Theory. Thanks to them, we immediately began work on the appearance of objects and very soon got good results:
On the basis of the storyboard made on preproduction, we performed the first iteration of the cameras, roughly identifying the necessary shots, and immediately made a list of the resources needed for each of them. At the same time, work on art for 3D character models was in full swing.
We needed ample opportunity to customize the artistic effects for each shot. Therefore, we have added the Scene Manager component to the Unity editor, which allows grouping objects by shots. With it, we were able to enable and disable objects for individual cameras, as well as change their properties: location, scale, material, etc. Moreover, for each shot unique parameters of light were set up, and Global Illumination provided an instant light change in real time.
Shading
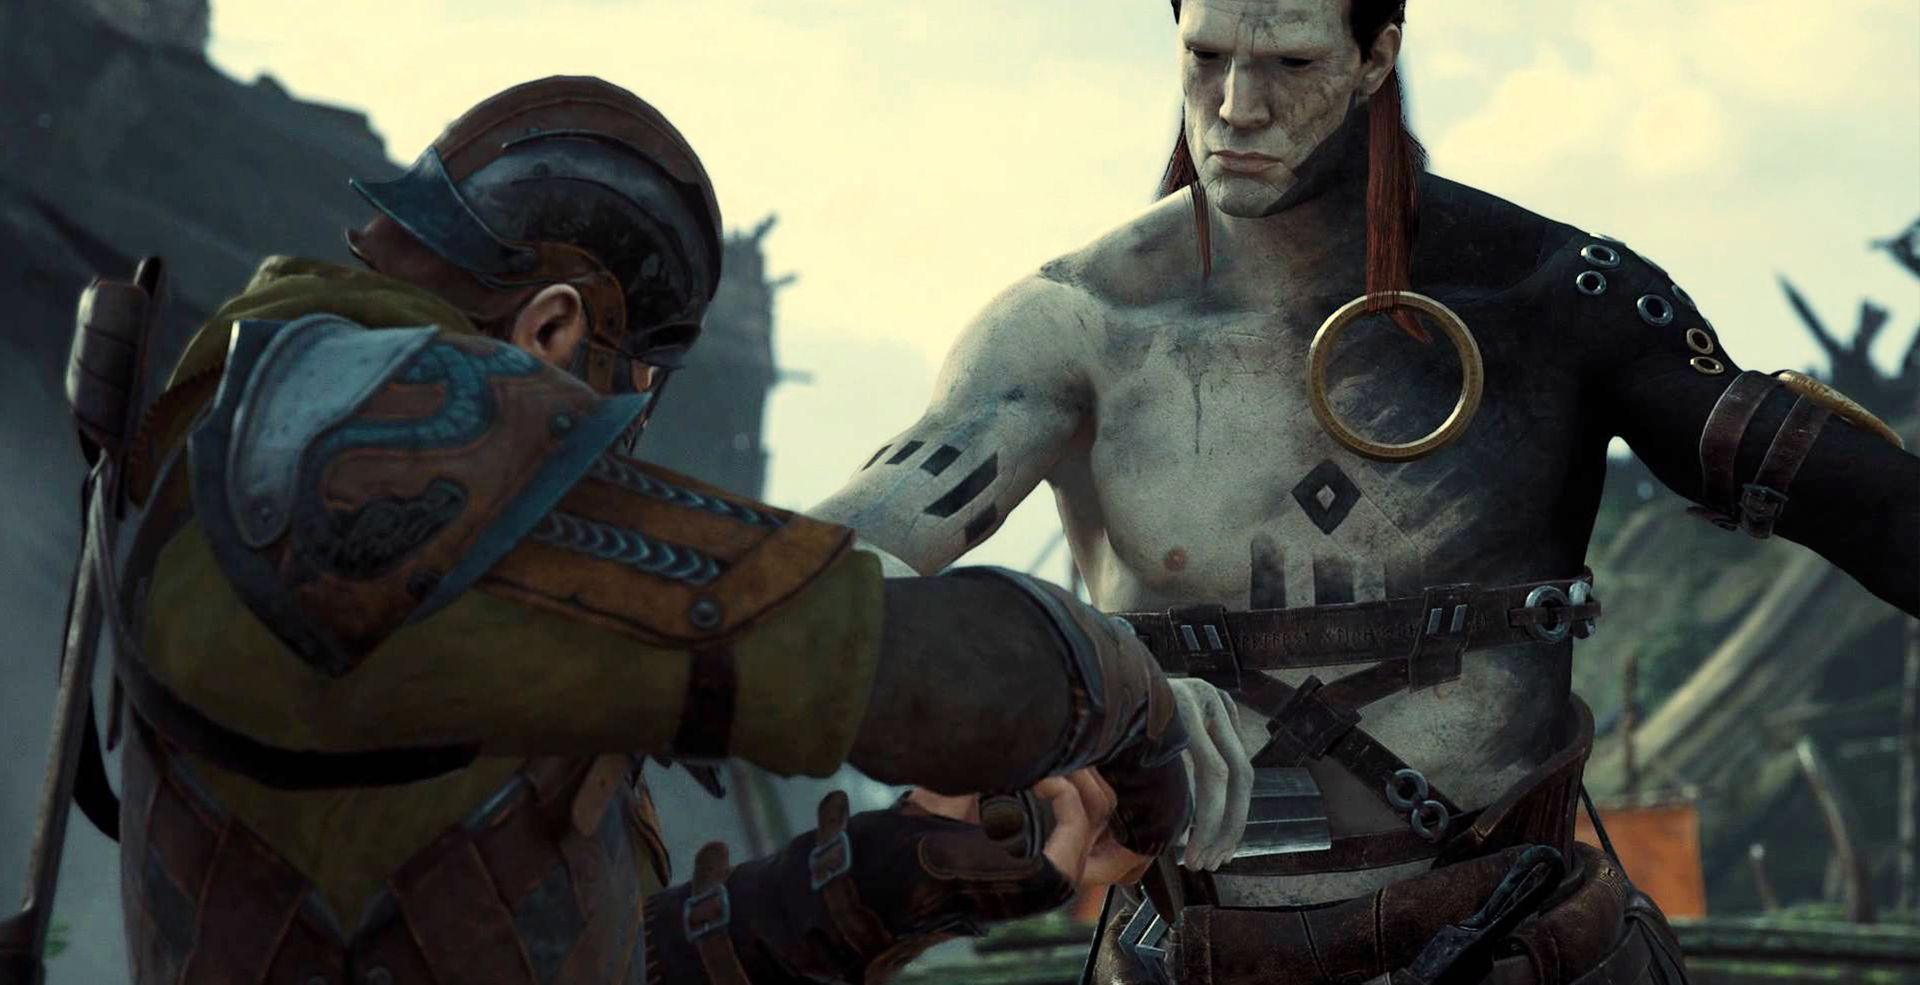
Physically accurate shader (PBS) in Unity is quite easy to use and configure. We worked with him at all stages of the project. Writing a separate shader for the skin was not included in our list of tasks, so we limited ourselves to the standard shader:
Antagonist. Screenshot from Unity Editor
One of the main advantages of the built-in shader in Unity 5 is the possibility of flexible configuration and expansion in accordance with the specifics of the project. You can download it from the link: http://unity3d.com/get-unity/download/archive (in the Downloads menu, select “Embedded shaders” for your platform). Taking it as a basis, you can easily create unique shaders for your projects, as we do for our video. Below we present some examples.
We have added a unique shader recognition function to the built-in shader. For this modification, we made two versions: for the environment (for example, to take into account atmospheric scattering) and for characters, more complex (to take into account unique shadows and wrinkle maps). In the latter, we slightly improved the UI by adding sliders for the reflection map.
To make the antagonist's mimicry more realistic, we added blend-based wrinkle maps to the project. In each frame, our component determined the blend shampoo with the greatest influence and appropriately arranged the textures of the normals and shadows at the prerendor stage. Then the modified standard shader sampled and unpacked the normals and shadows from the screen space buffer instead of the usual material slots.
The standard Unity shader is well suited for a variety of real materials, but unfortunately, hair is not one of them. Despite the fact that hair rendering was not part of the project’s objectives, we wanted to provide characteristic anisotropic lighting while maintaining proper integration with the physical environment used by other materials. To do this, we modified the built-in shader by changing the reflection distribution model, but left the process of sampling reflections and lightning probes in its original form.
Hair shader Screenshot from Unity Editor .
For some shots, we wanted to make soft vegetation and find an easy way to diversify it. To this end, we have broken the whole process into 2 stages and expanded the vegetation creation functions built into Unity. Using the small PaintJob tool, we automated the process of adding any static geometry to a world with a temporary landscape. Combined with a set of simple rules that control the process, this allowed us to generate layers of vegetation on the meshes of the earth's surface, around objects and on the roofs of houses. For rendering, we collected all of this data in a unique component for sorting around the viewpoint, sampling the global illumination, and managing the sample rendering and level of detail.
Lighting
We divided the lighting for the characters and the surrounding world into several layers and assigned the appropriate culling-masks to the lamps. So we got more control over each layer. A similar approach is usually used in the film industry, adjusting the lighting depending on the location of the actors in the frame.
To improve the appearance of the characters, we used additional local light sources to soften the shadows (unlit areas) on their faces.
In the Blacksmith demo, we focused on the characters and used a lot of close-up shots. Therefore, it was very important that the shadows were in a sufficiently high resolution. Therefore, especially for the shadows of the characters, we added a separate texture.
According to the idea, the forge inside had to look as if it was illuminated by rays penetrating through holes in the walls and roof. To achieve this effect, we used a cookie with the appropriate pattern.
As for reflections in the ocean and puddles on the shore, we wanted them to look as sharp as possible at the point of contact of the object with the reflecting surface and gradually become blurry as the distance from the object. As a result, we added a convolution step to the shader taking into account the depth and the ability to adjust the data depending on the smoothness of the surface. The obtained data was then imported into a standard shader with the replacement of cubic textures of reflections with new unique textures.
Source: https://habr.com/ru/post/271759/
All Articles