PostCSS quick start
In this guide, you will learn how to use PostCSS with the GULP, allowing you to decide for yourself which plugins you want to use and, therefore, include in your ecosystem.
We will work as already mentioned above with GULP, it is assumed that you have already installed:
Before we begin directly, you must have created a folder with the project in which the files should be:
')
Inside your project folder, create 2 subfolders: “src” and “dist”. In the src folder we will have uncompressed CSS files, while in the dist folder there will be final files processed by PostCSS.
The next step is to install the gulp-postcss plugin into your project - we will use it to control PostCSS processing.
In the terminal (console), go to the folder with your project, and run the command:
After installation, your project should look like this:
Now open the Gulpfile and create variables to invoke the "gulp" and "gulp-postcss" modules:
Now we can set up a task in GULP to read our CSS and transfer it to PostCSS for further processing. Add the following:
Let's see what we have done in the code above. In the first line, we created a task for GULP and named it css. This task calls the function inside which we created the processors array. For now, this array is empty, but then we'll fill it with PostCSS plugins that we want to use. After the processors array, we specified the files that will be the target for processing: any css files in the src folder.
In the first of the two pipe () functions, we start PostCSS with the postcss () function, and we pass an array of processors as an argument, which we later fill with plugins. In the second function pipe () we specify the folder in which our final css will be located.
Create a style.css file in the src folder and add some test css properties to it, for example:
Now in the console / terminal, go to the directory with your project and run the command:
This command will start the task (task) that we have just done. Now go to the dest folder and you should see the style.css file there. If you open it, you will see the same one that we wrote in style.css, which is located in the src folder.
We’ll now add custom PostCSS plugins:
Autoprefixer
cssnext
precss
Run the following commands in the terminal / console to install these plugins:
Next we will create a variable to load these plugins into our project. Add the following code to the Gulpfile after the two variables already created:
Next we add these 3 plugins to our processors array, then update the array creation code with the following:
We have added 3 plugins to the array and now GULP will know that you need to apply these plugins to the source css file. Now we can add several test styles to check that everything works. Delete everything in the style.css file in the src folder and add the following lines:
Run the command again:
And look at the style.css file in the dest folder. You should see something like the following code:
If you want to use specific plug-in settings (options), add curly brackets after the plug-in name in the processors array and pass the parameters. For example, you can specify a list of browsers with which Autoprefixer will work. The following code demonstrates this:
Requirements
We will work as already mentioned above with GULP, it is assumed that you have already installed:
- Node.js
- NPM
- Git
Before we begin directly, you must have created a folder with the project in which the files should be:
')
- gulpfile.js
- package.json
- Gulp installed in the folder "node_modules" and installed as dev. dependency (dev dependent) for your project
Basic setup GULP PostCSS
Inside your project folder, create 2 subfolders: “src” and “dist”. In the src folder we will have uncompressed CSS files, while in the dist folder there will be final files processed by PostCSS.
The next step is to install the gulp-postcss plugin into your project - we will use it to control PostCSS processing.
In the terminal (console), go to the folder with your project, and run the command:
npm install --save-dev gulp-postcss After installation, your project should look like this:
Project structure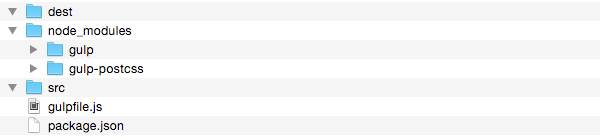
Now open the Gulpfile and create variables to invoke the "gulp" and "gulp-postcss" modules:
var gulp = require('gulp'); var postcss = require('gulp-postcss'); Now we can set up a task in GULP to read our CSS and transfer it to PostCSS for further processing. Add the following:
gulp.task('css', function () { var processors = [ ]; return gulp.src('./src/*.css') .pipe(postcss(processors)) .pipe(gulp.dest('./dest')); }); Let's see what we have done in the code above. In the first line, we created a task for GULP and named it css. This task calls the function inside which we created the processors array. For now, this array is empty, but then we'll fill it with PostCSS plugins that we want to use. After the processors array, we specified the files that will be the target for processing: any css files in the src folder.
In the first of the two pipe () functions, we start PostCSS with the postcss () function, and we pass an array of processors as an argument, which we later fill with plugins. In the second function pipe () we specify the folder in which our final css will be located.
Test run
Create a style.css file in the src folder and add some test css properties to it, for example:
.test { background: black; } Now in the console / terminal, go to the directory with your project and run the command:
gulp css This command will start the task (task) that we have just done. Now go to the dest folder and you should see the style.css file there. If you open it, you will see the same one that we wrote in style.css, which is located in the src folder.
Add PostCSS Plugins
We’ll now add custom PostCSS plugins:
Autoprefixer
cssnext
precss
Run the following commands in the terminal / console to install these plugins:
npm install autoprefixer --save-dev npm install cssnext --save-dev npm install precss --save-dev Next we will create a variable to load these plugins into our project. Add the following code to the Gulpfile after the two variables already created:
var autoprefixer = require('autoprefixer'); var cssnext = require('cssnext'); var precss = require('precss'); Next we add these 3 plugins to our processors array, then update the array creation code with the following:
var processors = [autoprefixer, cssnext, precss ]; We have added 3 plugins to the array and now GULP will know that you need to apply these plugins to the source css file. Now we can add several test styles to check that everything works. Delete everything in the style.css file in the src folder and add the following lines:
/* Testing autoprefixer */ .autoprefixer { display: flex; }; /* Testing cssnext */ .cssnext { background: color(red alpha(-10%)); } /* Testing precss */ .precss { @if 3 < 5 { background: green; } @else { background: blue; } }; Run the command again:
gulp css And look at the style.css file in the dest folder. You should see something like the following code:
/* Testing autoprefixer */ .autoprefixer { display: -webkit-box; display: -webkit-flex; display: -ms-flexbox; display: flex; } /* Testing cssnext */ .cssnext { background: rgba(255, 0, 0, 0.9); } /* Testing precss */ .precss { background: green } , . Autoprefixer, rgba() cssnext, @if @else PreCSS . Additional plugin settings
If you want to use specific plug-in settings (options), add curly brackets after the plug-in name in the processors array and pass the parameters. For example, you can specify a list of browsers with which Autoprefixer will work. The following code demonstrates this:
var processors = [ autoprefixer({browsers: ['last 1 version']}), cssnext, precss ]; Source: https://habr.com/ru/post/271739/
All Articles