We write software for generating music card data. Part one: parse the MIDI file
Introduction
In my articles about the transition to the Russian microcontroller K1986BE92QI I have repeatedly talked about the generation of sound by means of a microcontroller. Then I had the task to reproduce the data. To create this data itself, obtained from MIDI files, very exotic methods were used, for example, as in this article . Yes, such methods have the right to life if you need to obtain data for reproduction a couple of times in your life. But since I often encounter tasks, when the controller needs to get a rather complex sound, or the sound is just an additional option, the task to convert MIDI files in such exotic ways becomes very nontrivial. In this small series of articles, I set for myself the task to create (and in one thing and tell in detail about the creation process) a universal program for converting MIDI files to a format acceptable for the microcontroller, as well as generating all the initialization data necessary for the microcontroller.
The result of this article will be the implementation of the main functionality of the program: the creation of arrays of note-duration created from a MIDI file. Who is interested - I ask under the cat.
')
Article structure
- Development of requirements for the program.
- Determination of the method of implementation.
- General information about MIDI.
- Headline
- MIDI file block.
- Developments.
- Parsing the data.
- Conclusion
Developing program requirements
As mentioned above, the main task of our program will be to convert data from MIDI format to our own. In other words, we are not faced with the task of taking into account the strength of keystrokes, the use of rare instruments, or the use of effects provided by the MIDI standard. We must ignore all this and similar unnecessary information. At the end of the program, we must get the Nth number of arrays, in each of which only one key will play at the current time (this is necessary to simplify the program in the microcontroller). In other words, we should get a list of arrays with polyphony of one note.
Determining how to implement
In a previous article, we already wrote a program that implemented similar functionality based on data already processed by another program in a specific form. The program was written in Pascal ABC, because at that time the task was reduced to processing the lines of the txt file, no more. Now we are writing a program from scratch, suggesting working with pure MIDI data. Also, in the future we plan to expand it to a full-fledged initialization data generator. So this time the program will be written in the graphical environment of Visual Studio in C #. We do not need a lot of computer resources, and beautiful syntax and the possibility of easy reading of the program, contributing to easy support, will not interfere.
MIDI Overview
Many are familiar with the MIDI format, or at least have heard about it. In this format it is convenient to store, for example, notes of musical works, with the ability to listen to them. For this purpose, most often, MIDI is used in the modern world. But once they tried to cram a lot of additional functions into it. So what does a MIDI file consist of?

As can be seen from the figure, a MIDI file consists of:
- The header of the file (it starts with the four characters that make up the word MThd).
- File blocks (starting with MTrk characters).
Headline
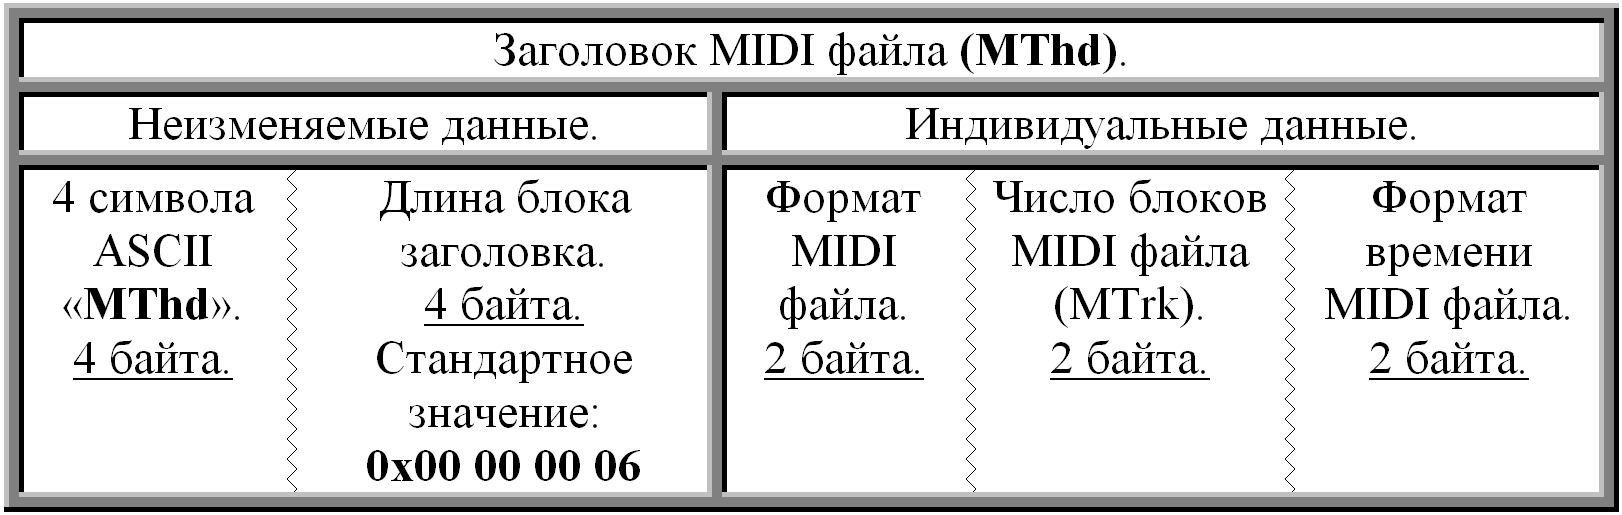 Let us analyze what the header of the MIDI file consists of.
- Standard Values. The header contains cells whose values are the same for all MIDI files.
- Caption caption "MThd". This parameter allows you to unequivocally say that we have a header block.
- The size of the individual file parameters in the header block. Since there are always 3 individual parameters in the header, each of which occupies 2 bytes - the total length of the header block (excluding the “MThd” inscription and four bytes of the size itself) is 6 bytes.
- Individual parameters.
- MIDI file format. In fact, MIDI file formats are only 2: 0 and 1 . There is also a format 2 , but for all my nine-year work with sound, in real life I never had a chance to encounter a MIDI file in this format. This parameter shows how events are packed (in our case, pressing / releasing keys). If the format is 0 , then we know for sure that all the useful information about all channels (up to 16 channels) is located in one single MTrk block. If we have format 1 , then each channel has its own MTrk block. Our program will be able to work with both formats.
- The number of MIDI file blocks (MTrk). Here we can see how many blocks are contained in our MIDI file. This parameter is relevant only for format 1 . For in the format 0 block is always 1.
- MIDI file time format. And here things are very interesting. The fact is that in the MIDI file the score goes not in seconds, but in ticks. And there is a musical way , when the value of our parameter shows how many “ticks” are in the musical quarter and absolute , showing the number of “ticks” in the SMPTE block. Yet again. Most often the first method occurs. The second, all the same, is exotic. Therefore, we will not take into account the existence of an absolute way of counting time and will operate only with music .
Now, knowing the structure of the MIDI file header, we can read it. But first you need to understand one thing. The data in the MIDI file (which is more than one byte in length) is presented in big-endian format. This means that if we have a cell consisting of two bytes, then the first byte is the high byte, and the second byte is the low byte. Unusually, but the format is not young, and you can forgive him.
So, read the title.
- To work, we need to create a Windows Forms application (WPF is unnecessary here, but if you want, nobody forbids it).
- Inside the form, we will create a button and richTextBox (for me they have the names button1 and richTextBox1, respectively), as well as a window for opening the openFileDialog file (I, again, have the name openFileDialogMIDI).
- Create an event associated with a button click, in which we will clear the richTextBox from old data. We also get the path to the MIDI file and pass it to the function that will open it. ( openMIDIFile )Event ID
private void button1_Click(object sender, EventArgs e) { richTextBox1.Clear(); if (openFileDialogMIDI.ShowDialog() == DialogResult.OK) // . { openMIDIFile(openFileDialogMIDI.FileName); // . } } - Since a MIDI file has an unusual data presentation format (big-endian), it will be easier to create a class in which we would define methods for comfortable work with a MIDI file.Code of the method for creating your own stream of work with MIDI files.
// MIDI. public class MIDIReaderFile { public BinaryReader BinaryReaderMIDIFile; // . MIDI . public MIDIReaderFile(Stream input) // . { BinaryReaderMIDIFile = new BinaryReader(input); // . } public UInt32 ReadUInt32BigEndian() // 4 " " . { UInt32 bufferData = 0; // = 0. for (int IndexByte = 3; IndexByte >= 0; IndexByte--) // . bufferData |= (UInt32)((UInt32)BinaryReaderMIDIFile.ReadByte()) << 8 * IndexByte; // . return bufferData; } public UInt16 ReadUInt16BigEndian() // 2 " " . { UInt16 bufferData = 0; // = 0. for (int IndexByte = 1; IndexByte >= 0; IndexByte--) // . bufferData |= (UInt16)((UInt16)BinaryReaderMIDIFile.ReadByte() << 8 * IndexByte); // . return bufferData; } public string ReadStringOf4byte() // 4 . { return Encoding.Default.GetString(BinaryReaderMIDIFile.ReadBytes(4)); // 4 4- . } public byte ReadByte() // 1 . { return BinaryReaderMIDIFile.ReadByte(); } public byte[] ReadBytes(int count) // count . { return BinaryReaderMIDIFile.ReadBytes(count); } } - Next, create a structure in which we store MIDI data.MThd block structure.
// : MIDI . // : MIDI . public struct MIDIheaderStruct { public string nameSection; // . "MThd". public UInt32 lengthSection; // , 4 . 0x6; public UInt16 mode; // MIDI : 0, 1 2. public UInt16 channels; // . public UInt16 settingTime; // . } - Now we will create a method that will read our structure from the stream and return it.Read the title.
// : MIDI . // : FileStream . // - MIDIheaderStruct. public MIDIheaderStruct CopyHeaderOfMIDIFile(MIDIReaderFile MIDIFile) { MIDIheaderStruct ST = new MIDIheaderStruct(); // . ST.nameSection = MIDIFile.ReadStringOf4byte(); // . ST.lengthSection = MIDIFile.ReadUInt32BigEndian(); // 4 . 0x6 ST.mode = MIDIFile.ReadUInt16BigEndian(); // 2 MIDI. 0, 1 2. ST.channels = MIDIFile.ReadUInt16BigEndian(); // 2 MIDI . ST.settingTime = MIDIFile.ReadUInt16BigEndian(); // 2 . return ST; // . } - Now let's write the function that the event of pressing the button to open the file causes. We will supplement this function. In the meantime, its main task is to open the file and, reading its values, output the individual parameters obtained.The code for the open file function.
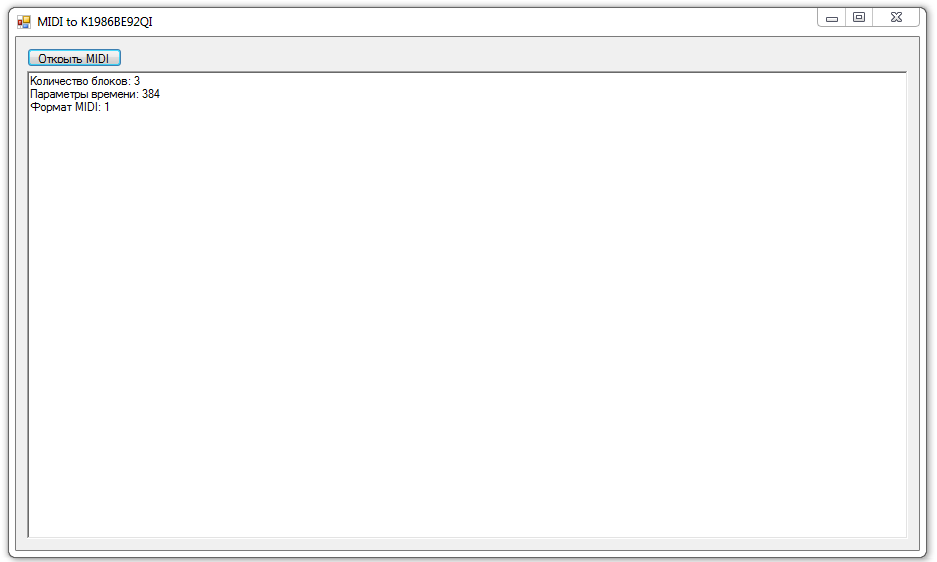
// : . // : . // : . true - , false - . public bool openMIDIFile(string pathToFile) { FileStream fileStream = new FileStream(pathToFile, FileMode.Open, FileAccess.Read); // . MIDIReaderFile MIDIFile = new MIDIReaderFile(fileStream); // MIDI . . . MIDIheaderStruct HeaderMIDIStruct = CopyHeaderOfMIDIFile(MIDIFile); // . MIDIMTrkStruct[] MTrkStruct = new MIDIMTrkStruct[HeaderMIDIStruct.channels]; // MTrkStruct. richTextBox1.Text += " : " + HeaderMIDIStruct.channels.ToString() + "\n"; // . richTextBox1.Text += " : " + HeaderMIDIStruct.settingTime.ToString() + "\n"; richTextBox1.Text += " MIDI: " + HeaderMIDIStruct.mode.ToString() + "\n"; return true; }
MIDI file block
Having considered the file header, we can proceed to the consideration of the block structure.

The block consists of:
- The four characters that make up the word MTrk. This is a pointer to what is in front of us a MIDI block.
- The length of the block, written using four bytes. The block length does not include the first 8 bytes (MTrk + 4 bytes of length).
Developments.
Here we come to the most interesting. It is in the events contains all the information we need. MIDI events are of four types.- Events of the first level.

In MIDI files, it is assumed that there are 16 channels. The location where the channel number is marked is nnnn. 0 = first channel, 1 = second, and so on. Thus, the lower 4 bits are allocated for the channel number. On each channel, the Nth number of notes can be pressed. Depending on how much you can play a device that reads a MIDI file. Channel number for us has no role, because we have in those. The task clearly states that on each channel at the current moment in time no more than one key should be included. In other words, we will carry out breaking in channels. From the first level commands we will use 0x8n (release the note), 0x9n (pick up the note), 0xBn (to refer to the second level message, which will be discussed later) and 0xA (change the power of the keystroke). - Second level events. These events are the first-level event 0xBn + event number (of which there are about a hundred) + the parameter of this event (if there is no parameter, then 0 is transmitted).

We will not use second level commands. But we now know how to ignore them. - Third level events. Third level events are 3 events of the second. The first two events we specify the number of the desired command, and in the third - its parameter.
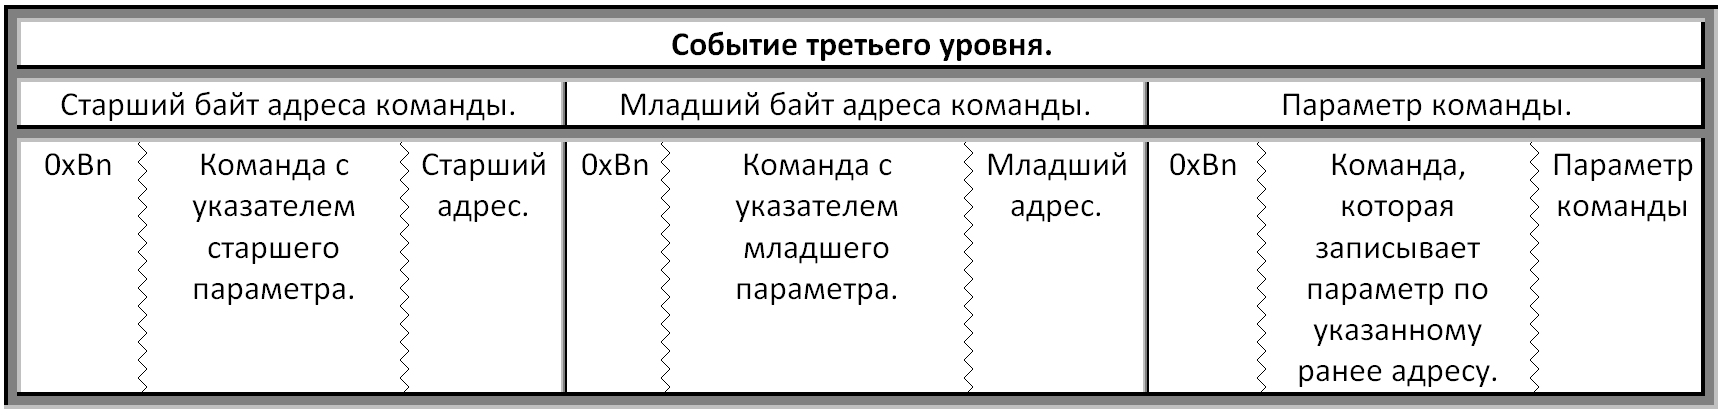
We do not use third level commands either. And the method of ignoring them coincides with the method of ignoring commands of the second level (in fact, we ignore 3 commands of the second). - SysEx events. These are exclusive messages. There are no piano works (or other classical instruments) in MIDI files of scores. When writing a program, we will assume that such messages do not exist. The message structure looks like this.

Now, knowing what events exist, we could begin to read them, but ... At what point in time do they appear? And here everything is as follows. Before each event of the first / second level (the third is not considered, since I have never come across such a MIDI file for the entire time of testing musical works) there is an n-th number of bytes describing the time elapsed since the last MIDI event. If the byte of the time data is the last, then its most significant byte is set to 0. If not, then 1. Consider an example.

The flag is set to 0 (7th bit = 0). Therefore this byte is the last and only one. Further, without paying attention to the senior category, we look at the remained number. It is 0 => event 0 occurred at zero second. Now consider event 1. Here, the most significant byte is set to 1 => not the last byte. We keep the value remaining if we cross out the most significant digit. We get 1. We look at the next byte. There, the flag = 0 and the rest = 0. Now we consider how much time has actually passed. Since each byte can carry as little as 7 bytes of information, we have (1 << 7) | (0 << 0) = 0x100 timer ticks. In the same way, we can consider the time before the event 2. There we passed 0x10 ticks.
It is worth noting that if the event 0 is, for example, a command to take a key, we ignore event 1, and event 2 is a command to release the key, then we need to take into account that the time for pressing the key = 0x100 + 0x10. For the countdown comes from the last event. Even if we ignore it.
Armed with all the information we receive, we can begin to write code.
- We will create a structure in which we will store the block header, as well as a list with read notes.Block structure
// : MIDI . // : MIDI . public struct MIDIMTrkStruct { public string nameSection; // . "MTrk". public UInt32 lengthSection; // , 4 . public ArrayList arrayNoteStruct; // . } - A structure is also required to store the read key press / release / change events.The structure of the notes.
// : / . public struct noteStruct { public byte roomNotes; // . public UInt32 noteTime; // . public byte dynamicsNote; // / . public byte channelNote; // . public bool flagNote; // (true) (false). } - Now we will write a function that reads the data, determines whether they are needed to create the array and adds the necessary ones to the array, indicating the real time from zero.Block read function.
// : MTrk ( ) MIDI . // : MIDI . // : . public MIDIMTrkStruct CopyMIDIMTrkSection(MIDIReaderFile MIDIFile) { MIDIMTrkStruct ST = new MIDIMTrkStruct(); // MIDI . ST.arrayNoteStruct = new ArrayList(); // . noteStruct bufferSTNote = new noteStruct(); // ( , arrayNoteStruct). ST.nameSection = MIDIFile.ReadStringOf4byte(); // . ST.lengthSection = MIDIFile.ReadUInt32BigEndian(); // 4 . UInt32 LoopIndex = ST.lengthSection; // . , = 0. UInt32 realTime = 0; // . while (LoopIndex != 0) // . { // . 8- ( ). byte loopount = 0; // . byte buffer; // . UInt32 bufferTime = 0; // . do { buffer = MIDIFile.ReadByte(); // . loopount++; // , . bufferTime <<= 7; // 7 (.. 1 ). bufferTime |= (byte)(buffer & (0x7F)); // . } while ((buffer & (1<<7)) != 0); // , ( = 0). realTime += bufferTime; // . buffer = MIDIFile.ReadByte(); loopount++; // -, , . // -, ... if (buffer == 0xFF) { buffer = MIDIFile.ReadByte(); // -. buffer = MIDIFile.ReadByte(); // . loopount+=2; for (int loop = 0; loop < buffer; loop++) MIDIFile.ReadByte(); LoopIndex = LoopIndex - loopount - buffer; // . } // -, , . else switch ((byte)buffer & 0xF0) // 4- . { // . case 0x80: // . bufferSTNote.channelNote = (byte)(buffer & 0x0F); // . bufferSTNote.flagNote = false; // . bufferSTNote.roomNotes = MIDIFile.ReadByte(); // . bufferSTNote.dynamicsNote = MIDIFile.ReadByte(); // . bufferSTNote.noteTime = realTime; // . ST.arrayNoteStruct.Add(bufferSTNote); // . LoopIndex = LoopIndex - loopount - 2; // . break; case 0x90: // . bufferSTNote.channelNote = (byte)(buffer & 0x0F); // . bufferSTNote.flagNote = true; // . bufferSTNote.roomNotes = MIDIFile.ReadByte(); // . bufferSTNote.dynamicsNote = MIDIFile.ReadByte(); // . bufferSTNote.noteTime = realTime; // . ST.arrayNoteStruct.Add(bufferSTNote); // . LoopIndex = LoopIndex - loopount - 2; // . break; case 0xA0: // . bufferSTNote.channelNote = (byte)(buffer & 0x0F); // . bufferSTNote.flagNote = true; // . bufferSTNote.roomNotes = MIDIFile.ReadByte(); // . bufferSTNote.dynamicsNote = MIDIFile.ReadByte(); // . bufferSTNote.noteTime = realTime; // . ST.arrayNoteStruct.Add(bufferSTNote); // . LoopIndex = LoopIndex - loopount - 2; // . break; // 2- . case 0xB0: byte buffer2level = MIDIFile.ReadByte(); // . switch (buffer2level) // . { default: // ( ). MIDIFile.ReadByte(); // - . LoopIndex = LoopIndex - loopount - 2; // . break; } break; // . case 0xC0: // . MIDIFile.ReadByte(); // . LoopIndex = LoopIndex - loopount - 1; // . break; case 0xD0: // . MIDIFile.ReadByte(); // . LoopIndex = LoopIndex - loopount - 1; // . break; case 0xE0: // . MIDIFile.ReadBytes(2); // . LoopIndex = LoopIndex - loopount - 2; // . break; } } return ST; // . } - . , , . ..
// : : /. // : , ; . public ArrayList reateNotesArray(MIDIMTrkStruct[] arrayST, int arrayCount) { ArrayList arrayChannelNote = new ArrayList(); // . for (int indexBlock = 0; indexBlock < arrayCount; indexBlock++) // MIDI. { for (int eventArray = 0; eventArray < arrayST[indexBlock].arrayNoteStruct.Count; eventArray++) // . { noteStruct bufferNoteST = (noteStruct)arrayST[indexBlock].arrayNoteStruct[eventArray]; // . if (bufferNoteST.flagNote == true) // . { byte indexChennelNoteWrite = 0; while (true) // . { if (indexChennelNoteWrite<arrayChannelNote.Count) // . { channelNote bufferChannel = (channelNote)arrayChannelNote[indexChennelNoteWrite]; // . if (bufferChannel.ToWriteaNewNote(bufferNoteST.roomNotes, bufferNoteST.noteTime) == true) break; // - . } else // - . { channelNote noteNambeChannelBuffer = new channelNote(); // . noteNambeChannelBuffer.ToWriteaNewNote(bufferNoteST.roomNotes, bufferNoteST.noteTime);// - . arrayChannelNote.Add(noteNambeChannelBuffer); // . break; // . } indexChennelNoteWrite++; // - . } } else // . { byte indexChennelNoteWrite = 0; while (true) // . { channelNote bufferChannel = (channelNote)arrayChannelNote[indexChennelNoteWrite]; // . if (bufferChannel.EntryEndNotes(bufferNoteST.roomNotes, bufferNoteST.noteTime) == true) break;// - . indexChennelNoteWrite++; // - . } } } } return arrayChannelNote; } - richTextBox..
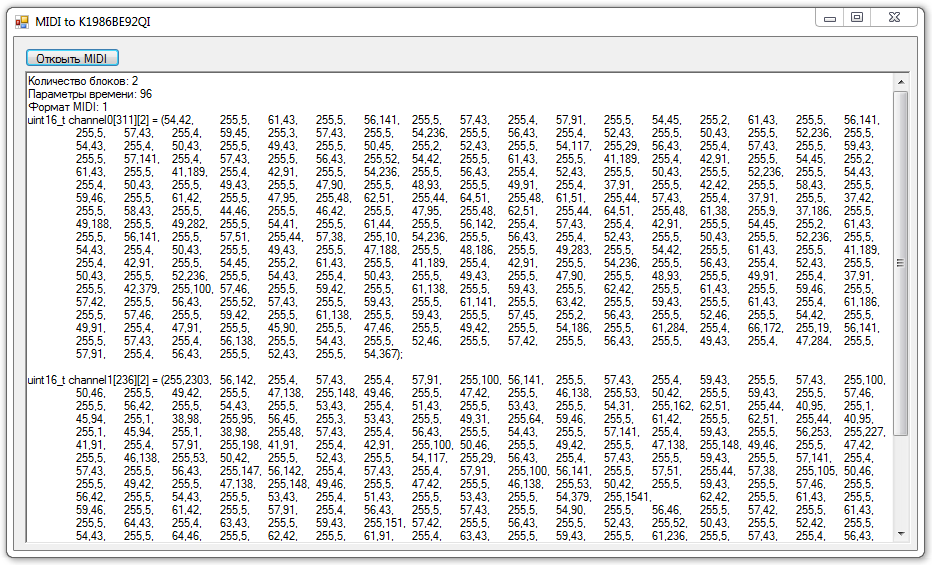
// richTextBox1. public void outData(ArrayList Data) { for (int loop = 0; loop<Data.Count; loop++) // . { channelNote buffer = (channelNote)Data[loop]; // . // . richTextBox1.Text += "uint16_t channel" + loop.ToString() + "[" + buffer.arrayNoteChannel.Count.ToString() + "][2] = {"; for (int loop1 = 0; loop1 < buffer.arrayNoteChannel.Count; loop1++) { channelNote.noteInChannelNote DataD = (channelNote.noteInChannelNote)buffer.arrayNoteChannel[loop1]; richTextBox1.Text += DataD.roomNotes.ToString() + "," + DataD.noteTime.ToString(); if (loop1 != (buffer.arrayNoteChannel.Count - 1)) richTextBox1.Text += ", \t"; } richTextBox1.Text += "};\n\n"; } } - . .MIDI .
// : . // : . // : . true - , false - . public bool openMIDIFile(string pathToFile) { FileStream fileStream = new FileStream(pathToFile, FileMode.Open, FileAccess.Read); // . MIDIReaderFile MIDIFile = new MIDIReaderFile(fileStream); // MIDI . . . MIDIheaderStruct HeaderMIDIStruct = CopyHeaderOfMIDIFile(MIDIFile); // . MIDIMTrkStruct[] MTrkStruct = new MIDIMTrkStruct[HeaderMIDIStruct.channels]; // MTrkStruct. richTextBox1.Text += " : " + HeaderMIDIStruct.channels.ToString() + "\n"; // . richTextBox1.Text += " : " + HeaderMIDIStruct.settingTime.ToString() + "\n"; richTextBox1.Text += " MIDI: " + HeaderMIDIStruct.mode.ToString() + "\n"; for (int loop = 0; loop<HeaderMIDIStruct.channels; loop++) MTrkStruct[loop] = CopyMIDIMTrkSection(MIDIFile); // MIDI . outData(reateNotesArray(MTrkStruct, HeaderMIDIStruct.channels)); // /. return true; }
Conclusion
Here we are with you and have mastered the basic information about the structure of a MIDI file, also having backed up our knowledge in practice, having obtained a working program. In the next articles, we will continue to increase its functionality and as a result we will obtain a lightweight tool for preparing data for audio playback on the microcontroller.
The project file can be downloaded from here .
Sources used
This series of articles , which has been written not one year since 2003, helped greatly in mastering MIDI .
Source: https://habr.com/ru/post/271693/
All Articles