Android Autostart application at boot: theory and practice
A simple search on stackoverflow.com shows that the subject of receiving the ACTION_BOOT_COMPLETED message remains relevant to this day. As you can see, many newbies face a problem: they do not receive the message ACTION_BOOT_COMPLETED in their applications. In this article, I will try to summarize the data from the official documentation, the experience of many developers from stackoverflow.com, as well as my experience. So, how to defeat this "cunning enemy" called "ACTION_BOOT_COMPLETED"?
Looking at examples from an official source (for example, this and this ) and studying the recommendations on stackoverflow.com, we can distinguish the following rules:
Let us analyze the mistakes that novices make when setting up the application and in the code.
In order for your application to run when loaded on all devices, the manifest should at least look like this:
The receiver code will usually be:
I hope this article will help newcomers to overcome the "cunning enemy" called "ACTION_BOOT_COMPLETED".
1. Theory
Looking at examples from an official source (for example, this and this ) and studying the recommendations on stackoverflow.com, we can distinguish the following rules:
- In the manifest in the “manifest” element specify the permission:
<uses-permission android:name="android.permission.RECEIVE_BOOT_COMPLETED" /> - In the manifest in the “application” element, register your receiver to receive the ACTION_BOOT_COMPLETED message:
')<receiver android:name="com.example.app.MyBroadcastReceiver"> <intent-filter> <action android:name="android.intent.action.BOOT_COMPLETED" /> </intent-filter> </receiver>
or<receiver android:name=".MyBroadcastReceiver"> <intent-filter> <action android:name="android.intent.action.BOOT_COMPLETED" /> </intent-filter> </receiver>
Use the correct full or relative class name of your broadcast receiver. In the description of the receiver without the need to not specify the attributes "enabled", "exported", etc. There are enough default settings and attributes. - Your broadcast receiver code:
public class BootCompletedReceiver extends BroadcastReceiver { public BootCompletedReceiver() { } public void onReceive(Context context, Intent intent) { if (intent.getAction().equals(Intent.ACTION_BOOT_COMPLETED)) { // } } }
If your receiver is used only for the ACTION_BOOT_COMPLETED message, then the “if” check is optional. However, sometimes developers use the same receiver for different messages. In this case, filter the messages by checking them inside the onReceive method. - The application must be installed on the internal memory. The Android OS is designed in such a way that the ACTION_BOOT_COMPLETED message is sent to applications before mounting external memory. Therefore, applications installed on external memory will never receive this message . To instruct the system not to install the application on external memory, in the manifest it is NOT necessary to prescribe for the attribute "@android: installLocation" the values of “auto” or “preferExternal”. By default, i.e. if this attribute is not specified, the OS will install your application only on the internal memory. However, according to official documentation, it is better to explicitly indicate the value “internalOnly” so that you and other developers will not be tempted to specify a different value in the future.
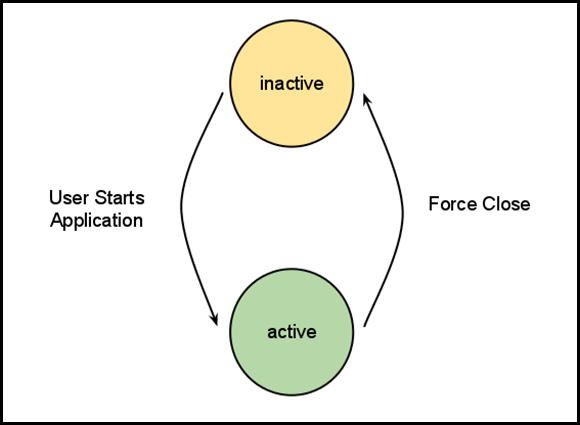
<manifest xmlns:android="http://schemas.android.com/apk/res/android" android:installLocation="internalOnly" ... > - After installation or forced stop (force stop), the application must be started at least once in order for the system to “remember” this application in order to send it the message ACTION_BOOT_COMPLETED. This behavior was implemented in the version of Android 3.1 for security purposes. What is the point? All newly installed applications are in the “stopped” state (not to be confused with activation, because the OS manages this state in applications and activates differently). The application “goes away” to the same state when the user forcibly stops the user in the phone settings. While the application is in this state, it will not be launched by the system for any reason (for example, via ACTION_BOOT_COMPLETED), excluding, of course, the launch by the user. Thanks to this innovation, a considerable part of the “viruses and Trojans” stopped working, because It is no longer possible to start automatically after installation.
The exception is system applications: see the kolipass user note . - Features of the Fast boot mode on HTC devices. It is known that HTC devices do not reboot in the classical sense, but use the so-called. Fast boot mode (this is one of the forms of hibernation), saving the state of the OS to disk. Therefore, the ACTION_BOOT_COMPLETED message is not sent by the system, since in reality, the reboot does not occur ( see here ). Instead of ACTION_BOOT_COMPLETED, the system can send the following messages:
<action android:name="android.intent.action.QUICKBOOT_POWERON" /> <action android:name="com.htc.intent.action.QUICKBOOT_POWERON" />
In your application, specify in the tag "receiver" in addition to ACTION_BOOT_COMPLETED also the above messages. In addition, you must prescribe the resolution in addition to claim 1:<uses-permission android:name="android.permission.QUICKBOOT_POWERON" />
2. Practice: errors and features of operation
Let us analyze the mistakes that novices make when setting up the application and in the code.
- After installation or force stop, the application has never started (see Section 1.5).
- The application is not installed on the internal memory, or the user manually transferred it to external memory (see § 1.4).
- For some developers, the technique started working when they indicated the relative class name of the receiver.
- Also, some developers , debugging the application, did not see their messages in the logcat from the receiver. Use Toast for debugging:
Toast toast = Toast.makeText(context.getApplicationContext(), context.getResources().getString(R.string.your_message), Toast.LENGTH_LONG); toast.show() - Typos or non-existent messages inside the receiver tag:
<action android:name="android.intent.action._BOOT_COMPLETED"/> <action android:name="android.intent.action.ACTION_BOOT_COMPLETED"/> - Incorrect position of elements in the application manifest:
- "Uses-permission" should be specified only as a direct descendant of the "manifest" element, it is not necessary to specify / duplicate it in the "receiver" tag;
- the “receiver” tag should be specified only as a direct descendant of the “application” element.
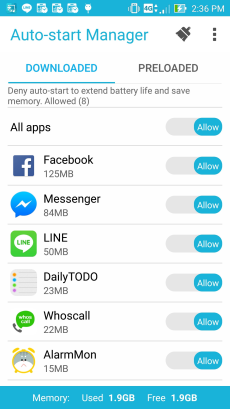
- Various task managers, optimizers, security applications, Startup managers, etc. can track the registration of the application for receiving ACTION_BOOT_COMPLETED and prohibit / allow its receipt at boot. Remove these applications or add your program to the exception in their settings.
- As mentioned above, some devices use the Fast boot mode. You can try to disable this mode in the phone settings or take into account p. 1.6.
- There are no activations in the application, so after installation the user cannot run your application at least once. Because of this, the ACTION_BOOT_COMPLETED message will not be sent to your application.
- Not errors, but nevertheless: extra, not obligatory attributes are specified in the "receiver" tag, for example ("uses-permission", "enabled", "exported"):
<receiver android:name=".BootCompletedReceiver" android:enabled="true" android:exported="true" > <uses-permission android:name="android.permission.RECEIVE_BOOT_COMPLETED" /> <intent-filter> <action android:name="android.intent.action.BOOT_COMPLETED" /> </intent-filter> </receiver>
3. Debugging the receiver in the emulator and on real devices.
- In the terminal do:
adb shell
Next, to send ACTION_BOOT_COMPLETED to all applications, type in the terminal:am broadcast -a android.intent.action.BOOT_COMPLETED
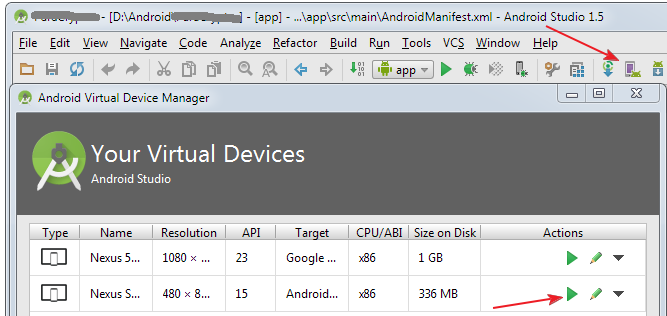
Or to send ACTION_BOOT_COMPLETED to a specific application, type in the terminal:am broadcast -a android.intent.action.BOOT_COMPLETED my.package.name - In the emulator: install your software by running it from the studio. At the same time, the studio will assemble your project, install the application and launch it. After that, close the emulator (this is similar to turning off on a real device). To get the message ACTION_BOOT_COMPLETED, run the emulator from the AVD manager, and not using the “Run app” button in the studio toolbar.Picture: how to run emulator via avd
After running the emulator, in the Android Monitor tab, specify the running emulator and your application to view the logcat logs.Picture: how to view logcat logs
Results
In order for your application to run when loaded on all devices, the manifest should at least look like this:
<?xml version="1.0" encoding="utf-8"?> <manifest xmlns:android="http://schemas.android.com/apk/res/android" android:installLocation="internalOnly" package="com.site.yourapp" > <uses-permission android:name="android.permission.RECEIVE_BOOT_COMPLETED" /> <uses-permission android:name="android.permission.QUICKBOOT_POWERON" /> <application> <activity android:name=".MainActivity" android:label="@string/app_name" > <intent-filter> <action android:name="android.intent.action.MAIN" /> <category android:name="android.intent.category.LAUNCHER" /> </intent-filter> </activity> <receiver android:name=".BootCompletedReceiver" > <intent-filter> <action android:name="android.intent.action.BOOT_COMPLETED" /> <action android:name="android.intent.action.QUICKBOOT_POWERON" /> <action android:name="com.htc.intent.action.QUICKBOOT_POWERON" /> </intent-filter> </receiver> </application> </manifest> The receiver code will usually be:
public class BootCompletedReceiver extends BroadcastReceiver { public BootCompletedReceiver() { } public void onReceive(Context context, Intent intent) { if (intent.getAction().equals(Intent.ACTION_BOOT_COMPLETED)) { Toast toast = Toast.makeText(context.getApplicationContext(), context.getResources().getString(R.string.your_message), Toast.LENGTH_LONG); toast.show(); Log.d("myapp", context.getResources().getString(R.string.your_message); // } } } I hope this article will help newcomers to overcome the "cunning enemy" called "ACTION_BOOT_COMPLETED".
Source: https://habr.com/ru/post/271663/
All Articles