Cooking ASP.NET 5: Continuous Deployment with Docker and Tutum
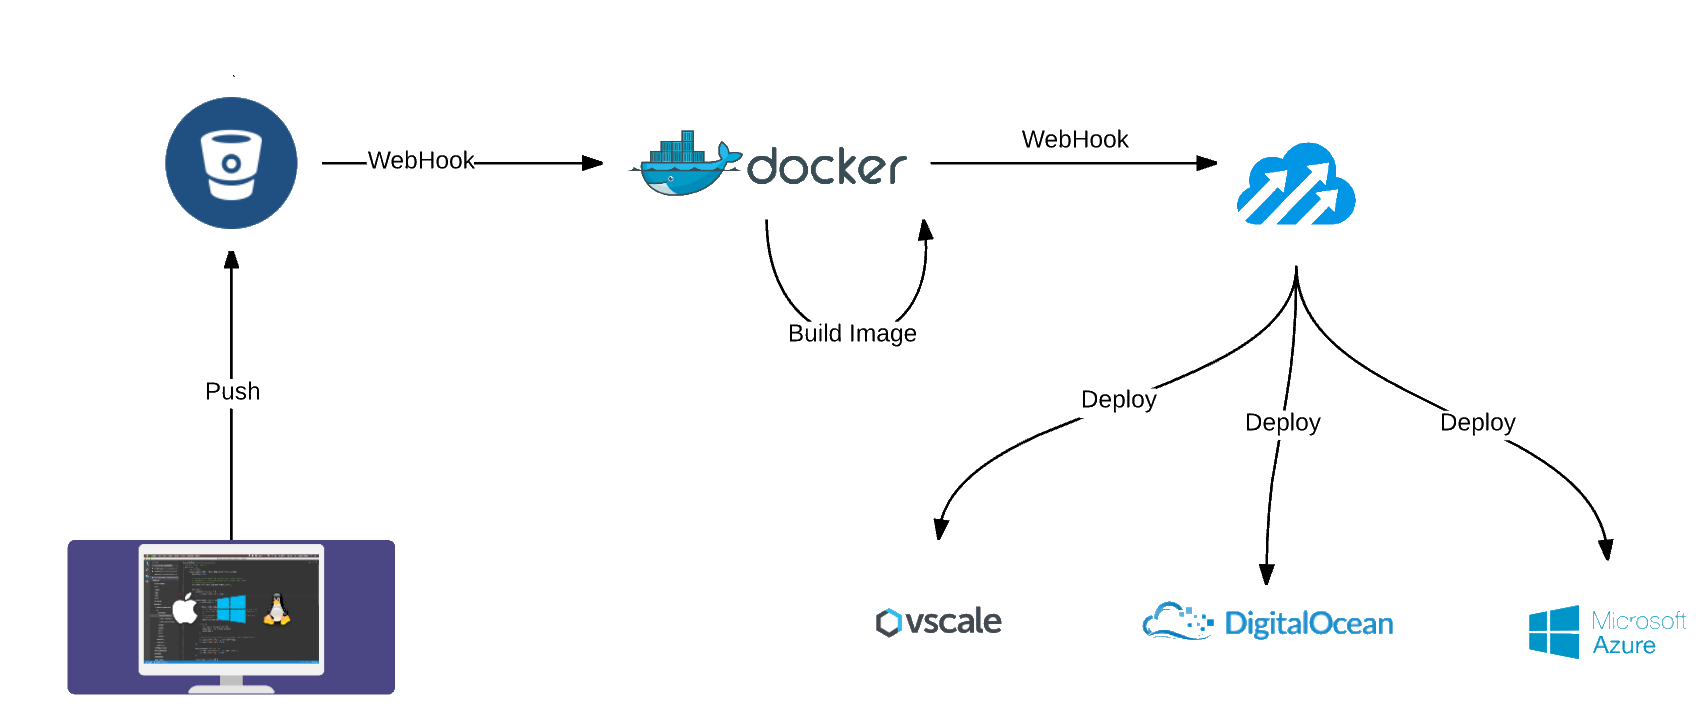
In this article, I’ll show you how to make a continuous deployment (Continuous Deployment) for an ASP.NET 5 (Vnext) application based on a Docker container, Tutum , server, or cloud.
When studying materials on Docker, the greatest number of questions was caused by the deployment of my private repository to the server and the automation of this process, and I wanted to make it not only a solution for Azure, but to have such an opportunity for Digital Ocean or Vscale .
First you need to create a private repository on Bitbucket , you can choose any type of repository, but we will use Git as the most popular in the example. You can create a private repository on both Github (paid) and GitLab (free, but not supported by https://hub.docker.com ), but historically, I mostly used bitbucket and mercurial, and now I switch to git.
To be able to download the repository via ssh from the docker container, we need to add a key to our account (manage Account-> SSH Keys-Add key).
')
Now we need to clone our repository on our machine - I do this with the help of Source Tree , add a new Vnext project there , add an ssh key and a Dockerfile.
When using Dockerfile to deploy, there are two approaches:
1) Make COPY - then the Dockerfile should be in the root of the project.
2) Make git clone - then the Dockerfile can be anywhere, ssh repository key is preferably nearby.
Make commit and push.
We have a project, there is a container, all this can be tested locally , the next task is to run all this on the server automatically.
Create an account or enter hub.docker.com . After that, you need to create a “Create Automated Build”, this can be done from the Github or Bitbucket repositories.
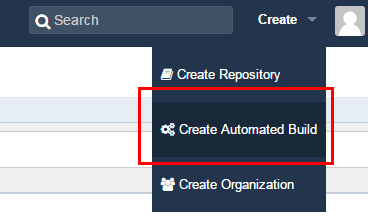
Figure 1 - Create Automated Build
Now we need to configure the assembly.
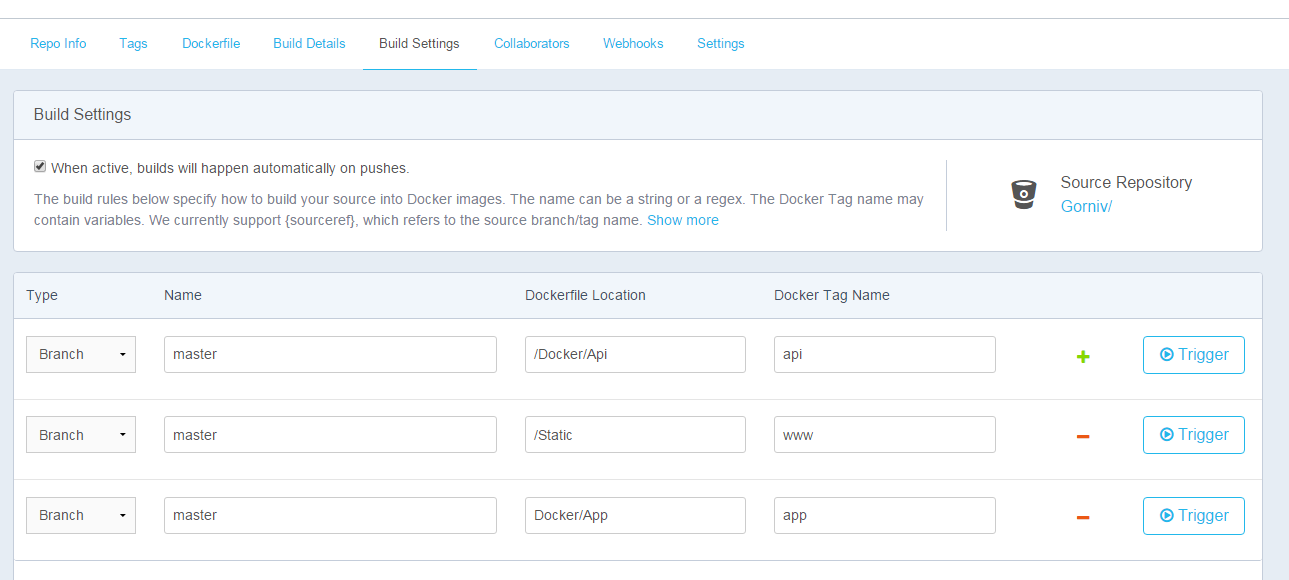
Fig.2 - Build Settings of my project
When active, builds will happen automatically on pushes. - if the property is set, then push to the repository will start the assembly of the new container in accordance with the settings.
Name - the branch from which to build the project, by default collects all the branches.
Dockerfile Location - the folder in which the Dockerfile is located, namely the folder, is not supported by the ability to specify your own Dockerfile name. It is for this reason that it is convenient to use getting code through the repository, and not through the COPY command. On one private repository, you can collect several projects with a common code base, for example, api and workers processing long operations.
Docker Tag Name - a tag that is later used to create a specific container.
If the assembly is selected for all branches, then the Trigger button is not available and we need to push to build.
We look at the Build Details statuses and the build log, if everything is ready, we can proceed to the next step.
Go through the docker hub on Tutum.
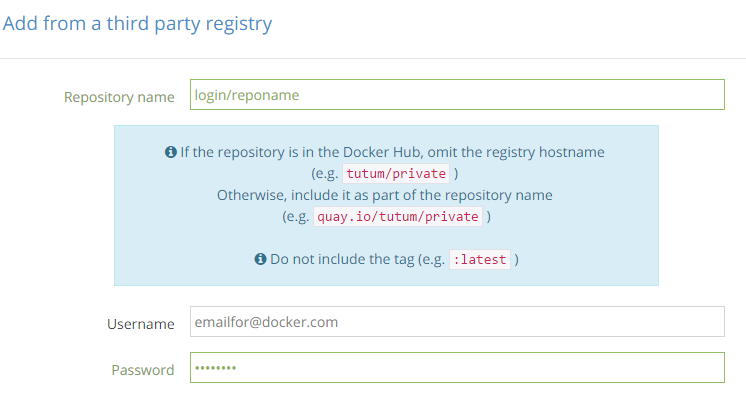
Fig.3 - Add a repository on Tutum to create services
Repository name - login / repository on hub.docker.com
Username and Password from hub.docker.com
Now configure Cloud Providers to be able to create servers from the Tutum panel.
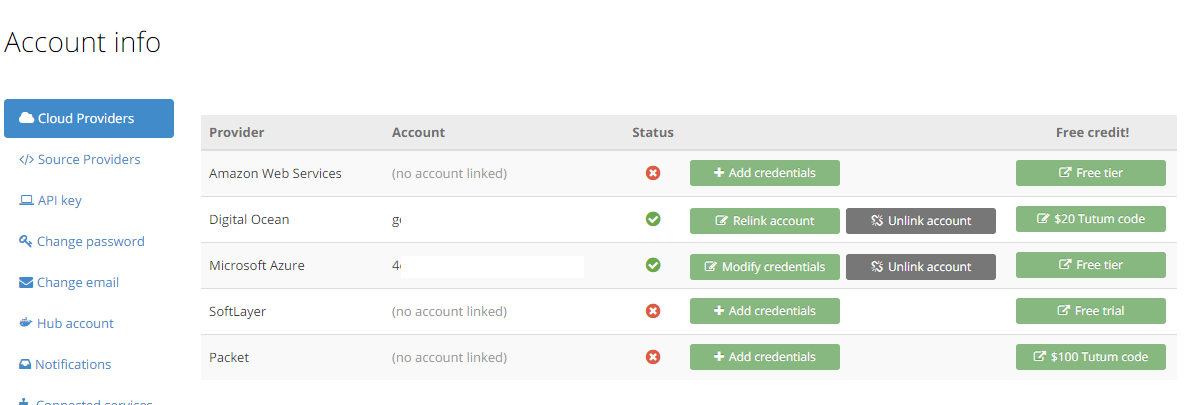
Fig.4 - Add links to the desired cloud services
Let's create a server (node) for publishing our services.
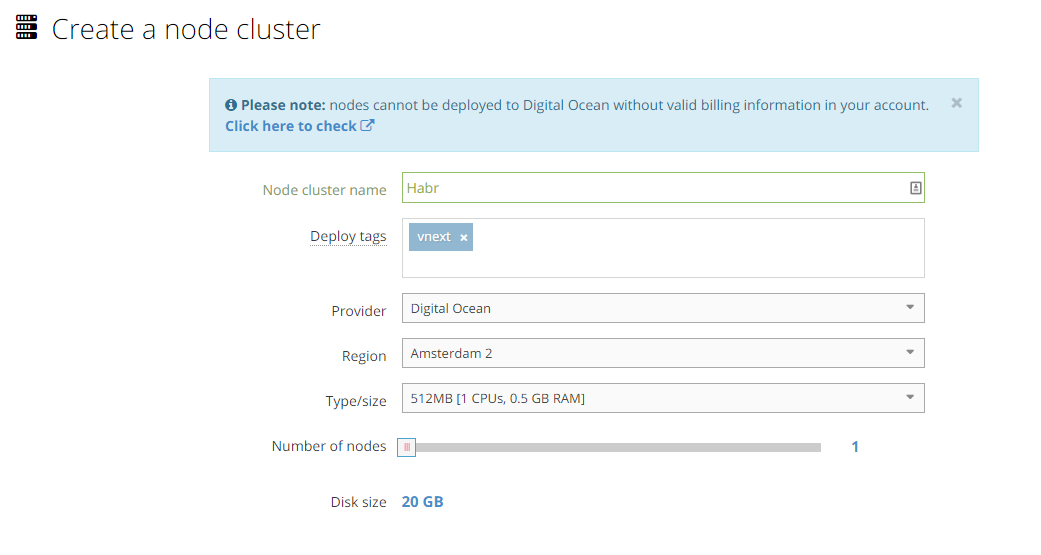
Fig.5 - Adding the server and its parameters, in this case it is DO
Deploy tags - tag that you write to the server description to relate the services and machines on which they are deployed.
Create a new service
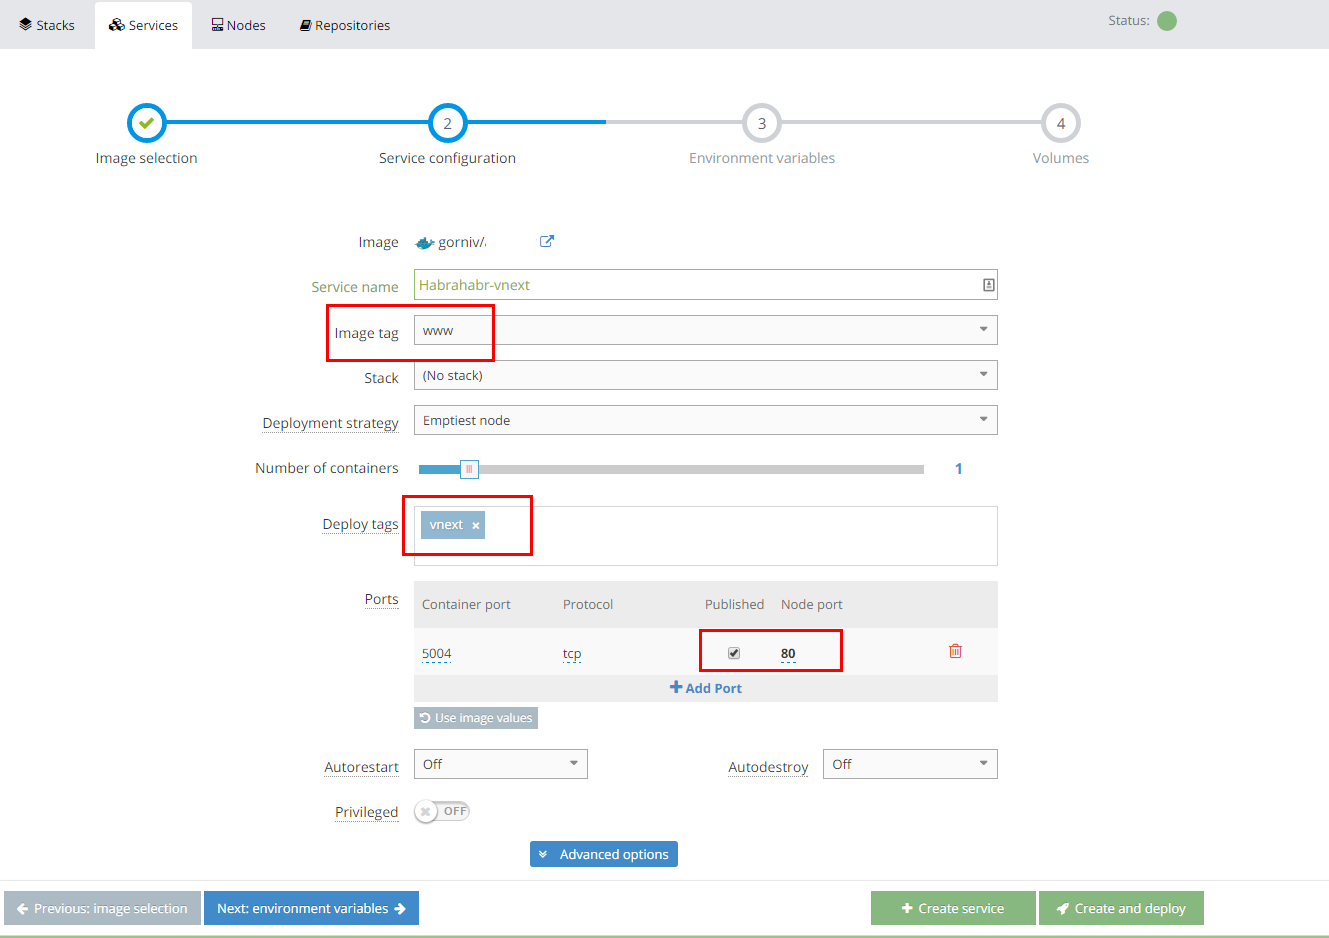
Fig.6 - Create Service on Tutum
Image tag - tag that you assigned to hub.docker.com, if there are no tags, then you’ve probably incorrectly entered login \ password when adding a repository.
Deploy tags - tag that you write to the server description to relate the services and machines on which they are deployed.
Ports - you need to make Published our port 5004 and assign it the 80th port.
Click create and deploy
Services can be created through the Stack file - a very convenient thing, it allows you to cover several services at once and quickly edit their parameters, I have 10 services now and this is just the beginning, at least I will add 3 more services ...
Now we have created and deployed the service on our server, at the address specified in Endpoints, you can see our website.
It remains to do a little magic - so that after assembling the new container, we will have its automatic redeploy .
Go to our service and select the Triggers tab.
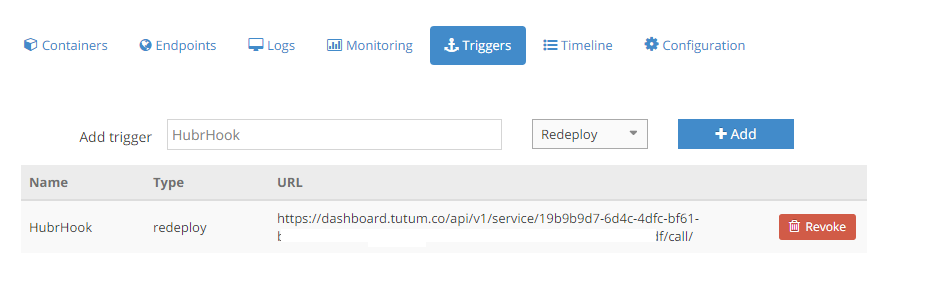
Pic.7 - Webhook for redeploy on Tutum
We need to add the resulting url to the docker hub for our repository.
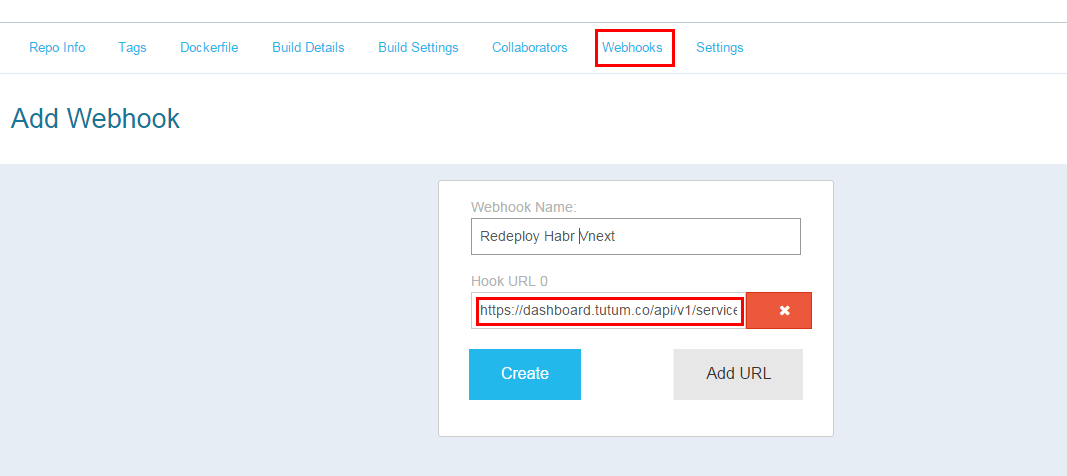
Pic.8 - Add Webhook from Tutum
Congratulations - everything works and will automatically turn around.
PS www.tutum.co is minimized, now it will be cloud.docker.com
Prices are pretty sad: $ 0.02 Node / hour
When studying materials on Docker, the greatest number of questions was caused by the deployment of my private repository to the server and the automation of this process, and I wanted to make it not only a solution for Azure, but to have such an opportunity for Digital Ocean or Vscale .
Repository
First you need to create a private repository on Bitbucket , you can choose any type of repository, but we will use Git as the most popular in the example. You can create a private repository on both Github (paid) and GitLab (free, but not supported by https://hub.docker.com ), but historically, I mostly used bitbucket and mercurial, and now I switch to git.
To be able to download the repository via ssh from the docker container, we need to add a key to our account (manage Account-> SSH Keys-Add key).
')
Now we need to clone our repository on our machine - I do this with the help of Source Tree , add a new Vnext project there , add an ssh key and a Dockerfile.
about beta-8, iis and vs
When using Dockerfile to deploy, there are two approaches:
1) Make COPY - then the Dockerfile should be in the root of the project.
2) Make git clone - then the Dockerfile can be anywhere, ssh repository key is preferably nearby.
Dockerfile
FROM microsoft/aspnet:1.0.0-beta8 # WORKDIR /app # git RUN apt-get update && apt-get install -y git # RUN mkdir -p /root/.ssh ADD yourkey /root/.ssh/id_rsa RUN chmod 700 /root/.ssh/id_rsa RUN echo "Host yourkey "$'\n'"HostName bitbucket.org"$'\n'"IdentityFile /root/.ssh/id_rsa" >> /root/.ssh/config # known_hosts RUN touch /root/.ssh/known_hosts # bitbuckets key RUN ssh-keyscan bitbucket.org >> /root/.ssh/known_hosts # RUN git clone git@bitbucket.org:login/repositoryName.git # NuGet - RUN mkdir -p ~/.config/NuGet RUN cd repositoryName RUN cp /app/repositoryName/NuGet.config ~/.config/NuGet/ # RUN dnu restore EXPOSE 5004 # ENTRYPOINT ["sh", "/app/repositoryName/init.sh"] init.sh
cd /app/repositoryName/ dnx -p project.json kestrel Make commit and push.
Hub.docker.com
We have a project, there is a container, all this can be tested locally , the next task is to run all this on the server automatically.
Create an account or enter hub.docker.com . After that, you need to create a “Create Automated Build”, this can be done from the Github or Bitbucket repositories.
Figure 1 - Create Automated Build
Now we need to configure the assembly.
Fig.2 - Build Settings of my project
When active, builds will happen automatically on pushes. - if the property is set, then push to the repository will start the assembly of the new container in accordance with the settings.
Name - the branch from which to build the project, by default collects all the branches.
Dockerfile Location - the folder in which the Dockerfile is located, namely the folder, is not supported by the ability to specify your own Dockerfile name. It is for this reason that it is convenient to use getting code through the repository, and not through the COPY command. On one private repository, you can collect several projects with a common code base, for example, api and workers processing long operations.
Docker Tag Name - a tag that is later used to create a specific container.
If the assembly is selected for all branches, then the Trigger button is not available and we need to push to build.
We look at the Build Details statuses and the build log, if everything is ready, we can proceed to the next step.
Tutum
Go through the docker hub on Tutum.
Fig.3 - Add a repository on Tutum to create services
Repository name - login / repository on hub.docker.com
Username and Password from hub.docker.com
Now configure Cloud Providers to be able to create servers from the Tutum panel.
Fig.4 - Add links to the desired cloud services
Let's create a server (node) for publishing our services.
Fig.5 - Adding the server and its parameters, in this case it is DO
Deploy tags - tag that you write to the server description to relate the services and machines on which they are deployed.
Vscale.io
How to add a Vscale.io car:
Click on Bring your own node - we are given a command of the form:
curl -ls get.tutum.co | sudo -H sh -s b5730f134e5f4674575c45a65a0ddd84
It must be done by connecting to our vscale.io server via ssh.
Click on Bring your own node - we are given a command of the form:
curl -ls get.tutum.co | sudo -H sh -s b5730f134e5f4674575c45a65a0ddd84
It must be done by connecting to our vscale.io server via ssh.
Create a new service
Fig.6 - Create Service on Tutum
Image tag - tag that you assigned to hub.docker.com, if there are no tags, then you’ve probably incorrectly entered login \ password when adding a repository.
Deploy tags - tag that you write to the server description to relate the services and machines on which they are deployed.
Ports - you need to make Published our port 5004 and assign it the 80th port.
Click create and deploy
Services can be created through the Stack file - a very convenient thing, it allows you to cover several services at once and quickly edit their parameters, I have 10 services now and this is just the beginning, at least I will add 3 more services ...
Stack file
asp: image: 'login/reponame:tag' ports: - '80:5004' restart: always tags: - tagdeploy Now we have created and deployed the service on our server, at the address specified in Endpoints, you can see our website.
It remains to do a little magic - so that after assembling the new container, we will have its automatic redeploy .
Go to our service and select the Triggers tab.
Pic.7 - Webhook for redeploy on Tutum
We need to add the resulting url to the docker hub for our repository.
Pic.8 - Add Webhook from Tutum
Congratulations - everything works and will automatically turn around.
PS www.tutum.co is minimized, now it will be cloud.docker.com
Prices are pretty sad: $ 0.02 Node / hour
Source: https://habr.com/ru/post/271477/
All Articles