Work with HealthKit. Part 1
In a series of articles, our colleagues from Techmas will share their experience with HealthKit and creating fitness apps. The first article is an introduction to technology and examines an application that selects personal data from Health.
The HealthKit platform was published by Apple in iOS 8. It is an API for third-party applications that allows you to use to collect information about the user's health status. HealthKit includes the Health app pre-installed on iOS8 and iOS9, which displays all the available data: physical activity, nutrition, pressure, calories, sleep time, and other personal characteristics.
Immediately after launching the platform, developers faced a number of problems that led to a temporary ban on its integration. Now everything is fixed and debugged, and applications in the AppStore using HealthKit are becoming more and more.
')

So, HealthKit is an aggregate with an interface to access all the information:
 The benefits of using it for application developers:
Note that HealthKit and the Health app are not yet available for the iPad.
HealthKit itself is a hierarchy of immutable classes inherited from the abstract class HKObject.
Each object has properties:
Objects in HealthKit can be of two types: characteristics (characteristics) and selections (samples). Characteristics are data that does not change with time: gender, date of birth, blood type. Third-party applications cannot change this data. Samples are available for adding new data. These are objects of classes inherited from HKSample. They have the following properties:
Below we look at creating an application that requests the use of HealthKit and displays data on user characteristics.
Only those applications for which the use of HealthKit APIs is the main functionality can use HealthKit. For example, an application for organizer and record keeping will not display health data. In addition, there are a number of other restrictions:
The entire list of restrictions is available on the Apple website.
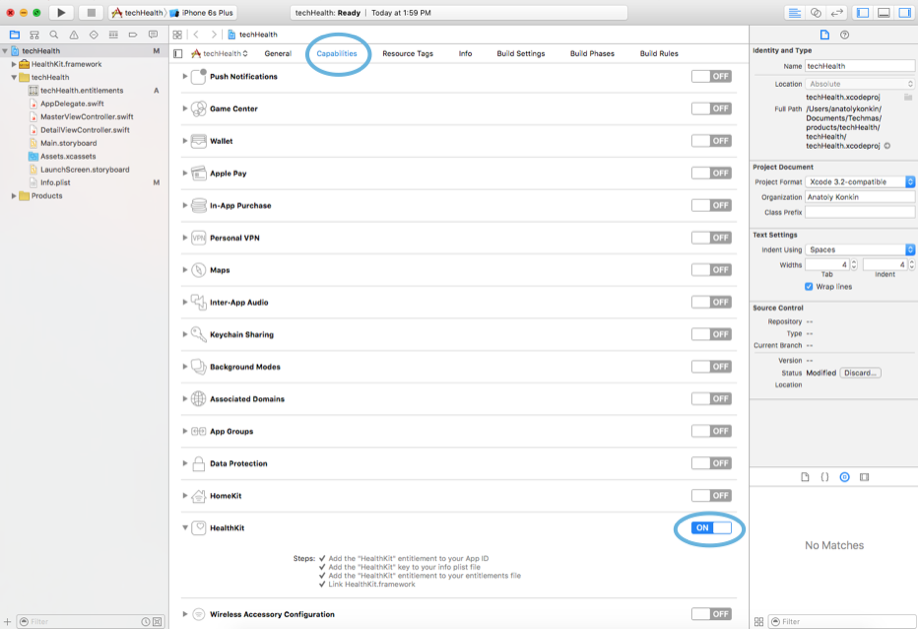
Now add the HealthKit to the test application. To do this, first, install the extension for HealthKit in the project settings.
It is important that the App ID must keep the HealthKit line, otherwise the option will not be available.
Next, add the user's permission to use health data.
Importing an extension to use HealthKit:
Now you need to define an object of the HKHealthStore class, which is one of the core objects in HealthKit. HealthKitStore allows you to obtain rights to access HealthKit data, the ability to read characteristics and write new samples:
As we noted earlier, the user selects only individual characteristics to which the application has access. All types are descendants of HKObjectType.
Create a function
In it we define data for reading and writing.
Data to read (characteristics):
Data to read and write (sample):
In addition, we will add a check for using the HKHealthStore on the device (HealthKit is currently not available on the iPad):
Finally, we will request authorization by passing in the parameters two sets with the types Set <HKSampleType> and Set <HKObjectType> for reading and writing, respectively:
Add a function call to viewDidLoad () :
When you start the application, the following window will be available:

The next step is to get the characteristics. Add gender and age to the Health app:

Let's create the readProfile () function. Its code is shown below:
To access the features, we used the created healthKitStore object.
Possible identifiers and their types for characterization are available in the documentation by reference .
Now using the following call we get a set of user characteristics:
The sample code is available in git .
In the following articles, we will separately describe methods for obtaining samples and adding training data.
The HealthKit platform was published by Apple in iOS 8. It is an API for third-party applications that allows you to use to collect information about the user's health status. HealthKit includes the Health app pre-installed on iOS8 and iOS9, which displays all the available data: physical activity, nutrition, pressure, calories, sleep time, and other personal characteristics.
Immediately after launching the platform, developers faced a number of problems that led to a temporary ban on its integration. Now everything is fixed and debugged, and applications in the AppStore using HealthKit are becoming more and more.
')
General information
So, HealthKit is an aggregate with an interface to access all the information:
- HealthKit serves as a general data repository for a set of applications. For example, to count the number of steps, users can use both different applications and different devices. When you install each new application history will be saved.
- Different applications can communicate with each other without the use of additional integration solutions. All information is available in the Health app.
- HealthKit allows you to configure individual rights for each application for certain indicators.
- Extend application functionality by using additional health data from third-party applications.
Note that HealthKit and the Health app are not yet available for the iPad.
Some theory
HealthKit itself is a hierarchy of immutable classes inherited from the abstract class HKObject.
Each object has properties:
- UUID. The unique identifier for the entry.
- Source. Data source (can be both a device and an application).
- Metadata. Additional data about the record. Provides a dictionary containing both predefined and user keys.
Objects in HealthKit can be of two types: characteristics (characteristics) and selections (samples). Characteristics are data that does not change with time: gender, date of birth, blood type. Third-party applications cannot change this data. Samples are available for adding new data. These are objects of classes inherited from HKSample. They have the following properties:
- Type. Sample type: number of steps, sleep time, etc.
- Start time. Start sampling time.
- End time. The end of the sample calculation time. If the sample is in the moment, then the value coincides with the beginning of time.
Sample application
Below we look at creating an application that requests the use of HealthKit and displays data on user characteristics.
HealthKit Use Rights
Only those applications for which the use of HealthKit APIs is the main functionality can use HealthKit. For example, an application for organizer and record keeping will not display health data. In addition, there are a number of other restrictions:
- Health data cannot be used for promotional purposes. At the same time, applications with HealthKit themselves can use ad units and make money from ads.
- An application can share information from HealthKit only with the user's permission and only with the application that is also authorized and using HealthKit.
The entire list of restrictions is available on the Apple website.
Now add the HealthKit to the test application. To do this, first, install the extension for HealthKit in the project settings.
It is important that the App ID must keep the HealthKit line, otherwise the option will not be available.
Next, add the user's permission to use health data.
Importing an extension to use HealthKit:
import HealthKit Now you need to define an object of the HKHealthStore class, which is one of the core objects in HealthKit. HealthKitStore allows you to obtain rights to access HealthKit data, the ability to read characteristics and write new samples:
let healthKitStore: HKHealthStore = HKHealthStore() As we noted earlier, the user selects only individual characteristics to which the application has access. All types are descendants of HKObjectType.
Create a function
authorizeHealthKit(completion: ((success:Bool, error:NSError!) -> Void)!) In it we define data for reading and writing.
Data to read (characteristics):
let healthKitTypesToRead = Set(arrayLiteral: HKObjectType.characteristicTypeForIdentifier(HKCharacteristicTypeIdentifierDateOfBirth)!, HKObjectType.characteristicTypeForIdentifier(HKCharacteristicTypeIdentifierBiologicalSex)! ) Data to read and write (sample):
let healthKitTypesToWrite = Set(arrayLiteral: HKObjectType.quantityTypeForIdentifier(HKQuantityTypeIdentifierActiveEnergyBurned)!, HKObjectType.quantityTypeForIdentifier(HKQuantityTypeIdentifierDistanceWalkingRunning)! ) In addition, we will add a check for using the HKHealthStore on the device (HealthKit is currently not available on the iPad):
if !HKHealthStore.isHealthDataAvailable() { let error = NSError(domain: "ru.techmas.techmasHealthKit", code: 2, userInfo: [NSLocalizedDescriptionKey:"HealthKit is not available in this Device"]) if( completion != nil ) { completion(success:false, error:error) } return; } Finally, we will request authorization by passing in the parameters two sets with the types Set <HKSampleType> and Set <HKObjectType> for reading and writing, respectively:
healthKitStore.requestAuthorizationToShareTypes(healthKitTypesToWrite, readTypes: healthKitTypesToRead) { (success, error) -> Void in if( completion != nil ) { completion(success:success,error:error) } } Add a function call to viewDidLoad () :
authorizeHealthKit { (authorized, error) -> Void in if authorized { print("HealthKit authorization received.") } else { print("HealthKit authorization denied!") if error != nil { print("\(error)") } } When you start the application, the following window will be available:
Reading characteristics
The next step is to get the characteristics. Add gender and age to the Health app:
Let's create the readProfile () function. Its code is shown below:
func readProfile() -> (age:NSDate?, bioSex:HKBiologicalSexObject?) { // Reading Characteristics var bioSex : HKBiologicalSexObject? var dateOfBirth : NSDate? do { dateOfBirth = try healthKitStore.dateOfBirth() bioSex = try healthKitStore.biologicalSex() } catch { print(error) } return (dateOfBirth, bioSex) } To access the features, we used the created healthKitStore object.
Possible identifiers and their types for characterization are available in the documentation by reference .
Now using the following call we get a set of user characteristics:
let profile = readProfile() The sample code is available in git .
In the following articles, we will separately describe methods for obtaining samples and adding training data.
Source: https://habr.com/ru/post/271133/
All Articles