How to implement a SOAP service for working with Google tables through SQL
There was a task - during the preparation of a demo of one of the solutions, it was necessary to show that customer information can be saved anywhere - in a simple case, for example, in Google tables, in a more complex ( after a six-month “implementation” and multi-million dollar budget ) in a CRM client. In the WSO2 ESB used by us there is a connector to Google tables - but it turned out to be not a very simple task to implement the required functionality on it - and then I scored it.
But recently, figuring out the new features of the WSO2 Data Services Server found that it can easily implement a SOAP-service for working with Google tables (which you can then pick up anywhere). And work with data in the table is carried out through familiar to all SQL.
How to make it, and I want to tell under a cat.
(If you suddenly think that you have already seen this post somewhere - do not be surprised - the last post was banned - got too carried away with links - here I tried to correct it).
But first, a small educational program. What is WSO2 ? If simple, this is a set of Open-Source projects (mainly from the Apache stack) delivered to the single OSGI-based Carbon platform. As a result - from the projects we get products - with a single admin, support and other things. WSO2 covers a wide range of integration tasks.
')
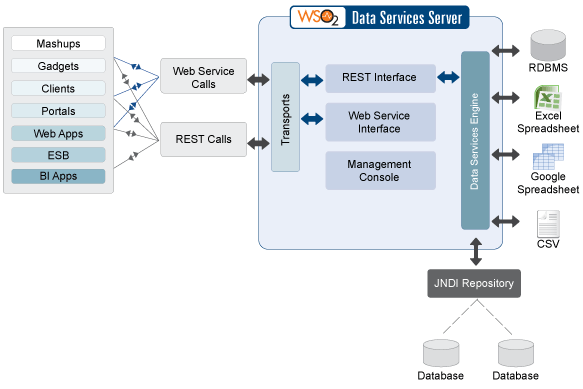
In our case - WSO2 Data Services Server is used to organize access to data, and data sources can be very different - and the usual databases (from MySQL to DB2 - roughly speaking, for which there is a JDBC driver), and NoSQL databases, and (CSV, Excel) and external services (as in our case - Google Spreadsheet). All this can be wrapped either by SOAP or by a REST service.
What is convenient when working with WSO2 products is that in terms of installation, configuration and support they are all guided by the same principles. Installing WSO2 DSS is no different from installing WSO2 ESB, an example of which can be seen, for example, here . Roughly speaking - downloaded, unpacked, launched - and voila - in a few seconds we can enter the admin area at (by default) https: // localhost: 9443 / carbon (the login password is admin / admin)

What is Google Spreadsheets will not tell - I think everyone knows. Let's create a test table with which we will work - for example with three columns - ID, FirstName, LastName

The table is opened by a link like docs.google.com/spreadsheets/d/1k4jebSdGJ39nyDnIc505PI0H2XKk8Q8ewxSpe71/edit#gid=0 , the part of the link before "/ edit" is the URL of the table, which will then need to be used for access, in our case it is
docs.google.com/spreadsheets/d/1k4jebSdGJ39nyDnIc505PI0H2XKk8Q8ewxSpe71
In order to create a service in the menu on the left, select Services -> Add -> Create. On the first screen, enter the basic data - the name of the service (in my case, GoogleClients, and Namespace (in my case, ws.wso2.org/dataservices/google_client ). You can use any other. We leave the rest of the default settings.

The next step is to set up data sources (Data Source). One service can work with several sources at once - we have to add our Google table as a source.
At the next step, we say “Add DataSource”, enter the name in the form that opens (for example, googleTable), select the type (Google Spreadsheet) and tick the “Use Query Mode” box (this will allow us to communicate with the table in SQL).
Further more interesting - you need to set the connection to the table. As the Google Spreadsheet URL we use the URL of the table, as I showed above.
But over the following fields will need to work.
The following fields are Client ID and Client Secret - the identification of your application (in this case, the service) with which it will knock on Google Spreadsheets. To get this data, go to the Google Developers Console: console.cloud.google.com , register a new application there and add OAuth2 authorization (API & Auth -> Credentials -> Add Credentials -> OAuth 2.0 client ID). When creating a key, it will be necessary to specify the same “Authorized redirect URIs” that is used when registering a Datasource (in the simplest case, it will be localhost : 9443 / authCodeReceiver.

After creation, we will get the required Client ID and Client Secret which we need to indicate on the DataSource registration form. The last thing you need to get is “Refresh Token” - the token in which information about a particular user will be “sewn up” on behalf of whom we work - to do this, click the “Generate Tokens” button - you will be asked to log in to Google (log in by the user who has there is access to the source table) and access permissions. As a result, the field will be inserted (automatically) received Refresh Token. Then click "Test Connection" - if everything went well - you will get a positive result - you can move on.

Everything, the step of magic passed - further everything is simpler. The next step is to create queries. Let's start with a request to get all the records. In the next “Queries” step, click “Add New Query” and start creating our query:
Yes Yes Yes! That's the point - we’ll work with our Google table through the familiar and beloved SQL!
Then click "Generate Response" - the output fields will be generated by the column names, it is recommended to change the "Group By Element" - For example, "Clients" and "Row name" to "Client" - these names will be used in the response tags. If you wish, you can edit the generated “Output Mapping”.

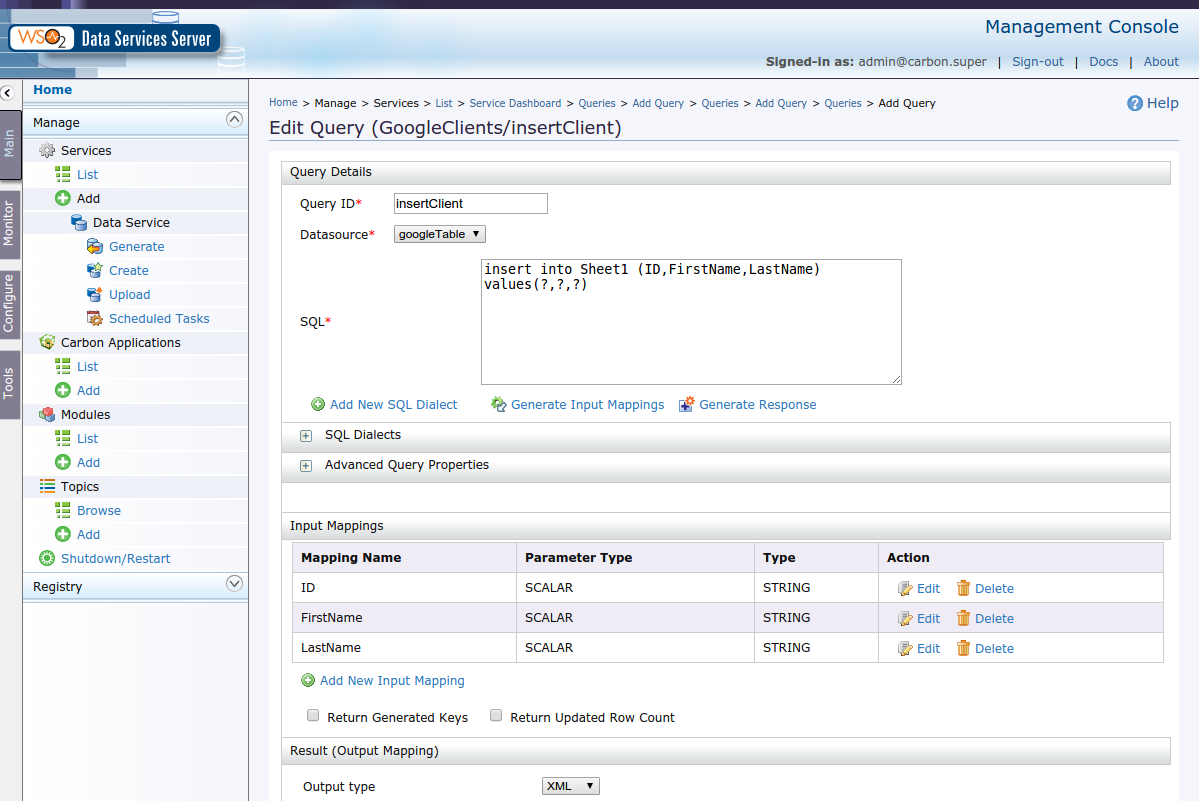
Similarly, we create insertQuery as insert into Sheet1 (ID, FirstName, LastName) values (?,?,?) - only now we will need to click "Generate Input Mappings" - to generate input parameters (by the number of questions in the query). They are best edited for names and types.
Similarly, you can generate any other queries — both selects with parameters, and updates and delete-s — it’s important that we can work with the Google table as with a normal SQL table. I did not investigate how complex queries are supported - but in my case I had fairly simple, basic queries.
The next step is simple - for each request we generate an operation (service method). Everything is simple here - we create an operation and specify for which request it is.

Click “Finish” - everything - SOAP service for working with our Google table is ready! You can test it - in the list of services we click on our “Try this service” - and in the window that opens, select the operation, drive in if necessary parameters - and go ahead.

Everything! Service is ready - now we can work with our table from the bus or any other application (by WSDL we can easily generate client code to call this service). If you do not hesitate to "magic" with ClientID, Secret Key and the receipt of Refresh Token - then everything gets no more than everything.
At the same time, we did not write a single line of code - well, except for simple SQL queries.
But recently, figuring out the new features of the WSO2 Data Services Server found that it can easily implement a SOAP-service for working with Google tables (which you can then pick up anywhere). And work with data in the table is carried out through familiar to all SQL.
How to make it, and I want to tell under a cat.
(If you suddenly think that you have already seen this post somewhere - do not be surprised - the last post was banned - got too carried away with links - here I tried to correct it).
What is WSO2 Data Services Server
But first, a small educational program. What is WSO2 ? If simple, this is a set of Open-Source projects (mainly from the Apache stack) delivered to the single OSGI-based Carbon platform. As a result - from the projects we get products - with a single admin, support and other things. WSO2 covers a wide range of integration tasks.
')
In our case - WSO2 Data Services Server is used to organize access to data, and data sources can be very different - and the usual databases (from MySQL to DB2 - roughly speaking, for which there is a JDBC driver), and NoSQL databases, and (CSV, Excel) and external services (as in our case - Google Spreadsheet). All this can be wrapped either by SOAP or by a REST service.
Installing WSO2 Data Services Server
What is convenient when working with WSO2 products is that in terms of installation, configuration and support they are all guided by the same principles. Installing WSO2 DSS is no different from installing WSO2 ESB, an example of which can be seen, for example, here . Roughly speaking - downloaded, unpacked, launched - and voila - in a few seconds we can enter the admin area at (by default) https: // localhost: 9443 / carbon (the login password is admin / admin)
Google spreadsheet
What is Google Spreadsheets will not tell - I think everyone knows. Let's create a test table with which we will work - for example with three columns - ID, FirstName, LastName
The table is opened by a link like docs.google.com/spreadsheets/d/1k4jebSdGJ39nyDnIc505PI0H2XKk8Q8ewxSpe71/edit#gid=0 , the part of the link before "/ edit" is the URL of the table, which will then need to be used for access, in our case it is
docs.google.com/spreadsheets/d/1k4jebSdGJ39nyDnIc505PI0H2XKk8Q8ewxSpe71
Creating a service
In order to create a service in the menu on the left, select Services -> Add -> Create. On the first screen, enter the basic data - the name of the service (in my case, GoogleClients, and Namespace (in my case, ws.wso2.org/dataservices/google_client ). You can use any other. We leave the rest of the default settings.
Creating a data source
The next step is to set up data sources (Data Source). One service can work with several sources at once - we have to add our Google table as a source.
At the next step, we say “Add DataSource”, enter the name in the form that opens (for example, googleTable), select the type (Google Spreadsheet) and tick the “Use Query Mode” box (this will allow us to communicate with the table in SQL).
Further more interesting - you need to set the connection to the table. As the Google Spreadsheet URL we use the URL of the table, as I showed above.
But over the following fields will need to work.
App registration in the Google Developers Console
The following fields are Client ID and Client Secret - the identification of your application (in this case, the service) with which it will knock on Google Spreadsheets. To get this data, go to the Google Developers Console: console.cloud.google.com , register a new application there and add OAuth2 authorization (API & Auth -> Credentials -> Add Credentials -> OAuth 2.0 client ID). When creating a key, it will be necessary to specify the same “Authorized redirect URIs” that is used when registering a Datasource (in the simplest case, it will be localhost : 9443 / authCodeReceiver.
After creation, we will get the required Client ID and Client Secret which we need to indicate on the DataSource registration form. The last thing you need to get is “Refresh Token” - the token in which information about a particular user will be “sewn up” on behalf of whom we work - to do this, click the “Generate Tokens” button - you will be asked to log in to Google (log in by the user who has there is access to the source table) and access permissions. As a result, the field will be inserted (automatically) received Refresh Token. Then click "Test Connection" - if everything went well - you will get a positive result - you can move on.
Making requests
Everything, the step of magic passed - further everything is simpler. The next step is to create queries. Let's start with a request to get all the records. In the next “Queries” step, click “Add New Query” and start creating our query:
- Query name : for example selectClients
- Datasource : select the googleTable created at the last step
- Query : select ID, FirstName, LastName from Sheet1 - where ID, FirstName and LastName are the names of the columns in the table, and Sheet1 is the name of the tab
Yes Yes Yes! That's the point - we’ll work with our Google table through the familiar and beloved SQL!
Then click "Generate Response" - the output fields will be generated by the column names, it is recommended to change the "Group By Element" - For example, "Clients" and "Row name" to "Client" - these names will be used in the response tags. If you wish, you can edit the generated “Output Mapping”.
Similarly, we create insertQuery as insert into Sheet1 (ID, FirstName, LastName) values (?,?,?) - only now we will need to click "Generate Input Mappings" - to generate input parameters (by the number of questions in the query). They are best edited for names and types.
Similarly, you can generate any other queries — both selects with parameters, and updates and delete-s — it’s important that we can work with the Google table as with a normal SQL table. I did not investigate how complex queries are supported - but in my case I had fairly simple, basic queries.
Creating operations
The next step is simple - for each request we generate an operation (service method). Everything is simple here - we create an operation and specify for which request it is.
Service testing
Click “Finish” - everything - SOAP service for working with our Google table is ready! You can test it - in the list of services we click on our “Try this service” - and in the window that opens, select the operation, drive in if necessary parameters - and go ahead.
Everything! Service is ready - now we can work with our table from the bus or any other application (by WSDL we can easily generate client code to call this service). If you do not hesitate to "magic" with ClientID, Secret Key and the receipt of Refresh Token - then everything gets no more than everything.
At the same time, we did not write a single line of code - well, except for simple SQL queries.
Source: https://habr.com/ru/post/271033/
All Articles