Preparing FMOD, Cocos2D-x, OpenAL and OpenSSL libraries for Android devices built on the Intel platform
No serious Android project can do without third-party libraries. Sometimes they can be found in a form suitable for the target architecture, sometimes not. Then the library has to be prepared independently, for example, by collecting from the source code.

In this tutorial, you will learn about the FMOD, Cocos2D-x, OpenAL, and OpenSSL libraries for Android devices built on the x86 platform. They, in particular - the first three, will be useful to those who develop games and multimedia applications. Namely, we will talk about their setup, compilation and use in Android applications.
Before we begin, something needs to be prepared. If you are already developing applications for Android, it is likely that most of what is being said you already have. However, in this case it would be useful to view the proposed list.
')
Namely, you will need the following software tools.
After you have all this, you need to edit the environment variables. Or, at least, check them, because during the installation of the tools described above, some of them may already be in the state we need.
These paths must be separated by a semicolon (;). In our case, the contents of this variable look like this:
Note that at the end of the path to the desired folder there should be no special characters, like "/" or "'".
FMOD is a commercial library for working with sound. This is a set of tools that works in different operating systems and allows you to play audio files of various formats. It is used in the implementation of the sound component of games and multimedia applications.
Below is a step-by-step guide to integrating the FMOD library into an Android application designed for the x86 platform using the Eclipse IDE.
First you need to download FMOD . In particular, we are interested in the Android version of FMOD Ex Programmer's API.
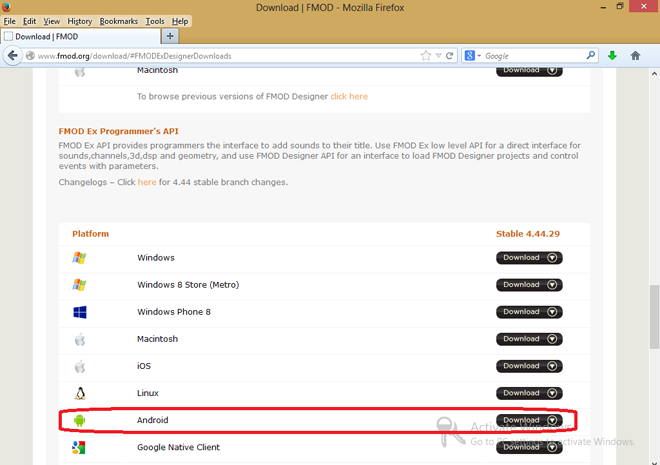
Download FMOD Ex
Installing FMOD consists in unpacking the downloaded archive into the local folder of the developer’s computer.
In order to work with sound through the API FMOD Ex, you need to include the corresponding C / C ++ library in the application and access it using the jni mechanism.
The FMOD functionality is implemented in the form of C / C ++ libraries, which can be accessed via jni, and you can work with them from the C / C ++ components of the application being developed.
FMOD Ex libraries are available in the form of armeabi and armeabi-v7a assemblies for android-3 and in the form of x86-assemblies for android-9. You can find these assemblies in this way:
The native OpenSL Android audio interface is used by default to play audio on devices that support it (android-9). On such devices, additional files are not required for work. For devices that do not support OpenSL, you will need to use the Audio Track output mode. To do this, you need the FMOD jar file. This file must be added to a Java application to perform initialization and audio output through FMOD.
We will discuss this below.
Note that the demo application that we will consider is part of the library. We do not include his code here. Instead, it shows the sequence of actions needed to work with FMOD, describes the changes that need to be made in the project files of the application.
In order to output audio using the Audio Track method, you need to include the FMOD audio driver (implemented in Java) in the application project and initialize it. If the output mode is OpenSL, this is not necessary.
To connect the driver, you need to add the
In the
Creating this application is the same as building an NDK application for Android. Take a look at an example for which we will use the demo application located at the following address:
We will refer to this folder as {$ PROJECT DIRECTORY}. However, before we build, we need to make some changes to the demo application.
Now open Cygwin and perform the following tasks to build the application:
The project will be assembled and ready for deployment.
Notice that here the "\" characters that are used in Windows when specifying folder paths are replaced by the characters "/" that are used in GNU format paths.
After successfully building the project in the Cygwin window, you will see the following messages:
Now, after successfully building a project, you can import it into Eclipse and prepare it for launch on an Android device.
In order to prepare the application for launch using the Eclipse IDE, you need to follow these steps.
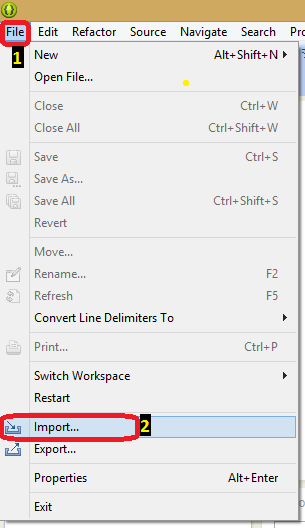
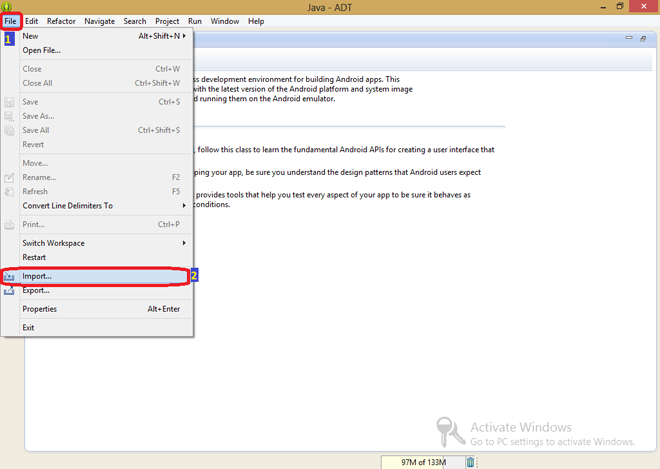
1. Launch Eclipse and run File> Import
Eclipse Import Command
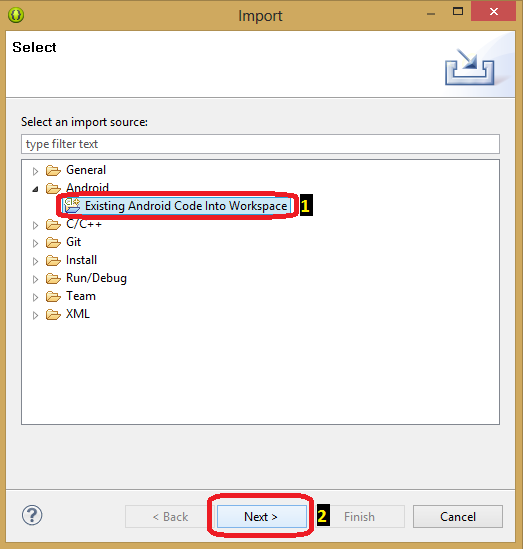
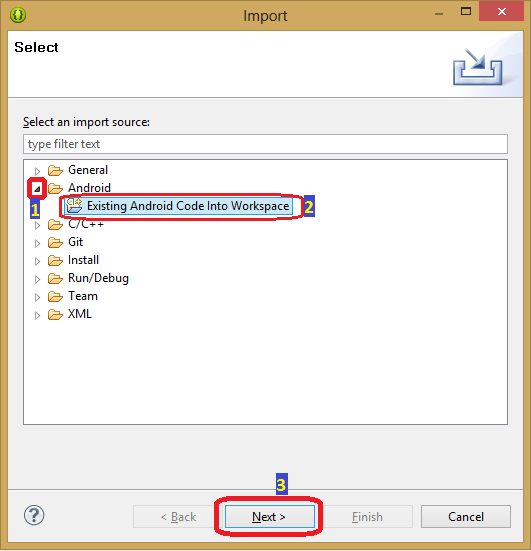
2. Select the Android Existing option ... and click Next.
Select the type of source to import
3. Navigate to the project root folder (i.e., the folder we

Completing the project import process
4. At this stage, you will notice a red exclamation mark on the imported project in the project browser.
Exclamation Mark in Project Browser
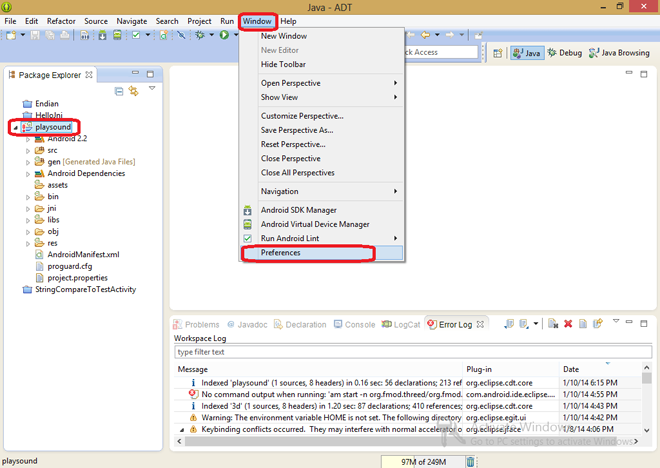
5. In order to solve the problem this sign points to, execute the Window> Preferences command by calling the settings window. In the window, go to the Classpath Variables settings.
Settings window
6. Click the New ... button on the Classpath Variables page, a window will appear for setting a new variable. It must be reduced to the form shown in the figure.

New variable settings window
7. In the Name field, enter
8. To fill in the Path field, click on the File button and locate the following file:
9. Click OK.
10. Then click OK again, the window shown below will appear. Click the Yes button in it.
Confirmation of the complete rebuilding of the project
11. Now the red exclamation mark will disappear, the problem will be solved.
12. Run the Project> Properties command.
Running a command to access project properties
13. In the window that appears, in the C / C ++ Build> Environment section, click the Add button.
Work Environment Settings Window
14. In the appeared window, in the Name field, enter ANDROID_NDK_ROOT, in the Value field - the full path to the NDK installed on the computer and click OK.

Setting the variable pointing to the NDK
15. Now click on the Apply button, then click on the OK button.

Save NDK Path Information
Now you can run the application on your Android device. In order for everything to work as it should, first you need to copy to the device, in the
Please note that on the Android emulator this application may not start.
When building an application designed for the x86 platform, it is very important to make the following change to the project. Please note that this is done before the library is built.
Materials received during assembly are placed in the
If during the construction of the project using NDK error messages appear, you need to configure the permission to access files. Namely, change the permission to “Full Access” (“Full Control”) for the “Everyone” group (“Everyone”).
In addition, note that the application that uses the libraries in question may not run in the emulator. Note that for its normal operation on the physical device, you need to copy files from the
Fmod, in addition to the Fmod Ex library, offers the Fmod Studio product, designed to prepare sound for computer games, and the corresponding library for various platforms that allows you to work with Fmod Studio projects. All this can be downloaded from here .
In order to quickly get a working example of using the Fmod Studio API on Android, you can use a project with GitHub Fmod Sample 3D . In particular, the project has a library designed for the x86 architecture. It can be imported into your IDE, for example - in Android Studio. If during the import an
Running a demo application on Asus FonePad 8
Many examples of using third-party libraries in Android projects, which, in particular, can be found on GitHub, are created using IDE Eclipse. They can also be imported into Android Studio, however, errors may occur during the import.
For example, if the system fails to detect the NDK - most likely, the path to it is incorrectly specified in the project settings. You can check this in the
If the Eclipse project contains links to external files that are irrelevant to your copy of the imported project, Android Studio may refuse to import the project until such links are corrected. To successfully import a project, you need to find files (for example,
We now consider the process of creating a cross-platform Android application using the Cocos2d-x game engine for the x86 target platform.
The sample application used in this guide is part of the content available when loading Cocos2d-x. The application can be found in the
Cocos2d-x is a library written in C ++ and ported to many platforms. Among them are iOS, Android, Windows, Marmalade, Linux, Bada and Blackberry 10. Lua and JavaScript are used as scripting languages when working with the game engine. Details about the engine can be found in its documentation .
Before you start working with Cocos2D-x, you need to prepare everything you need - as described at the beginning of this material.
Download the latest version of Cocos2d-x . Please note that we need the usual, not html-5 version of the engine.
Before we continue, look at a few variables that point to the paths to the various folders. We will use them below:
1. Run Eclipse using the executable file
2. Create a workspace. We created it at

Android project workspace
3. Run File> Import.
Import command
4. A window similar to the one shown in the figure will appear.
Import window
5. Expand the Android section, select Existing Android Code Into Workspace, and click Next.
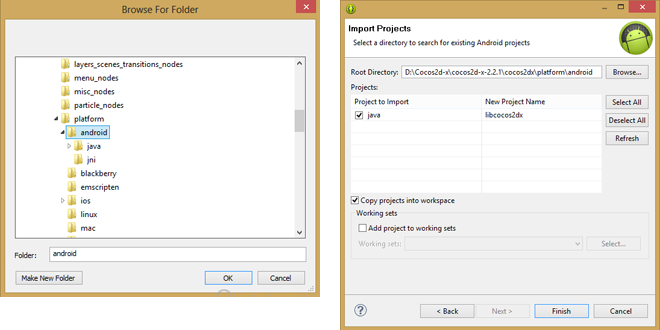
6. In the next window, click the Browse button, as shown below.
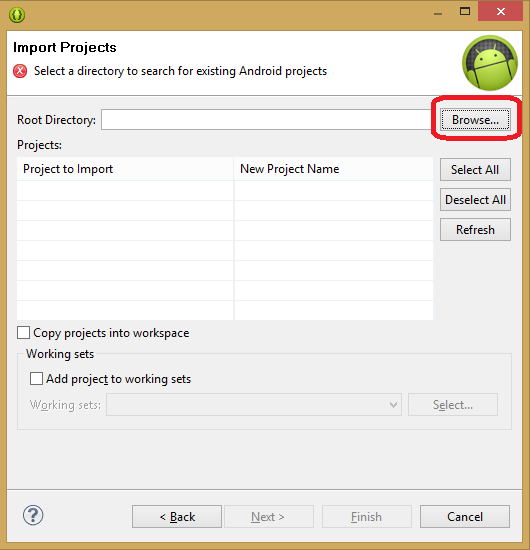
Search project root for import
7. Locate the folder {$ COCOS2D-X PATH} \ samples \ Cpp \ HelloCpp \ proj.android, as shown in the figure, and click OK.

Selecting the project root directory for import
8. For this demo, before clicking on the Finish button, check that the Copy projects into workspace flag is not set .

Copy projects into workspace flag should be cleared
9. After importing to Eclipse, error messages may appear. For now, you can ignore them and move on to the next steps.
Note that if in the future you decide to leave the source code of the project intact and at the same time you will be sure that importing the project code into the workspace will not affect its execution, you can set the Copy projects into workspace flag described above.
10. Now repeat steps
Import another project
11. If the error messages that occurred in step 8 did not disappear, follow these steps to solve the problems.
12. On the Package Explorer tab, on the left, right-click libcocos2dx and select Properties from the menu that appears.
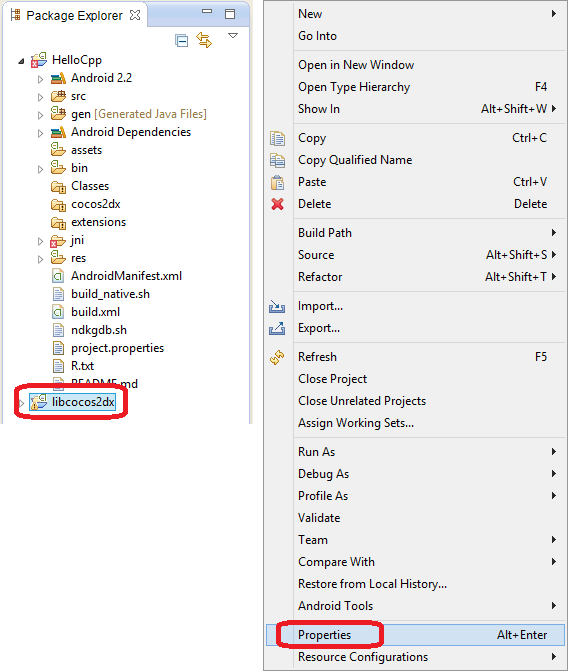
Command to call the project properties window
13. In the window that appears, select, in the left column, the Android item and check whether the Is Library flag is set, as shown in the figure below. If not, set the flag, click Apply and OK.
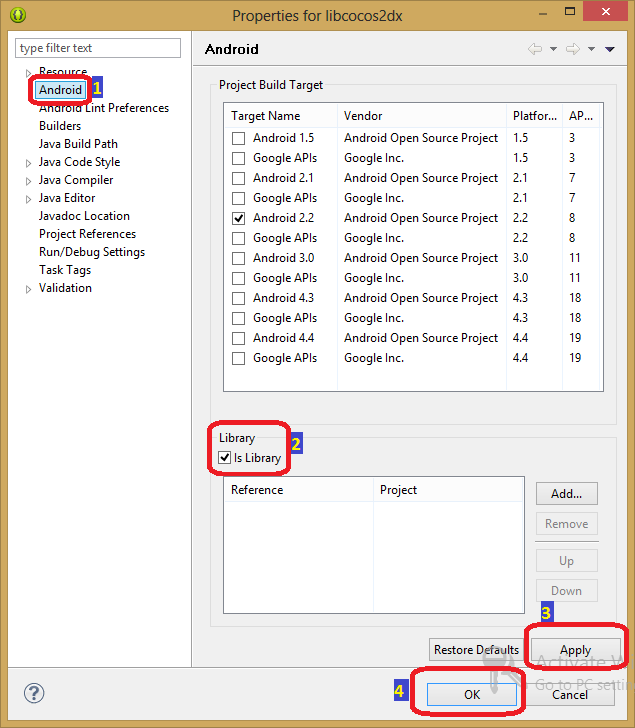
Setting project parameters
14. Just as described above, open the properties of the HelloCpp project by reaching the window shown in the figure.
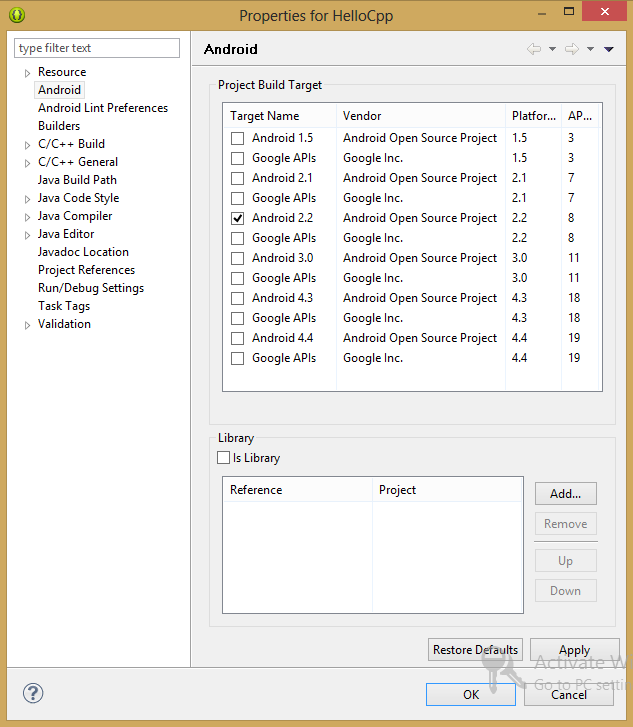
HelloCpp project properties window
15. Remove from the Library section all that is marked with a red cross and click the Add button.
16. Select libcocos2dx and click OK.
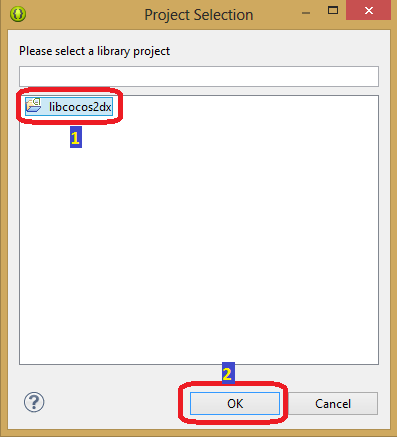
Choosing the libcocos2dx project
17. Now you will see that the project name with a green check mark appears in the Library section. After that, you can click Apply, and then - OK.
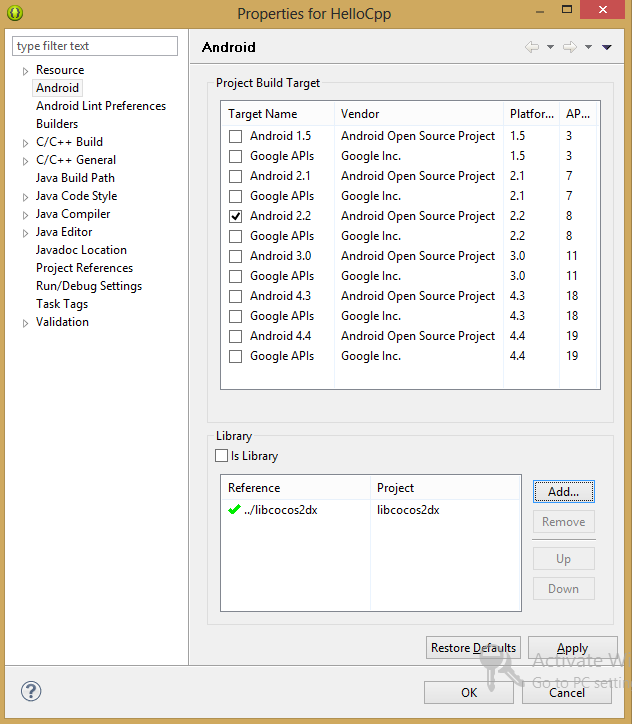
Finishing HelloCpp project setup
18. At this stage, Eclipse will rebuild the project. If no error messages appear, skip this step. If not, delete the HelloCpp project from the Package Explorer panel. In this case, pay attention to the flag Delete project contents on disk ... has not been set . If it is installed, this action cannot be undone. Now repeat steps 3–8 and 13–16.
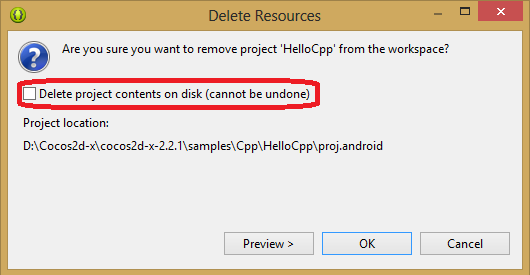
Deleting a project from the Project Explorer panel
19. Now your project should look something like this.
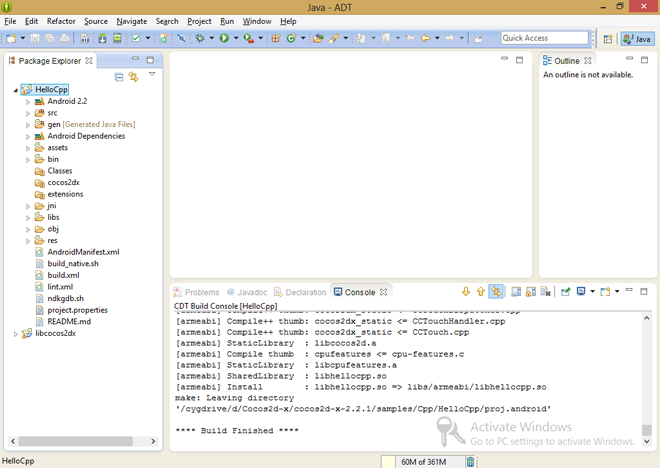
Project ready for further work
If you successfully reached this place - congratulations! The project was successfully opened in IDE Eclipse, everything is ready to build it.
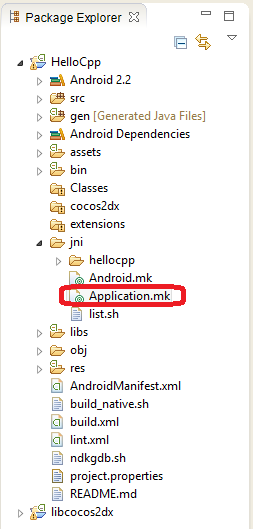
1. On the Package Explorer tab, find the HelloCpp file> jni> Application.mk
File Application.mk
2. To build for the x86 platform, add the following to it:
Now, in the Project main menu, first run the Clean ... command, then the Build Project.

Cleaning and assembling a project
1. Launch Cygwin and navigate to the HelloCpp demo project folder using the following command:
Note that the path to the project folder depends on
2. Open the /jni/Application.mk file. It should contain the following line:
3. To build a project, while in the /proj.android folder, run the following command:
If you encounter error messages, check the following:
Upon successful completion of the build, the binaries will be in the
OpenAL (Open Audio Library) is a cross-platform API for working with sound. This library is designed to efficiently output multi-channel surround sound. The API style and conventions adopted in it are intentionally made similar to OpenGL. Starting with version 1.1., Creative has closed the code for its implementation. However, OpenAL Soft is a widely used open source alternative. We will use the version of OpenAL Soft, adapted for Android.
To work with OpenAL, we need the same environment that we used in the previous examples.
In order to work with OpenAL, we need a revised source code, which is specially adapted for Android. The corresponding version of OpenAL was released thanks to the efforts of Martins Mozeiko and Chris Robinson. Thank them for that! To continue our experiments, download the latest version of the code .
You can download everything you need in a different way using the Cygwin terminal.
Please note that in the case of the Windows version of Cygwin, the directory
, Android- Hello OpenAL. , –
OpenAL Android, .
1. OpenAL config.h. :
:
2. , , OpenAL
3.
4. native- .
5. make-. – Android.mk Application.mk
x86, , Application.mk :
, ,
–
OpenSSL Android-, x86.
.
OpenSSL Android eighthave guardianproject .
, Android-, Application Binary Interface (ABI).
, , NDK , Android OpenSSL (,
x86:
NDK :
OpenSSL-
, Android-, x86. – FMOD OpenAL, Cocos2d-x, OpenSSL. , , , x86, FFMPEG, .
, , , , , . !
In this tutorial, you will learn about the FMOD, Cocos2D-x, OpenAL, and OpenSSL libraries for Android devices built on the x86 platform. They, in particular - the first three, will be useful to those who develop games and multimedia applications. Namely, we will talk about their setup, compilation and use in Android applications.
Preliminary preparation
Before we begin, something needs to be prepared. If you are already developing applications for Android, it is likely that most of what is being said you already have. However, in this case it would be useful to view the proposed list.
')
Namely, you will need the following software tools.
- Android application development environment. From this page you need to download the Android SDK. We, using practical examples, use IDE Eclipse .
- Android NDK .
- Cygwin . During installation, at the stage of setting up the package composition, the following should be selected: Autoconf, Automake, binutils, gcc-core, gcc-g ++, gcc4-core, gcc4-g ++, gdb, pcre, pcre-devel, gawk, make, python. Do not forget to choose the GNU version of make, otherwise you will not be able to build projects using NDK.
- JDK .
- Apache Ant .
After you have all this, you need to edit the environment variables. Or, at least, check them, because during the installation of the tools described above, some of them may already be in the state we need.
- Write the path to the installed Java JDK in the JAVA_HOME environment variable. In our case, this
– C:\Program Files\Java\jdk1.7.0_45 - Write the full path to the Android SDK folder in the ANDROID_SDK_ROOT variable. For example, in our case, the Android development package was unpacked into the
D:\android\folder, as a result, the pathD:\android\adt-bundle-windows-x86-20131030\sdkwas written to this variable - In the variable NDK_ROOT you need to write the full path to the folder in which the NDK files are located. In our case, this is the
D:\android\android-ndk-r9b. - The Path variable must be brought to a state in which it contains the following paths:
- JDK folder path;
- JDK bin folder path;
- path to the folder NDK;
- the path to the Cygwin bin folder;
- path to the bin folder ANT;
- path to the tools folder Android SDK;
- path to the platform-tools folder of the Android SDK.
These paths must be separated by a semicolon (;). In our case, the contents of this variable look like this:
D:\cygwin64\bin;C:\Program Files\Java\jdk1.7.0_40\bin;D:\android\adt-bundle-windows-x86_64-20131030\sdk\tools;D:\android\adt-bundle-windows-x86_64-20131030\sdk\platform-tools;%JAVA_HOME%\bin;%ANT_HOME%\bin Note that at the end of the path to the desired folder there should be no special characters, like "/" or "'".
FMOD
FMOD is a commercial library for working with sound. This is a set of tools that works in different operating systems and allows you to play audio files of various formats. It is used in the implementation of the sound component of games and multimedia applications.
Below is a step-by-step guide to integrating the FMOD library into an Android application designed for the x86 platform using the Eclipse IDE.
First you need to download FMOD . In particular, we are interested in the Android version of FMOD Ex Programmer's API.
Download FMOD Ex
Installing FMOD consists in unpacking the downloaded archive into the local folder of the developer’s computer.
Building using Android NDK
In order to work with sound through the API FMOD Ex, you need to include the corresponding C / C ++ library in the application and access it using the jni mechanism.
The FMOD functionality is implemented in the form of C / C ++ libraries, which can be accessed via jni, and you can work with them from the C / C ++ components of the application being developed.
- The libfmodex.so library is used in ready-to-release applications.
- The libfmodexL.so library is the same library with debugging output enabled. It can be used during the development of the application, when debugging it, to identify and fix errors.
FMOD Ex libraries are available in the form of armeabi and armeabi-v7a assemblies for android-3 and in the form of x86-assemblies for android-9. You can find these assemblies in this way:
{$FMOD INSTALLED PATH}\api\lib\$(ABI) The native OpenSL Android audio interface is used by default to play audio on devices that support it (android-9). On such devices, additional files are not required for work. For devices that do not support OpenSL, you will need to use the Audio Track output mode. To do this, you need the FMOD jar file. This file must be added to a Java application to perform initialization and audio output through FMOD.
fmodex.jar We will discuss this below.
Note that the demo application that we will consider is part of the library. We do not include his code here. Instead, it shows the sequence of actions needed to work with FMOD, describes the changes that need to be made in the project files of the application.
Java driver initialization
In order to output audio using the Audio Track method, you need to include the FMOD audio driver (implemented in Java) in the application project and initialize it. If the output mode is OpenSL, this is not necessary.
To connect the driver, you need to add the
fmodex.jar file to the project and import the org.fmod.FMODAudioDevice package. For the Java driver to work, the application needs to load the fmodex library.In the
FMODAudioDevice class FMODAudioDevice are two functions, start () and stop () , which need to be called to initialize the sound playback system and turn it off. They can be called at any time and in any place, but we recommend placing the calls to the start () and stop () functions in the lifecycle methods of the object of the Activity onStart() and onStop() classes Activity onStart() in your project.An example application for an x86 based Android device
Creating this application is the same as building an NDK application for Android. Take a look at an example for which we will use the demo application located at the following address:
{$FMOD INSTALLED PATH}\examples\playsound We will refer to this folder as {$ PROJECT DIRECTORY}. However, before we build, we need to make some changes to the demo application.
- Go to the folder
{$PROJECT DIRECTORY}/jniand open the fileApplication.mk. - Change this code:
APP_ABI := armeabi armeabi-v7a
On that:APP_ABI := x86
Now open Cygwin and perform the following tasks to build the application:
- Update the PATH variable in Cygwin:
export PATH=.:/cygdrive/{$PATH TO NDK}:$PATH - Go to the project folder:
cd /cygdrive/{$PROJECT DIRECTORY} - Run the command to build the application:
ndk-build
The project will be assembled and ready for deployment.
Notice that here the "\" characters that are used in Windows when specifying folder paths are replaced by the characters "/" that are used in GNU format paths.
After successfully building the project in the Cygwin window, you will see the following messages:
[x86] Prebuilt : libfmodex.so <= jni/../../../api/lib/x86/ [x86] Install : libfmodex.so => libs/x86/libfmodex.so [x86] Cygwin : Generating dependency file converter script [x86] Compile : main <= main.c [x86] SharedLibrary : libmain.so [x86] Install : libmain.so => libs/x86/libmain.so Now, after successfully building a project, you can import it into Eclipse and prepare it for launch on an Android device.
Preparing and running the application in the Eclipse IDE
In order to prepare the application for launch using the Eclipse IDE, you need to follow these steps.
1. Launch Eclipse and run File> Import
Eclipse Import Command
2. Select the Android Existing option ... and click Next.
Select the type of source to import
3. Navigate to the project root folder (i.e., the folder we
{$PROJECT DIRECTORY} ), then check that the Copy projects ... flag is cleared and click Finish.Completing the project import process
4. At this stage, you will notice a red exclamation mark on the imported project in the project browser.
Exclamation Mark in Project Browser
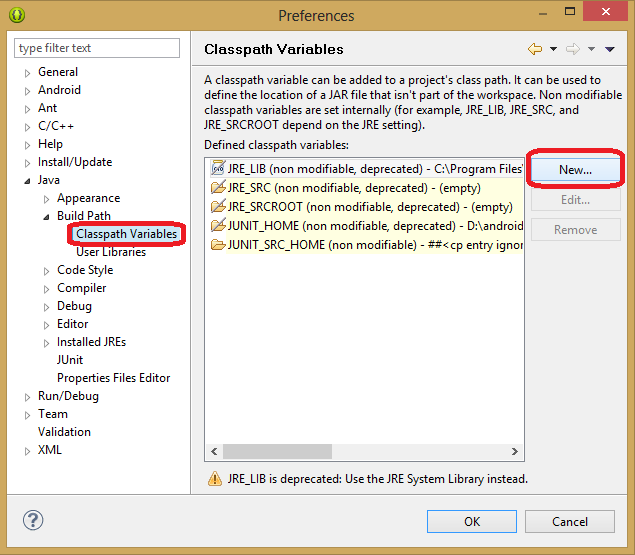
5. In order to solve the problem this sign points to, execute the Window> Preferences command by calling the settings window. In the window, go to the Classpath Variables settings.
Settings window
6. Click the New ... button on the Classpath Variables page, a window will appear for setting a new variable. It must be reduced to the form shown in the figure.
New variable settings window
7. In the Name field, enter
FMOD_LIB8. To fill in the Path field, click on the File button and locate the following file:
{$FMOD INSTALLED PATH}/api/lib/fmodex.jar 9. Click OK.
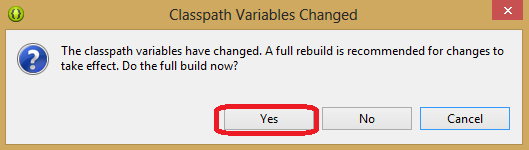
10. Then click OK again, the window shown below will appear. Click the Yes button in it.
Confirmation of the complete rebuilding of the project
11. Now the red exclamation mark will disappear, the problem will be solved.
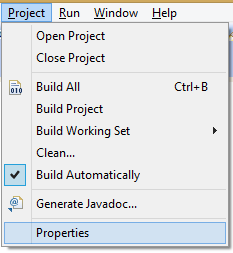
12. Run the Project> Properties command.
Running a command to access project properties
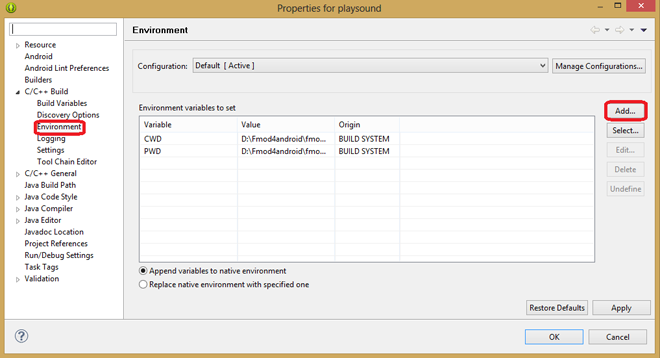
13. In the window that appears, in the C / C ++ Build> Environment section, click the Add button.
Work Environment Settings Window
14. In the appeared window, in the Name field, enter ANDROID_NDK_ROOT, in the Value field - the full path to the NDK installed on the computer and click OK.
Setting the variable pointing to the NDK
15. Now click on the Apply button, then click on the OK button.
Save NDK Path Information
Now you can run the application on your Android device. In order for everything to work as it should, first you need to copy to the device, in the
fmod folder, which should be located in the root directory of the SD card, two sets of sample files: {$FMOD INSTALLED PATH}\examples\media\* {$FMOD INSTALLED PATH}\fmoddesignerapi\examples\media\* Please note that on the Android emulator this application may not start.
Settings specific to the x86 platform
When building an application designed for the x86 platform, it is very important to make the following change to the project. Please note that this is done before the library is built.
- You need to go to the
{$PROJECT DIRECTORY}\jniand open the Application.mk file (or create such a file if it is not in this directory). - In the specified file, you need to replace the code
APP_ABI := armeabi armeabi-v7a
onAPP_ABI := x86
Materials that are obtained after construction
Materials received during assembly are placed in the
{$PROJECT DIRECTORY}\ folder. Namely, the libraries libmain.so and libfmodex.so will be in the folder {$PROJECT DIRECTORY}\libs\x86 . The generated object files fall into the {$PROJECT DIRECTORY}\obj folder.Known bugs and problems
If during the construction of the project using NDK error messages appear, you need to configure the permission to access files. Namely, change the permission to “Full Access” (“Full Control”) for the “Everyone” group (“Everyone”).
In addition, note that the application that uses the libraries in question may not run in the emulator. Note that for its normal operation on the physical device, you need to copy files from the
{$FMOD INSTALLED PATH}\examples\media\* folders {$FMOD INSTALLED PATH}\examples\media\* and {$FMOD INSTALLED PATH}\fmoddesignerapi\examples\media\ to the fmod folder, which should be located in the root directory of the SD card device.Fmod Studio API, work in Android Studio
Fmod, in addition to the Fmod Ex library, offers the Fmod Studio product, designed to prepare sound for computer games, and the corresponding library for various platforms that allows you to work with Fmod Studio projects. All this can be downloaded from here .
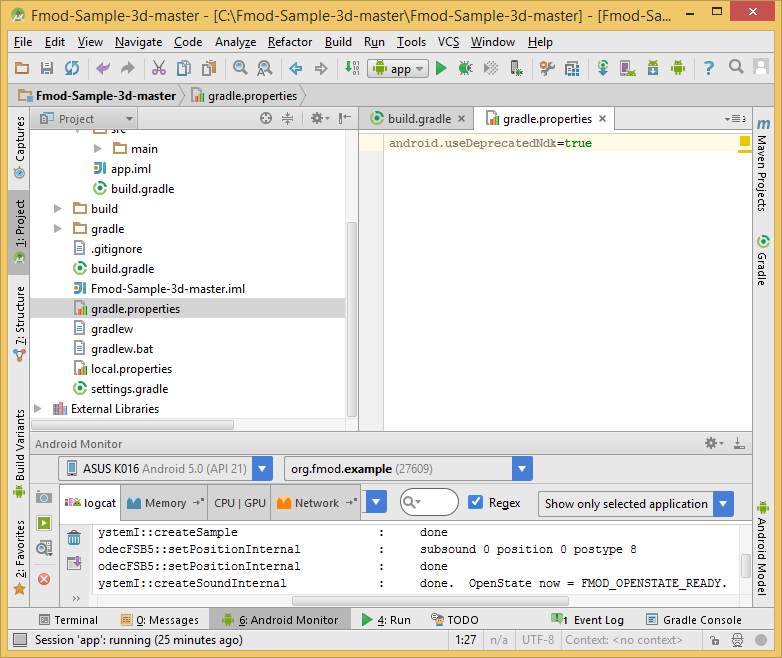
In order to quickly get a working example of using the Fmod Studio API on Android, you can use a project with GitHub Fmod Sample 3D . In particular, the project has a library designed for the x86 architecture. It can be imported into your IDE, for example - in Android Studio. If during the import an
NDK integration is deprecated… error occurs, to fix it, you need to create the file gradle.properties in the project root folder and write the line android.useDeprecatedNdk=true .Running a demo application on Asus FonePad 8
Many examples of using third-party libraries in Android projects, which, in particular, can be found on GitHub, are created using IDE Eclipse. They can also be imported into Android Studio, however, errors may occur during the import.
For example, if the system fails to detect the NDK - most likely, the path to it is incorrectly specified in the project settings. You can check this in the
local.properties file, in the project root directory. Fix - by writing the correct path in the variable ndk.dir .If the Eclipse project contains links to external files that are irrelevant to your copy of the imported project, Android Studio may refuse to import the project until such links are corrected. To successfully import a project, you need to find files (for example,
project.properties ) containing such links (for example, of the form “ android.library.reference.1= ”) and correct them for those that are relevant to your environment.Cocos2d-x
We now consider the process of creating a cross-platform Android application using the Cocos2d-x game engine for the x86 target platform.
The sample application used in this guide is part of the content available when loading Cocos2d-x. The application can be found in the
\samples\Cpp\ folder, which is located, in our case, in the cocos2d-x-2.1.1 directory.Cocos2d-x is a library written in C ++ and ported to many platforms. Among them are iOS, Android, Windows, Marmalade, Linux, Bada and Blackberry 10. Lua and JavaScript are used as scripting languages when working with the game engine. Details about the engine can be found in its documentation .
Before you start working with Cocos2D-x, you need to prepare everything you need - as described at the beginning of this material.
Cocos2d-x download
Download the latest version of Cocos2d-x . Please note that we need the usual, not html-5 version of the engine.
Installing and configuring Cocos2d-x
- Unzip the archive downloaded in the previous step to disk. In our case, the archive is extracted to the folder
D:\Cocos2d-x. - After unpacking the archive, for the described version of the engine, the target folder will contain the directories
D:\Cocos2d-x\__MACOSXandD:\Cocos2d-x\cocos2d-x-2.2.1. - Set the environment variable for Cocos2d-x as follows:
COCOS2DX_ROOT = full path to thecocos2d-x-2.2.1folder, in our case it is:D:\Cocos2d-x\cocos2d-x-2.2.1.
Before we continue, look at a few variables that point to the paths to the various folders. We will use them below:
{$ADT PATH}= full path to Android ADT, in our case it is:D:\android\adt-bundle-windows-x86_64-20131030.{$ECLIPSE PATH}= full path to Eclipse. In our case, since Eclipse is part of ADT, the path will look like this:{$ADT PATH}\eclipse{$COCOS2D-X PATH}= full path to the cocos2d-x-2.2.1 folder, in our case this is:D:\Cocos2d-x\cocos2d-x-2.2.1.{$WORKSPACE PATH}= full path to the folder of the Eclipse Android project workspace. We have this:D:\and_proj_coco.
Setting up the Cocos2d-x project in the Eclipse IDE
1. Run Eclipse using the executable file
{$ECLIPSE PATH}\eclipse.exe .2. Create a workspace. We created it at
{$WORKSPACE PATH} , as shown in the figure.Android project workspace
3. Run File> Import.
Import command
4. A window similar to the one shown in the figure will appear.
Import window
5. Expand the Android section, select Existing Android Code Into Workspace, and click Next.
6. In the next window, click the Browse button, as shown below.
Search project root for import
7. Locate the folder {$ COCOS2D-X PATH} \ samples \ Cpp \ HelloCpp \ proj.android, as shown in the figure, and click OK.
Selecting the project root directory for import
8. For this demo, before clicking on the Finish button, check that the Copy projects into workspace flag is not set .
Copy projects into workspace flag should be cleared
9. After importing to Eclipse, error messages may appear. For now, you can ignore them and move on to the next steps.
Note that if in the future you decide to leave the source code of the project intact and at the same time you will be sure that importing the project code into the workspace will not affect its execution, you can set the Copy projects into workspace flag described above.
10. Now repeat steps
{$COCOS2D-X PATH}\samples\Cpp\HelloCpp\proj.android , with the difference that instead of importing {$COCOS2D-X PATH}\samples\Cpp\HelloCpp\proj.android , you need to import {$COCOS2D-X PATH}\cocos2dx\platform\android as shown below. If you want, set the Copy project into workspace flag.Import another project
11. If the error messages that occurred in step 8 did not disappear, follow these steps to solve the problems.
12. On the Package Explorer tab, on the left, right-click libcocos2dx and select Properties from the menu that appears.
Command to call the project properties window
13. In the window that appears, select, in the left column, the Android item and check whether the Is Library flag is set, as shown in the figure below. If not, set the flag, click Apply and OK.
Setting project parameters
14. Just as described above, open the properties of the HelloCpp project by reaching the window shown in the figure.
HelloCpp project properties window
15. Remove from the Library section all that is marked with a red cross and click the Add button.
16. Select libcocos2dx and click OK.
Choosing the libcocos2dx project
17. Now you will see that the project name with a green check mark appears in the Library section. After that, you can click Apply, and then - OK.
Finishing HelloCpp project setup
18. At this stage, Eclipse will rebuild the project. If no error messages appear, skip this step. If not, delete the HelloCpp project from the Package Explorer panel. In this case, pay attention to the flag Delete project contents on disk ... has not been set . If it is installed, this action cannot be undone. Now repeat steps 3–8 and 13–16.
Deleting a project from the Project Explorer panel
19. Now your project should look something like this.
Project ready for further work
If you successfully reached this place - congratulations! The project was successfully opened in IDE Eclipse, everything is ready to build it.
Build Cocos2d-x project in IDE Eclipse
1. On the Package Explorer tab, find the HelloCpp file> jni> Application.mk
File Application.mk
2. To build for the x86 platform, add the following to it:
APP_ABI := x86 Now, in the Project main menu, first run the Clean ... command, then the Build Project.
Cleaning and assembling a project
Discovery and construction of the Cocos2d-x project using Cygwin
1. Launch Cygwin and navigate to the HelloCpp demo project folder using the following command:
cd /cygdrive/d/Cocos2d-x/cocos2d-x-2.2.1/samples/Cpp/HelloCpp/proj.android Note that the path to the project folder depends on
{$COCOS2D-X PATH}.2. Open the /jni/Application.mk file. It should contain the following line:
APP_ABI := x86 3. To build a project, while in the /proj.android folder, run the following command:
./build_native.sh If you encounter error messages, check the following:
- Make sure all the necessary packages for Cygwin are downloaded.
- The PATH Cygwin variable contains paths to the Android NDK, SDK, JDK, and COCOS2D-X folders, as described in the preliminary preparation section.
Upon successful completion of the build, the binaries will be in the
proj.android\obj\local\x86 folder. In particular, these are the following files: proj.android\obj\local\x86\libhellocpp.so proj.android\obj\local\x86\libcocos2d.a OpenAL (Open Audio Library)
OpenAL (Open Audio Library) is a cross-platform API for working with sound. This library is designed to efficiently output multi-channel surround sound. The API style and conventions adopted in it are intentionally made similar to OpenGL. Starting with version 1.1., Creative has closed the code for its implementation. However, OpenAL Soft is a widely used open source alternative. We will use the version of OpenAL Soft, adapted for Android.
To work with OpenAL, we need the same environment that we used in the previous examples.
Download the corrected OpenAL code
In order to work with OpenAL, we need a revised source code, which is specially adapted for Android. The corresponding version of OpenAL was released thanks to the efforts of Martins Mozeiko and Chris Robinson. Thank them for that! To continue our experiments, download the latest version of the code .
You can download everything you need in a different way using the Cygwin terminal.
- Start Cygwin and enter the following command:
git clone http://repo.or.cz/r/openal-soft/android.git OpenAL - After successful execution of this command, the repository we need will be cloned into the local OpenAL folder. In our case, this is the folder
/home/user001or ~.
Please note that in the case of the Windows version of Cygwin, the directory
/home can be found in the folder where Cygwin is installed. In our case, this – D:\cygwin64 .OpenAL x86
, Android- Hello OpenAL. , –
{$PROJECT_DIR} , , : D:\openal_proj\HelloOpenAL .OpenAL Android, .
1. OpenAL config.h. :
{$OPENAL_DIR}/android/jni :
{$OPENAL_DIR}/include {$OPENAL_DIR} – , OpenAL. ~/openal .2. , , OpenAL
{$PROJECT_DIR}. . native- .3.
org_pielot_helloopenal_HelloOpenAL.c «» .4. native- .
5. make-. – Android.mk Application.mk
jni .c .h .x86, , Application.mk :
APP_OPTIM := release APP_ABI := x86 - Cygwin
{$PROJECT_DIR}:cd /cygdrive/{$PROJECT_DIR}{$PROJECT_DIR}. :cd /cygdrive/d/openal_proj - , , NDK PATH Cygwin, :
export PATH=.:/cygdrive/{$PATH TO NDK}:$PATH
, :export PATH=.:/cygdrive/d/android/android-ndk-r9b:$PATH - :
ndk-build
OpenAL x86.
,
, ,
{$PROJECT_DIR} . , libopenal.so libopenaltest.so {$PROJECT_DIR}\libs\x86 .–
{$PROJECT_DIR}\obj .OpenSSL
OpenSSL Android-, x86.
Preliminary preparation
.
- , Windows 7 .
- OpenSSL C, Android NDK , - (ARM, x86 ).
OpenSSL Android eighthave guardianproject .
x86
, Android-, Application Binary Interface (ABI).
jni/Application.mk : APP_ABI := x86 , , NDK , Android OpenSSL (,
C:\openssl-android-master ), .- (cmd.exe).
- , OpenSSL Android. , :
x86:
APP_ABI := x86 NDK :
C:\openssl-android-master > ndk-build OpenSSL-
libssl libcrypto , , , : C:\openssl-android-master\libs\x86\libcrypto.so C:\openssl-android-master\libs\x86\libssl.so findings
, Android-, x86. – FMOD OpenAL, Cocos2d-x, OpenSSL. , , , x86, FFMPEG, .
, , , , , . !
Source: https://habr.com/ru/post/271013/
All Articles