How Badoo generates images for “sharing” in social networks
Social networks are an important source of traffic. It is beneficial for us when users share content, and we give them the opportunity - we have several types of content that can be shared:
To make the user want to share all this, we generate special images, which we call badges. Here is an example of a badge that a user can receive:

')
The feature of the badges is that there are photos of the users themselves, so everyone sees and shares unique images. In this article I will tell you how we generate such images, what problems we faced and how they were solved.
We generate images for badges in real time at the request of users or bots from social networks. We can not cook them in advance, because This would require a lot of storage space and server resources to generate absolutely all the images that may be needed (but not the fact that they really will be needed).
We took as the basis of the generation scheme the one according to which our photos work, but changed it a little. From the server’s point of view, the generation is as follows:

Each type of badge has its own URL format, in which we include identifiers of user photos and other resources (for example, awards) that are needed for generation; service parameters that affect the transfer of the request to the correct server; codes of the language and social network for which this badge is generated.
The language code in the URL is very important, because Badoo is a project localized for several languages. In normal queries, to obtain tokens we use a localization object based on the settings of the current user. In badges it does not work, because about a third of requests come from social networking bots, which our system treats as unauthorized users and tries to guess their language by IP address. At first we didn’t think about it and it turned out that on our website or in the application the user saw a picture with the text in one language, added it to his facebook and saw it as well, but with the text in English.
Social network code is needed, because different social networks have different preferences for image sizes. For example, for Facebook you need 1200x630 images, and for Instagram - 640x640. If we know for whom we are generating the image, then we can adapt to the recipient:

In addition to all this, we usually leave in the URL a place under the bit mask of modifications, which will be used if some functionality in the generator needs to be included only in some cases. For example, we used this field when Apple asked not to distribute photos with a rating of users of an iOS application. Then we added a flag to hide the rating, which allowed, on the one hand, not to quarrel with Apple, and on the other, to keep the existing badge where it is possible. You can do without this field, but then you have to create a new URL format for each modified version of the badge, which will lead to the growth of these formats and will over time complicate support.
From a code point of view, the image generation script looks like this:
The structure of data source objects, as a rule, differs greatly depending on the type of badge, and the generator objects have a similar structure, therefore there is an abstract class from which they are inherited. It looks like this:
The most important thing here is the getimage method, which is “twitching” from the controller. If it does not return the image object, the controller returns an error 404. Calls to the methods for checking availability and assembling the image are overlaid by Pinba-timers, and we substitute the names of specific classes in the names, which gives us information about the time required to generate each type of badge. In addition, we try to enclose all the manipulations with images in specific generator classes in timers and collect information on the total operating time of the source and generator in the controller, then write it to the database using our statistics collection system (On Habré, you can find a video with its description ).
When working with images, we use a very limited number of operations: rotation at an arbitrary angle, resize and crop images, overlay layers (including with transparency) and add text. To accomplish them, we use the Leptonica library, the wrapper for which was written by Anton Dovgal (the old version can be found on his github ). It was her chosen a few years ago for the fact that she worked faster than competitors. To demonstrate this, I did a small GD, ImageMagick and Leptonica benchmarking test.
For each of the libraries, I wrote a script that creates a new image of 1000x1000 in size, onto which another image is loaded, loaded from disk (analogue of the resource). To bring the code closer to what is used when generating badges, I added a few more operations on the loaded image - it will be reduced and rotated. The result of the manipulations will be saved to disk in JPEG format. This scenario allows us to estimate the speed of almost all operations that we use when generating badges. I will not give the code in the article because of its large size, but for those interested I will post the source code on GitHub .
I made 100 consecutive launches of these scripts on our server and got the following results:
According to the test results, it turned out that in this scenario, Leptonica was almost twice as fast as GD and Imagemagick, which showed a total time close to each other.
Of course, much more image manipulation is used in the generation of real badges than in this test, so you should not hope that Leptonica works quickly anyway, but try to minimize the number of required operations. To do this, we try to optimize the preparation of resources, combining as many layers as possible into one image.
Gradually, badges became more and more and we wanted to be sure that all badges work correctly after making changes to the code or resources. To do this, we decided to use functional tests: we created the user's stubs, his photos and awards, formed the badge URLs and passed them to the generator. The main difficulty was precisely in checking the results. The obvious way is to compare the image generated in the test with the existing sample — we really didn’t like it, because He either demanded manual assembly of all possible samples of badges (whose number reached 50) for any change and deprived us of the charms of automation, or did not give a guarantee that all badges work if we took only a part of the options.
After some thoughts and experiments, we began to use two simplified types of checks:
The concept of control points appears in both checks. Under it, I mean a set of points in the image, obtained by some rule. Specifically, we divide the image into 10 equal parts horizontally and vertically, with the result that at the intersection of the lines we get 81 control points for which we collect a color map with the help of a similar code:
The coincidence of all points in the two images does not mean that these images completely coincide, but this is a reason to be alert and either to increase the number of such points or to change the rules for their selection in the case of frequent false positives. In practice, with 81 points, we have never encountered false positives.
Of course, such simple checks do not guarantee that the badges will show exactly what we expect. But they allow you to quickly check that all the badges work, and helped us catch a number of bugs before they hit production, and some of them were allowed not even in the PHP generation code, but a lower level - in the "sishnoy" image library .
Although the article is devoted to the generation of images, the problems, the solution of which was spent the most time, were associated with texts.
We display texts in different languages. Some languages use alphabets other than Cyrillic and Latin, and not all fonts support them. Therefore, it is important to understand which alphabet we need for output in order to use the appropriate font. Where we print predefined lexemes, this is very easy to do - we know the language in which the text is written. But in some places we display user text (for example, when a person’s “sharing” on the badge is shown in the Instagram name), we don’t know what language it is written in.
This problem was solved quite easily, because it is possible to find the belonging of a symbol to a group directly on the site unicode.org . All we had to do was download the tables and reduce the ranges of groups of characters into a single table. Having such a table, you can check all the characters in a row, get a list of used groups and select a font that supports all these groups of characters.
The main thing you need to remember: the codes on the site are given in UCS-4, and not in the usual UTF-8.
Badges use texts in different languages, and the same phrase in different languages will have different lengths (and therefore require different places). To fit text sizes we use two algorithms: font size fitting and text splitting into lines.
Font size fitting. We have some “perfect” font size and maximum width that we can use under the text. We check if the text fits in this width (for example, in GD there are functions imagettfbbox and imageftbbox for this) and if so, we just output the text. If the text takes up more space, then reduce the font size and repeat the check. The code that implements the size selection looks like this:
This algorithm is good in its simplicity, but it can be used only for a small variation in the length of the output text. Larger texts may require a significant reduction in font size, which will make them unreadable. For such cases, we use split by rows.
Splitting by lines works quite simply: we determine the number of characters that can be output, after which we first break the text into words, and then we put the words into strings, each of which does not exceed our maximum number of characters. Here it must be remembered that there are long words that can be longer than the number of characters in a string (then the font size will need to be applied to the split results), and some languages do not use standard separators (for example, Japanese ).
Splitting by strings does not work well when only a few characters do not fit on one line. As a result of this situation, there is usually one long line and one short, with one or two short words. To correct this situation, we are trying to split the text into two as close as possible to each other along the length of the line. To do this, when splitting, we focus not on the maximum length of the line, but on half the actual length of the text. To solve the problem of long words that break the perfect split, we make two options: from the beginning of the text to the end and from the end of the text to the beginning, and then choose the one that has less discrepancy between the lengths of the lines.
Funny fact about the texts. In our experience, most places required lexemes in Greek and Swahili. Texts in German are usually shorter, but they are difficult to break into lines because of the presence of long words.
Texts that use right-to-left spelling (RTL languages) cannot be displayed as they are - they will be completely unreadable. This is due to the fact that such languages have two orders of characters: a logical one, which is used during storage, and a visual one, which we see.
For the conversion of one order to another, the so-called Unicode Bidirectional Algorithm (abbreviated BIDI) is responsible. You can learn more about this at habr ( BIDI (unicode bidding algorithm) ), W3C website ( Visual vs. Logical Ordering of Text , Unicode Bidirectional Algorithm Basics ) and unicode.org ( Unicode Bidirectional Algorithm ). Modern clients working with Unicode contain an implementation of this algorithm, and when writing texts on images, you have to take care of this yourself.
There are several RTL languages, but our users specifically use only two - Arabic and Hebrew, which in total give slightly less than 1% of the total number of badge generation requests.
The problem with Hebrew was solved very quickly: in PHP there is a hebrev function for converting logical text into visual, and the first comment on the page with the documentation of this function shows how to use it for texts in UTF-8:
With Arabic, everything was more complicated. We were lucky that our remote Arabic translator had encountered such a problem before and participated in the creation of the Ar-PHP library . The library contains a lot of functionality, but the last couple of years have not been very actively developed. Her site is periodically unavailable, although the code can be found in forks on GitHub: 1, 2 , 3 . In the original version, the text conversion is as follows:
If the texts are processed in this way, they can be displayed using ordinary functions like imagettftext. Here is what it will look like:
Working with images in php is not the most popular topic and it can be difficult to find solutions to problems on the Internet. I hope that thanks to my article it will become a little easier. If something in my article seemed incomprehensible to you and you have any questions - ask them in the comments, I will try to answer them.
More articles and materials can be found in our TechBadoo tech blog .
Victor Pryazhnikov, Developer, Features
- your profile;
- someone else's profile (if its owner allowed it);
- its rating reflecting the popularity of the user on the site;
- awards received by the user for their actions or the actions of other users.
To make the user want to share all this, we generate special images, which we call badges. Here is an example of a badge that a user can receive:
')
The feature of the badges is that there are photos of the users themselves, so everyone sees and shares unique images. In this article I will tell you how we generate such images, what problems we faced and how they were solved.
Image generation
We generate images for badges in real time at the request of users or bots from social networks. We can not cook them in advance, because This would require a lot of storage space and server resources to generate absolutely all the images that may be needed (but not the fact that they really will be needed).
We took as the basis of the generation scheme the one according to which our photos work, but changed it a little. From the server’s point of view, the generation is as follows:
- The HTTP request to generate a badge comes to the Photocache server, the purpose of which is to receive requests, to keep the response cache
- and thereby reduce the load on the servers that store the photos themselves;
- nginx on Photocache searches for an image in its cache, and if it is, it gives it to the client. Here comes the first difference of badges: there are relatively few requests; the standard nginx cache is used here, rather than a self-written module, as when working with regular photos;
- If there is nothing in the cache, the request is proxied to Bphotos - the server on which the photos of the user whose badge we generate are stored;
- nginx to Bphotos sends the request to a PHP script that loads all the necessary resources, starts the generation and gives the finished image. This is the second difference: nginx gives ordinary user photos without the help of any php scripts;
- Photocache gives the received badge image to the client and caches it.
Each type of badge has its own URL format, in which we include identifiers of user photos and other resources (for example, awards) that are needed for generation; service parameters that affect the transfer of the request to the correct server; codes of the language and social network for which this badge is generated.
The language code in the URL is very important, because Badoo is a project localized for several languages. In normal queries, to obtain tokens we use a localization object based on the settings of the current user. In badges it does not work, because about a third of requests come from social networking bots, which our system treats as unauthorized users and tries to guess their language by IP address. At first we didn’t think about it and it turned out that on our website or in the application the user saw a picture with the text in one language, added it to his facebook and saw it as well, but with the text in English.
Social network code is needed, because different social networks have different preferences for image sizes. For example, for Facebook you need 1200x630 images, and for Instagram - 640x640. If we know for whom we are generating the image, then we can adapt to the recipient:
In addition to all this, we usually leave in the URL a place under the bit mask of modifications, which will be used if some functionality in the generator needs to be included only in some cases. For example, we used this field when Apple asked not to distribute photos with a rating of users of an iOS application. Then we added a flag to hide the rating, which allowed, on the one hand, not to quarrel with Apple, and on the other, to keep the existing badge where it is possible. You can do without this field, but then you have to create a new URL format for each modified version of the badge, which will lead to the growth of these formats and will over time complicate support.
From a code point of view, the image generation script looks like this:
- There is a single controller that receives requests from the server, determines the necessary type of badge by the URL format and creates a pair of objects, one of which is the generator that creates the image of the badge, and the second is the data source for the generator.
- Parameters from URLs are transferred to the source object, by which it understands what resources are needed to create a badge and loads them.
- The source object is “setted” into the generator object, which allows the generator to be engaged only in assembling an image from already loaded resources.
- The controller receives the result of the generator object and returns it with the necessary headers.
The structure of data source objects, as a rule, differs greatly depending on the type of badge, and the generator objects have a similar structure, therefore there is an abstract class from which they are inherited. It looks like this:
abstract class AbstractBadgeGenerator { /** * false * @return bool|\FastImageEditor */ final public function getImage() { $this->startPinbaTimer('isAvailable'); $is_available = $this->isAvailable(); $this->stopPinbaTimer(); if (!$is_available) { return false; } $this->startPinbaTimer('generate'); $Result = $this->generate(); $this->stopPinbaTimer(); return $Result; } /** * , . * — , , * * @return bool */ public function isAvailable() { return true; } /** * false, * @return bool|\FastImageEditor */ abstract public function generate(); // } The most important thing here is the getimage method, which is “twitching” from the controller. If it does not return the image object, the controller returns an error 404. Calls to the methods for checking availability and assembling the image are overlaid by Pinba-timers, and we substitute the names of specific classes in the names, which gives us information about the time required to generate each type of badge. In addition, we try to enclose all the manipulations with images in specific generator classes in timers and collect information on the total operating time of the source and generator in the controller, then write it to the database using our statistics collection system (On Habré, you can find a video with its description ).
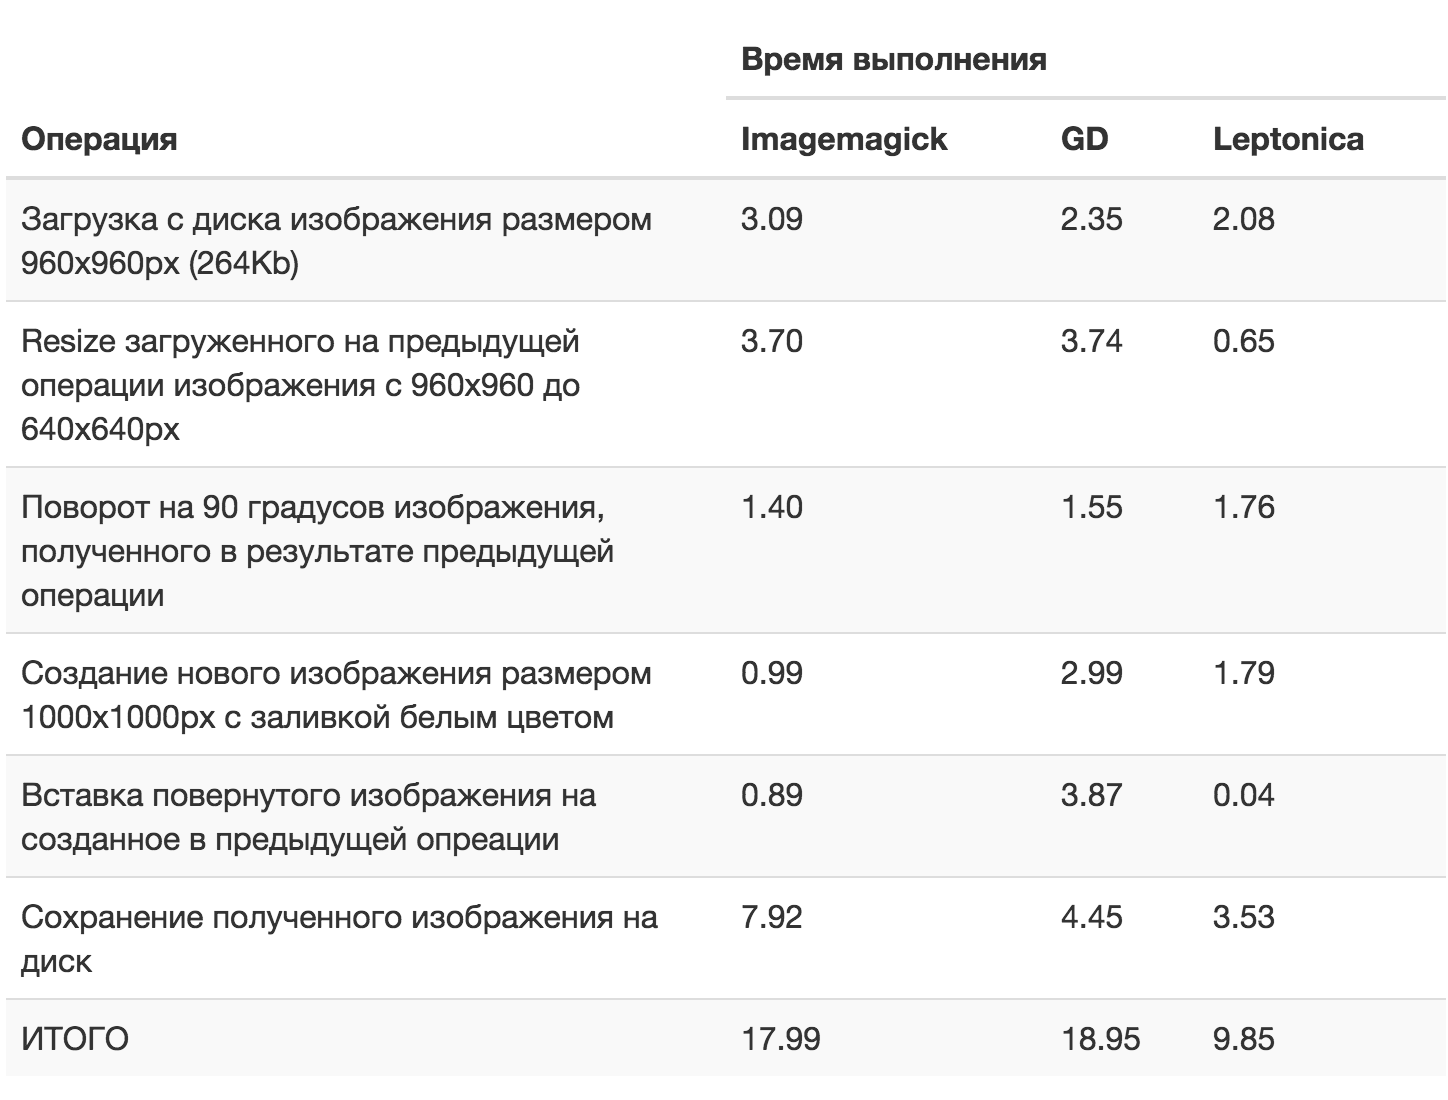
When working with images, we use a very limited number of operations: rotation at an arbitrary angle, resize and crop images, overlay layers (including with transparency) and add text. To accomplish them, we use the Leptonica library, the wrapper for which was written by Anton Dovgal (the old version can be found on his github ). It was her chosen a few years ago for the fact that she worked faster than competitors. To demonstrate this, I did a small GD, ImageMagick and Leptonica benchmarking test.
For each of the libraries, I wrote a script that creates a new image of 1000x1000 in size, onto which another image is loaded, loaded from disk (analogue of the resource). To bring the code closer to what is used when generating badges, I added a few more operations on the loaded image - it will be reduced and rotated. The result of the manipulations will be saved to disk in JPEG format. This scenario allows us to estimate the speed of almost all operations that we use when generating badges. I will not give the code in the article because of its large size, but for those interested I will post the source code on GitHub .
I made 100 consecutive launches of these scripts on our server and got the following results:
According to the test results, it turned out that in this scenario, Leptonica was almost twice as fast as GD and Imagemagick, which showed a total time close to each other.
Of course, much more image manipulation is used in the generation of real badges than in this test, so you should not hope that Leptonica works quickly anyway, but try to minimize the number of required operations. To do this, we try to optimize the preparation of resources, combining as many layers as possible into one image.
Testing Generation Results
Gradually, badges became more and more and we wanted to be sure that all badges work correctly after making changes to the code or resources. To do this, we decided to use functional tests: we created the user's stubs, his photos and awards, formed the badge URLs and passed them to the generator. The main difficulty was precisely in checking the results. The obvious way is to compare the image generated in the test with the existing sample — we really didn’t like it, because He either demanded manual assembly of all possible samples of badges (whose number reached 50) for any change and deprived us of the charms of automation, or did not give a guarantee that all badges work if we took only a part of the options.
After some thoughts and experiments, we began to use two simplified types of checks:
- Basic verification of the generation results: we verify that the generator returned exactly the image of the expected size and it contains several colors at the control points;
- Comparison of several generation results: we generate in the test URL for two badges that are similar to each other in almost everything, but differing only in one parameter (language code, output text, reward, etc.) and we expect that we get two images different from each other. The difference we define as the presence of a discrepancy in colors in at least one control point.
The concept of control points appears in both checks. Under it, I mean a set of points in the image, obtained by some rule. Specifically, we divide the image into 10 equal parts horizontally and vertically, with the result that at the intersection of the lines we get 81 control points for which we collect a color map with the help of a similar code:
protected function getImageColorsMap($Image, $color_grid_size = self::COLOR_GRID_SIZE) { $image_info = $Image->getInfo(); $dx = ceil($image_info['width'] / $color_grid_size); $dy = ceil($image_info['height'] / $color_grid_size); $colors_map = []; for ($row = 1; $row < $color_grid_size; $row++) { for ($cell = 1; $cell < $color_grid_size; $cell++) { $x = $dx * $cell; $y = $dy * $row; $color = $Image->getOnePixel($x, $y); $colors_map[$color][] = [$x, $y]; } } return $colors_map; } The coincidence of all points in the two images does not mean that these images completely coincide, but this is a reason to be alert and either to increase the number of such points or to change the rules for their selection in the case of frequent false positives. In practice, with 81 points, we have never encountered false positives.
Of course, such simple checks do not guarantee that the badges will show exactly what we expect. But they allow you to quickly check that all the badges work, and helped us catch a number of bugs before they hit production, and some of them were allowed not even in the PHP generation code, but a lower level - in the "sishnoy" image library .
Issues with text output
Although the article is devoted to the generation of images, the problems, the solution of which was spent the most time, were associated with texts.
Alphabet Definition by Text
We display texts in different languages. Some languages use alphabets other than Cyrillic and Latin, and not all fonts support them. Therefore, it is important to understand which alphabet we need for output in order to use the appropriate font. Where we print predefined lexemes, this is very easy to do - we know the language in which the text is written. But in some places we display user text (for example, when a person’s “sharing” on the badge is shown in the Instagram name), we don’t know what language it is written in.
This problem was solved quite easily, because it is possible to find the belonging of a symbol to a group directly on the site unicode.org . All we had to do was download the tables and reduce the ranges of groups of characters into a single table. Having such a table, you can check all the characters in a row, get a list of used groups and select a font that supports all these groups of characters.
The main thing you need to remember: the codes on the site are given in UCS-4, and not in the usual UTF-8.
Fit the text to the designated size
Badges use texts in different languages, and the same phrase in different languages will have different lengths (and therefore require different places). To fit text sizes we use two algorithms: font size fitting and text splitting into lines.
Font size fitting. We have some “perfect” font size and maximum width that we can use under the text. We check if the text fits in this width (for example, in GD there are functions imagettfbbox and imageftbbox for this) and if so, we just output the text. If the text takes up more space, then reduce the font size and repeat the check. The code that implements the size selection looks like this:
$font_size = $initial_font_size; $max_x = 0; while ($font_size > $min_font_size) { $text_size = $Image->getTextBox($font_size, $angle, $font, $text); $max_x = max($text_size[2], $text_size[4]); if ($max_width >= $max_x) { break; } $font_size -= 1; } This algorithm is good in its simplicity, but it can be used only for a small variation in the length of the output text. Larger texts may require a significant reduction in font size, which will make them unreadable. For such cases, we use split by rows.
Splitting by lines works quite simply: we determine the number of characters that can be output, after which we first break the text into words, and then we put the words into strings, each of which does not exceed our maximum number of characters. Here it must be remembered that there are long words that can be longer than the number of characters in a string (then the font size will need to be applied to the split results), and some languages do not use standard separators (for example, Japanese ).
Splitting by strings does not work well when only a few characters do not fit on one line. As a result of this situation, there is usually one long line and one short, with one or two short words. To correct this situation, we are trying to split the text into two as close as possible to each other along the length of the line. To do this, when splitting, we focus not on the maximum length of the line, but on half the actual length of the text. To solve the problem of long words that break the perfect split, we make two options: from the beginning of the text to the end and from the end of the text to the beginning, and then choose the one that has less discrepancy between the lengths of the lines.
$len = mb_strlen($text); if ($len <= 2 * $this->max_line_size) { $ideal_line_len = ceil($len / 2) - 1; $lexems_list = $this->getTextLexems($text); $direct_order_lines = $this->getDirectOrderLines($lexems_list, $ideal_line_len); $reversed_order_lines = $this->getReversedOrderLines($lexems_list, $ideal_line_len); $delta_direct = $this->getLinesDelta($direct_order_lines); $delta_reversed = $this->getLinesDelta($reversed_order_lines); return ($delta_direct < $delta_reversed) ? $direct_order_lines : $reversed_order_lines; } Funny fact about the texts. In our experience, most places required lexemes in Greek and Swahili. Texts in German are usually shorter, but they are difficult to break into lines because of the presence of long words.
Right-to-left word processing
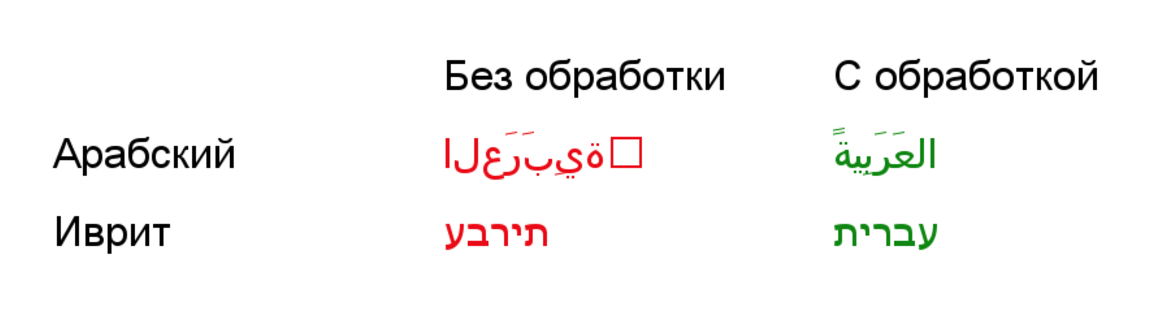
Texts that use right-to-left spelling (RTL languages) cannot be displayed as they are - they will be completely unreadable. This is due to the fact that such languages have two orders of characters: a logical one, which is used during storage, and a visual one, which we see.
For the conversion of one order to another, the so-called Unicode Bidirectional Algorithm (abbreviated BIDI) is responsible. You can learn more about this at habr ( BIDI (unicode bidding algorithm) ), W3C website ( Visual vs. Logical Ordering of Text , Unicode Bidirectional Algorithm Basics ) and unicode.org ( Unicode Bidirectional Algorithm ). Modern clients working with Unicode contain an implementation of this algorithm, and when writing texts on images, you have to take care of this yourself.
There are several RTL languages, but our users specifically use only two - Arabic and Hebrew, which in total give slightly less than 1% of the total number of badge generation requests.
The problem with Hebrew was solved very quickly: in PHP there is a hebrev function for converting logical text into visual, and the first comment on the page with the documentation of this function shows how to use it for texts in UTF-8:
$visual_hebrew_text = iconv("ISO-8859-8", "UTF-8", hebrev(iconv("UTF-8", "ISO-8859-8", $logical_hebrew_text))); With Arabic, everything was more complicated. We were lucky that our remote Arabic translator had encountered such a problem before and participated in the creation of the Ar-PHP library . The library contains a lot of functionality, but the last couple of years have not been very actively developed. Her site is periodically unavailable, although the code can be found in forks on GitHub: 1, 2 , 3 . In the original version, the text conversion is as follows:
$ArabicGlyphs = new \I18N_Arabic_Glyphs(); $visual_arabic_text = $ArabicGlyphs->utf8Glyphs($logical_arabic_text, $max_characters_count); If the texts are processed in this way, they can be displayed using ordinary functions like imagettftext. Here is what it will look like:
- In addition to processing, there are a couple of nuances that need to be remembered when working with RTL texts:
- When outputting text using graphic library functions, the coordinate of the left border of the text is indicated, while in RTL, as a rule, you need to know the right one. Therefore, before the conclusion itself, it is necessary to first calculate the width of the text and then, knowing it and the coordinate of the right border of the text, it will be possible to calculate the coordinate of the left border.
- If you display text split into several lines, you must first invert their order. We break the text from left to right and get an array of strings in which the text on the left is stored in the first element. For RTL texts, this will be the end, not the beginning, and it turns out that the text is written from the bottom up, which is wrong.
Conclusion
Working with images in php is not the most popular topic and it can be difficult to find solutions to problems on the Internet. I hope that thanks to my article it will become a little easier. If something in my article seemed incomprehensible to you and you have any questions - ask them in the comments, I will try to answer them.
More articles and materials can be found in our TechBadoo tech blog .
Victor Pryazhnikov, Developer, Features
Source: https://habr.com/ru/post/270991/
All Articles