Embedding Addictions in Angular 2
Good evening, ladies and gentlemen!
With all the unrelenting popularity of the AngularJS framework, we still did not have time to check out the book on its first version, and now we decided not to wait for the second and ask: how much does this work appeal to you, covering, apart from AngularJS, the wider context of JavaScript development?
')
Under the cut, you will find a translation of a regularly updated article by Pascal Precht (version of October 12, 2015), telling about such lofty matters as the introduction of dependencies in AngularJs and, most interestingly, those improvements that await this mechanism in Angular 2.
Dependency injection has always been one of the most visible and trump features of Angular. So, this framework allows you to embed dependencies in various components at different points in the application; you do not need to know how these dependencies are created, or what dependencies they in turn need. However, it turns out that the modern dependency injection mechanism (in Angular 1) has some problems to be solved in Angular 2 in order to build a new generation framework. In this article we will talk about the new dependency injection system - for future generations.
Before we start exploring new material, let's look at what “dependency injection” (DI) is and what problems with DI arise in Angular 1.
Dependency injection
Vojta Gina made an excellent report on the implementation of dependencies at the ng-conf 2014 conference. In his speech, he outlined the history of creating a new dependency injection system that will be developed for Angular 2, described the ideas on which it is based. In addition, he clearly described that DI can be viewed in two ways: as a design pattern and as a framework. In the first case, DI application patterns are explained, and in the second case, it is a question of a support system and dependency assemblies. I’m going to build this article in the same way, since it will be easier to explain this whole concept.
To begin, consider the following code and see what problems arise in it.
Nothing special. We have a class
It turns out code that is difficult to maintain and even harder to test. Just imagine that you would like to test this class. How would you replace the
So, how could this code be improved and made more convenient for testing? It's very simple, and you probably already know what this is about. Change the code like this:
We simply removed the creation of dependencies from the constructor and expanded the constructor function — now it counts on all the necessary dependencies. There are no concrete implementations left in the code; we literally moved the responsibility for creating these dependencies to a higher level. If we now wanted to create a car object, we would just have to pass all the necessary dependencies to the constructor:
Cool? Now the dependencies are separated from our class, which allows us to report the mock dependencies when writing tests:
Imagine, this is the introduction of dependence . More precisely, this particular pattern is also called “ constructor injection ”. There are two more patterns: introduction through the class method (setter injection) and introduction through the interface (interface injection), but we will not consider them in this article.
Great, here we are using DI, but where does the DI system start to be involved? As mentioned earlier, we literally moved the responsibility for creating dependencies to a higher level. This is our new problem. Who organizes the assembly of all these dependencies for us? Ourselves.
Now we need support for the main function. Doing this manually is quite cumbersome, especially as the application grows. Maybe it's better to do something like this?
Deploying dependencies as a framework
Here we start using dependency injection as a framework. As you know, Angular 1 has its own DI system, which allows you to annotate services and other components; also with its help, the injector can find out which dependencies need to be instantiated. For example, the following code shows how to annotate our class
Then we register our
Everything is cool, but it turns out that the existing DI mechanism still has some problems:
These problems need to be resolved to take Angular's dependency injection to a new level.
Embedding Addictions in Angular 2
Before moving on to code review, you need to understand the concept behind the DI in Angular 2. The following figure illustrates the essential components of the new DI system.

The implementation of dependencies in Angular 2 basically consists of three elements:
So, having got an idea about this concept, let's consider how it is implemented in the code. We continue to work with our class
We import from Angular 2
We import the Inject entity from the framework and apply it as a decorator to the parameters of our constructor.
Great, our class declares its own dependencies, and DI can read this information and instantiate everything that is needed to create a
Again, the question may arise as to how this list of classes will act as a list of providers.
It turns out that this is just a shorthand syntax. If we convert it into a longer and more extensive version, then the situation will somewhat clarify:
We have a
Now the next question arises: when is it desirable to use a longer syntax instead of a shorter one? Why write
Right. We can display a marker on almost anything. Here we display the
This is an incredibly powerful mechanism that allows not only to avoid name conflicts, but also to create a type as an interface, tying it to a specific implementation. In addition, we can unload this or that dependency in the right place, replacing it with a marker and not touching the rest of the code.
The introduction of dependencies in Angular 2 also brings a couple of recipe providers, which we will discuss in the next section.
Other provider configurations
Sometimes we want to get not an instance of a class, but just a single value or a factory function, which may require additional configuration. Therefore, the providers mechanism when working with DI in Angular 2 provides several recipes. Let's quickly go over them.
Providing values
You can provide a simple value with
This is useful when we want to provide simple configuration values.
Aliases
You can map a marker alias to another marker, like this:
Providing factories
Yes, our favorite factories
Of course, a factory can accept its own dependencies. To transfer dependencies to a factory, you simply add a list of tokens to this factory:
Optional dependencies
Decorator
As you can see, DI in Angular 2 solves almost all the problems that existed with DI in Angular. But one question we have not yet discussed. Are loners still being created with the new DI? Yes.
One-time dependencies and child injectors
If we need a one-time dependency (transient dependency) - one that, when requested, will always require its new instance, there are two options:
Factories can return instances of classes. It will not be loners.
You can create a child injector using
Child injectors are interesting not only this. It turns out that the child injector can search for the marker binding on the parent injector, if no binding is registered for the specific marker on the child injector. The following diagram shows what happens:
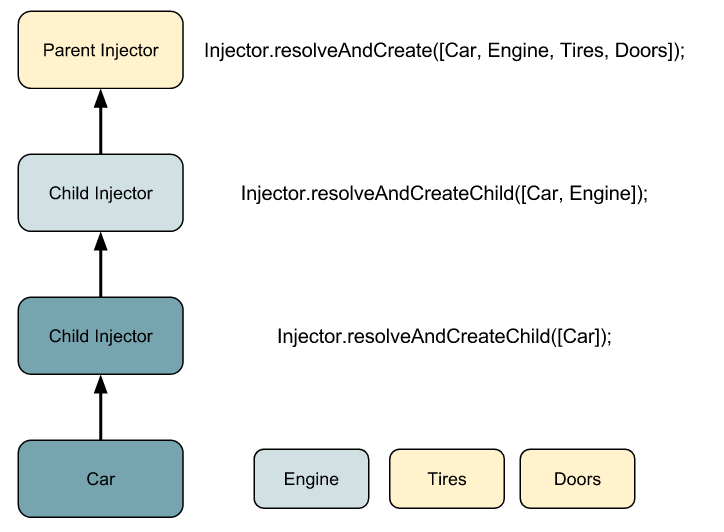
The figure shows three injectors, two of which are children. Each injector gets its own configuration of providers. Now, if we request an instance of the Car type from the second child injector, then this child injector will create the “car” object. However, the “engine” (engine) will be created by the first child injector, and the “tires” (tires) and “doors” (doors) - the most superior of the external parent injectors. It turns out something like a chain of prototypes.
You can even configure the visibility of dependencies, as well as specify the level up to which the child injector should look for information. However, this is a topic for another article.
How does all this work in Angular 2?
Now that we’ve covered the implementation of dependencies in Angular 2, let's discuss how this mechanism works within the framework of the framework. Should we create injectors manually when we assemble Angular 2 components? Fortunately, the Angular team wasted no time and effort, and created a beautiful API that hides the entire injector machine when building components in Angular 2.
Consider the following simple component Angular 2.
Nothing special. Suppose we want to extend this component with
Again, nothing special. Just create a class. Then, in order to open up access to it as an object under implementation in our application, we must provide some information about the provider’s configuration to the injector of our application. But how to do that? We haven't even created an injector yet.
That's all. Now, turning to the implementation as such, we apply the decorators
Or, if we dwell on TypeScript, we can simply add type annotations to our constructor:
Gorgeous! The whole interior of Angular miraculously disappeared somewhere! But one more question remains: what to do if we need a different configuration of bindings for a particular component?
Suppose we have a service
I will explain:
Conclusion
The new system of introducing dependencies in Angular solves all the problems that existed with DI in Angular 1. No more name conflicts. This is a separate component of the framework, can be used as a standalone system, even without Angular 2.
With all the unrelenting popularity of the AngularJS framework, we still did not have time to check out the book on its first version, and now we decided not to wait for the second and ask: how much does this work appeal to you, covering, apart from AngularJS, the wider context of JavaScript development?
')
Under the cut, you will find a translation of a regularly updated article by Pascal Precht (version of October 12, 2015), telling about such lofty matters as the introduction of dependencies in AngularJs and, most interestingly, those improvements that await this mechanism in Angular 2.
Dependency injection has always been one of the most visible and trump features of Angular. So, this framework allows you to embed dependencies in various components at different points in the application; you do not need to know how these dependencies are created, or what dependencies they in turn need. However, it turns out that the modern dependency injection mechanism (in Angular 1) has some problems to be solved in Angular 2 in order to build a new generation framework. In this article we will talk about the new dependency injection system - for future generations.
Before we start exploring new material, let's look at what “dependency injection” (DI) is and what problems with DI arise in Angular 1.
Dependency injection
Vojta Gina made an excellent report on the implementation of dependencies at the ng-conf 2014 conference. In his speech, he outlined the history of creating a new dependency injection system that will be developed for Angular 2, described the ideas on which it is based. In addition, he clearly described that DI can be viewed in two ways: as a design pattern and as a framework. In the first case, DI application patterns are explained, and in the second case, it is a question of a support system and dependency assemblies. I’m going to build this article in the same way, since it will be easier to explain this whole concept.
To begin, consider the following code and see what problems arise in it.
class Car { constructor() { this.engine = new Engine(); this.tires = Tires.getInstance(); this.doors = app.get('doors'); } } Nothing special. We have a class
Car
Car
with the constructor, in which we set everything necessary to create the car object (“car”) as soon as we need it. What is the problem with this code? As you can see, the constructor not only assigns the necessary dependencies to the internal properties, but also knows how their object is created. For example, an engine object (“engine”) is created using the Engine
Designer. Engine
, Tires
Tires
(bus) seems to be a lone interface, and doors
doors
(doors) are queried through a global object acting as a service locator .It turns out code that is difficult to maintain and even harder to test. Just imagine that you would like to test this class. How would you replace the
Engine
in this code Engine
Engine
MockEngine
dependency MockEngine
? When writing tests, we want to test different scenarios in which our code can be used, since each scenario requires its own configuration. If we need the code to be tested, it is assumed that this will be a reusable code. Which leads us to the thesis that the code under test = reused code and vice versa.So, how could this code be improved and made more convenient for testing? It's very simple, and you probably already know what this is about. Change the code like this:
class Car { constructor(engine, tires, doors) { this.engine = engine; this.tires = tires; this.doors = doors; } } We simply removed the creation of dependencies from the constructor and expanded the constructor function — now it counts on all the necessary dependencies. There are no concrete implementations left in the code; we literally moved the responsibility for creating these dependencies to a higher level. If we now wanted to create a car object, we would just have to pass all the necessary dependencies to the constructor:
var car = new Car( new Engine(), new Tires(), new Doors() ); Cool? Now the dependencies are separated from our class, which allows us to report the mock dependencies when writing tests:
var car = new Car( new MockEngine(), new MockTires(), new MockDoors() ); Imagine, this is the introduction of dependence . More precisely, this particular pattern is also called “ constructor injection ”. There are two more patterns: introduction through the class method (setter injection) and introduction through the interface (interface injection), but we will not consider them in this article.
Great, here we are using DI, but where does the DI system start to be involved? As mentioned earlier, we literally moved the responsibility for creating dependencies to a higher level. This is our new problem. Who organizes the assembly of all these dependencies for us? Ourselves.
function main() { var engine = new Engine(); var tires = new Tires(); var doors = new Doors(); var car = new Car(engine, tires, doors); car.drive(); } Now we need support for the main function. Doing this manually is quite cumbersome, especially as the application grows. Maybe it's better to do something like this?
function main() { var injector = new Injector(...) var car = injector.get(Car); car.drive(); } Deploying dependencies as a framework
Here we start using dependency injection as a framework. As you know, Angular 1 has its own DI system, which allows you to annotate services and other components; also with its help, the injector can find out which dependencies need to be instantiated. For example, the following code shows how to annotate our class
Car
Car
in Angular 1: class Car { ... } Car.$inject = ['Engine', 'Tires', 'Doors']; Then we register our
Car
Car
as a service, and whenever we ask for it, we get a single instance from him, without bothering to create the necessary dependencies for the "car". var app = angular.module('myApp', []); app.service('Car', Car); app.service('OtherService', function (Car) { // Car }); Everything is cool, but it turns out that the existing DI mechanism still has some problems:
- Internal cache - dependencies are issued as loners. Whenever we request a service, it is created only once within the life cycle of the application. Creating factory machinery is quite burdensome.
- Namespace conflict - an application can have only one marker of a specific “type”. If we have a car service and a third-party extension, which also introduces the same-name service into the program, we have a problem.
- Framework Embedding - Dependency injection in Angular 1 is built right into the framework. It is not possible to use this mechanism separately as an independent system.
These problems need to be resolved to take Angular's dependency injection to a new level.
Embedding Addictions in Angular 2
Before moving on to code review, you need to understand the concept behind the DI in Angular 2. The following figure illustrates the essential components of the new DI system.
The implementation of dependencies in Angular 2 basically consists of three elements:
- Injector is an object that provides us with various APIs for creating dependency instances.
- The provider - the provider resembles a recipe that describes the injector how to create an instance of a dependency. The provider has a marker that it maps to the factory function that creates the object.
- Dependency - A dependency is the type to which the created object should belong.
So, having got an idea about this concept, let's consider how it is implemented in the code. We continue to work with our class
Car
Car
and its dependencies. Here’s how you can use dependency injection in Angular 2 to get an instance of Car
Car
: import { Injector } from 'angular2/di'; var injector = Injector.resolveAndCreate([ Car, Engine, Tires, Doors ]); var car = injector.get(Car); We import from Angular 2
Injector
Injector
that provides some static APIs for creating injectors. Method resolveAndCreate()
resolveAndCreate()
- this is, in essence, a factory function that creates an injector and accepts a list of providers. Soon we will discuss how these classes are supposed to be used as providers, but for now injector.get()
focus on injector.get()
injector.get()
. See how we request a copy of Car
Car
in the last line? How does our injector know what dependencies need to be created to instantiate a “car”? Well, consider the class Car
Car
... import { Inject } from 'angular2/di'; class Car { constructor( @Inject(Engine) engine, @Inject(Tires) tires, @Inject(Doors) doors ) { ... } } We import the Inject entity from the framework and apply it as a decorator to the parameters of our constructor.
Inject
decorator Inject
attaches metadata to our Car
class Car
which is then consumed by our DI system. In principle, this is what we are doing here: we inform DI that the first parameter of the constructor must be an instance of the Engine
type. Engine
the second is of type Tires
Tires
and the third is Doors
Doors
. We can rewrite this code in the spirit of TypeScript to make it look more natural: class Car { constructor(engine: Engine, tires: Tires, doors: Doors) { ... } } Great, our class declares its own dependencies, and DI can read this information and instantiate everything that is needed to create a
Car
object. Car
. But how does the injector know how to create such an object? This is where providers come into play. Remember the resolveAndCreate()
method resolveAndCreate()
in which we passed the list of classes? var injector = Injector.resolveAndCreate([ Car, Engine, Tires, Doors ]); Again, the question may arise as to how this list of classes will act as a list of providers.
It turns out that this is just a shorthand syntax. If we convert it into a longer and more extensive version, then the situation will somewhat clarify:
import {provide} from 'angular2/angular2'; var injector = Injector.resolveAndCreate([ provide(Car, {useClass: Car}), provide(Engine, {useClass: Engine}), provide(Tires, {useClass: Tires}), provide(Doors {useClass: Doors}) ]); We have a
provide()
function. provide()
that displays a marker on the configuration object. This marker can be a type or a string. If you read these providers now, it becomes much clearer what is happening. We provide an instance of the type Car
Car
through Car
class Car
type Engine
Engine
through class Engine
Engine
etc. This is the recipe mechanism that we talked about above. So, with the help of providers, we do not just tell the injector what dependencies are used throughout the application, but also describe how the objects of these dependencies will be created.Now the next question arises: when is it desirable to use a longer syntax instead of a shorter one? Why write
provide(Foo, {useClass: Foo})
provide(Foo, {useClass: Foo})
if you can get by with foo alone, right? Yeah, right. That is why we immediately started with abbreviated syntax. However, a longer syntax opens up great, very large possibilities. Take a look at the following code snippet. provide(Engine, {useClass: OtherEngine}) Right. We can display a marker on almost anything. Here we display the
Engine
marker. Engine
on class OtherEngine
OtherEngine
. So, if we now request an object of type Engine
Engine
then we get an instance of the class OtherEngine
OtherEngine
.This is an incredibly powerful mechanism that allows not only to avoid name conflicts, but also to create a type as an interface, tying it to a specific implementation. In addition, we can unload this or that dependency in the right place, replacing it with a marker and not touching the rest of the code.
The introduction of dependencies in Angular 2 also brings a couple of recipe providers, which we will discuss in the next section.
Other provider configurations
Sometimes we want to get not an instance of a class, but just a single value or a factory function, which may require additional configuration. Therefore, the providers mechanism when working with DI in Angular 2 provides several recipes. Let's quickly go over them.
Providing values
You can provide a simple value with
{useValue: value} provide(String, {useValue: 'Hello World'}) This is useful when we want to provide simple configuration values.
Aliases
You can map a marker alias to another marker, like this:
provide(Engine, {useClass: Engine}) provide(V8, {useExisting: Engine}) Providing factories
Yes, our favorite factories
provide(Engine, {useFactory: () => { return function () { if (IS_V8) { return new V8Engine(); } else { return new V6Engine(); } } }}) Of course, a factory can accept its own dependencies. To transfer dependencies to a factory, you simply add a list of tokens to this factory:
provide(Engine, { useFactory: (car, engine) => { }, deps: [Car, Engine] }) Optional dependencies
Decorator
@Optional
@Optional
allows you to declare dependencies as optional. This is convenient, for example, in cases where our application relies on a third-party library, and if this library is not available, a rollback mechanism is needed. class Car { constructor(@Optional(jQuery) $) { if (!$) { // } } } As you can see, DI in Angular 2 solves almost all the problems that existed with DI in Angular. But one question we have not yet discussed. Are loners still being created with the new DI? Yes.
One-time dependencies and child injectors
If we need a one-time dependency (transient dependency) - one that, when requested, will always require its new instance, there are two options:
Factories can return instances of classes. It will not be loners.
provide(Engine, {useFactory: () => { return () => { return new Engine(); } }}) You can create a child injector using
Injector.resolveAndCreateChild()
Injector.resolveAndCreateChild()
. The child injector introduces its own bindings, and this instance will be different from the parent injector. var injector = Injector.resolveAndCreate([Engine]); var childInjector = injector.resolveAndCreateChild([Engine]); injector.get(Engine) !== childInjector.get(Engine); Child injectors are interesting not only this. It turns out that the child injector can search for the marker binding on the parent injector, if no binding is registered for the specific marker on the child injector. The following diagram shows what happens:
The figure shows three injectors, two of which are children. Each injector gets its own configuration of providers. Now, if we request an instance of the Car type from the second child injector, then this child injector will create the “car” object. However, the “engine” (engine) will be created by the first child injector, and the “tires” (tires) and “doors” (doors) - the most superior of the external parent injectors. It turns out something like a chain of prototypes.
You can even configure the visibility of dependencies, as well as specify the level up to which the child injector should look for information. However, this is a topic for another article.
How does all this work in Angular 2?
Now that we’ve covered the implementation of dependencies in Angular 2, let's discuss how this mechanism works within the framework of the framework. Should we create injectors manually when we assemble Angular 2 components? Fortunately, the Angular team wasted no time and effort, and created a beautiful API that hides the entire injector machine when building components in Angular 2.
Consider the following simple component Angular 2.
@Component({ selector: 'app' }) @View({ template: '<h1>Hello !</h1>' }) class App { constructor() { this.name = 'World'; } } bootstrap(App); Nothing special. Suppose we want to extend this component with
NameService
NameService
used in component constructor. Such a service might look like this: class NameService { constructor() { this.name = 'Pascal'; } getName() { return this.name; } } Again, nothing special. Just create a class. Then, in order to open up access to it as an object under implementation in our application, we must provide some information about the provider’s configuration to the injector of our application. But how to do that? We haven't even created an injector yet.
bootstrap()
method bootstrap()
is creating a root injector for our application when it boots up. It accepts the list of providers as the second argument, and this list will be transmitted directly to the injector right at the stage of its creation. In other words, here’s what you need to do here: bootstrap(App, [NameService]); That's all. Now, turning to the implementation as such, we apply the decorators
@Inject
studied above @Inject
. class App { constructor(@Inject(NameService) NameService) { this.name = NameService.getName(); } } Or, if we dwell on TypeScript, we can simply add type annotations to our constructor:
class App { constructor(NameService: NameService) { this.name = NameService.getName(); } } Gorgeous! The whole interior of Angular miraculously disappeared somewhere! But one more question remains: what to do if we need a different configuration of bindings for a particular component?
Suppose we have a service
NameService
NameService
that can be deployed across the entire application for the NameService
type NameService
, but exactly one component needs a different service? This is where the providers
property comes in handy. providers
annotations @Component
@Component
. It allows us to add providers to a specific component (as well as its child components). @Component({ selector: 'app', providers: [NameService] }) @View({ template: '<h1>Hello !</h1>' }) class App { ... } I will explain:
providers
providers
does not configure instances to be injected. It configures the child injector that will be created for this component. As mentioned above, we can also configure the visibility of our bindings, more precisely, to indicate which component it can embed. For example, the viewProviders property allows you to open access to dependencies only for the representation of the component, but not for its descendants.Conclusion
The new system of introducing dependencies in Angular solves all the problems that existed with DI in Angular 1. No more name conflicts. This is a separate component of the framework, can be used as a standalone system, even without Angular 2.
Source: https://habr.com/ru/post/270837/
All Articles