Use Carthage to manage dependencies

iOS developers are a fantastic community that offers a wide range of available third-party libraries.
If you developed for this platform, then you probably used at least one of these libraries. Be it AFNetworking , SDWebImage , SSKeychain or CocoaLumberjack , and you should already understand the importance of using someone else's code if you don’t like to “reinvent your bike.”
')
There are CocoaPods . If for some reason you are not familiar with this excellent tool, then this is the most popular dependency manager that simplifies the process of integrating this kind of library into your project.
CocoaPods is widely used in the iOS community, and even Google uses it to distribute various iOS SDKs.
While CocoaPods is an awesome dependency management tool, there are other options. Carthage is one such option; This is a ruthlessly simple dependency manager for Mac and iOS, created by a group of developers from Github.
It was the first dependency manager for working with Swift ; in fact, Carthage itself is written in Swift! It uses only dynamic frameworks instead of static libraries - this is just the way Swift binaries are supported, which are supported in iOS 8 and higher.
In this article on Carthage, you will learn the following:
- Why and when to use a dependency manager, and how does Carthage differ from other dependency managers?
- How to install Carthage
- Declaring your dependencies, installing and integrating them into a project
- Update dependencies to different versions
- Create an application that uses the DuckDuckGo API to find the definition of the hidden word.
Note: This article is for those who are already familiar with the basics of iOS development and with Swift , and are familiar with the Xcode development environment , and can work with the command line.
let's start
First, download the starter project you will work on.
It includes DuckDuckDefine "skeleton", a simple tool for finding word definitions using the DuckDuckGo API . At the moment there is only one problem: it still does not actually perform a search!
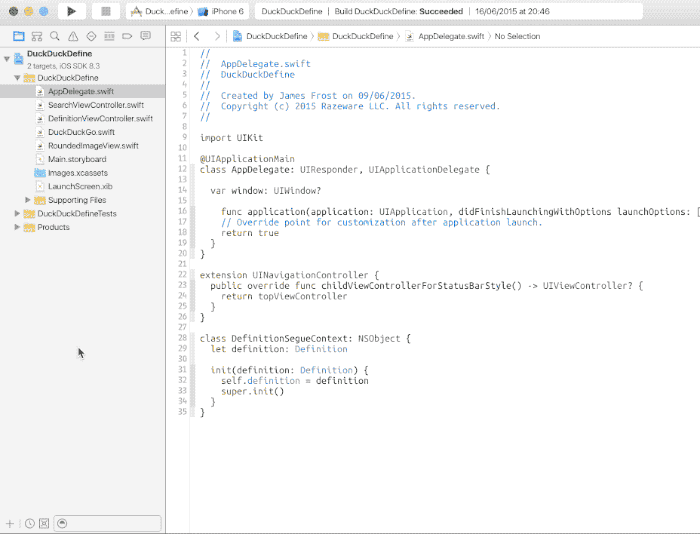
Open the project in Xcode and read it. Notice the two controllers: SearchViewController provides a search bar for the user to perform the search, and the DefinitionViewController displays the definition of the search term.
The main work takes place in the DuckDuckGo.swift file - or at least it will be there by the time you finish the project! At the moment, the performSearch (_: completion :) method is a lazy, useless block of code.
To perform a search, you will need to do two things:
- Make a request using the DuckDuckGo API
- Analyze / parse data in response to a request that you receive in JSON format
There are a number of open source libraries that can help you with these two tasks. Alamofire is a large Swift library that simplifies query creation, and SwiftyJSON allows you to get a more pleasant experience with working with JSON in Swift. And guess what?
You will use Carthage to add these dependencies to the project.
Dependency management
To add Alamofire and SwiftyJSON to a project, you can of course just visit their respective pages on Github , download the zip file with the source code and copy them into the project. So why use tools like Carthage?
Dependency managers perform a number of useful functions:
- They simplify and standardize the process of selecting third-party code and incorporating it into your project. Without such a tool, this can be done manually, by copying source files, by copying compiled binaries, or using a mechanism as Git submodules.
- They make it easy to update third-party libraries. Imagine that you need to visit each of the dependencies on github, download the source code, and copy it into your project every time there is an update. Why not do it for yourself?
- They select the appropriate and compatible dependency versions that you use. For example, if you manually add dependencies, the situation can be difficult when they depend on each other or share another dependency.
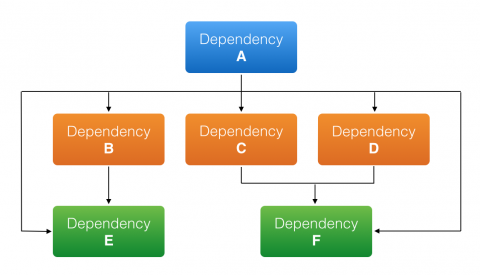
Most dependency managers will create a dependency graph from the dependencies of your project and each of these sub-dependencies, and then determine the best version of each for use.
You can do the same thing manually, but at what cost? Your sanity?
Carthage vs CocoaPods
So how exactly is Carthage different from CocoaPods, and why are you using another tool besides the most popular dependency manager for iOS?
The Carthage developers thought that although CocoaPods are usually easy to use, it is not. The main principles of Carthage work is that this tool should be ruthlessly simple.
CocoaPods adds complexity to both application development and library distribution processes:
- Libraries should create, update and contain Podspec files (or application developers should write their own files if they are not in the library).
- When added to a pod project, CocoaPods creates a new Xcode project with a target for each individual pod. Then you need to use the workspace and rely on the CocoaPods project to work correctly. Talk about a lot of advanced build options for support.
- The CocoaPods Podspecs data store is centralized, which can be problematic if for some reason it has disappeared or has become unavailable.
The goal of the Carthage project is to provide a simpler tool than CocoaPods; one that is easier to understand, easier to maintain and to be more flexible from.
This is achieved in several ways:
- Carthage does not change your project and does not force you to use the workspace.
- There is no need for Podspecs or a centralized data warehouse for the authors of the library to submit their pods. Your project can be developed as a framework, it can be used with Carthage . It uses existing information directly from Git and Xcode .
- Carthage does nothing magical; you always control the situation. Manually add dependencies to the project and Carthage , extract and create them.
Note: Carthage uses dynamic frameworks to achieve simplicity. This means that your project must support iOS 8 or later .
Now that you know the basic concepts, it's time to learn in practice what Carthage is.
Carthage installation
In the “core” of Carthage there is a command line tool that helps with fetching and creating dependencies.
There are two ways to install: download and run the latest version of the .pkg installer, or use the Homebrew Package Manager. In the same way that Carthage helps install Cocoa development packages, Homebrew helps you install useful Unix and OS X tools.
Today you will use the .pkg installer. Download the latest version of Carthage and double click on Carthage.pkg to launch the installer. Click Continue , choose a place to install, then click Continue again, and finally click Install .
Note: When you try to launch the installer, you may see a message that “the Carthage.pkg file cannot be opened because it is from an unknown developer. “If so, click on the installer and select“ Open ”from the context menu.
Done! To verify that Carthage is properly installed, you can simply run the command:
carthage version If everything went according to plan, you will see the version number of the Carthage that was installed.
Note: At the time of this writing, the current version of Carthage was 0.10.0.
Next, for Carthage, you need to specify which libraries to install. This is done using a cartfile .

Creating a Cartfile
Cartfile is a simple text file that describes the dependencies of your project for Carthage, so it defines what to install. Each line in the Cartfile indicates where to extract the dependency, the name of the dependency, and, if necessary, which version of the dependency is used. Cartfile is similar to a Podfile in CocoaPods .
Open Terminal and go to the root directory of your project (the directory containing your .xcodeproj files) with the cd command:
cd ~/Path/To/Starter/Project Create an empty Cartfile file with the touch command:
touch Cartfile And then open this file in Xcode for editing:
open -a Xcode Cartfile If you are familiar with another text editor like Vim , feel free to use it. However, do not use TextEdit to edit the file; using TextEdit is too easy to use the so-called “ automatic quotes ” instead of direct quotes, and they will disorder the work of Carthage.
Add the following lines to the cartfile and save it:
github "Alamofire/Alamofire" == 2.0 github "SwiftyJSON/SwiftyJSON" ~> 2.3.0 They tell Carthage that your project requires Alamofire version 2.0 and the latest version of SwiftyJSON, which is compatible with version 2.3.0.
Cartfile format
Cartfiles are written in a subset of OGDL : Ordered Graph Data Language . It sounds unusual, but it is really very simple. There are two key pieces of information in each Cartfile line:
- Source of Dependency: He tells Carthage where to get the dependency. Carthage supports two types of sources:
- github for hosted Github projects (name hint!). You define the Github project in the Username / ProjectName format , as you did with the Cartfile above.
- git for Git generic repositories hosted elsewhere. The git keyword is followed by the git repository path, be it a remote URL, using git: // , http: // , or ssh: // , or a local path to the git repository on the developer’s computer.
- Dependency Version: This is how you tell Carthage which version you would like to use. At your disposal there are several options, depending on how accurate you want to be:
- == 1.0 means “Use exactly version 1.0”
- > = 1.0 means “Use version 1.0 or higher”
- ~> 1.0 means “use any version that is compatible with 1.0”, which means, in essence, you can use any version up to the next version.
- If you specify ~> 1.7.5, then any version from 1.7.5 to, but not including 2.0, is considered compatible.
- In addition, if you specify ~> 2.0, then Carthage will use version 2.0 or later, but less than 3.0.
- Compatibility is based on Semantic Versioning - for more information, read our tutorial on Using CocoaPods with Swift .
- branch name / tag name / commit name means “Use git branch / tag / commit ”. For example, you can specify master, or commit as 5c8a74a.
If you do not specify a version, Carthage will simply use the latest version, which is compatible with other dependencies. You can see examples of each of these options in practice in Carthage in the Carthage README file
Create dependencies
Since you now have a complete Cartfile file, it's time to use it and install some dependencies!
Close the Xfile Cartfile and go back to Terminal and execute the following command:
carthage update --platform iOS This gives Carthage the command to clone repositories with Git from the specified paths in the Cartfile , and then create a framework for each dependency. You should get a result that shows what happened:
*** Fetching SwiftyJSON *** Fetching Alamofire *** Checking out Alamofire at "2.0.0" *** Checking out SwiftyJSON at "2.3.0" *** xcodebuild output can be found in /var/folders/h8/qp5163ln7mz2d7_l_yn6hd0m0000gp/T/carthage-xcodebuild.HBRNcq.log *** Building scheme "Alamofire iOS" in Alamofire.xcworkspace Parameters iOS ensures that the framework is created only for iOS . If you do not specify a platform, then by default Carthage will create for all frameworks (often Mac and iOS ) supported by the library.
If you want to take a look at the advanced options, you can run carthage update help.
By default, Carthage will debug and create a new directory called Carthage in the same location as the Cartfile file. Now open this directory using the command:
open Carthage You will see a Finder popup window that contains two directories: Build and Checkouts . Take a moment to see what Carthage has created for you.

Artifacts
If you are familiar with CocoaPods, you know that it makes some changes to your project and links it together with the special project Pods in Xcode workspace .
Carthage is a little different. It simply checks the code for your dependencies, and builds it into the frameworks, and then you decide whether to integrate it into the project or not. It looks like you will have more extra work, but it is profitable. It only takes a few minutes, but you will be more aware of the changes in the project.
When you upgrade carthage, Carthage creates several files and directories for you:

- Cartfile.resolved: This file is created as an add-on to the Cartfile . It determines which particular dependency versions Carthage chose to install. It is strongly recommended that you transfer this file to your version control directory, because its presence ensures that other developers can get started quickly using the exact same dependency version as yours.
- The Carthage directory contains two subdirectories:
- Build: This contains a built-in framework for each dependency. They can be integrated into your project, which you will create in the near future. Each framework is either created from source or downloaded from the “Releases” project page on Github.
- Checkouts: Here, Carthage checks the source code for each dependency that can be embedded in the framework. Carthage maintains its own internal cache of dependency repositories, so it does not have to clone the same source multiple times for different projects.
Whether you copy the Build and Checkouts catalogs into your repository is completely up to you. This is not necessary, but it means that whoever clones your repository will always have the binaries and / or source for each dependency available.
This can be a useful kind of insurance policy, for example, if Github is not available, or the source code repository is completely removed then you would have a clean backup. Do not change the code in the Checkouts folder, because its content can be overwritten at any time with a future update by carthage or the checkout command, and your work will disappear in the blink of an eye.
If modifications to your dependencies are necessary, you can update the carthage using the sub-modules option.
With this option, Carthage adds each dependency to the Checkouts folder in your Git repository as a submodule, that is, you can change the source of dependencies, commit and move those changes elsewhere without fear of overwriting.
Note: If other users need to use your project and you don’t commit the frameworks created, they will have to boot the carthage after the project has been cloned.
The bootstrap command will download and create exact versions of your dependencies that are defined in Cartfile.resolved .
On the other hand, carthage update would update the project to use the latest compatible versions for each dependency that may be necessary.
Now, how about using these artifacts that you worked so hard to create?
Adding frameworks to the project
Open the start project in Xcode, if you have not already done so, and click on the project DuckDuckDefine in the Project Navigator. Select the DuckDuckDefine target, then select the “General” tab at the top and scroll down to the Linked Frameworks and Libraries section.
In the Finder window, go to the Carthage directory and then to Build \ iOS . Now, move Alamofire.framework and SwiftyJSON.framework to the Linked Frameworks and Libraries section of Xcode :
This informs you that you need to associate your application with these frameworks, allowing you to use them in your own code.
Next, go to Build Phases and add a new Run Script . Add the following command:
/usr/local/bin/carthage copy-frameworks Click on + under Input Files and add an entry for each platform:
$(SRCROOT)/Carthage/Build/iOS/Alamofire.framework $(SRCROOT)/Carthage/Build/iOS/SwiftyJSON.framework Strictly speaking, this stage of construction is not required to run the project. However, this is a tricky workaround for a problem that may arise when you send an application to the AppStore, where applications with frameworks containing binary images for the iOS simulator are automatically rejected.
You will not see anything new, but you will need to compile and run the application to make sure everything continues to work as expected. When the application starts, you should see a searchable screen:

Fine. Now everything looks good. Next, update the dependencies.
Framework Updates
I must confess

Remember when you previously created the Cartfile , and I told you which versions of Alamofire and SwiftyJSON need to be installed? Well, as you can see, I gave you false information. I told you to use the old version of Alamofire.
Do not be angry! This was done with the best of intentions. Look at this as an opportunity ... yes, an opportunity to learn how to update dependencies. This is a gift.

Open your Cartfile file again. From the project directory, for this in Terminal , run:
open -a Xcode Cartfile Change the Alamofire line to:
github "Alamofire/Alamofire" ~> 2.0 This means that you can use any version of Alamofire that is compatible with 2.0 , so, any version up to and including not including 3.0 .
Adding dependencies with Carthage is a good idea to consider compatibility and limit the version you are targeting. This way you will know the exact status of its API and functionality.
For example, version 2.0 dependencies may include changes to the API application — you probably would not want to automatically upgrade to it if you created your project before version 1.4.
Save and close the Cartfile file, and return to terminal . Perform another update:
carthage update --platform iOS Carthage will check for new versions of each of the dependencies, unload them and create them, if necessary. You will see that he chooses the latest version of Alamofire.
Since the project already contains a link to the created .framework for Alamofire and Carthage creates a new version in the same place on the disk, you can relax and let Carthage do its work; Your project will automatically use the latest version of Alamofire!
DuckDuckGo!
Now that Alamofire and SwiftyJSON have been added to the project, you can use them to search as intended. Ready?
In Xcode, open DuckDuckGo.swift . At the top of the file, add an import statement for each dependency:
import Alamofire import SwiftyJSON Then add the following method to the ResultType , just below the two entries of the case statement:
func parseDefinitionFromJSON(json: JSON) -> Definition { switch self { case .Answer: let heading = json["Heading"].stringValue let abstract = json["AbstractText"].stringValue let imageURL = NSURL(string: json["Image"].stringValue) return Definition(title: heading, description: abstract, imageURL: imageURL) case .Exclusive: let answer = json["Answer"].stringValue return Definition(title: "Answer", description: answer, imageURL: nil) } } This uses SwiftyJSON to extrapolate the necessary data from the JSON response and create a Definition containing the title, description, and URL of the image.
DuckDuckGo API can return different types of results, but these two answers are Answer , which gives a simple definition of the desired concept, and Exclusive , which gives exhaustive answers to calculations.
Then, while still in DuckDuckGo, replace the existing definition of performSearch (_: completion :) with this:
func performSearch(searchTerm: String, completion: ((definition: Definition?) -> Void)) { // 1 let parameters: [String:AnyObject] = ["q": searchTerm, "format": "json", "pretty": 1, "no_html": 1, "skip_disambig": 1] // 2 Alamofire.request(.GET, "https://api.duckduckgo.com", parameters: parameters).responseJSON { _, _, result in // 3 if result.isFailure { completion(definition: nil) } // 4 if let jsonObject: AnyObject = result.value { let json = JSON(jsonObject) // 5 if let jsonType = json["Type"].string, resultType = ResultType(rawValue: jsonType) { // 6 let definition = resultType.parseDefinitionFromJSON(json) completion(definition: definition) } } } } There are quite a few, so let's break it down:
- First, create a list of options to send to DuckDuckGo. The most important here are the search criteria itself and the format that tells the web service to respond with JSON.
- Then we execute the query using Alamofire. This call performs a Get api.duckduckgo.com request, using the dictionary of the parameter created above.
- As soon as the answer returns, check if the request has stopped working. If so, then leave early.
- If necessary, associate a JSON response object to verify that it has a value, and then use it to create JSON SwiftyJSON structures.
- Then, grab the value for the Type key from JSON and use it to create the ResultType enum that is declared at the top of DuckDuckGo.swift .
- Finally, let the result type analyze the definition from the provided JSON objects.
Note: If you are wondering why the skip_disambig parameter exists , it tells DuckDuckGo not to return unambiguous results.
The results of the ambiguity are similar to those pages that you see on Wikipedia: did you mean the Chris Evans film actor, Chris Evans, the British TV anchorman, or Chris Evans the robber?
skip_disambig means the API will simply select the most likely result and return it.
Compile and run the project! Once the application starts, enter the search criteria in the search bar: you can try typing “Duck” or “Carthage”. If everything works correctly, you should see the definition on the next screen.
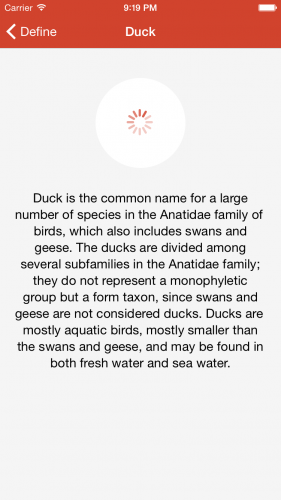
However, something is missing: drawing! It's one thing to read what a duck is, but who reads so much? And with a picture is another matter - well, I will save you from these cliches - you know what I mean.
In any case, who does not like to look at the pictures with ducks? Or kittens like last season, right?
Open DefinitionViewController.swift , and add import Alamofire just below the existing UIKit import at the top:
import Alamofire Then, at the bottom of the viewDidLoad () method, add the following
if let imageURL = definition.imageURL { Alamofire.request(.GET, imageURL).response { _, _, data, _ in self.activityIndicator.stopAnimating() if let data = data { let image = UIImage(data: data) self.imageView.image = image } } } This code "opens" the URL of the definition image if it has one image and performs a GET request to get the image. If the query successfully returns data, it is used to create the images and displays them on the screen in the image view.
Compile and run the application, then perform a search.

Where to go?
You can download the completed project .
Congratulations, you learned about the basic principles of dependency management and about Carthage itself, gained experience with Carthage , learning how to add dependencies to a project, and use these dependencies to make the application useful!
Also learned how to update dependencies for future releases.
If you want to learn more about Carthage , then you must first study the Carthage README and the documentation on Build Artifacts .
Justin Spahr-Summers, one of the founders of the project, gave a wonderful talk in Realm.io about Carthage called “ Ruthlessly Simple Dependency Management. "
Hope you learned enough from this article on Carthage. If you have any questions or comments, join the discussion in the comments!
Source: https://habr.com/ru/post/270805/
All Articles