Share experience. FirePOWER Services Integration on Cisco ASA

Hi habr! In this article, I wanted to share my experience in implementing FirePOWER services on the Cisco ASA firewall. What is FirePOWER, SourceFIRE, etc. Already a lot has been written on Habré in the blog of the company cisco here and here . In this article I will try first to describe the process of initialization of a solution from a practical point of view, to tell about the nuances and problems that had to be encountered.
The description of the initial system initialization steps described in this article is based on the FirePOWER Services for ASA POV Best Practices document.
The article will be divided into two parts. In the first part, I will describe points that, in my opinion, should be paid special attention to during the planning and implementation stages of the solution. The first point is the FirePOWER licensing features of Cisco ASA, the second is the user authentication and system integration features with Microsoft Active Directory. In the second part I will go through all the implementation steps, highlighting as little as possible nuances.
')
Immediately make a small comment. At the time of implementing FirePOWER on the Cisco ASA, described in this article, the FirePOWER services on the ASA5515 were configured only with the help of the stand-alone Defense Center (FireSIGHT) management system. The preferred option was the Defense Center virtual machine. This option is described in the article. However, almost before the moment of publication of the article, a new version of FirePOWER 6.0.0.0 was released. Judging by the Release Notes , in the new version of FirePOWER, management can be carried out using the ASA-ASDM graphical interface, that is, the use of a separate management system is not a prerequisite.
FirePOWER Licensing Features on Cisco ASA
Since there is a confusion with licenses from time to time, I will try to clarify.
All licenses are installed using FireSIGHT. The following set of licenses is required to implement FirePOWER services on Cisco ASA:
- FireSIGHT license;
- License PROTECT + CONTROL;
- Subscription licenses (Protection, URL Filtering, Malware);
Now we’ll focus on each type of license in more detail.
FireSIGHT license
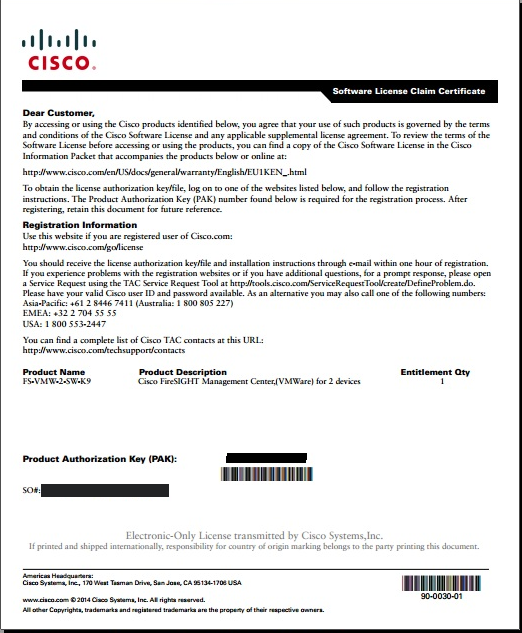
This license provides the ability to detect devices and users on the network (Discovery Policies). The license has no restrictions on the term of validity. An example of a FireSIGHT license partner number for managing up to two Cisco ASAs with a FirePOWER module:
FS-VMW-2-SW-K9 =
Cisco FireSIGHT Management Center, (VMWare) for 2 devices
In the FireSIGHT interface in the System -> Licenses tab, this license will open the following items:
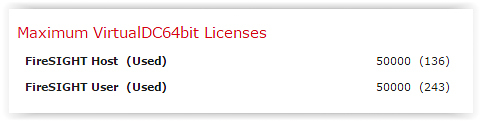
The number 50,000 is the maximum possible number of detectable devices and users supported by a particular model of the Defense Center (FireSIGHT). For virtual FireSIGHT, this is exactly the limit - 50 thousand.
By the way, we didn’t notice anywhere in FireSIGHT, where the limit on the number of connected managed devices (FirePOWER modules) is indicated ...
PROTECT + CONTROL license
This license opens functionality:
- PROTECT: IPS, file monitoring (file type detection, the ability to block download / upload files by type), Security Intelligence (bot network detection / blocking, Open Proxy, Spam distributors, TOR, etc.). Here you need to make a reservation. For full IPS operation, in addition to the PROTECT license, a subscription license is required to access the Cisco cloud, from which IPS signature updates will be downloaded. Subscription licenses will be discussed below.
- CONTROL: Recognition and control of applications, access control for users.
Example of license number PROTECT + CONTROL for ASA5515:
ASA5515-CTRL-LIC =
Cisco ASA5515 Control License
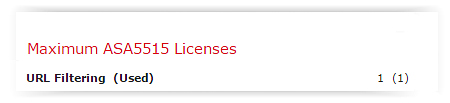
On FireSIGHT in the System -> Licenses tab, this license will open the following items:

Nuance license PROTECT + CONTROL. I want to pay special attention, this partnumber has zero cost. I recommend very carefully tracking the specifications at the time of the order so that this partnumber is not lost anywhere. In my case, this is exactly what happened. PAK for the license ASA5515-CTRL-LIC is not available. I had to write a letter to licensing@cisco.com with a request to generate a missing license for me. We must pay tribute to Cisco TAC, the missing license was sent within six hours, without asking any unnecessary questions.
Subscription Licenses (Protection, URL Filtering, Malware)
These licenses open functionality:
- Protection. Subscribe to IPS signature updates;
- URL Filtering. Subscribe to update URL categories and reputations;
- Malware. Subscription to AMP functionality - checking files for the presence of malicious code based on the analysis of the reputation of files passing through the device (reputation is requested for the value of the hash function applied to the file).
Subscription licenses may be valid for 1 year and 3 years. For new ASA models (5506, 5508, 5516), subscriptions for 5 years are available.
The nuance of subscription licenses . A very important point. Subscription licenses take effect from the moment of ordering, and not from the moment of installation on the device. Thus, if work on the implementation of the system began 3 months after the moment of ordering the licenses, then these 3 months of validity of the license will be irretrievably lost.
Update
FirePOWER Subscription Licenses are valid 31 days after ordering. Recently it became known that since November 2015, when ordering FirePOWER license-subscriptions, it became possible to indicate a shift in the beginning and end of the license validity in months. The maximum shift period is 2 months (60 days).
Licenses are combined into various bundle options (URL Filtering + Protection, Protection + Malware, URL Filtering + Protection + Malware). In my case, the URL Filtering + Protection license was used. The partnumber looked like this:
L-ASA5515-TAC =
Cisco ASA5515 FirePOWER IPS and URL Licenses
On FireSIGHT in the System -> Licenses tab, this license will open the following items:
I draw your attention, although this subscription includes a subscription to IPS (Protection), the presence of the Protection license is displayed elsewhere, for which the PROTECT + CONTROL license is responsible.
Features user authentication and integration with AD
Since we want to be able to authenticate users and apply Internet access policies to specific accounts and / or groups of AD, system integration with AD is necessary.
At the time of our FirePOWER implementation on the Cisco ASA, user authentication only occurs in passive mode. Passive authentication implies that the “agent” software is installed separately, which “listens” to user activity in AD logs, forms the IP address matching database - the users, and transmits this information to the system (in our case, FireSIGHT). The big plus of passive authentication is the fact that the User Experience for the end user does not change at all. But there are also disadvantages, which I will try to tell you.
The lack of a passive authentication approach is manifested primarily if a company has several users simultaneously using the same domain machine (or more precisely, one IP address) to access the Internet. Such an authentication scheme may lead to incorrect access restriction rules. The simplest example of a problem situation is the use of a terminal farm (built on the basis of Microsoft RDS). The problem manifests itself if users of the same terminal server should have different access restrictions to the Internet. Each new user logging into the terminal server system grants the entire IP address of the server (and, therefore, all other working users) its own access to the Internet.
Also, the problem with the incorrect granting of access rights may occur if at the time of the user's login to the system the PC was disconnected from the network. Thus, in theory, the new user will be able to get the access rights of the previous PC user, if after some time the PC is connected back to the network.
Another approach to the authentication procedure is active user authentication. Active user authentication was announced for FirePOWER almost before the moment of publication of this article. Active authentication implies that the user, in order to gain access to the Internet, must independently enter his credentials at the request of the system.
Active authentication can be enhanced with Single Sign On (SSO). In this case, the user does not need to enter anything. We had experience implementing a previous Cisco solution in the NGFW class - ASA CX. Due to the interface of several technologies, namely, active authentication in SSO mode, IP Virtualization on terminal servers and special DHCP configuration, ASA CX was able to solve the problem of correct authentication of terminal server users. The solution of the described task by means of the ASA + FirePOWER product has not yet been verified by us.
By the way, some time ago we compared various systems that provide firewall functions for a new generation. Products such as ASA CX, ASA FirePOWER, Cisco WSA (despite the fact that this is a web proxy, and not NGFW, WSA provides similar capabilities in terms of controlling Internet access), Checkpoint and Fortigate were compared. In the process of testing, we paid special attention to user authentication procedures and, in particular, to the problem of authentication of terminal server users. As a result, we found out that the Cisco WSA web proxy server and Checkpoint software and hardware systems are able to correctly recognize users of terminal servers.
Cisco WSA is able to identify client sessions not only by source IP address, but also by so-called session fingerprints (Session Cookies). Simply put, Cisco WSA sends information to the user browser, which is then used on the WSA to determine if a session belongs to a particular user. Therefore, Internet access filtering rules will correctly apply to users of terminal servers that access the Internet from the same IP address.
Checkpoint proposes to use special software - Identity Agent, which can also be installed on the terminal server (hereinafter TC). The principle of operation of the TS agent differs from the principle of operation of the WSA. TS Agent installs a TDI driver (Transport Driver Interface), which intercepts all requests from all user processes to a new connection. As soon as TDI receives such a request, it tells the system to assign the user to this new connection and selects the outgoing port for it from the port pool allocated specifically to this user.
But back to FireSIGHT and FirePOWER. As noted earlier, user authentication in our case works in a passive mode. The agent is software FireSIGHT User Agent. What is this agent, and what settings you need to perform, will be discussed later in the "Implementation Process" section. At the moment, I want to add only one thing: in the step of integrating the system with the corporate Active Directory, you will probably need the support of Microsoft specialists, Active Directory administrators. First, it may be necessary to check the settings and / or reconfigure Active Directory in accordance with the requirements of the User Agent. User Agent requirements can be found in the User Guide in the “ Configuring Permissions to Connect to an Active Directory Server ” section.
Secondly, if something does not work: (and we did not work a couple of times), we will need help in diagnosing the problem.
Implementation process
So, let's proceed to the description of the implementation process. I was lucky to implement the FirePOWER solution on the Cisco ASA5515. The introduction of the Cisco ASA 5515 firewall into the network infrastructure in this article is omitted and I begin the story from the stage when it was necessary to implement FirePOWER services directly.
First of all, I highlighted the following plan, which I followed later:
- Install FireSIGHT Management System:
1. Deploy and configure the FireSIGHT management virtual machine;
2. Install the necessary licenses;
3. Install the patch for FireSIGHT; - Install the FirePOWER software module on Cisco ASA:
4. Upgrade IOS on Cisco ASA to version 9.2.2 (4) or higher;
5. Install the SSD disk on the Cisco ASA;
6. Install and configure the FirePOWER software module on the Cisco ASA; - Further settings:
7. Connect the FirePOWER software module to the FireSIGHT control system;
8. Install the patch for the FirePOWER module using the FireSIGHT management system;
9. Install FireSIGHT User Agent for system integration with corporate server AD;
10. Set up the implemented system in accordance with best practice;
11. Configure user access policies on the Internet.
So, step number 1 - Deploy and configure the virtual machine of the FireSIGHT management system. You need to deploy a virtual machine from the OVF-template on the ESXi server. I will not describe this step in detail, there is a detailed instruction .
System requirements for FireSIGHT:
| Option | Default value | Custom value |
|---|---|---|
| RAM | 4 GB | 4 GB - minimum 7 GB - maximum (recommended when using filtering by categories and site reputation and using Security Intelligence functionality) |
| Virtual processors | four | until 6 |
| Hard drives | 250 GB | not customizable |
- VMware ESXi 5.5 (vSphere 5.5)
- VMware ESXi 5.1 (vSphere 5.1)
- VMware vCloud Director 5.1
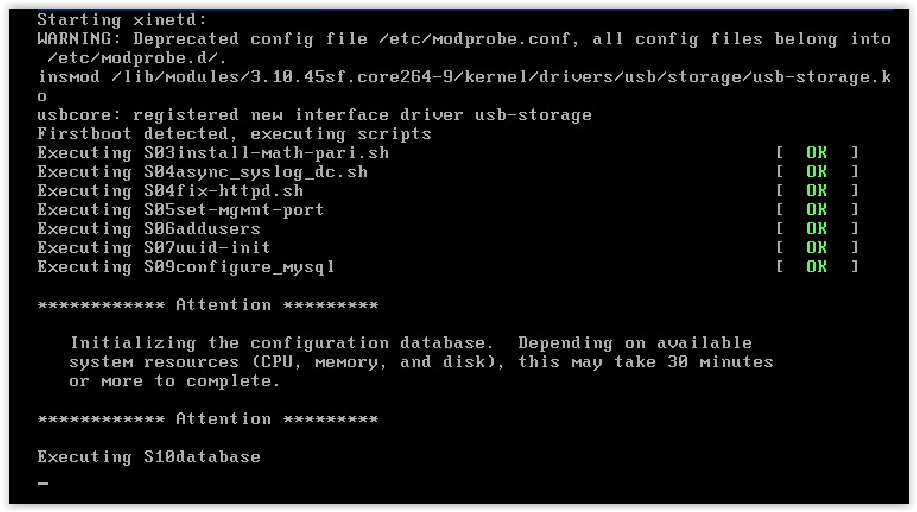
Nuances . At this step, I did not single out any interesting nuances. The only time I wanted to mention is that the first launch of FireSIGHT takes a long time.
First, during the boot process, FireSIGHT will offer to wait 30 minutes:
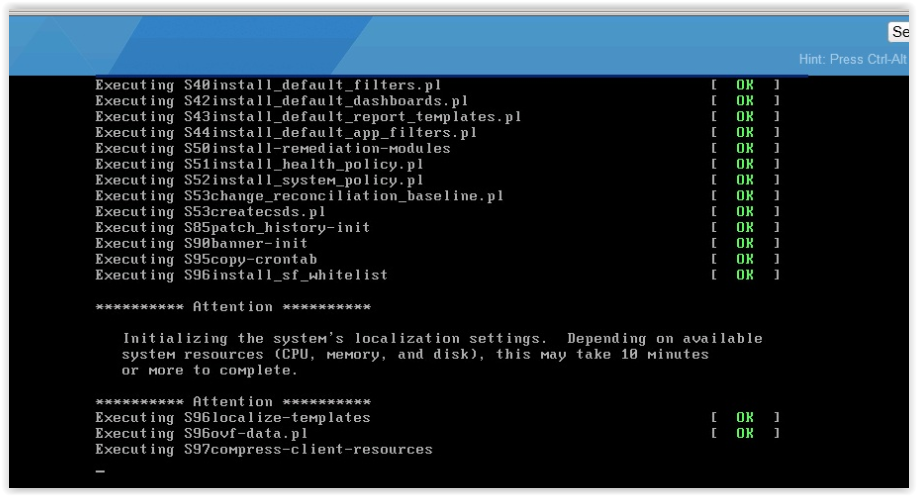
And then another 10 minutes:
After loading FireSIGHT in the console, we see the standard linux-like command shell. To carry out the initial initialization and installation of network settings, you must run the appropriate script and complete all the proposed steps:
And now, we finally get the long-awaited FireSIGHT Web interface:

After the first login to the Web interface, FireSIGHT will prompt you to change the administrator password and perform / confirm additional initialization settings (network settings, date / time settings, update settings, backup settings, etc.)
Step # 2 - Install the necessary licenses.
All required licenses are supplied in the Product Activation Key (PAK) format:
In order to generate license files from the PAK data, you need to go through the standard procedure for almost any Cisco Systems product on the Product License Registration site.
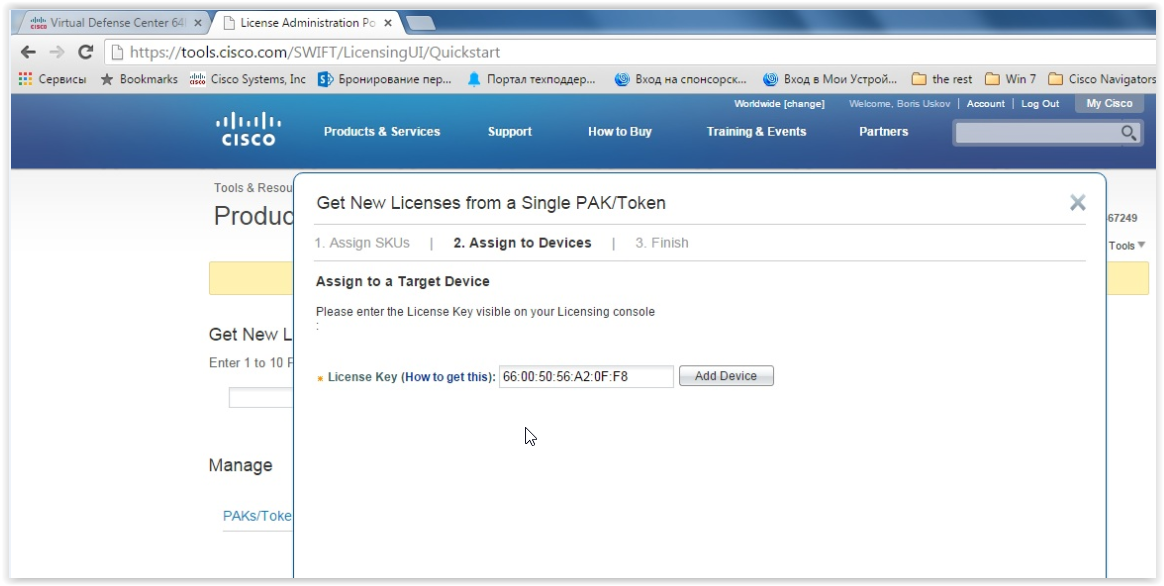
In the case of a FireSIGHT virtual machine, licenses are tied to a specific instance. If you want to deploy a second copy from the same OVF-template, to complete the work you will need to purchase an additional set of licenses. The unique identifier of the virtual machine is the License Key parameter. You can learn the License Key of the FireSIGHT virtual machine on the System -> Licenses tab by clicking the Add New License button:

This License Key must be entered together with PAK during the process of generating a license file on the above site:
If you later need to obtain license files for another FireSIGHT instance with a different License Key parameter, you will need to carry out the License Rehosting procedure (similar to the situation when Cisco equipment is replaced by RMA).
After completing the PAK registration procedure on the site, the contents of the obtained license files must be entered into FireSIGHT:

I have already described the nuances of licensing in detail in the first part of the article. Here I will remind again two main ideas:
1. Do not lose the CTRL license for Cisco ASA (free position in the specification);
2. Subscription licenses take effect from the moment an order is completed.
Step # 3 - Install the patch for FireSIGHT. It is recommended to install the latest patch for your version of FireSIGHT. Intermediate patches do not need to be installed, because they are embedded in the last patch.
Patches are installed on the System -> Updates tab:

After installing the patch, the system will automatically reboot.
Nuances At this step, there are no nuances. The only point that I again wanted to mention is that the installation of patches is a long process, therefore I recommend to perform this step in advance.
Step 4 - Upgrade IOS to Cisco ASA to version 9.2.2 (4) or higher. FirePOWER module support on Cisco ASA is claimed starting with IOS version 9.2.2 (4) and higher, so an IOS upgrade is required. This information is described in Cisco ASA Compatibility , Table 8, “ ASA Module Compatibility .”
Nuances Special nuances again, no. Ways to upgrade ASA to version 9.2.2 are described in the Release Notes in the Upgrading section of the Software .
If any other software modules (Legacy IPS or ASA CX) were used on the Cisco ASA prior to FirePOWER deployment, you must uninstall these modules.
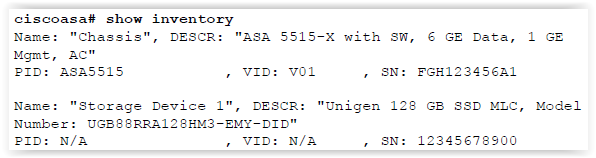
Step # 5 - Install the SSD on the Cisco ASA.
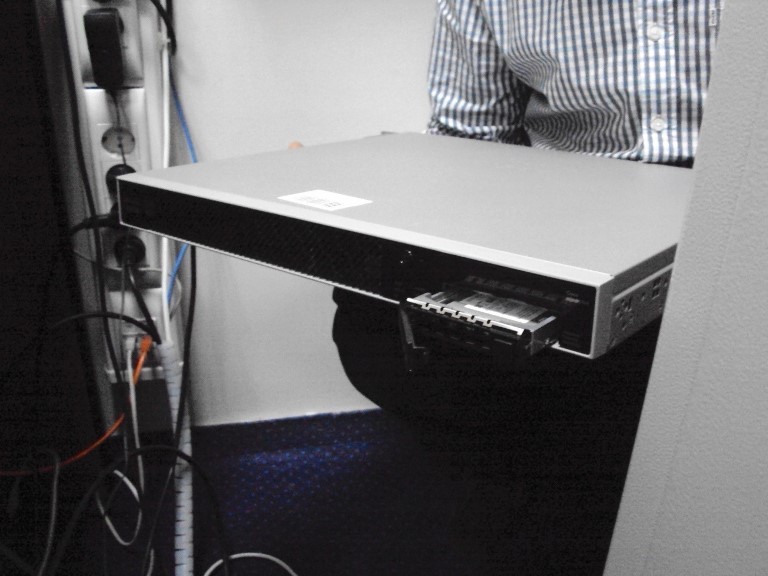
Nuances The SSD drive is Hot-swappable, but in order for the ASA to see it, a reboot is required. The status of the SSD drive can be checked with the command inventory inventory:
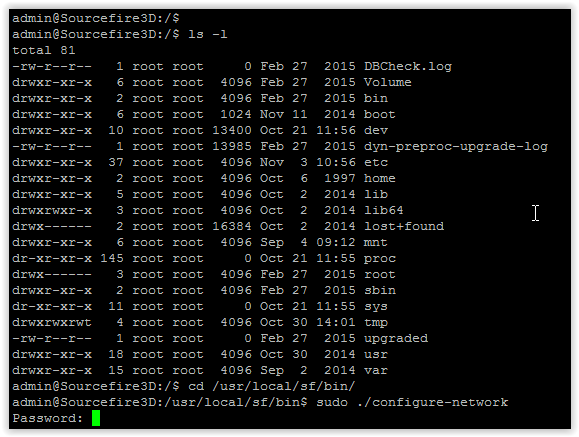
Step 6 — Install and Configure the FirePOWER Software Module on the Cisco ASA. First you need to install the boot image:
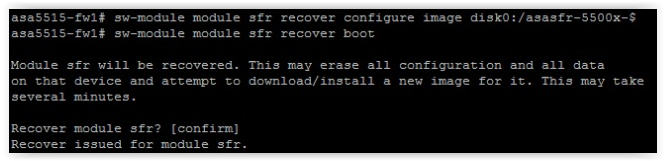
The installation process will take 10-15 minutes. You can check whether the installation has completed or not by using the session sfr console command. If an error message is displayed, wait. If the boot image fails on the command line, the download completed successfully.
Next, you need to perform network settings and run the installation system package:
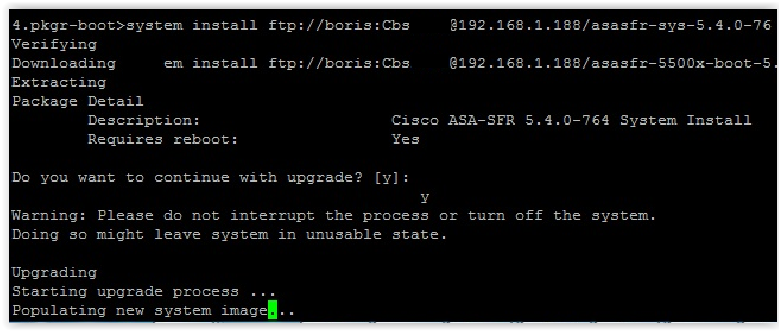
After installing the system package, you need to repeat the network settings again and specify the management system for this FirePOWER module, i.e. specify the IP address of our FireSIGHT system, which we deployed in the previous steps:

Nuance. To get to the FirePOWER command line from the Cisco ASA command line, enter the session sfr console command from enable mode (privileged mode). To return to the Cisco ASA command line, you need to hold down the CTRL + SHIFT + 6 combination, release this combination and press the letter key "x".
Step # 7 - Connect the FirePOWER software module to the FireSIGHT control system. In the previous step, during the configuration of the FirePOWER module, we specified for it the control system of the command configure manager add. Now, on the FireSIGHT management system, we also need to add a new managed device. This can be done on the Devices -> Device Management tab by clicking the Add Device button:
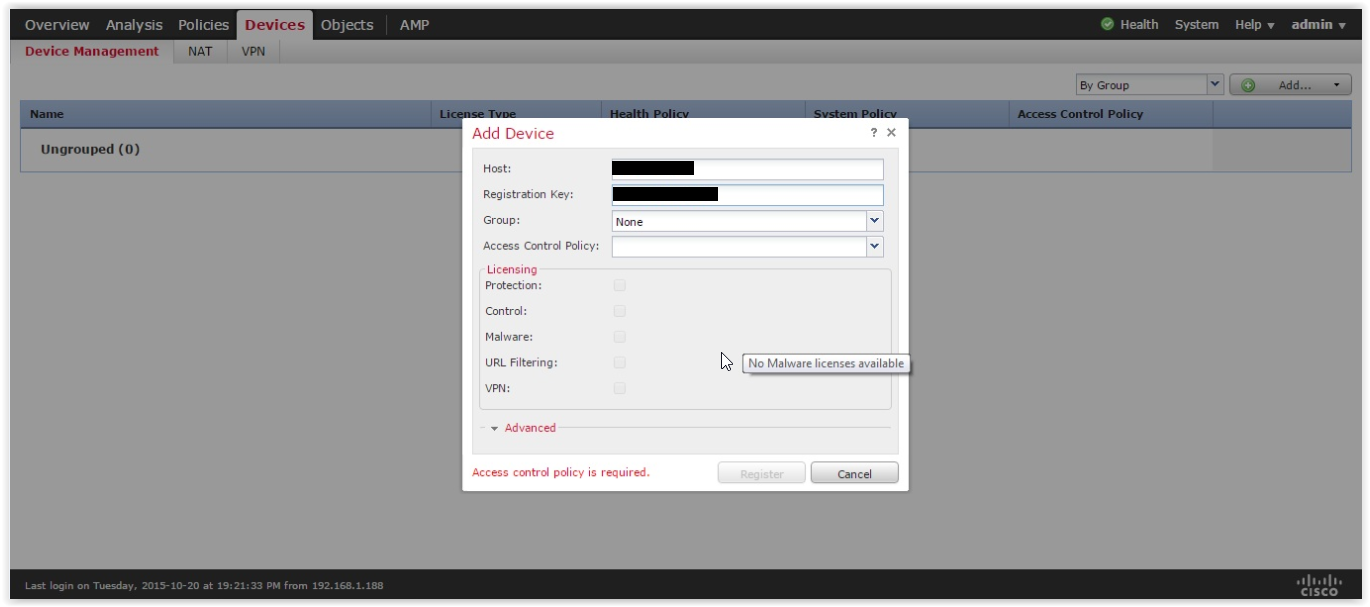
After adding ASA5515 FirePOWER to the FireSIGHT management system, you need to apply the existing licenses to the managed module:

Nuance. At this step, there are no nuances.
Step # 8 - Install the patch for the FirePOWER module using the FireSIGHT management system. In step 3, we have already installed a patch for FireSIGHT. Now you need to install a patch for the managed device - the FirePOWER module. As usual, it is recommended to install the latest patch for your version. Intermediate patches do not need to be installed, because they are embedded in the last patch.
Patches are installed on the System -> Updates tab:
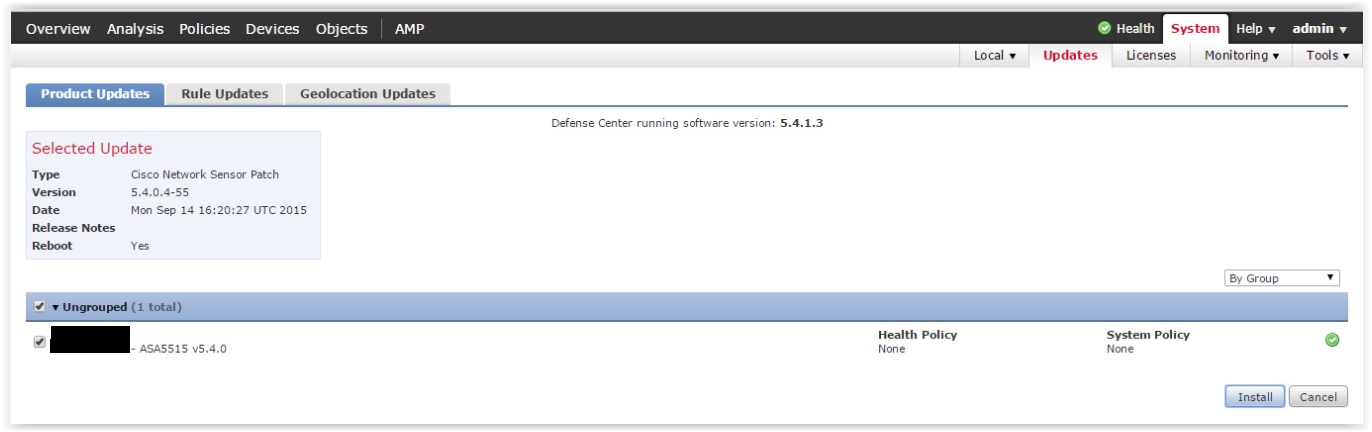
After installing the patch, the FirePOWER module will automatically restart.
Nuance. At this step, there are no nuances. The only time, again, installing patches is a long process.
Step # 9 - Install the FireSIGHT User Agent to integrate the system with the corporate AD server. I already described the features of integrating the system with AD and the user authentication process in the first part of the article. Here I will show what and how you need to configure.
First you need to perform two actions on FireSIGHT in the Policies -> Users tab:
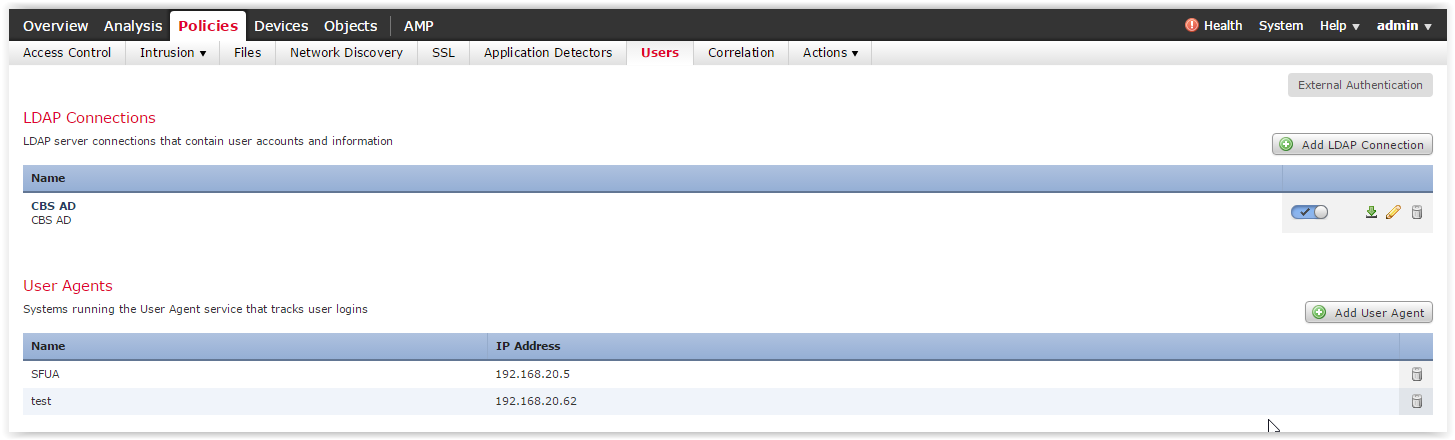
The first step is to create a direct FireSIGHT connection to Active Directory (the Add LDAP Connection button) and set the necessary LDAP parameters in the menu that appears (IP addresses / ports AD, BASE DN, user account). A direct FireSIGHT connection is necessary so that you can create access policies for specific users and groups from AD. In addition, a direct connection is necessary to determine the membership of users to groups.
The second action is to specify the FireSIGHT User Agent (the Add User Agent button).
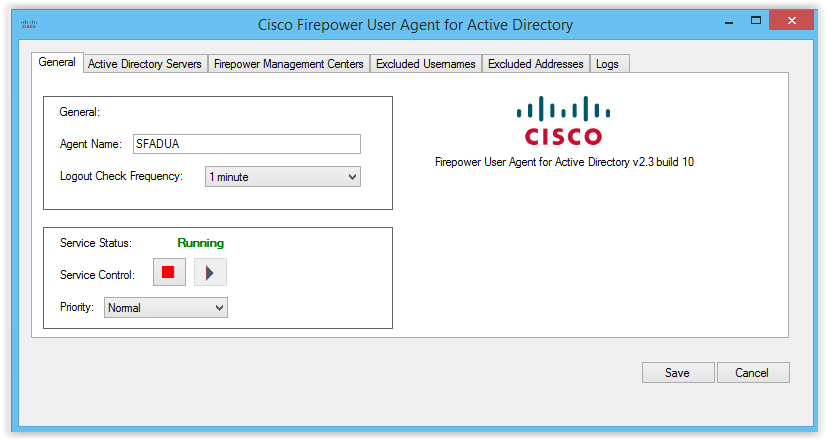
Further, to integrate with AD, you need to install the small FireSIGHT User Agent software on any computer in the domain or directly on the Active Directory server. The appearance of the main tab of the agent is shown in the figure below:
Next, you need to perform two simple agent settings. On the Active Director Servers tab, you need to add corporate AD servers:
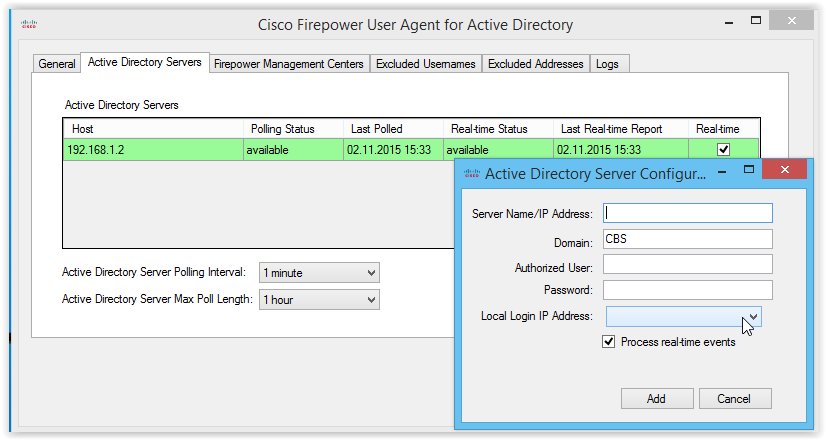
Authorized User / Password - user account under which the agent will enter Active Directory to read Security logs. The user account must have some rights and permissions, which are described in detail in the Grant Minimum Permission to An Active Directory User Account document.
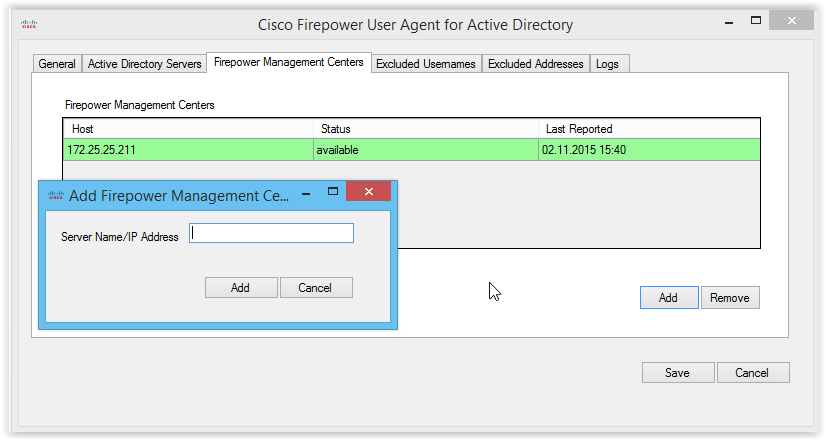
On the FirePOWER Management Centers tab, you must specify the IP address of the FireSIGHT system:
If everything is configured correctly, on the Analysis tab -> Users -> User Activity we will be able to see the current user activity:

Nuances In my case, it was necessary to deploy the User Agent directly on the Active Directory server. The AD administrator independently performed and verified the necessary AD settings and provided the user accounts. However, when trying to add an AD server to the FireSIGHT User Agent, we always got the error “Unable to read security logs”:
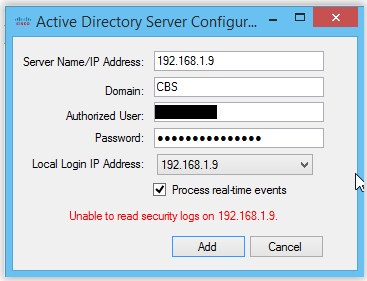
The impression was that the user’s account did not have all the necessary rights. However, when we tried to install the User Agent on a remote computer, the AD server was added to the User Agent without problems. As a result, it turned out that I just did not carefully read the User Guide. It turned out that if the agent is installed directly on the AD server, the “localhost” keyword should be specified in the Server Name / IP Address field, and not the IP address or domain name of the server.
In parallel with writing the article, my colleague implemented FirePOWER and also lost some time during the integration of the agent with AD. In his case, the AD administrator also fulfilled the necessary requirements for the user account used in the agent. However, the AD server refused to send the necessary data to the agent, despite the

The highlighted column is only present in agent version 2.2 (displays information about when data from the AD server was last received). In addition, when Real-time mode is on, Real-time Status is displayed as unavailable (and as it turned out later, this was not related to the problems described in this document , despite the corresponding messages in the agent log):

The figure shows the agent version 2.3 and it is Real-time Status and the absence of the Last Reported column in this version of the agent, initially, they let us in the wrong place.
But in the end, it turned out that, in addition to the Default Domain Controllers Policy , another group policy was used on the AD server, and the AD administrator added permissions to the user through the tools of this separately created group policy. Microsoft specialists have suggested that the permissions on the Manage auditing and security log in the Default Domain Controllers Policy always take precedence over other group policies. As soon as permission was added to the user directly in the Default Domain Controllers Policy, the problem was resolved. Here I would like to note that in the Cisco documentation we have not found an exact indication anywhere to use the Default Domain Controllers Policy . Although the document in the example in the screenshot shows that this particular group policy is used.
Step 10 - Set up the implemented system in accordance with best practice. At this step, the following policies are supposed to be configured:
- System Policy (NTP, DNS, Database, etc.);
- Health Policy (parameters and thresholds for various indicators of the "vital activity" of the system);
- Network Discovery (network discovery policies);
- Intrusion Policy (intrusion detection system policies);
- File Policy (file type detection policies, blocking download / upload files, policies for detecting malicious code in files).
I will not dwell on the settings of all these policies.These policies are configured based on the company's security policy requirements and Cisco recommendations. At the same step, alerts, configuration backup policies and logs of network transactions, report templates and much more are configured.
Nuances The time zone of Moscow in FireSIGHT is still incorrect (UTC + 4). To correctly display events, it is necessary to use a different time zone UTC + 3. I chose Bahrain (Asia -> Bahrain).
Step 11 - Configure user access policies.
The system offers very wide possibilities for creating access control policies. These include access control to various types of applications (Web applications, Client Applications, Application Protocols, etc.), access control by categories and URL reputations, file policies, Security Intelligence (detection / blocking of Bot networks, Open Proxy, Spam- distributors, TOR, etc.), IPS. Issues of system capabilities are already material for other articles and discussions.
Conclusion
In this article, I tried to talk about the main nuances of FirePOWER implementation on the Cisco ASA and briefly go through the implementation steps. I hope this article will help in more detail about the product and some aspects of its work. Well, in conclusion about the FirePOWER I would like to say: “May the force be with you ... FIRE.”
Source: https://habr.com/ru/post/270795/
All Articles