LinOTP + RADIUS. Authentication with one-time passwords
1. Basic information
This tutorial describes the process of integrating LinOTP and FreeRadius on machines running CentOS and setting up SSH user authentication using the OTP generated using Google Authenticator software (or anyone using a similar algorithm).
2. Baseline
This instruction implies that we have three machines running CentOS 6.7. They are on the same subnet and network connectivity is configured between them. The names and addresses of the machines are shown in the table below.
  Hostname IP Address Reference Name Operating System
 linotp 10.1.0.114 LinOTP CentOS 6.7 Server
 radius-p 10.1.0.122 RADIUS CentOS 6.7 Server
 client 10.1.0.113 CentOS 6.7 Client
 admin-PC 10.1.0.120 Workstation (AWP) Windows 7
Linotp software is deployed on the LinOTP server according to the instructions from the official website ( document “LinOTP Server Installation” ). Software version linotp 2.7.2.
')
On the RADIUS server, the freeradius server is deployed. I will not describe the package installation in detail, because it is executed trivially with the help of the yum manager. A complete list of packages required for installation is given below:
- freeradius-2.2.6-6.el6_7.i686;
- freeradius-perl-2.2.6-6.el6_7.i686;
- perl-devel-5.10.1-141.el6.i686;
- perl-Pod-Escapes-1.04-141.el6.i686;
- perl-version-0.77-141.el6.i686;
- perl-Test-Harness-3.17-141.el6.i686;
- perl-ExtUtils-ParseXS-2.2003.0-141.el6.i686;
- perl-Digest-SHA-5.47-141.el6.i686;
- perl-libs-5.10.1-141.el6.i686;
- perl-Module-Pluggable-3.90-141.el6.i686;
- perl-5.10.1-141.el6.i686;
- perl-ExtUtils-MakeMaker-6.55-141.el6.i686;
- perl-DBI-1.609-4.el6.i686;
- perl-CPAN-1.9402-141.el6.i686;
- perl-pod-simple-3.13-141.el6.i686.
Machine Client is a RADIUS client on which OTP authentication will take place. To support RADIUS authentication, the pam_radius-1.3.17-2.el5 package is installed on the machine.
The Windows-based workstation machine simulates an administrator's workstation that will access the client’s machine via SSH using the OTP. This machine is Windows 7, put the SSH client and GAUTH software - the OTP generator.
3. What we get in the end
The purpose of this work is to configure authentication on the Client via the RADIUS server using the OTP (generated on the LinOTP Server).
The RADIUS server in this configuration does not store user accounts in its database — this task is entrusted to the LinOTP Server. The RADIUS server stores the NAS database, i.e. list of servers and network equipment, the users of which it authenticates. This configuration uses the text configuration file /etc/raddb/clients.conf for this.
The LinOTP server in this configuration is used to manage user tokens. Information about users and their tokens is stored in a MySQL database, also deployed on the LinOTP server. The linotp software itself does not have the functionality to control the KNS of users, thus it is necessary to add users and their data to the MySQL table manually.
4. Configuration steps
4.1. RADIUS Configuration Procedure
The settings described in this section are made on the RADIUS server, i.e. by car radius-p.
4.1.1. Installing Perl Plugins
# perl -MCPAN -e shell cpan[1]> install LWP cpan[1]> install LWP:UserAgent cpan[1]> install LWP:UserAgent:Determined cpan[1]> install LWP::Protocol::https Some of the installed modules may give the following error when installing:
  Running make install
   make test had returned bad status
 Failed during this command:
  MSCHILLI / LWP-Protocol-https-6.06.tar.gz: make_test NO
In this case, you should use the force install command, for example:
cpan[1]> force install LWP::Protocol::https A successful installation will be indicated by a message of the form:
  Failed during this command:
  MSCHILLI / LWP-Protocol-https-6.06.tar.gz: 'make_test FAILED but not ignored because' force 'in effect
4.1.2. Radius Setup
Add the NAS client radius in the /etc/raddb/clients.conf file. In our case it is:
  client 10.1.0.113 {
         secret = testing123
         shortname = client
 }
Add the line to / etc / raddb / users
DEFAULT Auth-type: = perl
*** However, this is not the best option. In this case, you force the authentication type, which makes it impossible for radius to simultaneously authenticate users to the users who are authenticated via linOTP, for example, their accounts are stored in mysql (and the corresponding settings are made in RADIUS).
I am in practice, just faced with this situation. In this case, this directive (DEFAULT Auth-type: = perl) is not necessary to register, but instead added a condition to the / etc / raddb / sites-enabled / default file in the authorize section:
  if (Sql-Group == sql) {pap}
           else {update control {
                                  Auth-Type: = perl
                                  }
                  }
This condition (written in the unlang language built in radius) includes the “perl” authentication type only for users who are not members of the user group authenticated through sql.
In the / etc / freeradius / modules / perl file, modify the following directive:
  perl {
          module = <linotp_radius.pm file path>
In the / etc / freeradius / sites-enabled / default file, modify the “authenticate” section as follows:
  authenticate {
 perl
4.1.3. Creating file - connector linotp_radius.pm
Create a file linotp_radius.pm with the following content:
#________START______ use strict; use LWP; use LWP::UserAgent::Determined; # use ... # This is very important ! Without this script will not get the filled hashesh from main. use vars qw(%RAD_REQUEST %RAD_REPLY %RAD_CHECK $URL); use Data::Dumper; $ENV{'PERL_LWP_SSL_VERIFY_HOSTNAME'} = 0; $URL = "https://<IP LinOTP>/validate/simplecheck"; # This is hash wich hold original request from radius #my %RAD_REQUEST; # In this hash you add values that will be returned to NAS. #my %RAD_REPLY; #This is for check items #my %RAD_CHECK; # # This the remapping of return values # use constant RLM_MODULE_REJECT=> 0;# /* immediately reject the request */ use constant RLM_MODULE_FAIL=> 1;# /* module failed, don't reply */ use constant RLM_MODULE_OK=> 2;# /* the module is OK, continue */ use constant RLM_MODULE_HANDLED=> 3;# /* the module handled the request, so stop. */ use constant RLM_MODULE_INVALID=> 4;# /* the module considers the request invalid. */ use constant RLM_MODULE_USERLOCK=> 5;# /* reject the request (user is locked out) */ use constant RLM_MODULE_NOTFOUND=> 6;# /* user not found */ use constant RLM_MODULE_NOOP=> 7;# /* module succeeded without doing anything */ use constant RLM_MODULE_UPDATED=> 8;# /* OK (pairs modified) */ use constant RLM_MODULE_NUMCODES=> 9;# /* How many return codes there are */ # Function to handle authorize sub authorize { # For debugging purposes only # &log_request_attributes; # Here's where your authorization code comes # You can call another function from here: &test_call; return RLM_MODULE_OK; } # Function to handle authenticate sub authenticate { # For debugging purposes only # &log_request_attributes; my $ua = LWP::UserAgent->new(); my $req = HTTP::Request->new(GET => $URL . "?user=" . $RAD_REQUEST{'User-Name'} . "&pass=" . $RAD_REQUEST{'User-Password'} ); my $response = $ua->request( $req ); die "Error at $URL\n ", $response->status_line, "\n Aborting" unless $response->is_success; if($response->content =~ m/:\-\)/i) { return RLM_MODULE_OK; } else { $RAD_REPLY{'Reply-Message'} = "LinOTP server denied access!"; return RLM_MODULE_REJECT; } } # Function to handle preacct sub preacct { # For debugging purposes only # &log_request_attributes; return RLM_MODULE_OK; } # Function to handle accounting sub accounting { # For debugging purposes only # &log_request_attributes; # You can call another subroutine from here &test_call; return RLM_MODULE_OK; } # Function to handle checksimul sub checksimul { # For debugging purposes only # &log_request_attributes; return RLM_MODULE_OK; } # Function to handle pre_proxy sub pre_proxy { # For debugging purposes only # &log_request_attributes; return RLM_MODULE_OK; } # Function to handle post_proxy sub post_proxy { # For debugging purposes only # &log_request_attributes; return RLM_MODULE_OK; } # Function to handle post_auth sub post_auth { # For debugging purposes only # &log_request_attributes; return RLM_MODULE_OK; } # Function to handle xlat sub xlat { # For debugging purposes only # &log_request_attributes; # Loads some external perl and evaluate it my ($filename,$a,$b,$c,$d) = @_; &radiusd::radlog(1, "From xlat $filename "); &radiusd::radlog(1,"From xlat $a $b $c $d "); local *FH; open FH, $filename or die "open '$filename' $!"; local($/) = undef; my $sub = <FH>; close FH; my $eval = qq{ sub handler{ $sub;} }; eval $eval; eval {main->handler;}; } # Function to handle detach sub detach { # For debugging purposes only # &log_request_attributes; # Do some logging. &radiusd::radlog(0,"rlm_perl::Detaching. Reloading. Done."); } # # Some functions that can be called from other functions # sub test_call { # Some code goes here } sub log_request_attributes { # This shouldn't be done in production environments! # This is only meant for debugging! for (keys %RAD_REQUEST) { &radiusd::radlog(1, "RAD_REQUEST: $_ = $RAD_REQUEST{$_}"); } } 1; #___________END This file was placed in the / etc / raddb / folder, but you can place it in another place, the main thing to remember is that the path to this file must be specified in / etc / freeradius / modules / perl (mentioned above).
At this stage, the radius should start successfully with the / usr / sbin / radiusd –X command and, when trying to connect to the Radius Client, send a request to the LinOTP server. This can be verified by connecting to the client via ssh and simultaneously listening to traffic on the LinOTP server using TCPDUMP. You should see packets on port 443 TCP.
4.2. LinOTP setup procedure
LinOTP was configured according to the official developer documentation ( see LinOTP document - QuickStart Guide ).
LinOTP by itself does not have the functionality to create users, it can only read information about UZ (accounts) of users from LDAP, MySQL or text files. This instruction implies that we use MySQL deployed on the same server as LinOTP as the base for UZ.
4.2.1. Formation of the base of user UZ
When creating a useridresolver (this is just an indication, a kind of “connector” to the UZ database, from which LinOTP will take user data), during initial initialization of the LinOTP server, you must specify the “password” field in the SQL table mapping with user data. This password is only needed for user access to the self service portal. If we do not plan to use this portal, then this can be not done.
If this was not done at the initialization stage, then it can be added later. column to table. Example:
ALTER TABLE usertable ADD password VARCHAR (200);
Next, generate a password hash for the user with the command:
/opt/LINOTP/bin/linotp-create-sqlidresolver-user -u < > -i < id > -p < > At the output we get a string of the form:
user7; 2; {SSHA512} 3QWyB5u2TkPLDc2mjIJxtcCLOVHSjLS / MyYjPGNIENchm5riFHF3M9CW7csaxADAFml8WkH / Whd1A047nUAaeWk2dFZod1ZhYzN3cTRNUkpRdlhrLmVsdFVSeUNIaUdWVEZVT1ZycW5BSlVXajVHbHVvckhHSmNYOWp5M3FQLi8 =; All that is highlighted in yellow is the resulting password hash. Next, add it to the appropriate field in the table:
update usertable set password = <hash obtained using> where user = 'user7';
In my example, the useridresolver configuration looks like this:
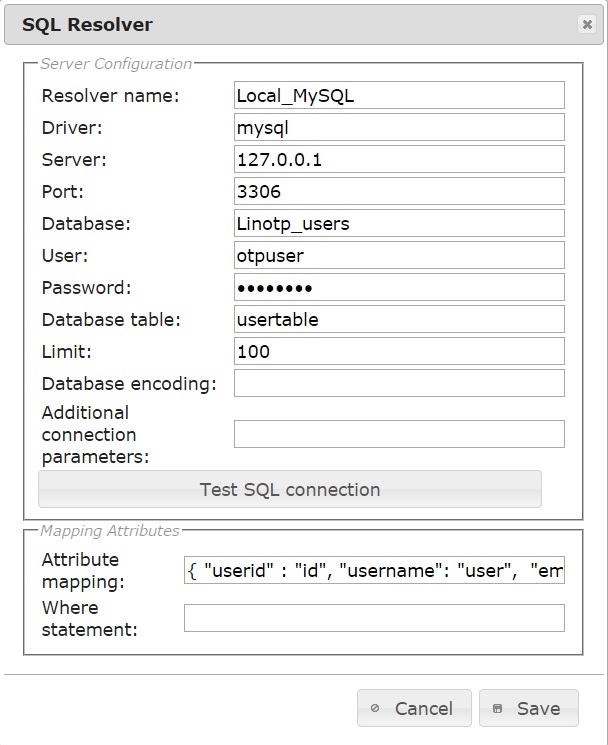
Figure 1 - Sample useridresolver configuration
Particular attention should be paid to the field "Attribute mapping", which is not fully visible in the figure. Here are its contents:
{"userid": "id", "username": "user", "email": "mail", "surname": "sn", "givenname": "givenName", "password": "password"} And below is the MySQL table (located on the LinOTP server) in which the users' KNOs are stored and with which the mapping is configured:
  mysql> select * from usertable;
 + ---- + ------- + ------------------------ + -------- + - --------- + ----------- +
 |  id |  user |  mail |  sn |  givenName | password |
 + ---- + ------- + ------------------------ + -------- + - --------- + ----------- +
 |  1 |  user6 |  user6@localdomain.mail |  ivan |  petrov | <hash> |
 |  2 |  user7 |  user7@localdomain.mail |  sergey |  fedorov | <hash> |
 + ---- + ------- + ------------------------ + -------- + - --------- + ----------- +
I suppose additional comments are unnecessary. The “userid” field in the useridresolver is mapped in the “id” field in the MySQL database. The “username” field in the useridresolver is in the “user” field in the MySQL database, etc.
And so, in the end, what we see in the LinOTP interface is to go to the “User view” tab:

Figure 2 - Displaying users in the LinOTP interface
4.2.2. LinOTP policy setup
Policies are a key element of LinOTP and allow flexible configuration of authentication options, types and restrictions on the number of tokens, etc.
To demonstrate LinOTP operation, the following set of policies will suffice:
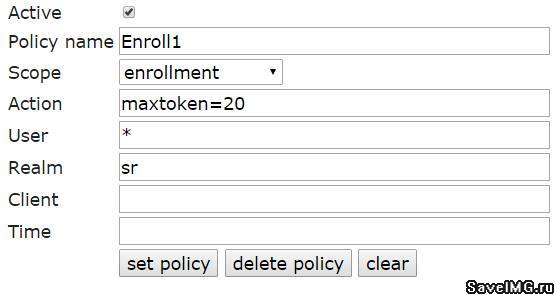
Figure 3 - Token Assignment Policies
This policy determines the maximum number of tokens that can be issued for a user - the “maxtoken” parameter.
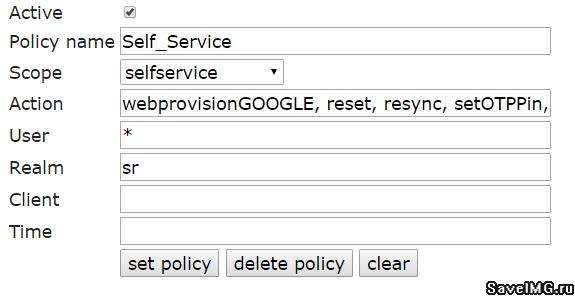
Figure 4 - Self-Service Portal Policies
This policy regulates the types of tokens and operations on them that users can independently perform through the self-service portal.

Figure 5 - System Policies
Required permission to read and modify system settings by the administrator (it makes sense to set additional settings in scope = system to restrict administrators).
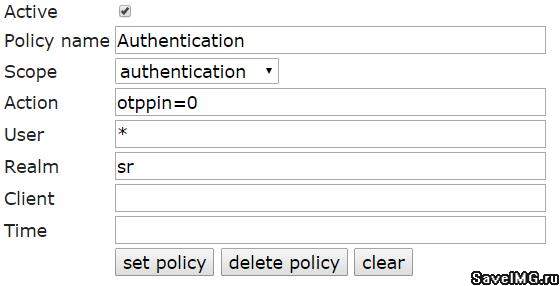
Figure 6 - Authentication Policies
This policy requires entering OTP-PIN and OTP when authenticating to the target system (Client). Parameter otppin = 0 is responsible for this. When it is set to 2, authentication will be performed only via OTP. If you set it to “1”, authentication will be performed using the combination User Password + OTP (the password is the same as for access to the self-service portal).
Example: parameter otppin = 0; user3 has a token with OTP-PIN = 123456 and generated OTP = 234567. In this case, the password of user3 when accessing ssh to the Client will be <OTP-PIN> i.e. 123456234567.
4.2.3. Creating tokens for users
After LinOTP is connected to the base of user KS (useridresolver is configured) and the minimum set of policies has been created, you can proceed to creating tokens for users.
Go to the “User view” tab, select the user for which you want to create a token. In the left menu, click "Enroll". You will see a window with the settings of the new token.

Figure 8 - Creating a token
Token type - token type. Many different tokens are supported. To support google authenticator (which will be used in this example), select “HMAC time based”. This type of token will generate one-time passwords (OTP), tied to the current time (sometimes called TOTR). Hence the time synchronization requirement on all our machines — the RADIUS Server, the LinOTP Server, and the Client.
Token Seed - you can ask to generate a random sequence (which was done in this example) - “generate a random seed” or set your own “enter seed”.
Token settings - to support Google authenticator, just check the box “Google authenticator compliant”, otherwise you can independently set the length of the generated OTP token - “OTP digits”, the algorithm used - “Hash algorithm”, the time window in which this OTP will act "Time step".
An arbitrary description of the token - “Description” - can be left empty at all, it does not affect anything.
Token Pin - pin code of this token. At least 6 digits for google authenticator.
After entering all the necessary data, click "Enroll". Token created.
You will see a window with information about the token: QR code of the token for reading by the Google Authenticator application installed on the mobile device and a string containing the secret required, for example, to import the token into the GAUTH software client running under Windows.
Copy the "otpauth: // totp / TOTP ...." Line at the bottom of the window and save. You will need this when configuring the OTP client on Windows.

Figure 9 - Created Token
After that, the window can be closed. This token will appear in the list of tokens on the “Token view” tab in the LinOTP interface.
4.3. Client setup procedure
4.3.1. Install the necessary software
In order for the Client to support authentication via RADIUS, it is necessary to install the libpam-radius-auth package on the Client (10.1.0.113 in the example). This is also done with the help of the yum manager.
4.3.2. Configuring Client Authentication via RADIUS
It is necessary to configure authentication through the radius server. To do this, edit the “other-server other-secret 3” line in the /etc/pam_radius_auth.conf file. Replace “other server” with the IP address of the RADIUS server, i.e. 10.1.0.122, and “other-secret” to the secret specified in section 4.1.2, i.e. "Testing123". The result is the following:
10.1.0.122 testing123 3
Edit the /etc/pam.d/sshd file. Add a line to it:
sufficient /lib/security/pam_radius_auth.so
above the lines
  # Standard Un * x authentication.
 @include common-auth
You also need to create a user account on the Client with the same name as the user on LinOTP for which the token was created. In this example, user7.
useradd –m –d / home / user7 user7
4.3.3. The procedure for setting arm
On the AWP you need to install the OTP generator, for example GAUTH. You can get this software here. It is installed from the installer file contained in the downloaded archive. The installation process is trivial.
After installation, it is recommended to fix the key in the registry as described below. Without this edit, the software will work, but at startup it will produce an error that does not please the eye. This is a GAUTH bug, described in the FAQ for this software.
You need to add a parameter of type String named key to the following branch:
HKEY_CURRENT_USER \ Software \ GoogleAuth \ GoogleAuth \ 1.0.0.
After that, run the client GAUTH through the START - programs - Google Auth. The corresponding icon will appear in the tray. Click on it with the right mouse button and select “Modify key”. In the opened window we insert the secret from the string saved during the creation of the token.
Example line: otpauth: // totp / TOTP00013B2A? Secret = APY ***** JH & counter = 0
In this case, the secret to be inserted will be:
APY ***** JH
Click "Save key".

Figure 10 - Import secret to GAUTH
Now, when you hover the mouse over the icon in the tray, a six-digit OTP will appear and in brackets near it the time that this OTP will be valid.
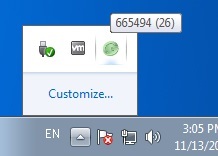
Figure 11 - Generated OTP
5. Verifying authentication operation using OTP
We start on putS client workstation “putty”. Connect to the Client (in the example - 10.1.0.113). Specify the name of the user for which the token was created (in the example, user7), enter <OTP-PIN> as a password without spaces or dashes, in one word (for example, 123456665494, where 123456 is a PIN and 665494 is a generated OTP).
If everything is done correctly, the clock on all servers and the workstation is synchronized, then user access user7 must be authorized.
Source: https://habr.com/ru/post/270571/
All Articles