Google Cloud Endpoints in Java: A Guide. Part 2 (Frontend)
Part One: Google Cloud Endpoints on Java: A Guide. part 1
Part Three: Google Cloud Endpoints on Java: A Guide. part 3
Part Four: Working with the database in Google App Engine / Google Cloud Endpoints in Java: Objectify framework
Part Five: Google Cloud Storage with Java: Images and Other Files in the Clouds
In the first part, we looked at creating a project on Google Cloud Endpoints with Java , in this article we will focus on creating a frontend to our API.
In addition to the tools used in the first part, we will need:
')
AngularJS , and an initial overview of how it works, optionally Bootstrap or Foundation .
The simplest web server on the local machine for testing, and the server for application deployment.
The application on AngularJS consists of the usual set of "static" files: .html, .js, .css + image files, fonts, etc. It would seem, since this is usually a one-page application, you can simply open index.html in the browser. However, if you try to just open index.html in Google Chrome, we can see a page without main content and something like this in the console:

In Firefox, the same application can work without a web server, but links like src = "// ... or href =" ... turn into file: /// ...
Well, Chrome DevTools , as my taste is much more convenient.
Therefore, it will still be preferable to use a web server on a local machine. You can use Sinatra on Ruby, NodeJS , good old Apache HTTP Server ("httpd") . The App Engine Java SDK also includes a development web server running on a local machine, and simulates GAE service services including a database (datastore).
In IntelliJ IDEA, when editing a .html file, browser icons are highlighted, if you click on the file, it will open on a local web server running IntelliJ IDEA.
In my opinion, the most simple and versatile option is Python (especially since you most likely have it already installed):
in this case, "python" means starting Python version 2.x (by default), "-m" - starting the module , " SimpleHTTPServer " - the module itself is the simplest http-server and included in the standard installation (i.e. You installed Python, then this module is already present), optionally - the port number, if this parameter is not specified, then by default it will be 8000.
This command should be executed in the project directory, where our index.htm is located , which will be given by default in / on the web server, and on localhost : 8000 / (http://127.0.0.1:8000/) we get static http -server. This is convenient because there are no settings in the directory itself, and generally no settings are needed.
You can place a front-end web application for our API on any web server where you can place static files, for example, on free GitHub Pages (see also Setting up a custom domain with GitHub Pages ) or on Amazon Web Services (AWS) .
Naturally the logical solution is to place the frontend on GAE. It may be in one project. In our manual, for educational purposes, we will place the backend and front-end in different projects on GAE. In the previous section, we created two projects for this in the developer console. The frontend will be a live project in hello-habrahabr-webapp, and the backend will be in hello-habrahabr-api.
In addition to the existing domain name of the form {project ID} .appspot.com, we can use our own domain registered either through Google Domains , or from another registrar, or several domains for one project. Previously, this feature was only available for domains used in Google Apps , but more recently, the binding to Google Apps has been removed.
In order to add a domain, select the project in the developer console and go to the menu: Compute -> App Engine -> Settings -> Custom domains. Then choose 'Register a new domain' to register a domain with Google, or if we already have a domain 'Add a custom domain'

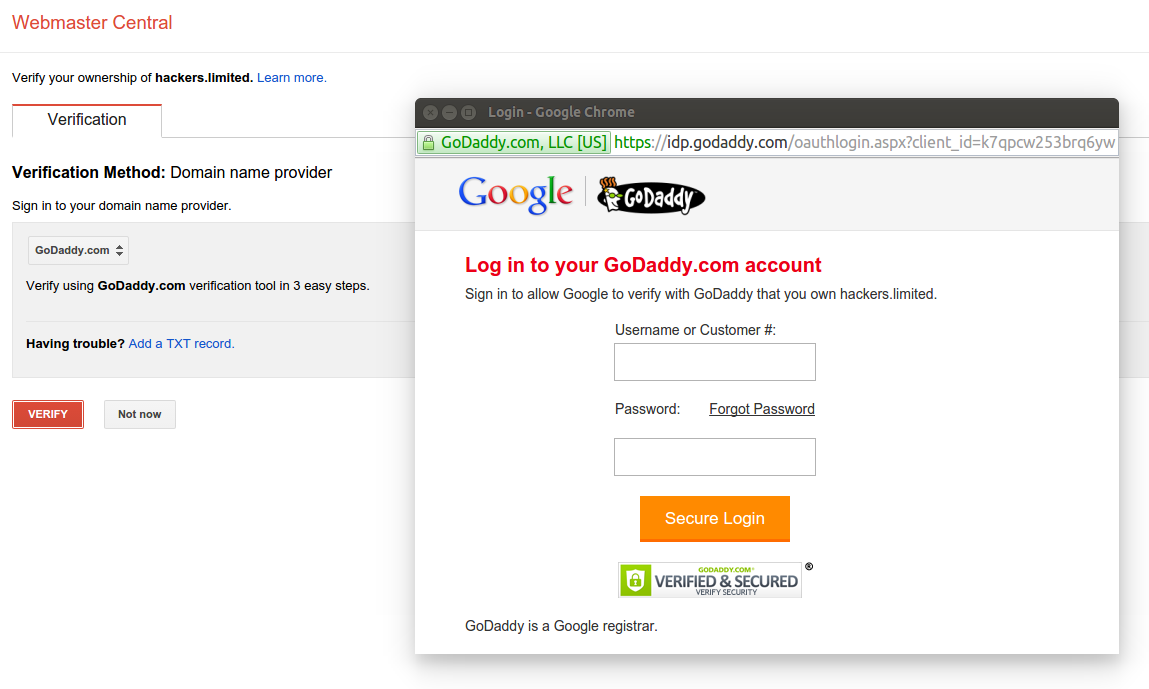
If we add a domain that is not registered with Google, then we first need to verify that you own the domain and add the domain to the list of verified google accounts for your account: enter the domain name in the field labeled 1, click 'Verify' and go to the verification page:

if the domain is registered with godaddy.com or another major one, for verification you need to select a provider and login in the window that will open:
and confirm:

Or make a manual verification, instructions will be shown by clicking on 'Add a TXT record.'
On the page ( www.google.com/webmasters/verification ):

You can add “properties” of verified domains, for example, add an additional google account from which you can manage your domain in Google services.
After verifying the domain, in the section labeled 2. (if we just added a new domain, then we need to reload the page so that the new domain is available for selection) we can assign this domain to the current project, either “entirely” or create and assign a subdomain , or both.

After selecting a domain and clicking the 'Add' button, you should make changes to the domain registrar settings (DNS Zone File) according to the instructions given in the section under number 3:

Attention: after clicking the 'Add' button, nothing visually reflects, you need to go to another section (for example, 'Application settings'), and return to 'Custom domains' again - now there should be shown the added (sub) domains and their settings.
Now the project will be (not immediately, but within 24 hours) available at {project ID} .appspot.com, as well as at the added addresses (domains).
Access to the address {project ID} .appspot.com can be done either via http or https
In order to provide access via https to our own domain, we need an SSL certificate signed by a certification authority (English Certification authority, CA) whose signature is accepted by browsers.
The leading service providers of the certification center are currently Symantec with the GeoTrust , Thawte , Verisign , the same Godaddy , and Comodo brands. The largest market share, and lower prices from Comodo. If you purchase certificates through resellers, the price is usually even lower.
To start / learn, you can use the free Comodo certificate for 90 days (issued free of charge once per domain) and / or a similar offer for 30 days from RapidSSL .
In order to receive a certificate, you need to send the provider a certificate signing request (CSR) ( certificate signing request ). Some services offer certificate generation on the site, however, in this case there is no guarantee that only you will have the secret key, therefore it is better to generate the CSR yourself. To do this, use the OpenSSL utility.
First, create a configuration file for CSR (let's call it scr.conf):
now run the command:
if in the settings we specified 'prompt = yes', then we have the opportunity to view the input values and change them. If you do not need to change the default values, simply press 'Enter'
As a result, we will create two new files: csr.key is a private key, and csr.csr is a CSR (certificate signing request)
You can check the CSR with the command:
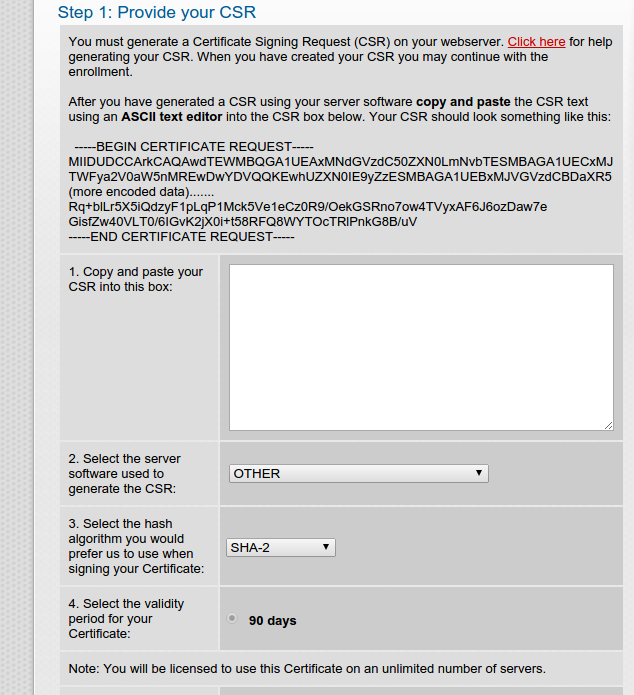
The .csr file needs to be opened with a text editor, inside there will be something like:
The contents of the file will need to be copied and pasted into a form on the website, something like this:
For the simplest verification of domain ownership, you should have access to the e-mail issued by whois, or to one of the email addresses in this domain:
admin @
administrator @
postmaster @
hostmaster @
webmaster @
Either you need to place http: //yourdomain.com/{Upper case value of MD5 hash of CSR} .txt or modify the DNS CNAME record by specifying again the corresponding hash.
Extended verification: Extended Business Verification or abbreviated as EV, requires the provision of documents to the organization for which the certificate is issued, but allows you to get a certificate with a green line (GreenBar) in the browser which reflects the name of the organization that owns the certificate.
After passing the check, you can download from the provider's website or receive an e-mail file of the form {your domain or order number} .crt, usually in a package (.zip) with certificates of the certification center, which also have the extension .crt This .zip file needs to be unzipped in a separate directory.
Our certificate we can check and view the information contained in it with the command:
where {file name} .crt is the name of our certificate file.
Now for GAE, we need to convert our private key from .key format to .pem format:
Attention : in this command, you do not need to specify the -text parameter, as recommended on Google, since this command adds unnecessary and unnecessary text to the key in this case. If you try to load a key, you get the message:
'The private key you selected doesn’t have to be valid'
This is most likely the reason. Open the file with a text editor and delete everything above the line ----- BEGIN RSA PRIVATE KEY -----
Or convert the key again, without the -text option.
2) connect (oncatenate) all .crt files from the resulting .zip file (and our certificate, and server certificates), with a command like this:
Attention : the order of the files is important , (just cat * .crt> concat.crt will not work in this case) our received certificate of our domain must go first, then certificates of the certification center will have different names of files, but not similar ones in the example.
Now check the resulting files:
and
must provide the same value (note: but not in the case of multi-domain certificates).
Now in the developer’s console menu, go to Compute -> Settings -> SSL Sertificates -> Upload a new certificate

In the 'Name' field, enter the name that we want to give our certificate in the developer console.
In 'PEM encoded X.509 public key certificate' we load our concat.crt
In the 'Unencrypted PEM encoded RSA private key' field we load our key in .pem format (forGAE.key.pem)
Click 'Upload'

Check the checkboxes in front of the domain names for which we can (and want) to activate the certificate (these are the ones specified in the certificate itself, of course), and click the blue 'Save' button:

Now in the address bar of the browser we will type the name of our domain indicating the httpS: // protocol at the beginning

There is nothing on the site yet, but at the beginning of the address bar we will see a green lock, by clicking on it we can view the certificate data.
SSL is working.
Also as in the first part we use Maven:
(hello-habrahabr-webapp - in this case, the project ID)
But since this project will not have Cloud Points API, then instead of archetype No. 2, we select archetype No. 1 (the basic skeleton of the application on GAE):
the rest is similar to what is stated in the first part , but with a different project ID.
Thus, Maven will create a hello-habrahabr-webapp folder for us, with a file structure similar to the previous project, but in this case the src / main / java / directory will be empty and we will not need it for the frontend now.
Similarly, as we did before, we edit pom.xml (in <appengine.version> 1.9.27 </appengine.version> you can now change to the latest 1.2.8). Go to the directory src / main / webapp / WEB-INF / edit the files appengine-web.xml and web.xml
The web.xml us is now almost empty, so we’ll add (between <web-app> </ web-app>) the security-constraint and welcome-file-list sections:
Create set.account.sh and commit.push.build.and.upload.sh scripts in this project similar to those in the first part, and run the commands:
We are convinced that the project is successfully assembled and uploaded to the server.
Maven collects the project into a .war file located in the target directory and uploads it to the GAE server. The same file can be deployed to another compatible java-server (Tomcat, Jetty). To run a .war file that will be deployed to GAE on a local machine, you need:
1) have Google Cloud SDK installed (installation was discussed in the first part )
2) install the Cloud SDK app-engine-java component:
3) make sure that Java 7 is on the default machine (the deployment with the mvn appengine: update command is also possible at 8), if not, then (on Linux) edit ~ / .bashrc
and restart with the command:
4) if not already created, create a .war by running in the project directory:
The .war file we can find at the address in target / {project ID} - {version} .war
5) in the project directory run the command:
The server will be available at localhost : 8080, and localhost : 8000 will be the administrative panel of the local server.
Let's start with the simple. Last time, we created a simple API available without authentication ('myApi API') by POST request to hello-habrahabr-api.appspot.com/_ah/api/myApi/v1/register (file YourFirstAPI.java). Let's modify this file somewhat so that it displays information in logs, which I recall are available in the developer’s console in the project menu: Monitoring -> Logs, and also contained the method that processes the GET request:
and upload it to the server (use the previously created commit.push.build.and.upload.sh script)
Now in the project in which we create the frontend we will create a form for such a request. Moving to the src / main / webapp / directory is a place where you can place static files starting from index.html, directories other than WEB-INF / will also be available for queries. Moreover, since this is still a Java server, then of course any such file can also be generated by a servlet.
So, index.html:
We have prescribed AngularJS with the module (from the standard set) ngRoute .
And also, for the site to have a user-friendly look, we will add Bootstrap (+ jQuery ), and AngularJS the ngProgress module. The latter is used to display process indicators (progress bar), we will use it to show the user the progress of requests.
We denoted the angualrjs application as “myApp” () and specified the place to insert the templates (<ng-view> </ ng-view>) to the application, and indicated two angularjs-controllers: js / simpleformcontroller.js and js / authformcontroller.js , respectively, for working with requests with and without authentication.
We will need the angular-google-gapi module to work with authentication, and will be discussed further.
Now create the main app.js module:
And the js / simpleformcontroller.js controller:
So: we created the module “MyApp”, the controller “SimpleFormController” and in it functions for GET and POST requests to the 'myApi API' (which in turn are processed by the code in the file YourFirstAPI.java) In this case, we will download data from by pressing the buttons, but of course you can download the data immediately when the controller is loaded.
Now we create the templates / simpleform.html template in which there will be an html form for the API request and the server response will be displayed:
Total at this stage: index.html, templates / simpleform.html, js / app.js, js / simpleformcontroller.js
To test, start the server in the src / main / webapp / directory:
and test the application:


If everything is fine, deploy it.
At the beginning in the developer’s console in the project’s backend (we had hello-habrahabr-api) in the menu:
APIs & auth -> Credentials -> Add Credentials -> OAuth 2.0 Client ID
we have to register the addresses from which Javascript can access the API (Authorized JavaScript origins) using Google’s OAuth 2.0, i.e. In our case, we will register hello-habrahabr-webapp.appspot.com and / or our domain for which we have made SSL certificates, as discussed above. If you need the ability to log in from the local server, then you need to register localhost + port number, for example localhost : 8000
In the 'Name' field, enter an arbitrary configuration name, for example, 'Web Client', and save the configuration with the "Save" button:

You need to copy the contents of the “Client ID” field, like: 647700180043-m8et0au4vhgiv2n4iqr2hssn0mkkl7q0.apps.googleusercontent.com, or load the JSON file with all the configuration settings by clicking on the icon that is marked in red in the picture.
In a project with an API (we have this hello-habrahabr-api) in the Constants.java file: WEB_CLIENT_ID, you need to assign the Client ID value, and EMAIL_SCOPE - “ www.googleapis.com/auth/userinfo.email ”:
Now we modify our OAuth2Api.java, in the @ Api annotation you need to register:
This means that this class will process requests from web clients to which the specified Client ID is assigned (the client must not only send the correct Client ID, but also the request must be from the domain specified in the APIs & auth - Credentials configuration) with email authentication . If these parameters are not specified in OAuth2Api.java, then API requests will respond with error 401. Accordingly, if you do not specify Constants.API_EXPLORER_CLIENT_ID, then when testing in the API Explorer, i.e. the web interface at the address of the form {project ID} .appspot.com / _ah / api / explorer will also receive an error 401 (that is, the server cannot authenticate the user )
OAuth2Api.java in the new edition:
We can test our API in the API Explorer, and move on to the frontend.
For access to the API with Google authentication, the API provides the Client Library for JavaScript API , for our application we will use the AngularJS module on the AngularJS web client angular-google-gapi , which is essentially a wrapper for the specified library and makes its use with AngularJS much more comfortable. For basic instructions on using the module, see github.com/maximepvrt/angular-google-gapi.
We added
at index.html
Add a dependency to the main application module (var app = angular.module ('myApp', ['angular-google-gapi']);), and set the configuration using app.run (...).
It will look like this (js / app.js):
Please note that we have placed the login () and logout () functions in $ rootScope, in our example this is not essential, but they will be available in different parts of the application (when there are these different parts).
Now the js / authformcontroller controller. js:
Please note that before running GApi.executeAuth (), we run GAuth.checkAuth () - this is different from the approach used by the author of the module, but it seems to me more logical, GApi.executeAuth () will update the authentication before sending the request, In this way, the user will not receive authorization errors when requesting after a long period of inactivity on the site, etc.
The $ rootScope will now contain a gapi.user object, which contains accessible information about the logged in user:
Thus, in the template, we can show the photo and email to the logged in user, use this in templates / authform.html:
Let's reload the home page of our website:
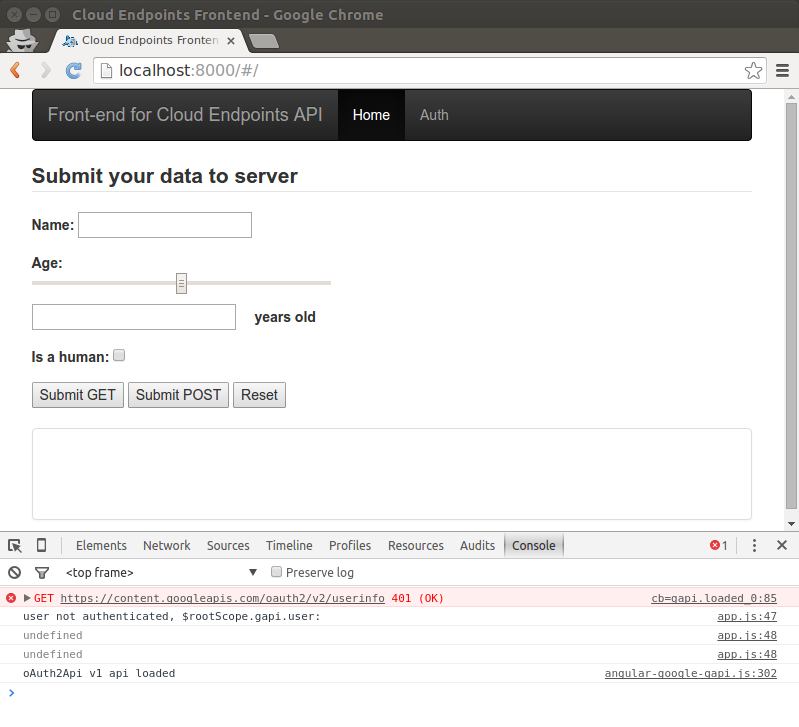
In the console, we see that the script tried to immediately recognize the user, but the user is still “unfamiliar”.
Follow the 'Auth' link:
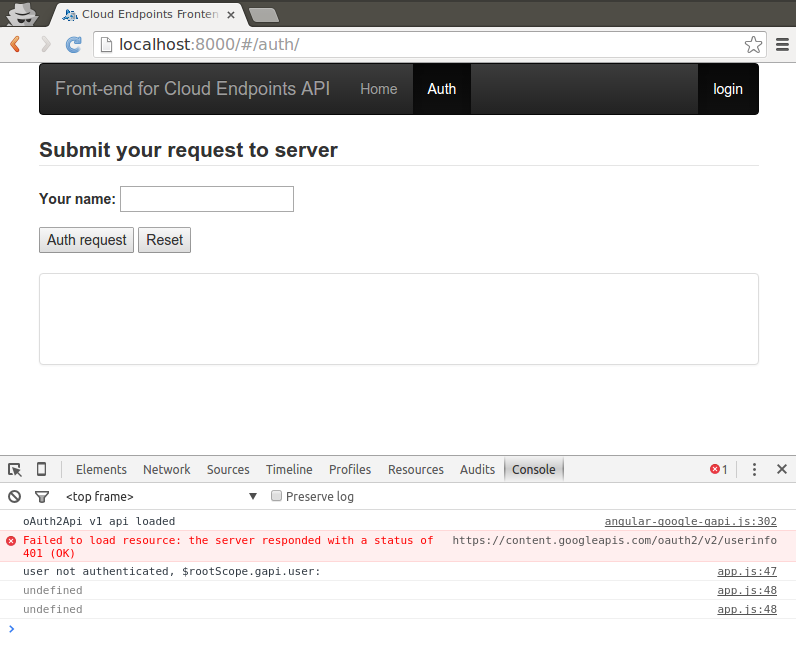
Enter the name in the 'Your name' field and click the 'Auth request' button:
Now we log in (the 'login' link in the navigation bar) using a Google account:
After the login, our navigation bar will show the user's photo from Google account, email with which the user has logged in, and the link 'logout'.
If we now send the request to the server again (using the 'Auth request' button), we will receive the server's response as befits a logged in user:
In this way, we can implement the connection of the web client and server over a secure channel and with user authentication without the need to store passwords on our own server. As I said in the previous article, the trend may be the lack of proper username-password authentication on sites and the use of OAuth 2.0 authentication by reliable providers.
Part Three: Google Cloud Endpoints on Java: A Guide. part 3
Part Four: Working with the database in Google App Engine / Google Cloud Endpoints in Java: Objectify framework
Part Five: Google Cloud Storage with Java: Images and Other Files in the Clouds
In the first part, we looked at creating a project on Google Cloud Endpoints with Java , in this article we will focus on creating a frontend to our API.
In addition to the tools used in the first part, we will need:
')
AngularJS , and an initial overview of how it works, optionally Bootstrap or Foundation .
The simplest web server on the local machine for testing, and the server for application deployment.
Local server
The application on AngularJS consists of the usual set of "static" files: .html, .js, .css + image files, fonts, etc. It would seem, since this is usually a one-page application, you can simply open index.html in the browser. However, if you try to just open index.html in Google Chrome, we can see a page without main content and something like this in the console:
In Firefox, the same application can work without a web server, but links like src = "// ... or href =" ... turn into file: /// ...
Well, Chrome DevTools , as my taste is much more convenient.
Therefore, it will still be preferable to use a web server on a local machine. You can use Sinatra on Ruby, NodeJS , good old Apache HTTP Server ("httpd") . The App Engine Java SDK also includes a development web server running on a local machine, and simulates GAE service services including a database (datastore).
In IntelliJ IDEA, when editing a .html file, browser icons are highlighted, if you click on the file, it will open on a local web server running IntelliJ IDEA.
In my opinion, the most simple and versatile option is Python (especially since you most likely have it already installed):
python -m SimpleHTTPServer <port> in this case, "python" means starting Python version 2.x (by default), "-m" - starting the module , " SimpleHTTPServer " - the module itself is the simplest http-server and included in the standard installation (i.e. You installed Python, then this module is already present), optionally - the port number, if this parameter is not specified, then by default it will be 8000.
This command should be executed in the project directory, where our index.htm is located , which will be given by default in / on the web server, and on localhost : 8000 / (http://127.0.0.1:8000/) we get static http -server. This is convenient because there are no settings in the directory itself, and generally no settings are needed.
Depla
You can place a front-end web application for our API on any web server where you can place static files, for example, on free GitHub Pages (see also Setting up a custom domain with GitHub Pages ) or on Amazon Web Services (AWS) .
Naturally the logical solution is to place the frontend on GAE. It may be in one project. In our manual, for educational purposes, we will place the backend and front-end in different projects on GAE. In the previous section, we created two projects for this in the developer console. The frontend will be a live project in hello-habrahabr-webapp, and the backend will be in hello-habrahabr-api.
Domain
In addition to the existing domain name of the form {project ID} .appspot.com, we can use our own domain registered either through Google Domains , or from another registrar, or several domains for one project. Previously, this feature was only available for domains used in Google Apps , but more recently, the binding to Google Apps has been removed.
In order to add a domain, select the project in the developer console and go to the menu: Compute -> App Engine -> Settings -> Custom domains. Then choose 'Register a new domain' to register a domain with Google, or if we already have a domain 'Add a custom domain'
If we add a domain that is not registered with Google, then we first need to verify that you own the domain and add the domain to the list of verified google accounts for your account: enter the domain name in the field labeled 1, click 'Verify' and go to the verification page:
if the domain is registered with godaddy.com or another major one, for verification you need to select a provider and login in the window that will open:
and confirm:
Or make a manual verification, instructions will be shown by clicking on 'Add a TXT record.'
On the page ( www.google.com/webmasters/verification ):
You can add “properties” of verified domains, for example, add an additional google account from which you can manage your domain in Google services.
After verifying the domain, in the section labeled 2. (if we just added a new domain, then we need to reload the page so that the new domain is available for selection) we can assign this domain to the current project, either “entirely” or create and assign a subdomain , or both.
After selecting a domain and clicking the 'Add' button, you should make changes to the domain registrar settings (DNS Zone File) according to the instructions given in the section under number 3:
Attention: after clicking the 'Add' button, nothing visually reflects, you need to go to another section (for example, 'Application settings'), and return to 'Custom domains' again - now there should be shown the added (sub) domains and their settings.
Now the project will be (not immediately, but within 24 hours) available at {project ID} .appspot.com, as well as at the added addresses (domains).
SSL setup
Access to the address {project ID} .appspot.com can be done either via http or https
In order to provide access via https to our own domain, we need an SSL certificate signed by a certification authority (English Certification authority, CA) whose signature is accepted by browsers.
The leading service providers of the certification center are currently Symantec with the GeoTrust , Thawte , Verisign , the same Godaddy , and Comodo brands. The largest market share, and lower prices from Comodo. If you purchase certificates through resellers, the price is usually even lower.
To start / learn, you can use the free Comodo certificate for 90 days (issued free of charge once per domain) and / or a similar offer for 30 days from RapidSSL .
In order to receive a certificate, you need to send the provider a certificate signing request (CSR) ( certificate signing request ). Some services offer certificate generation on the site, however, in this case there is no guarantee that only you will have the secret key, therefore it is better to generate the CSR yourself. To do this, use the OpenSSL utility.
First, create a configuration file for CSR (let's call it scr.conf):
# csr.conf # you can rename scr.conf, scr.key, scr.csr to filenames you prefer, # but with the same filename extensions [req] default_bits = 2048 # default_md = sha512 default_keyfile = csr.key #name of keyfile distinguished_name = req_distinguished_name prompt = yes # If 'prompt = no' provide right values to properties, not to _default properties # and remove or comment _default properties. # Use 'yes' and _default to see and correct values interactively encrypt_key = no # # req_extensions = v3_req #this is for multi-domain certificate [req_distinguished_name] # # Use your company name, e-mai, domain names as default values # if you enter '.', the field will be left blank # countryName = Country Name (2 letter code) countryName_default = GB stateOrProvinceName = State or Province Name (full name) stateOrProvinceName_default = City of London localityName = Locality Name (eg, city) localityName_default = London organizationName = Organization name organizationName_default = MyCompany Limited organizationalUnitName = Organizational Unit Name (eg, section) organizationalUnitName_default = . commonName = This is fully qualified domain name that you wish to secure # eg www.example.com or mail.example.com commonName_default = www.my-domain.com emailAddress = Email Address emailAddress_default = admin@my-domain.com # [v3_req] # subjectAltName = @alt_names #this is for multi-domain certificate # [alt_names] #this is for multi-domain certificate # DNS.1 = my-domain.net #this is for multi-domain certificate # DNS.2 = my-domain.org #this is for multi-domain certificate # DNS.3 = myseconddomain.com #this is for multi-domain certificate # to generate .csr: # openssl req -newkey rsa:2048 -sha512 -out csr.csr -config csr.conf # or: # openssl req -newkey rsa:2048 -sha512 -nodes -out csr.csr -config csr.conf # Note: If the "-nodes" is entered the key will NOT be encrypted with a # DES pass phrase, ( see: # https://support.comodo.com/index.php?/Default/Knowledgebase/Article/View/1/19/csr-generation-using-openssl-apache-wmod_ssl-nginx-os-x # ) # # to verify .csr: # openssl req -text -noout -verify -in csr.csr # # in one command generate and verify: # openssl req -newkey rsa:2048 -out csr.csr -config csr.conf && openssl req -text -noout -verify -in csr.csr # now run the command:
openssl req -newkey rsa:2048 -out csr.csr -config csr.conf if in the settings we specified 'prompt = yes', then we have the opportunity to view the input values and change them. If you do not need to change the default values, simply press 'Enter'
As a result, we will create two new files: csr.key is a private key, and csr.csr is a CSR (certificate signing request)
You can check the CSR with the command:
openssl req -text -noout -verify -in csr.csr The .csr file needs to be opened with a text editor, inside there will be something like:
-----BEGIN CERTIFICATE REQUEST----- MIIC5TCCAc0CAQAwgZ8xCzAJBgNVBAYTAkdCMRcwFQYDVQQIDA5DaXR5IG9mIExv bmRvbjEPMA0GA1UEBwwGTG9uZG9uMRowGAYDVQQKDBFNeUNvbXBhbnkgTGltaXRl NZBB4bDdgJ+uyNZq54dM1tUvzSolv/+LAY78/z85edqLH4nc5CxgMEn8hurFOpB4 RXS+ShhpBsJr6RJhSk2xkRe/idkM/TUon/7n1TUthFpjv2tYQZ6on3iWUZ61FDuM mNPHGMIX+sn/OceViRtlu1Lx+t4JV9dTJQ== -----END CERTIFICATE REQUEST----- The contents of the file will need to be copied and pasted into a form on the website, something like this:
For the simplest verification of domain ownership, you should have access to the e-mail issued by whois, or to one of the email addresses in this domain:
admin @
administrator @
postmaster @
hostmaster @
webmaster @
Either you need to place http: //yourdomain.com/{Upper case value of MD5 hash of CSR} .txt or modify the DNS CNAME record by specifying again the corresponding hash.
Extended verification: Extended Business Verification or abbreviated as EV, requires the provision of documents to the organization for which the certificate is issued, but allows you to get a certificate with a green line (GreenBar) in the browser which reflects the name of the organization that owns the certificate.
After passing the check, you can download from the provider's website or receive an e-mail file of the form {your domain or order number} .crt, usually in a package (.zip) with certificates of the certification center, which also have the extension .crt This .zip file needs to be unzipped in a separate directory.
Our certificate we can check and view the information contained in it with the command:
openssl x509 -in { }.crt -text -noout where {file name} .crt is the name of our certificate file.
Now for GAE, we need to convert our private key from .key format to .pem format:
openssl rsa -in *.key > forGAE.key.pem Attention : in this command, you do not need to specify the -text parameter, as recommended on Google, since this command adds unnecessary and unnecessary text to the key in this case. If you try to load a key, you get the message:
'The private key you selected doesn’t have to be valid'
This is most likely the reason. Open the file with a text editor and delete everything above the line ----- BEGIN RSA PRIVATE KEY -----
Or convert the key again, without the -text option.
2) connect (oncatenate) all .crt files from the resulting .zip file (and our certificate, and server certificates), with a command like this:
cat mydomain_com.crt ASecureServerCA.crt ATrustCA.crt ATrustExternal.crt > concat.crt
Attention : the order of the files is important , (just cat * .crt> concat.crt will not work in this case) our received certificate of our domain must go first, then certificates of the certification center will have different names of files, but not similar ones in the example.
Now check the resulting files:
openssl x509 -noout -modulus -in concat.crt | openssl md5 and
openssl rsa -noout -modulus -in forGAE.key.pem | openssl md5 must provide the same value (note: but not in the case of multi-domain certificates).
Now in the developer’s console menu, go to Compute -> Settings -> SSL Sertificates -> Upload a new certificate
In the 'Name' field, enter the name that we want to give our certificate in the developer console.
In 'PEM encoded X.509 public key certificate' we load our concat.crt
In the 'Unencrypted PEM encoded RSA private key' field we load our key in .pem format (forGAE.key.pem)
Click 'Upload'
Check the checkboxes in front of the domain names for which we can (and want) to activate the certificate (these are the ones specified in the certificate itself, of course), and click the blue 'Save' button:
Now in the address bar of the browser we will type the name of our domain indicating the httpS: // protocol at the beginning
There is nothing on the site yet, but at the beginning of the address bar we will see a green lock, by clicking on it we can view the certificate data.
SSL is working.
Application skeleton
Also as in the first part we use Maven:
mvn archetype:generate -Dappengine-version=1.9.28 -Dapplication-id=hello-habrahabr-webapp -Dfilter=com.google.appengine.archetypes: (hello-habrahabr-webapp - in this case, the project ID)
But since this project will not have Cloud Points API, then instead of archetype No. 2, we select archetype No. 1 (the basic skeleton of the application on GAE):
1: remote -> com.google.appengine.archetypes:appengine-skeleton-archetype (A skeleton application with Google App Engine) the rest is similar to what is stated in the first part , but with a different project ID.
Thus, Maven will create a hello-habrahabr-webapp folder for us, with a file structure similar to the previous project, but in this case the src / main / java / directory will be empty and we will not need it for the frontend now.
Similarly, as we did before, we edit pom.xml (in <appengine.version> 1.9.27 </appengine.version> you can now change to the latest 1.2.8). Go to the directory src / main / webapp / WEB-INF / edit the files appengine-web.xml and web.xml
The web.xml us is now almost empty, so we’ll add (between <web-app> </ web-app>) the security-constraint and welcome-file-list sections:
<?xml version="1.0" encoding="UTF-8"?> <web-app version="2.5" xmlns="http://java.sun.com/xml/ns/javaee" xmlns:xsi="http://www.w3.org/2001/XMLSchema-instance" xsi:schemaLocation="http://java.sun.com/xml/ns/javaee http://java.sun.com/xml/ns/javaee/web-app_2_5.xsd"> <!-- Force SSL for entire site --> <!-- (server automatically redirects the requests to the SSL port if you try to use HTTP ) --> <security-constraint> <web-resource-collection> <web-resource-name>Entire Application</web-resource-name> <url-pattern>/*</url-pattern> </web-resource-collection> <user-data-constraint> <transport-guarantee>CONFIDENTIAL</transport-guarantee> </user-data-constraint> </security-constraint> <!-- Welcome file list --> <welcome-file-list> <welcome-file>index.html</welcome-file> </welcome-file-list> <!-- --> </web-app> Create set.account.sh and commit.push.build.and.upload.sh scripts in this project similar to those in the first part, and run the commands:
git init gcloud init git config credential.helper gcloud.sh git remote add google https://source.developers.google.com/p/hello-habrahabr-webapp git push --all google set.account.sh commit.push.build.and.upload.sh We are convinced that the project is successfully assembled and uploaded to the server.
Maven collects the project into a .war file located in the target directory and uploads it to the GAE server. The same file can be deployed to another compatible java-server (Tomcat, Jetty). To run a .war file that will be deployed to GAE on a local machine, you need:
1) have Google Cloud SDK installed (installation was discussed in the first part )
2) install the Cloud SDK app-engine-java component:
gcloud components update app-engine-java 3) make sure that Java 7 is on the default machine (the deployment with the mvn appengine: update command is also possible at 8), if not, then (on Linux) edit ~ / .bashrc
export JAVA_HOME=/usr/lib/jvm/java-7-oracle/ # Java 7 ( ) export PATH=$JAVA_HOME/bin:$PATH and restart with the command:
source ~/.bashrc 4) if not already created, create a .war by running in the project directory:
mvn clean install The .war file we can find at the address in target / {project ID} - {version} .war
5) in the project directory run the command:
mvn gcloud:run The server will be available at localhost : 8080, and localhost : 8000 will be the administrative panel of the local server.
API access without authentication
Let's start with the simple. Last time, we created a simple API available without authentication ('myApi API') by POST request to hello-habrahabr-api.appspot.com/_ah/api/myApi/v1/register (file YourFirstAPI.java). Let's modify this file somewhat so that it displays information in logs, which I recall are available in the developer’s console in the project menu: Monitoring -> Logs, and also contained the method that processes the GET request:
package com.appspot.hello_habrahabr_api; import com.google.api.server.spi.config.Api; import com.google.api.server.spi.config.ApiMethod; import com.google.api.server.spi.config.ApiMethod.HttpMethod; import java.util.logging.Logger; import java.util.Random; @Api(name = "myApi", //The api name must match '[az]+[A-Za-z0-9]*' version = "v1", scopes = {Constants.EMAIL_SCOPE}, description = "first API for this application.") public class YourFirstAPI { @SuppressWarnings("unused") private static final Logger LOG = Logger.getLogger(YourFirstAPI.class.getName()); @ApiMethod( name = "registerPOST", path = "register", httpMethod = HttpMethod.POST ) @SuppressWarnings("unused") public MessageToUser registerPOST(final UserForm userForm) { LOG.warning("[YourFirstAPI] (HTTP Method: POST): userForm: {name: " + userForm.getName() + ", age: " + userForm.getAge() + ", ishuman: " + userForm.getIshuman() + "}" ); MessageToUser messageToUser = new MessageToUser(); messageToUser.setMessage("Hi, " + userForm.getName() + ", you are registered on our site"); Random random = new Random(); messageToUser.setUsernumber(random.nextInt(100) + 1); messageToUser.setIsregistered(true); return messageToUser;} @ApiMethod( name = "getGreeting", path = "getgreeting", httpMethod = HttpMethod.GET ) @SuppressWarnings("unused") public MessageToUser getGreeting(final UserForm userForm) { LOG.warning("[YourFirstAPI] (HTTP Method: GET): userForm: {name: " + userForm.getName() + ", age: " + userForm.getAge() + ", ishuman: " + userForm.getIshuman() + "}" ); MessageToUser messageToUser = new MessageToUser(); messageToUser.setMessage("Hi, " + userForm.getName() + ", nice to meet you :)"); Random random = new Random(); messageToUser.setUsernumber(random.nextInt(100) + 1); messageToUser.setIsregistered(false); return messageToUser;} } and upload it to the server (use the previously created commit.push.build.and.upload.sh script)
Now in the project in which we create the frontend we will create a form for such a request. Moving to the src / main / webapp / directory is a place where you can place static files starting from index.html, directories other than WEB-INF / will also be available for queries. Moreover, since this is still a Java server, then of course any such file can also be generated by a servlet.
So, index.html:
<!DOCTYPE html> <html lang="en"> <head> <meta charset="utf-8"> <link rel="shortcut icon" href="favicon.ico?" /> <!-- JQUERY 2.1.4 --> <script src="vendors/jquery-2.1.4.js"></script> <!-- BOOTSTRAP 3.3.5 --> <link rel="stylesheet" href="vendors/bootstrap.css"> <link rel="stylesheet" href="vendors/bootstrap-theme.css"> <script src="vendors/bootstrap.js"></script> <!-- ANGULARJS 1.4.7 --> <script src="vendors/angular.js"></script> <script src="vendors/angular-route.js"></script> <!-- <script src="https://code.jquery.com/jquery-2.1.4.min.js"></script> <link rel="stylesheet" href="https://maxcdn.bootstrapcdn.com/bootstrap/3.3.5/css/bootstrap.min.css"> <link rel="stylesheet" href="https://maxcdn.bootstrapcdn.com/bootstrap/3.3.5/css/bootstrap-theme.min.css"> <script src="https://maxcdn.bootstrapcdn.com/bootstrap/3.3.5/js/bootstrap.min.js"></script> <script src="https://ajax.googleapis.com/ajax/libs/angularjs/1.4.7/angular.min.js"></script> <script src="https://code.angularjs.org/1.4.7/angular-route.min.js"></script> --> <!-- angular-google-gapi --> <!-- https://github.com/maximepvrt/angular-google-gapi/releases --> <script src="vendors/angular-google-gapi.js"></script> <!-- ngProgress --> <!-- https://github.com/VictorBjelkholm/ngProgress --> <script src="vendors/ngprogress.js"></script> <link rel="stylesheet" href="vendors/ngProgress.css"> <!-- angular-google-gapi --> <!-- https://github.com/maximepvrt/angular-google-gapi/releases --> <script src="vendors/angular-google-gapi.js"></script> <!-- ~~~ MY APP ~~~ --> <!-- main app module --> <script src="js/app.js"></script> <!-- controllers --> <script src="js/simpleformcontroller.js"></script> <script src="js/authformcontroller.js"></script> <!-- --> <title>Cloud Endpoints Frontend</title> </head> <body ng-app="myApp"> <ng-view></ng-view> </body> </html> We have prescribed AngularJS with the module (from the standard set) ngRoute .
And also, for the site to have a user-friendly look, we will add Bootstrap (+ jQuery ), and AngularJS the ngProgress module. The latter is used to display process indicators (progress bar), we will use it to show the user the progress of requests.
We denoted the angualrjs application as “myApp” () and specified the place to insert the templates (<ng-view> </ ng-view>) to the application, and indicated two angularjs-controllers: js / simpleformcontroller.js and js / authformcontroller.js , respectively, for working with requests with and without authentication.
We will need the angular-google-gapi module to work with authentication, and will be discussed further.
Now create the main app.js module:
'use strict'; ( function () { // create main module var app = angular.module("myApp", [ 'ngRoute', // https://code.angularjs.org/1.4.7/docs/api/ngRoute 'ngProgress' // https://github.com/victorbjelkholm/ngprogress ] ); // routes app.config(function ($routeProvider) { $routeProvider.when('/', { templateUrl: "templates/simpleform.html", controller: "SimpleFormController" }).when('/auth/', { templateUrl: "templates/authform.html", controller: "AuthFormController" }) .otherwise({redirectTo: '/'}) } ); }() ); And the js / simpleformcontroller.js controller:
'use strict'; ( function() { var SimpleFormController = function($scope, $http, ngProgressFactory) { $scope.progressbar = ngProgressFactory.createInstance(); $scope.progressbar.setColor('blue'); $scope.data = {}; // data from form (ng-model="data. ...") // $http configuration object // https://code.angularjs.org/1.4.7/docs/api/ng/service/$http#usage $scope.postReq = { method: 'POST', url: 'https://hello-habrahabr-api.appspot.com/_ah/api/myApi/v1/register', data: $scope.data // 'data' for POST }; $scope.getReq = { method: 'GET', url: 'https://hello-habrahabr-api.appspot.com/_ah/api/myApi/v1/getgreeting', params: $scope.data // 'params:' for GET }; $scope.actionPost = function() { $scope.progressbar.start(); console.log("request sent:"); // for testing console.log($scope.postReq); // for testing // AJAX request: // $http(req).then(function(){...}, function(){...}); $http($scope.postReq).then(function(response) { // success: $scope.progressbar.complete(); $scope.serverresponse = response; $scope.errormessage = null; console.log("response received:"); console.log(response); }, // comma operator, see: https://developer.mozilla.org/en/docs/Web/JavaScript/Reference/Operators/Comma_Operator function(response) { // error: $scope.progressbar.complete(); $scope.errormessage = response; $scope.serverresponse = null; console.log("get Error form server:"); console.log(response); }); }; $scope.actionGet = function() { $scope.progressbar.start(); console.log("request sent:"); // for testing console.log($scope.getReq); // for testing // AJAX request: // $http(req).then(function(){...}, function(){...}); $http($scope.getReq).then(function(response) { // success: $scope.progressbar.complete(); $scope.serverresponse = response; $scope.errormessage = null; console.log("response received:"); console.log(response); }, // comma operator, see: https://developer.mozilla.org/en/docs/Web/JavaScript/Reference/Operators/Comma_Operator function(response) { // error: $scope.progressbar.complete(); $scope.errormessage = response; $scope.serverresponse = null; console.log("get Error form server:"); console.log(response); }); }; $scope.clear = function() { $scope.serverresponse = null; $scope.errormessage = null; $scope.data = null; }; }; // $inject property annotation // see: https://code.angularjs.org/1.4.7/docs/guide/di SimpleFormController.$inject = ['$scope', '$http', 'ngProgressFactory']; angular.module('myApp') .controller('SimpleFormController', SimpleFormController); }()); So: we created the module “MyApp”, the controller “SimpleFormController” and in it functions for GET and POST requests to the 'myApi API' (which in turn are processed by the code in the file YourFirstAPI.java) In this case, we will download data from by pressing the buttons, but of course you can download the data immediately when the controller is loaded.
Now we create the templates / simpleform.html template in which there will be an html form for the API request and the server response will be displayed:
<div class="container"> <!-- Navigation Bar --> <nav class="navbar navbar-inverse"> <a class="navbar-brand" href="#/">Front-end for Cloud Endpoints API</a> <ul class="nav navbar-nav"> <li class="active"><a href="#/">Home</a></li> <li><a href="#/auth/">Auth</a></li> </ul> </nav> <!-- Form --> <form> <fieldset> <legend style="font-weight: bold;">Submit your data to server</legend> <p> <label> Name: <input ng-model="data.name"> </label> </p> <label> Age: <p> <input type="range" min="0" max="120" step="1" ng-model="data.age"> </p> <p> <input ng-model="data.age" name="ageNumber" class="col-md-3"> <span class="col-md-5">years old</span> </p> </label> <br> <label> <p> Is a human: <input type="checkbox" ng-model="data.ishuman" name="data.ishuman"> </p> </label> </fieldset> <input type="button" value="Submit GET" ng-click="actionGet()"> <input type="button" value="Submit POST" ng-click="actionPost()"> <input type="reset" ng-click="clear()"> </form> <!-- Server Response --> <br> <div class="panel panel-default"> <div ng-hide="(serverresponse != null || errormessage != null)" class="panel-body"> <p></p> <br> <p></p> <br> </div> <div ng-show="serverresponse != null" class="panel-body"> <p>Response from server: </p> <p> {{ serverresponse.data.message }} and your number is: {{serverresponse.data.usernumber}} </p> </div> <div ng-show="errormessage != null" class="panel-body"> <p>Error from server: </p> <p> {{errormessage.data.error.message}} </p> </div> </div> </div> Total at this stage: index.html, templates / simpleform.html, js / app.js, js / simpleformcontroller.js
To test, start the server in the src / main / webapp / directory:
python -m SimpleHTTPServer and test the application:
If everything is fine, deploy it.
API access with Google account login / password authentication (OAuth 2.0)
Preparing the backend
At the beginning in the developer’s console in the project’s backend (we had hello-habrahabr-api) in the menu:
APIs & auth -> Credentials -> Add Credentials -> OAuth 2.0 Client ID
we have to register the addresses from which Javascript can access the API (Authorized JavaScript origins) using Google’s OAuth 2.0, i.e. In our case, we will register hello-habrahabr-webapp.appspot.com and / or our domain for which we have made SSL certificates, as discussed above. If you need the ability to log in from the local server, then you need to register localhost + port number, for example localhost : 8000
In the 'Name' field, enter an arbitrary configuration name, for example, 'Web Client', and save the configuration with the "Save" button:
You need to copy the contents of the “Client ID” field, like: 647700180043-m8et0au4vhgiv2n4iqr2hssn0mkkl7q0.apps.googleusercontent.com, or load the JSON file with all the configuration settings by clicking on the icon that is marked in red in the picture.
In a project with an API (we have this hello-habrahabr-api) in the Constants.java file: WEB_CLIENT_ID, you need to assign the Client ID value, and EMAIL_SCOPE - “ www.googleapis.com/auth/userinfo.email ”:
package com.appspot.hello_habrahabr_api; import com.google.api.server.spi.Constant; /** * Contains the client IDs and scopes for allowed clients consuming your API. */ public class Constants { public static final String WEB_CLIENT_ID = "647700180043-m8et0au4vhgiv2n4iqr2hssn0mkkl7q0.apps.googleusercontent.com"; public static final String ANDROID_CLIENT_ID = "replace this with your Android client ID"; public static final String IOS_CLIENT_ID = "replace this with your iOS client ID"; public static final String ANDROID_AUDIENCE = WEB_CLIENT_ID; public static final String EMAIL_SCOPE = "https://www.googleapis.com/auth/userinfo.email"; public static final String API_EXPLORER_CLIENT_ID = Constant.API_EXPLORER_CLIENT_ID; } Now we modify our OAuth2Api.java, in the @ Api annotation you need to register:
scopes = {Constants.EMAIL_SCOPE}, clientIds = {Constants.WEB_CLIENT_ID, Constants.API_EXPLORER_CLIENT_ID}, This means that this class will process requests from web clients to which the specified Client ID is assigned (the client must not only send the correct Client ID, but also the request must be from the domain specified in the APIs & auth - Credentials configuration) with email authentication . If these parameters are not specified in OAuth2Api.java, then API requests will respond with error 401. Accordingly, if you do not specify Constants.API_EXPLORER_CLIENT_ID, then when testing in the API Explorer, i.e. the web interface at the address of the form {project ID} .appspot.com / _ah / api / explorer will also receive an error 401 (that is, the server cannot authenticate the user )
OAuth2Api.java in the new edition:
package com.appspot.hello_habrahabr_api; /** * explore on: https://apis-explorer.appspot.com/apis-explorer/?base=https://hello-habrahabr-api.appspot.com/_ah/api#p/oAuth2Api/v1/ */ import com.google.api.server.spi.config.Api; import com.google.api.server.spi.config.ApiMethod; import com.google.api.server.spi.config.ApiMethod.HttpMethod; import com.google.api.server.spi.response.UnauthorizedException; import com.google.appengine.api.users.User; import com.google.appengine.repackaged.com.google.gson.Gson; import java.util.Random; import java.util.logging.Logger; @Api(name = "oAuth2Api", // The api name must match '[az]+[A-Za-z0-9]*' version = "v1", scopes = {Constants.EMAIL_SCOPE}, clientIds = {Constants.WEB_CLIENT_ID, Constants.API_EXPLORER_CLIENT_ID}, description = "API using OAuth2") public class OAuth2Api { @SuppressWarnings("unused") private static final Logger LOG = Logger.getLogger(OAuth2Api.class.getName()); @ApiMethod( name = "getUserInfo", path = "getuserinfo", httpMethod = HttpMethod.POST ) @SuppressWarnings("unused") public MessageToUser getUserInfo(final User user, final UserForm userForm) throws UnauthorizedException { if (user == null) { LOG.warning("User not logged in"); throw new UnauthorizedException("Authorization required"); } MessageToUser messageToUser = new MessageToUser(); Gson gson = new Gson(); messageToUser.setMessage( "Hi, " + userForm.getName() + ", your data from Google: " + gson.toJson(user) ); Random random = new Random(); messageToUser.setUsernumber(random.nextInt(100) + 1); messageToUser.setIsregistered(true); return messageToUser; } } We can test our API in the API Explorer, and move on to the frontend.
Frontend for authenticated requests
For access to the API with Google authentication, the API provides the Client Library for JavaScript API , for our application we will use the AngularJS module on the AngularJS web client angular-google-gapi , which is essentially a wrapper for the specified library and makes its use with AngularJS much more comfortable. For basic instructions on using the module, see github.com/maximepvrt/angular-google-gapi.
We added
<script src="vendors/angular-google-gapi.js"></script> at index.html
Add a dependency to the main application module (var app = angular.module ('myApp', ['angular-google-gapi']);), and set the configuration using app.run (...).
It will look like this (js / app.js):
'use strict'; ( function () { // create main module var app = angular.module("myApp", [ 'ngRoute', // https://code.angularjs.org/1.4.7/docs/api/ngRoute 'ngProgress', // https://github.com/victorbjelkholm/ngprogress 'angular-google-gapi' // https://github.com/maximepvrt/angular-google-gapi/ - add app.run() after app.config() ]); // routes app.config(function ($routeProvider) { $routeProvider.when('/', { templateUrl: "templates/simpleform.html", controller: "SimpleFormController" }).when('/auth/', { templateUrl: "templates/authform.html", controller: "AuthFormController" }).otherwise({redirectTo: '/'}) }); app.run(['GAuth', 'GApi', 'GData', '$rootScope', function (GAuth, GApi, GData, $rootScope) { $rootScope.gdata = GData; // var CLIENT = '647700180043-m8et0au4vhgiv2n4iqr2hssn0mkkl7q0.apps.googleusercontent.com'; var BASE = 'https://hello-habrahabr-api.appspot.com/_ah/api'; GApi.load('oAuth2Api', 'v1', BASE); GAuth.setClient(CLIENT); // see: https://github.com/maximepvrt/angular-google-gapi/issues/8 GAuth.setScope("https://www.googleapis.com/auth/userinfo.email"); GAuth.checkAuth().then( function () { // action if it's possible to authenticate user at startup of the application console.log("user authenticated, $rootScope.gapi.user: "); console.log(console.log($rootScope.gapi.user)); }, function () { // action if it's impossible to authenticate user at startup of the application console.log("user not authenticated, $rootScope.gapi.user: "); console.log(console.log($rootScope.gapi.user)); } ); $rootScope.login = function () { // shows auth window from Google GAuth.login().then( function () { console.log('user logged in'); console.log(console.log($rootScope.gapi.user)); }); }; /* * As stated on * https://cloud.google.com/appengine/docs/java/endpoints/consume_js: * "There is no concept of signing out using the JS client library, * but you can emulate the behavior if you wish by any of these methods: * - Resetting the UI to the pre signed-in state. * - Setting any signed-in variables in your application logic to false * - Calling gapi.auth.setToken(null);" // <- * * */ $rootScope.logout = function () { GAuth.logout().then( function () { console.log('user logged out'); console.log(console.log($rootScope.gapi.user)); }); }; } ]); }() ); Please note that we have placed the login () and logout () functions in $ rootScope, in our example this is not essential, but they will be available in different parts of the application (when there are these different parts).
Now the js / authformcontroller controller. js:
'use strict'; ( function () { var AuthFormController = function ($scope, $rootScope, $http, GApi, GAuth, ngProgressFactory) { $scope.progressbar = ngProgressFactory.createInstance(); $scope.progressbar.setColor('#00F'); $scope.data = {}; // object to store form data $scope.authrequest = function () { $scope.progressbar.start(); GAuth.checkAuth().then( function () { // if it's possible to authenticate user GApi.executeAuth( // execute request 'oAuth2Api', 'getUserInfo', $scope.data // data to send to server ) .then(function (resp) { // receive response $scope.userinfofromserver = resp; console.log("GApi.executeAuth() get resp:"); console.log(resp); $scope.progressbar.complete(); }); }, function () { // if it's impossible to authenticate user $scope.userinfofromserver = {}; $scope.userinfofromserver.message = 'User not logged in '; console.log("GAuth.checkAuth() - failed: "); console.log(console.log($rootScope.gapi.user)); $scope.progressbar.complete(); } ); }; $scope.clear = function () { $scope.userinfofromserver = null; $scope.data = null; }; }; // $inject property annotation // see: https://code.angularjs.org/1.4.7/docs/guide/di AuthFormController.$inject = ['$scope', '$rootScope', '$http', 'GApi', 'GAuth', 'ngProgressFactory']; angular.module('myApp') .controller('AuthFormController', AuthFormController); }() ); Please note that before running GApi.executeAuth (), we run GAuth.checkAuth () - this is different from the approach used by the author of the module, but it seems to me more logical, GApi.executeAuth () will update the authentication before sending the request, In this way, the user will not receive authorization errors when requesting after a long period of inactivity on the site, etc.
The $ rootScope will now contain a gapi.user object, which contains accessible information about the logged in user:
- user.email
- user.picture (user avatar, url picture)
- user.id (Google id (number))
- user.name (username, or if it is missing, email)
- user.link (link to Google+ user’s page if it exists)
Thus, in the template, we can show the photo and email to the logged in user, use this in templates / authform.html:
<div class="container"> <!-- Navigation Bar --> <nav class="navbar navbar-inverse"> <a class="navbar-brand" href="#/">Front-end for Cloud Endpoints API</a> <ul class="nav navbar-nav"> <li><a href="#/">Home</a></li> <li class="active"><a href="#/auth/">Auth</a></li> </ul> <!-- --> <ul class="nav navbar-nav navbar-right"> <li> <a ng-show="gapi.user" href="" class="navbar-brand" style="padding-top: 0;"> <img src="{{gapi.user.picture}}" class="navbar-brand" style="padding-top: 0; padding-bottom: 0;"></a> </li> </ul> <!-- --> <ul class="nav navbar-nav navbar-right"> <!-- --> <li ng-show="!gapi.user" class="active"> <a href="" ng-click="login()">login</a> </li> <!-- --> <li ng-show="gapi.user"> <a href="">{{gapi.user.email}}</a> </li> <li ng-show="gapi.user"> <a href="" ng-click="logout()">logout</a> </li> </ul> </nav> <!-- Form --> <form> <fieldset> <legend style="font-weight: bold;">Submit your request to server</legend> <p> <label> Your name: <input ng-model="data.name"> </label> </p> </fieldset> <input type="button" value="Auth request" ng-click="authrequest()"> <input type="reset" ng-click="clear()"> </form> <!-- Server Response --> <br> <div class="panel panel-default" style="font-weight: bold;" > <!-- --> <div ng-hide="(userinfofromserver != null)" class="panel-body"> <p></p> <br> <p></p> <br> </div> <!-- --> <div ng-show="userinfofromserver" class="panel-body" style=""> <p> User's data from server (reg # {{userinfofromserver.usernumber}}): </p> <p>{{userinfofromserver.message}}</p> </div> <!-- --> </div> </div> Let's reload the home page of our website:
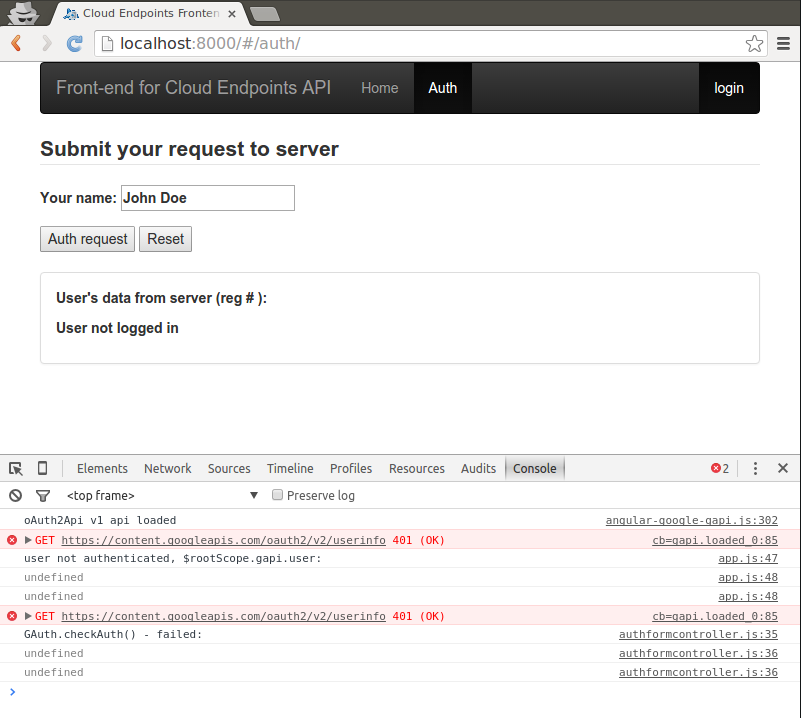
In the console, we see that the script tried to immediately recognize the user, but the user is still “unfamiliar”.
Follow the 'Auth' link:
Enter the name in the 'Your name' field and click the 'Auth request' button:
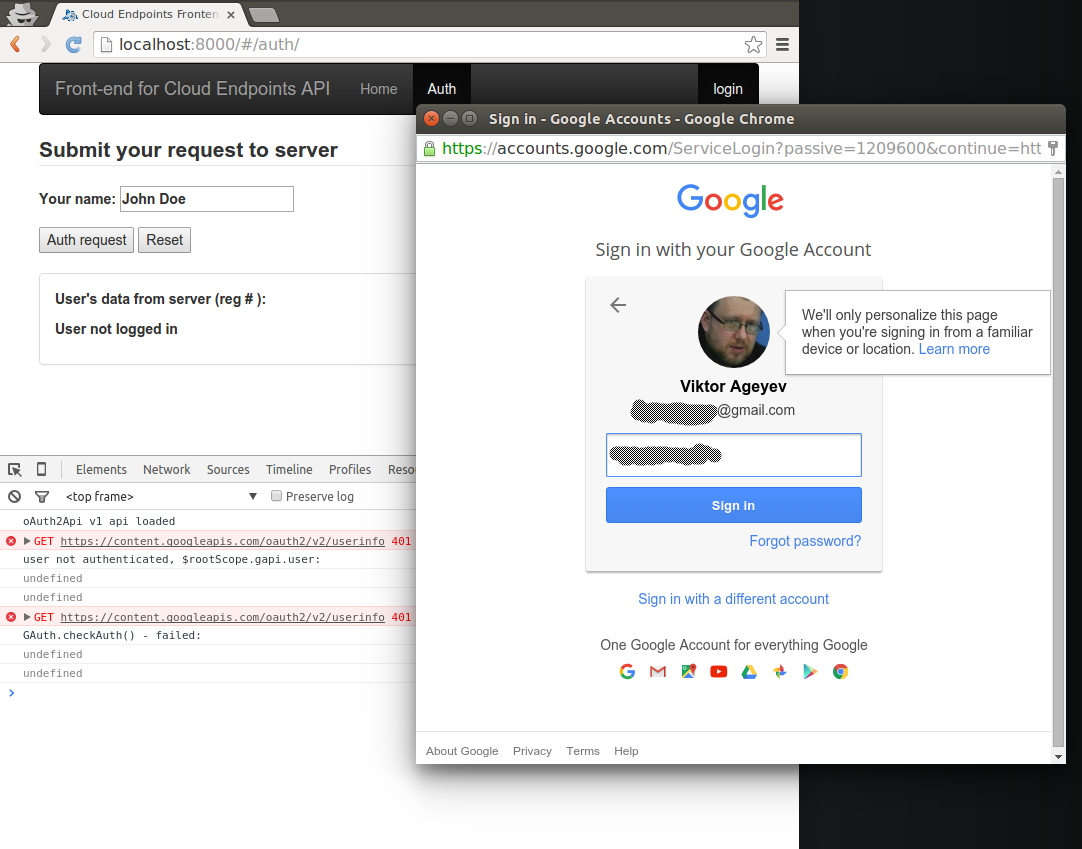
Now we log in (the 'login' link in the navigation bar) using a Google account:
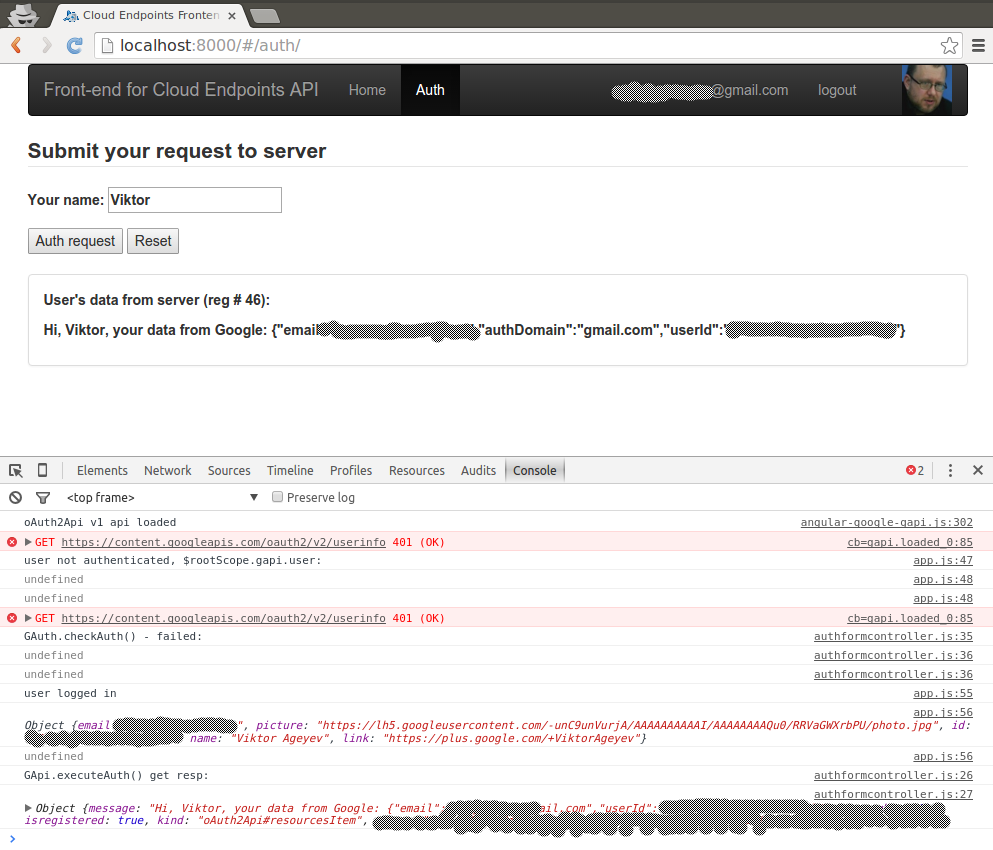
After the login, our navigation bar will show the user's photo from Google account, email with which the user has logged in, and the link 'logout'.
If we now send the request to the server again (using the 'Auth request' button), we will receive the server's response as befits a logged in user:
In this way, we can implement the connection of the web client and server over a secure channel and with user authentication without the need to store passwords on our own server. As I said in the previous article, the trend may be the lack of proper username-password authentication on sites and the use of OAuth 2.0 authentication by reliable providers.
Additional materials:
Source: https://habr.com/ru/post/270459/
All Articles