Node.js in battle (cluster creation)
When you use applications on node.js in production, you have to think about stability, performance, security, and ease of support. This article describes my thoughts on best practices for using node.js in combat.
By the end of this guide, you will receive a system from 3 servers: a balancer (lb) and 2 application servers (app1 and app2). The balancer will monitor the availability of servers and distribute traffic between them. Application servers will use a combination of systemd and node.js clustering to balance traffic between multiple node processes on the server. You can roll out the code with a single command from your machine, and there will be no interruptions in service or unprocessed requests.
All this can be represented as a diagram:
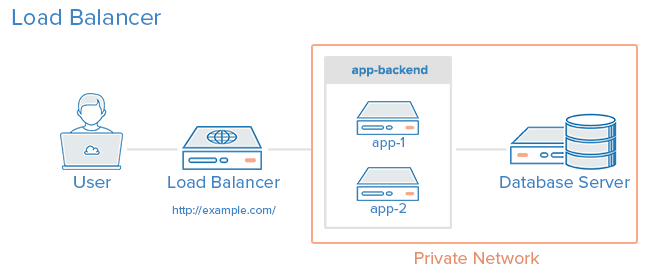
Photo courtesy: Digital Ocean
This article is addressed to those who are just beginning to deal with the issues of setting up servers for combat operation. However, you should have a general understanding of this process, know what upstart, systemd or init is, and what process signals in unix are. I suggest you try this manual on your servers (but still use my demo code). In addition, I will provide several useful configuration settings and scripts that will serve as a good starting point when setting up your own environment.
')
The final version of the application is here: https://github.com/jdxcode/node-sample .
In this guide, I will use Digital Ocean and Fedora . However, the article is written as independent of the technology stack as possible.
I’ll use the Digital Ocean servers with Fedora 20 vanilla images. I tested the manual several times, so you should have no problems reproducing these actions.
All Linux distributions (except Gentoo) move from different init systems to systemd. Since Ubuntu (perhaps the most popular distribution in the world) has not yet switched to it (but they have already announced it), I believe that it would be wrong to teach you how to use Upstart.
systemd offers several significant advantages over Upstart, including advanced centralized logging, simplified configuration, performance, and many other features.
First you need to install node.js on a fresh server. On Digital Ocean, I had only 4 teams.
bootstrap.sh
Here we install the node through yum (which can supply us with an outdated version), then we put an excellent package n, which can install and switch different versions of the node. We will use them to update node.js.
Now run
Later I will show how you can automate this step with Ansible .
Since it is not safe to run applications as root, we will create a separate web user.
To do this, run:
We have a node server, and we can proceed to adding our application:
Create a directory:
Set him web owner:
As well as the web group:
Enter it:
Switch to our user:
Clone the repository with the Hello world app:
This is the simplest application for the node:
app.js
Run it:
You can log in to the server by IP using a browser, and you will see that the application is running:

Note: you may need to run
Another note: By default, the application runs on port 3000. To start it on port 80, you need a proxy server (like nginx), but for our configuration you need to start the application server on port 3000, and the balancer (on another server) will work on port 80
After we learned how to start the application server, we need to add it to systemd so that it will restart in the event of a crash.
We will use the following systemd script:
node-sample.service
Copy this file (as root) into
Activate it:
Run it:
Check status:
Check out the logs:
Try to kill the pid node process and see how it starts up again!
Now that we can run a single process with our application, we need to use the built-in node clustering methods, which will automatically distribute traffic across multiple processes.
Here is a script that you can use to launch the Node.js application.
Just put this file next to
This script will launch 2 instances of the application, and will restart them if necessary. It also seamlessly restarts when it receives a SIGHUP signal.
Let's try it. To do this, make changes to what
For a clustered version of the application to work, you must update the systemd configuration. Also, you can add the setting
Here is an example of a file for a clustered version:
node-sample.service
In combat operation, you need at least 2 servers in case one of them falls. I would not raise a real system with just one. Keep in mind: the servers are turned off not only when they are broken, but also when it may be necessary to turn off one for maintenance. The balancer checks the availability of servers and if it notices a problem, it excludes this server from rotation.
First install the second application server, repeating the previous steps. Then create a new server in the Digital Ocean (or somewhere else) and connect to it via ssh.
Install HAProxy:
Replace the
haproxy.cfg
Now restart HAProxy:
You should see a running application on port 80 on the balancer. Can you go to
For additional information on setting up HAProxy, I suggest that you familiarize yourself with the manual that I used , or with the official documentation .
Most of the guidelines for setting up a server end there, but I think that the instruction will not be complete without organizing the deployment! Without automation, the process does not look very scary:
But the main disadvantage is that this will have to be done on each server, and this is laborious. Using Ansible, we can roll out our code directly from our machine and properly restart the application.
People are afraid of Ansible. Many people think that it is similar to complex tools like Chef or Puppet, but in fact it is closer to Fabric or Capistrano. In the simplest case, it simply connects via ssh to the server and executes commands. Without clients, master servers, complicated cookbooks, they are just commands. It has excellent opportunities for server deployment (provisioning), but you can not use them.
Here is the Ansible file, which simply deploit the code:
deploy.yml
production
Run it on your machine for development ( make sure you install Ansible ):
The production file in Ansible is called an inventory file . It simply lists the addresses of all servers and their roles.
A file with the yml extension is called a script ( playbook ). It defines the tasks to run. We get it with fresh code from github. If there are changes, the “notify” task is started, which reboots the application server. If there are no changes, the handler will not start. If you say you want to install npm packages, you can do it here. By the way, make sure you use
Note: if you want to use your own git repository, you will need to install SSH Authorization Agent Redirection .
Ideally, we should automate the assembly of the application server so that we do not have to manually repeat all the steps every time. To do this, we can use the following Ansible script to deploy the application server:
app.yml
systemd.service.j2
It
But the same for the balancer .
Here is the final result of all these steps . As it says, to run the application, you need to: update the inventory file, deploy our servers and run the application application.
Creating a new environment is easy. Add another inventory file (ansible / production) for tests and can refer to it when you call the
Test your system . Even discarding other reasons, it’s really fun to try and find a way to bring down your cluster. Use Siege to create a load. Try sending kill -9 to different processes. Shut down the server completely. Send arbitrary signals to processes. Drive a drive. Just find things that can ruin your cluster and insure yourself from sinking% uptime.
There are no perfect clusters, and this is no exception. I would calmly put it in production, but in the future something can be strengthened:
At the moment, HAProxy is a single point of failure, although it is reliable. We could remove it using a DNS failover. It is not instantaneous and will give several seconds of idle time while the DNS record is being distributed. I do not worry that HAProxy will fall by itself, but there is a high probability of human error when changing its configuration.
In case the next deployment breaks the cluster, I would set up a consistent deployment in Ansible to gradually roll out the changes, checking the availability of servers along the way.
I think some will be more important than me. In this guide, we had to save server addresses in source code. You can configure Ansible to dynamically request a list of hosts on Digital Ocean (or another provider). You can even create new servers this way. However, creating a server on the Digital Ocean is not the most difficult task.
JSON logs are a great thing if you want to easily aggregate them and search them. I would look at Bunyan for this.
It would be great if the logs of all servers flow into one place. You can use something like Loggly , but you can try other ways.
There are many solutions for error collection and logging. I didn’t like any of the ones I tried, so I’m not going to advise you anything. If you know a good tool for this, please write about it in the comments.
I recommend an excellent guide to running Node.js in production from Joyent - there are a lot of additional tips.
By the end of this guide, you will receive a system from 3 servers: a balancer (lb) and 2 application servers (app1 and app2). The balancer will monitor the availability of servers and distribute traffic between them. Application servers will use a combination of systemd and node.js clustering to balance traffic between multiple node processes on the server. You can roll out the code with a single command from your machine, and there will be no interruptions in service or unprocessed requests.
All this can be represented as a diagram:
Photo courtesy: Digital Ocean
From the translator: With the proliferation of an isomorphic approach to building web applications, more and more developers are faced with the need to use Node.js in production. I liked this article by Jeff Dickey with a practical approach and a general view on this broad topic.
UPD (2018): Fixed links to the author’s github.
About this article
This article is addressed to those who are just beginning to deal with the issues of setting up servers for combat operation. However, you should have a general understanding of this process, know what upstart, systemd or init is, and what process signals in unix are. I suggest you try this manual on your servers (but still use my demo code). In addition, I will provide several useful configuration settings and scripts that will serve as a good starting point when setting up your own environment.
')
The final version of the application is here: https://github.com/jdxcode/node-sample .
In this guide, I will use Digital Ocean and Fedora . However, the article is written as independent of the technology stack as possible.
I’ll use the Digital Ocean servers with Fedora 20 vanilla images. I tested the manual several times, so you should have no problems reproducing these actions.
Why Fedora?
All Linux distributions (except Gentoo) move from different init systems to systemd. Since Ubuntu (perhaps the most popular distribution in the world) has not yet switched to it (but they have already announced it), I believe that it would be wrong to teach you how to use Upstart.
systemd offers several significant advantages over Upstart, including advanced centralized logging, simplified configuration, performance, and many other features.
Installing Node.js
First you need to install node.js on a fresh server. On Digital Ocean, I had only 4 teams.
bootstrap.sh
yum update -y yum install -y git nodejs npm npm install -gn n stable Here we install the node through yum (which can supply us with an outdated version), then we put an excellent package n, which can install and switch different versions of the node. We will use them to update node.js.
Now run
# node --version and you will see information about the latest version of the node.Later I will show how you can automate this step with Ansible .
Create a web user
Since it is not safe to run applications as root, we will create a separate web user.
To do this, run:
# useradd -mrU webAdd an application
We have a node server, and we can proceed to adding our application:
Create a directory:
# mkdir /var/wwwSet him web owner:
# chown web /var/wwwAs well as the web group:
# chgrp web /var/wwwEnter it:
# cd /var/www/Switch to our user:
$ su webClone the repository with the Hello world app:
$ git clone https://github.com/jdxcode/node-hello-worldThis is the simplest application for the node:
app.js
var http = require('http'); var PORT = process.env.PORT || 3000; http.createServer(function (req, res) { console.log('%d request received', process.pid); res.writeHead(200, {'Content-Type': 'text/plain'}); res.end('Hello world!\n'); }).listen(PORT); console.log('%d listening on %d', process.pid, PORT); Run it:
$ node app.jsYou can log in to the server by IP using a browser, and you will see that the application is running:
Note: you may need to run
# iptables -F
# iptables -F
to clear iptables tables or open a port on the firewall firewall-cmd --permanent --zone=public --add-port=3000/tcp.
firewall-cmd --permanent --zone=public --add-port=3000/tcp.
Another note: By default, the application runs on port 3000. To start it on port 80, you need a proxy server (like nginx), but for our configuration you need to start the application server on port 3000, and the balancer (on another server) will work on port 80
systemd
After we learned how to start the application server, we need to add it to systemd so that it will restart in the event of a crash.
We will use the following systemd script:
node-sample.service
[Service] WorkingDirectory=/var/www/node-hello-world ExecStart=/usr/bin/node app.js Restart=always StandardOutput=syslog StandardError=syslog SyslogIdentifier=node-hello-world User=web Group=web Environment='NODE_ENV=production' [Install] WantedBy=multi-user.target Copy this file (as root) into
/etc/systemd/system/node-sample.service
/etc/systemd/system/node-sample.service
Activate it:
# systemctl enable node-sample
# systemctl enable node-sample
Run it:
# systemctl start node-sample
# systemctl start node-sample
Check status:
# systemctl status node-sample
# systemctl status node-sample
Check out the logs:
# journalctl -u node-sample
# journalctl -u node-sample
Try to kill the pid node process and see how it starts up again!
Process clustering
Now that we can run a single process with our application, we need to use the built-in node clustering methods, which will automatically distribute traffic across multiple processes.
Here is a script that you can use to launch the Node.js application.
Just put this file next to
app.js and run: $ node boot.jsThis script will launch 2 instances of the application, and will restart them if necessary. It also seamlessly restarts when it receives a SIGHUP signal.
Let's try it. To do this, make changes to what
app.js
returns app.js
app.js
. Run $ kill -hup [pid]
$ kill -hup [pid]
and then in the browser you can see the new data. The script restarts one process at a time, thereby ensuring a seamless restart.For a clustered version of the application to work, you must update the systemd configuration. Also, you can add the setting
ExecReload=/bin/kill -HUP $MAINPID
ExecReload=/bin/kill -HUP $MAINPID
so systemd can seamlessly restart itself when it receives the # systemctl reload node-sample.
command # systemctl reload node-sample.
# systemctl reload node-sample.
Here is an example of a file for a clustered version:
node-sample.service
[Service] WorkingDirectory=/var/www/node-hello-world ExecStart=/usr/bin/node boot.js ExecReload=/bin/kill -HUP $MAINPID Restart=always StandardOutput=syslog StandardError=syslog SyslogIdentifier=node-sample User=web Group=web Environment='NODE_ENV=production' [Install] WantedBy=multi-user.target Balancing
In combat operation, you need at least 2 servers in case one of them falls. I would not raise a real system with just one. Keep in mind: the servers are turned off not only when they are broken, but also when it may be necessary to turn off one for maintenance. The balancer checks the availability of servers and if it notices a problem, it excludes this server from rotation.
First install the second application server, repeating the previous steps. Then create a new server in the Digital Ocean (or somewhere else) and connect to it via ssh.
Install HAProxy:
# yum install haproxyReplace the
/etc/haproxy/haproxy.cfg file /etc/haproxy/haproxy.cfg the following (substitute the IP of your servers):haproxy.cfg
defaults log global mode http option httplog option dontlognull option http-server-close option forwardfor option redispatch retries 3 timeout http-request 10s timeout queue 1m timeout connect 10s timeout client 1m timeout server 1m timeout http-keep-alive 10s timeout check 10s frontend main *:80 stats enable stats uri /haproxy?stats stats auth myusername:mypass default_backend app backend app balance roundrobin server app1 107.170.145.120:3000 check server app2 192.241.205.146:3000 check Now restart HAProxy:
systemctl restart haproxyYou should see a running application on port 80 on the balancer. Can you go to
/haproxy?stats
/haproxy?stats
to view the HAProxy status page. Log in using myusername/mypass .For additional information on setting up HAProxy, I suggest that you familiarize yourself with the manual that I used , or with the official documentation .
Deploy code with Ansible
Most of the guidelines for setting up a server end there, but I think that the instruction will not be complete without organizing the deployment! Without automation, the process does not look very scary:
- Connect via SSH to app1
cd /var/www/node-hello-world- Get the latest
git pullcode - And reload the application
systemctl reload node-sample
But the main disadvantage is that this will have to be done on each server, and this is laborious. Using Ansible, we can roll out our code directly from our machine and properly restart the application.
People are afraid of Ansible. Many people think that it is similar to complex tools like Chef or Puppet, but in fact it is closer to Fabric or Capistrano. In the simplest case, it simply connects via ssh to the server and executes commands. Without clients, master servers, complicated cookbooks, they are just commands. It has excellent opportunities for server deployment (provisioning), but you can not use them.
Here is the Ansible file, which simply deploit the code:
deploy.yml
--- - hosts: app tasks: - name: update repo git: repo=https://github.com/jdxcode/node-hello-world version=master dest=/var/www/node-hello-world sudo: yes sudo_user: web notify: - reload node-sample handlers: - name: reload node-sample service: name=node-sample state=reloaded production
[app] 192.241.205.146 107.170.233.117 Run it on your machine for development ( make sure you install Ansible ):
ansible-playbook -i production deploy.yml
The production file in Ansible is called an inventory file . It simply lists the addresses of all servers and their roles.
A file with the yml extension is called a script ( playbook ). It defines the tasks to run. We get it with fresh code from github. If there are changes, the “notify” task is started, which reboots the application server. If there are no changes, the handler will not start. If you say you want to install npm packages, you can do it here. By the way, make sure you use
npm shrinkwrap if you do not fix dependency files in the repository.Note: if you want to use your own git repository, you will need to install SSH Authorization Agent Redirection .
Ansible for deployment (provisioning)
Ideally, we should automate the assembly of the application server so that we do not have to manually repeat all the steps every time. To do this, we can use the following Ansible script to deploy the application server:
app.yml
--- - hosts: app tasks: - name: Install yum packages yum: name={{item}} state=latest with_items: - git - vim - nodejs - npm - name: install n (node version installer/switcher) npm: name=n state=present global=yes - name: install the latest stable version of node shell: n stable - name: Create web user user: name=web - name: Create project folder file: path=/var/www group=web owner=web mode=755 state=directory - name: Add systemd conf template: src=systemd.service.j2 dest=/etc/systemd/system/node-sample.service notify: - enable node-sample handlers: - name: enable node-sample shell: systemctl enable node-sample systemd.service.j2
[Service] WorkingDirectory={{project_root}} ExecStart=/usr/bin/node boot.js ExecReload=/bin/kill -HUP $MAINPID Restart=always StandardOutput=syslog StandardError=syslog SyslogIdentifier={{project_name}} User=web Group=web Environment='NODE_ENV=production' [Install] WantedBy=multi-user.target It
ansible-playbook -i [inventory file] app.yml
like this: ansible-playbook -i [inventory file] app.yml
ansible-playbook -i [inventory file] app.yml
.But the same for the balancer .
Final application
Here is the final result of all these steps . As it says, to run the application, you need to: update the inventory file, deploy our servers and run the application application.
Test environment?
Creating a new environment is easy. Add another inventory file (ansible / production) for tests and can refer to it when you call the
ansible-playbook
ansible-playbook
.Testing
Test your system . Even discarding other reasons, it’s really fun to try and find a way to bring down your cluster. Use Siege to create a load. Try sending kill -9 to different processes. Shut down the server completely. Send arbitrary signals to processes. Drive a drive. Just find things that can ruin your cluster and insure yourself from sinking% uptime.
What can be improved
There are no perfect clusters, and this is no exception. I would calmly put it in production, but in the future something can be strengthened:
HAProxy Failover
At the moment, HAProxy is a single point of failure, although it is reliable. We could remove it using a DNS failover. It is not instantaneous and will give several seconds of idle time while the DNS record is being distributed. I do not worry that HAProxy will fall by itself, but there is a high probability of human error when changing its configuration.
Rolling deploys
In case the next deployment breaks the cluster, I would set up a consistent deployment in Ansible to gradually roll out the changes, checking the availability of servers along the way.
Dynamic inventory files
I think some will be more important than me. In this guide, we had to save server addresses in source code. You can configure Ansible to dynamically request a list of hosts on Digital Ocean (or another provider). You can even create new servers this way. However, creating a server on the Digital Ocean is not the most difficult task.
Centralized logging
JSON logs are a great thing if you want to easily aggregate them and search them. I would look at Bunyan for this.
It would be great if the logs of all servers flow into one place. You can use something like Loggly , but you can try other ways.
Error reporting and monitoring
There are many solutions for error collection and logging. I didn’t like any of the ones I tried, so I’m not going to advise you anything. If you know a good tool for this, please write about it in the comments.
I recommend an excellent guide to running Node.js in production from Joyent - there are a lot of additional tips.
That's all! We built a simple, stable Node.js cluster. Let me know if you have any idea how to improve it!
From the translator: thanks for being here. For the first time I try myself as a translator. I am sure that not everything translated correctly, so please send error messages, as well as typos and design problems by internal mail.
Source: https://habr.com/ru/post/270385/
All Articles