Let's Encrypt: getting the certificate step by step
This article will describe the real way of obtaining a certificate from Let's Encrypt in manual mode for further installation on a Windows (IIS / Microsoft Azure) or Linux web server (fully manual mode). Due to the lack of an official client on Windows, a Linux distribution will be used to generate the certificate.
In the first days of the opening of applications for beta testing, it was decided to sign up and just recently received a letter informing us that ACME will now generate a valid certificate for our domain.
')
Then we decided to publish an article with step-by-step instructions of the process so that by the time of release you could already quickly create and start using your certificate.
A full description of the process is available at this link .
It is only important to know that in order to verify domain ownership and successful certificate generation, you will need to have access to DNS records or to the server where the A-record refers, which is quite logical.
The meaning of the Automated Certificate Management Environment Environment (ACME) software suite (written in Python) is to automate certificate generation and installation in a Linux environment.
There is an unofficial open source Windows client that can generate and install certificates on Windows IIS and Amazon Web Services, but we had the task of retrieving the keys and installing them manually. I suggest anyone wishing to write an article on working with him.
Attention: this instruction teaches how to create a certificate in manual mode, there are also easier ways to automatically generate and renew certificates. I hope that they will soon be described on this resource.
[11/01/17] New CertBot Client
A small update of the article in 2017.
Now you can install CertBot and get a certificate in manual mode.
Short instructions:
1. Downloading the distribution
2. Setting file permissions
3. Run to get the certificate in manual mode.
4. Follow the program instructions (for details, see the full instructions below from step # 4).
Detailed instructions (old client - still working)
Used official instructions .
Linux users can use the text below as an example of generating a certificate in manual mode.
1. Launch your favorite Linux distribution (we used Debian 8).
or 2. Install Git and execute the commands below:
or 2. Download and unpack this archive into the folder and go to this folder.
3. Start the installation and generation using
You will be prompted to enter email for future recovery.
The -a manual switch allows you to generate keys manually without automatically installing them on a web server.
4. Next, enter the domains for which you want to create certificates.

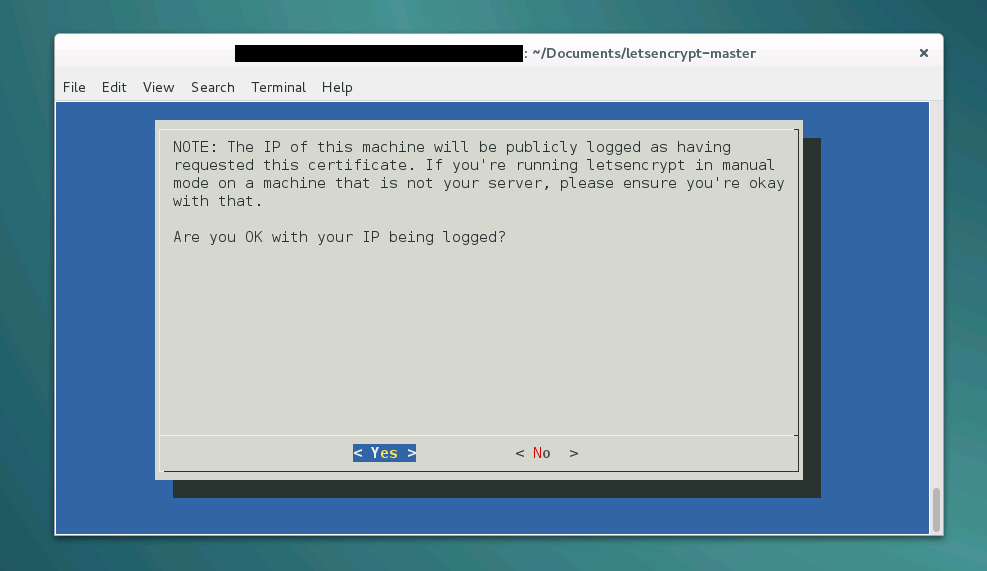
5. Confirm saving your address in the Let's Encrypt logs
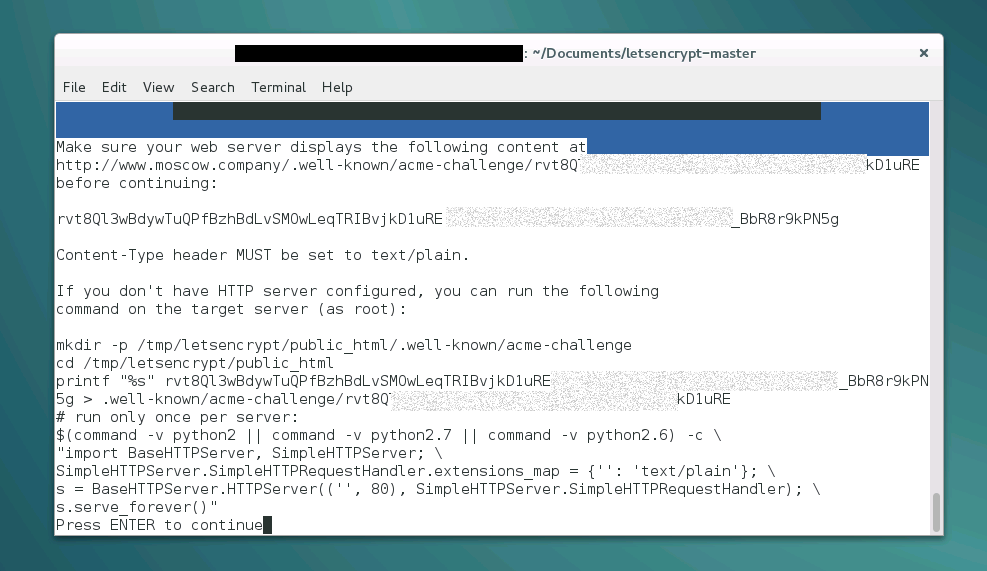
6. Confirm domain ownership
In September 2016, there were minor changes in the procedure for obtaining a certificate. Thank you toxi_roman for the update.
If you have a server on Windows (with Razor Views support, similarly with MVC), then the easiest way to create the correct answer is:
a) create an .well-known folder and in it an acme-challenge folder
b) put the file [request] .cshtml there
c) in the content of this file add:
7. After successful verification, the following certificates will be created in the / etc / letsencrypt / live / [domain name] folder:
privkey.pem - private key for the certificate
Used by Apache for SSLCertificateKeyFile and nginx for ssl_certificate_key.
cert.pem (server certificate)
Apache for SSLCertificateFile is used.
chain.pem (chain certificate)
It is used by Apache for SSLCertificateChainFile.
fullchain.pem (connection chain.pem and cert.pem)
It is used by nginx for ssl_certificate.
7. Now it's time to convert it to the Windows native .pfx format.
Go to the / etc / letsencrypt / live / [domain name] folder (open the terminal in administrator mode using the su command):
Start OpenSSL with the command:
and start the conversion with the command:
You will be asked to enter a password and confirm it.

7.2 Exit OpenSSL with the quit command
7.3 Copying the final file to our user directory
8. We received the certificate mydomain.pfx , which we can now use in the Windows environment.
To renew the certificate in manual mode:
It is important to know that Let's Encrypt certificates are valid for 90 days. It is recommended to update them every 60 days. The email you specified for generation will receive notifications of certificate expiration.
I will be glad to hear your comments or suggestions to the article.
In the first days of the opening of applications for beta testing, it was decided to sign up and just recently received a letter informing us that ACME will now generate a valid certificate for our domain.
')
Then we decided to publish an article with step-by-step instructions of the process so that by the time of release you could already quickly create and start using your certificate.
How it works
A full description of the process is available at this link .
It is only important to know that in order to verify domain ownership and successful certificate generation, you will need to have access to DNS records or to the server where the A-record refers, which is quite logical.
The meaning of the Automated Certificate Management Environment Environment (ACME) software suite (written in Python) is to automate certificate generation and installation in a Linux environment.
There is an unofficial open source Windows client that can generate and install certificates on Windows IIS and Amazon Web Services, but we had the task of retrieving the keys and installing them manually. I suggest anyone wishing to write an article on working with him.
Process step by step
Attention: this instruction teaches how to create a certificate in manual mode, there are also easier ways to automatically generate and renew certificates. I hope that they will soon be described on this resource.
[11/01/17] New CertBot Client
A small update of the article in 2017.
Now you can install CertBot and get a certificate in manual mode.
Short instructions:
1. Downloading the distribution
wget https://dl.eff.org/certbot-auto2. Setting file permissions
chmod a+x certbot-auto3. Run to get the certificate in manual mode.
./certbot-auto certonly --authenticator manual4. Follow the program instructions (for details, see the full instructions below from step # 4).
Detailed instructions (old client - still working)
Used official instructions .
Linux users can use the text below as an example of generating a certificate in manual mode.
1. Launch your favorite Linux distribution (we used Debian 8).
or 2. Install Git and execute the commands below:
git clone https://github.com/letsencrypt/letsencryptcd letsencryptor 2. Download and unpack this archive into the folder and go to this folder.
3. Start the installation and generation using
./letsencrypt-auto --agree-dev-preview --server \https://acme-v01.api.letsencrypt.org/directory -a manual authYou will be prompted to enter email for future recovery.
The -a manual switch allows you to generate keys manually without automatically installing them on a web server.
4. Next, enter the domains for which you want to create certificates.
5. Confirm saving your address in the Let's Encrypt logs
6. Confirm domain ownership
In September 2016, there were minor changes in the procedure for obtaining a certificate. Thank you toxi_roman for the update.
Old way to confirm with text / plain (not relevant as of October 2016)
This is one of the crucial points in the manual registration mode.
Please note: we are asked to create a response to the query that returns the Content-Type text / plain .
This answer will not work and confirmation will give an error:
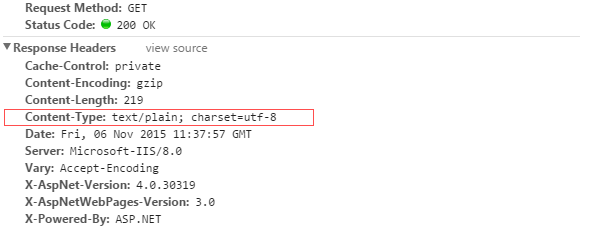
It is necessary that it be like this:

Please note: we are asked to create a response to the query that returns the Content-Type text / plain .
This answer will not work and confirmation will give an error:
It is necessary that it be like this:
If you have a server on Windows (with Razor Views support, similarly with MVC), then the easiest way to create the correct answer is:
a) create an .well-known folder and in it an acme-challenge folder
b) put the file [request] .cshtml there
c) in the content of this file add:
@{Response.ContentType = "text/plain";Response.Charset = "";}7. After successful verification, the following certificates will be created in the / etc / letsencrypt / live / [domain name] folder:
privkey.pem - private key for the certificate
Used by Apache for SSLCertificateKeyFile and nginx for ssl_certificate_key.
cert.pem (server certificate)
Apache for SSLCertificateFile is used.
chain.pem (chain certificate)
It is used by Apache for SSLCertificateChainFile.
fullchain.pem (connection chain.pem and cert.pem)
It is used by nginx for ssl_certificate.
7. Now it's time to convert it to the Windows native .pfx format.
Go to the / etc / letsencrypt / live / [domain name] folder (open the terminal in administrator mode using the su command):
cd /etc/letsencrypt/live/[ ]Start OpenSSL with the command:
openssland start the conversion with the command:
pkcs12 -inkey privkey.pem -in fullchain.pem -export -out mydomain.pfxYou will be asked to enter a password and confirm it.
7.2 Exit OpenSSL with the quit command
7.3 Copying the final file to our user directory
cp --no-preserve=all mydomain.pfx /home/( )/Documents8. We received the certificate mydomain.pfx , which we can now use in the Windows environment.
To renew the certificate in manual mode:
./letsencrypt-auto certonly --renew-by-default -a manualIt is important to know that Let's Encrypt certificates are valid for 90 days. It is recommended to update them every 60 days. The email you specified for generation will receive notifications of certificate expiration.
I will be glad to hear your comments or suggestions to the article.
Source: https://habr.com/ru/post/270273/
All Articles