100 lines on canvas: part 1
Preface I would like to congratulate a habrauser on his birthday. Grow big, be smart, and at last your finished Graphics2D canvas framework has finished to the state that you consider acceptable.
Happy Birthday. : P
This summer, an interesting thought occurred to me: if I wrote a 100-line microblib library for the canvas, what would I fit in there? .. You can write the most detailed answer in 1 evening. And then came the idea of this article.
I propose to implement OOP, events and animation on canvas - the most often necessary (IMHO) things ... and all this in 100 lines. Part one.
Disclaimer: here you are (sometimes) waiting for completely unnecessary perversions to save a couple of characters of code. The author (and this is me) believes that this is possible in microbiblikotekh, and very often done. If this does not violate the performance, of course.
')
Let's start with the idea (and first of all - the PLO). 3 main objects: paths, images, text. There is no need to implement, for example, rectangles and circles in the mini-library: they are easily created through the path. Like sprites - through the pictures. Etc.
The first argument of the object is its content.
The second is the styles that are set on the canvas before drawing.
I will call it Rat: P
Somehow it will be nice:

All 3 objects need to be set with a context property, an object for styles, etc.… So:
It seems to be all clear? Each object has 3 properties: opt (1 argument), style (2nd) and context (context), as well as the draw (ctx) function, which paints this object.
Our class:
Yes, oddly enough, the designer is everything.
Most importantly: drawing:
The process function is not for nothing at all: it will be needed somewhere else:
Why callback? Hmm ... for beauty.
The Rat.style function, also common to all 3 objects, simply transfers the properties to the canvas. Do not forget that we also want transformations:
Ay, do not hit, I'll explain everything.
And finally, the context function that creates and returns an instance of our class:
Everything, you can draw a path. Hooray!
And, in addition to the main styles, there are, as you can see in Rat.style, transformations:
Following further the principle of 2 arguments, we want a class like this:
In addition, in styles you can pass the parameters width , height and crop (an array of 4 numbers). Everything is the same as in the original drawImage CanvasRendering2DContext.
Again class constructor:
Drawing looks something like this:
Everything seems to be simple.
And last, of course:
Hooray, and there are pictures.
3rd global object:
Constructor:
Drawing is very simple. And the solution, as always, is not very clean, but it works).
And the text on the canvas can be measured. Width, yes. Height is determined by the size of the font.
Do not forget:
Sometimes you need to forgive, forget, throw everything out and start from scratch. For such cases, there is a clear function:
For everything else, there is draw , which draws all the objects from the array:
Well, now ... Let's, for example, let's assign a button to the canvas (the simplest thing that came up):
And put ... When you hover the mouse, it is highlighted:

The most interesting thing is that on basic canvas, you can code about the same with about the same amount of code.
But it became obvious only after 100 lines were written ...
github.com/keyten/Rat.js/blob/master/rat.js
Well ... In the next part (if this topic is interesting for the habrahabra), I will show the implementation of the mouse processing, and the third part is the animation. Everything is again in 100 lines (see if it works).
I'm going to celebrate a birthday.
Happy Birthday. : P
This summer, an interesting thought occurred to me: if I wrote a 100-line microblib library for the canvas, what would I fit in there? .. You can write the most detailed answer in 1 evening. And then came the idea of this article.
I propose to implement OOP, events and animation on canvas - the most often necessary (IMHO) things ... and all this in 100 lines. Part one.
Disclaimer: here you are (sometimes) waiting for completely unnecessary perversions to save a couple of characters of code. The author (and this is me) believes that this is possible in microbiblikotekh, and very often done. If this does not violate the performance, of course.
')
Glad to see you under the cut;)
Let's start with the idea (and first of all - the PLO). 3 main objects: paths, images, text. There is no need to implement, for example, rectangles and circles in the mini-library: they are easily created through the path. Like sprites - through the pictures. Etc.
The first argument of the object is its content.
The second is the styles that are set on the canvas before drawing.
I will call it Rat: P
Rat = function(context){ this.context = context; }; Paths
Somehow it will be nice:
var path = rat.path([ ['moveTo', 10, 10], ['lineTo', 100, 100], ['lineTo', 10, 100], ['closePath'] ], { fillStyle: 'red', strokeStyle: 'green', lineWidth: 4 }); All 3 objects need to be set with a context property, an object for styles, etc.… So:
Rat.init = function(cls, arg){ cls.opt = arg[0]; cls.style = arg[1] || {}; cls.context = arg[2]; cls.draw(arg[2].context); }; It seems to be all clear? Each object has 3 properties: opt (1 argument), style (2nd) and context (context), as well as the draw (ctx) function, which paints this object.
Our class:
Rat.Path = function(opt, style, context){ Rat.init(this, arguments); }; Yes, oddly enough, the designer is everything.
Most importantly: drawing:
Rat.Path.prototype = { draw: function(ctx){ this.process(function(ctx){ if(this.style.fillStyle) ctx.fill(); if(this.style.strokeStyle) ctx.stroke(); }, ctx); }, process: function(callback, ctx){ ctx = ctx || this.context.context; Rat.style(ctx, this.style); ctx.beginPath(); this.opt.forEach(function(func){ ctx[func[0]].apply(ctx, func.slice(1)); }); var result = callback.call(this, ctx); ctx.restore(); return result; } }; The process function is not for nothing at all: it will be needed somewhere else:
isPointIn: function(x,y, ctx){ return this.process(function(ctx){ return ctx.isPointInPath(x, y); }, ctx); } Why callback? Hmm ... for beauty.
The Rat.style function, also common to all 3 objects, simply transfers the properties to the canvas. Do not forget that we also want transformations:
// , // Rat.notStyle = "translate0rotate0transform0scale".split(0); Rat.style = function(ctx, style){ ctx.save(); style.origin && ctx.translate.apply(ctx, style.origin); style.rotate && ctx.rotate(style.rotate); style.scale && ctx.scale.apply(ctx, style.scale); style.origin && ctx.translate(-style.origin[0], -style.origin[1]); style.translate && ctx.translate.apply(ctx, style.translate); // , origin? style.transform && ctx.transform.apply(ctx, style.transform); Object.keys(style).forEach(function(key){ if(!~Rat.notStyle.indexOf(key)) ctx[key] = style[key]; }); }; Ay, do not hit, I'll explain everything.
!~Rat.notStyle.indexOf(key) - the same as Rat.notStyle.indexOf(key) != -1 . This is a micro library though.And finally, the context function that creates and returns an instance of our class:
Rat.prototype = { path : function(opt, style){ return new Rat.Path(opt, style, this); }, }; Everything, you can draw a path. Hooray!
And, in addition to the main styles, there are, as you can see in Rat.style, transformations:
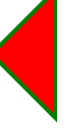
var path = rat.path([ ['moveTo', 10, 10], ['lineTo', 100, 100], ['lineTo', 10, 100], ['closePath'] ], { fillStyle: 'red', strokeStyle: 'green', lineWidth: 4, rotate: 45 / 180 * Math.PI, origin: [55, 55] }); The picture is cropped because drawn in zero coordinates.Pictures
Following further the principle of 2 arguments, we want a class like this:
var img = new Image(); img.src = "image.jpg"; img.onload = function(){ rat.image(img); } In addition, in styles you can pass the parameters width , height and crop (an array of 4 numbers). Everything is the same as in the original drawImage CanvasRendering2DContext.
Again class constructor:
Rat.Image = function(opt, style, context){ Rat.init(this, arguments); }; Drawing looks something like this:
Rat.Image.prototype.draw = function(ctx){ Rat.style(ctx, this.style); if(this.style.crop) ctx.drawImage.apply(ctx, [this.opt, 0, 0].concat(this.style.crop)); else ctx.drawImage(this.opt, 0, 0, this.style.width || this.opt.width, this.style.height || this.opt.height); ctx.restore(); }; Everything seems to be simple.
And last, of course:
Rat.prototype = { ... image : function(opt, style){ return new Rat.Image(opt, style, this); }, }; Hooray, and there are pictures.
Text
3rd global object:
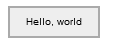
var text = rat.text("Hello, world!", { fillStyle: 'blue' }); There is also a maxWidth property.Constructor:
Rat.Text = function(){ Rat.init(this, arguments); }; Drawing is very simple. And the solution, as always, is not very clean, but it works).
Rat.Text.prototype.draw = function(ctx){ Rat.style(ctx, this.style); if(this.style.fillStyle) ctx.fillText(this.opt, 0, 0, this.style.maxWidth || 999999999999999); if(this.style.strokeStyle) ctx.strokeText(this.opt, 0, 0, this.style.maxWidth || 9999999999999999); ctx.restore(); }; And the text on the canvas can be measured. Width, yes. Height is determined by the size of the font.
Rat.Text.prototype.measure = function(){ var ctx = this.context.context; Rat.style(ctx, this.style); var w = ctx.measureText(this.opt).width; ctx.restore(); return w; }; Do not forget:
Rat.prototype = { ... image : function(opt, style){ return new Rat.Image(opt, style, this); }, }; Trivia
Sometimes you need to forgive, forget, throw everything out and start from scratch. For such cases, there is a clear function:
Rat.prototype = { ... clear: function(){ var cnv = this.context.canvas; this.context.clearRect(0, 0, cnv.width, cnv.height); } }; For everything else, there is draw , which draws all the objects from the array:
Rat.prototype = { ... draw: function(elements){ var ctx = this.context; elements.forEach(function(element){ element.draw(ctx); }); } }; Examples:
Well, now ... Let's, for example, let's assign a button to the canvas (the simplest thing that came up):
// var path = rat.path([ ['moveTo', 10, 10], ['lineTo', 100, 10], ['lineTo', 100, 40], ['lineTo', 10, 40], ['closePath'] ], { fillStyle: '#eee', strokeStyle: '#aaa', lineWidth: 2 }); // var text = rat.text("Hello, world", { translate: [55, 28], textAlign: 'center', fillStyle: 'black' }); And put ... When you hover the mouse, it is highlighted:
var bounds = ctx.canvas.getBoundingClientRect(); var hover = false; ctx.canvas.addEventListener('mousemove', function(e){ var x = e.clientX - bounds.left, y = e.clientY - bounds.top; if(x > 10 && x < 100 && y > 10 && y < 40){ if(hover) return; hover = true; path.style.fillStyle = '#ccc'; rat.clear(); rat.draw([path, text]); } else if(hover){ hover = false; path.style.fillStyle = '#eee'; rat.clear(); rat.draw([path, text]); } }); What for?
The most interesting thing is that on basic canvas, you can code about the same with about the same amount of code.
Hidden text
// var path = { fill: '#eee', draw: function(){ ctx.moveTo(10, 10); ctx.lineTo(100, 10); ctx.lineTo(100, 40); ctx.lineTo(10, 40); ctx.closePath(); ctx.fillStyle = this.fill; ctx.strokeStyle = '#aaa'; ctx.lineWidth = 2; ctx.fill(); ctx.stroke(); } }; // var text = { draw: function(){ ctx.textAlign = 'center'; ctx.fillStyle = 'black'; ctx.fillText("Hello, world", 55, 28); } }; path.draw(); text.draw(); var bounds = ctx.canvas.getBoundingClientRect(); var hover = false; ctx.canvas.addEventListener('mousemove', function(e){ var x = e.clientX - bounds.left, y = e.clientY - bounds.top; if(x > 10 && x < 100 && y > 10 && y < 40){ if(hover) return; hover = true; path.fill = '#ccc'; ctx.clearRect(0, 0, 800, 400); path.draw(); text.draw(); } else if(hover){ hover = false; path.fill = '#eee'; ctx.clearRect(0, 0, 800, 400); path.draw(); text.draw(); } }); But it became obvious only after 100 lines were written ...
github.com/keyten/Rat.js/blob/master/rat.js
Well ... In the next part (if this topic is interesting for the habrahabra), I will show the implementation of the mouse processing, and the third part is the animation. Everything is again in 100 lines (see if it works).
I'm going to celebrate a birthday.
All interesting code!
Source: https://habr.com/ru/post/270255/
All Articles