Visual Studio Online: Continuous Integration and Testing
Visual Studio Online , like Team Foundation Server 2015, has the capacity to implement a continuous integration process.
In this article, we will look at an example of using Visual Studio Online (VSO) with a Git repository, as well as ways to customize the processes of continuous integration, testing, and automatic deployment.
')
Setting up a Visual Studio Online service is one of the fastest ways to organize and plan the process of building and deploying applications for various platforms. The service will be deployed within a few minutes and run on our cloud infrastructure without the need for installation or configuration on a separate server.
Using VSO and Git
Creating a project in VSO and initializing a remote Git repository
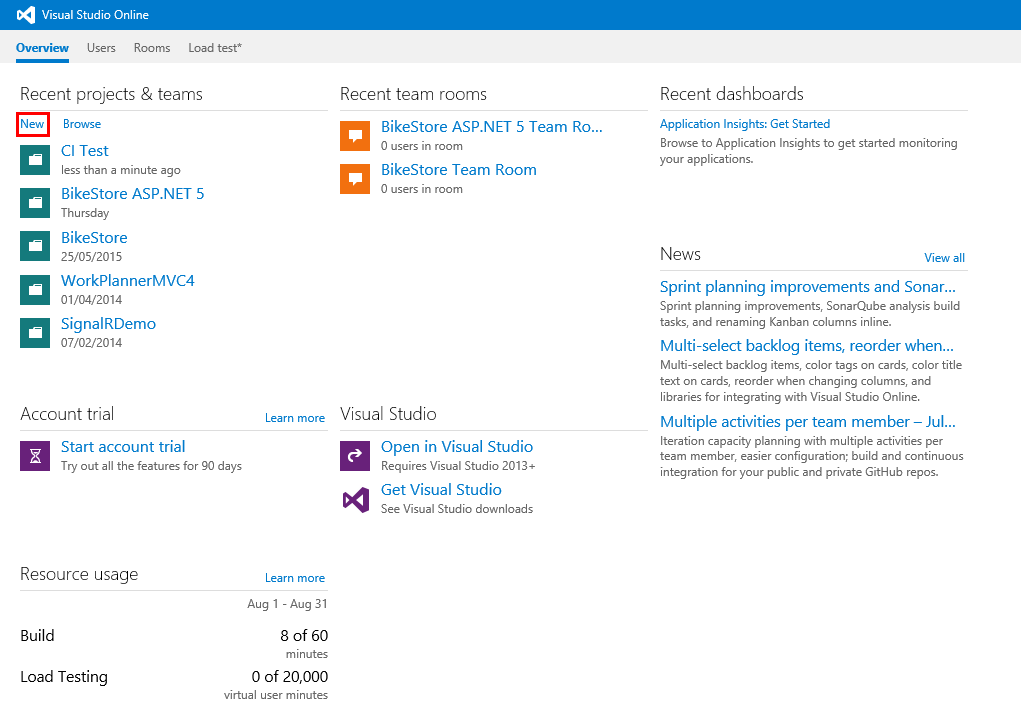
Create a new project for the team in VSO. Go to the VSO website, go to the main page and click New:
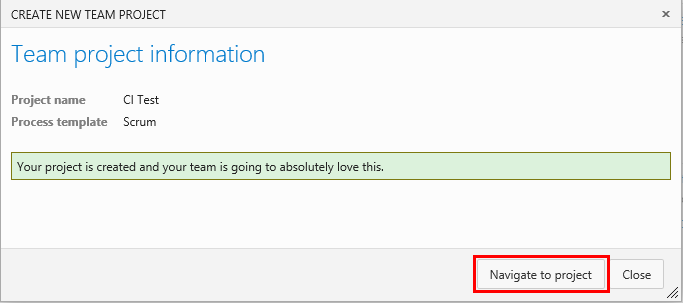
We specify the name and description of the project. We select the necessary template for the development process.
Here we select Git as a version control system and click the “Create Project” button:

When the project is created, click on the "Navigate to project" button:
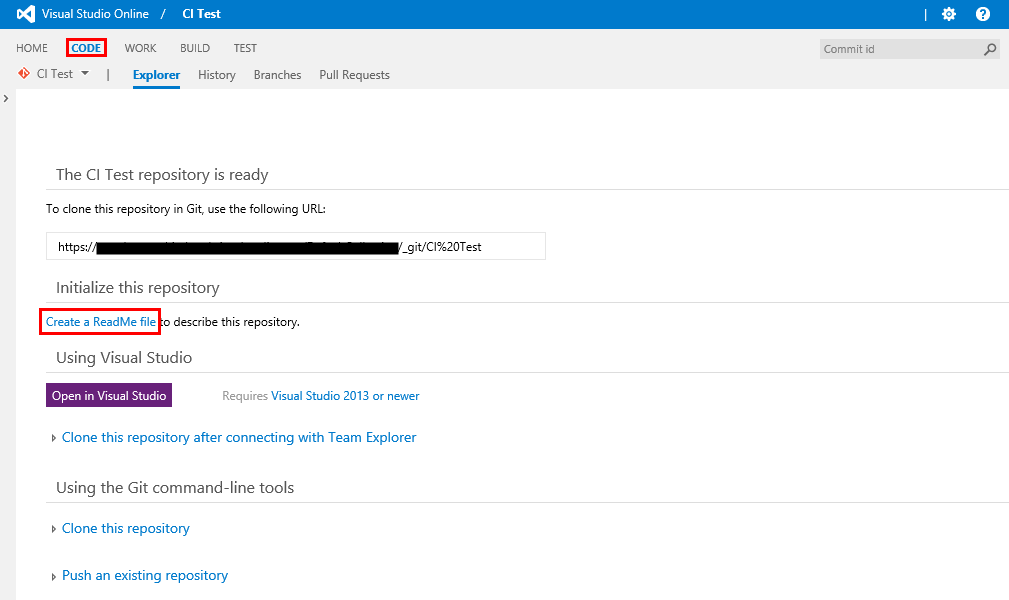
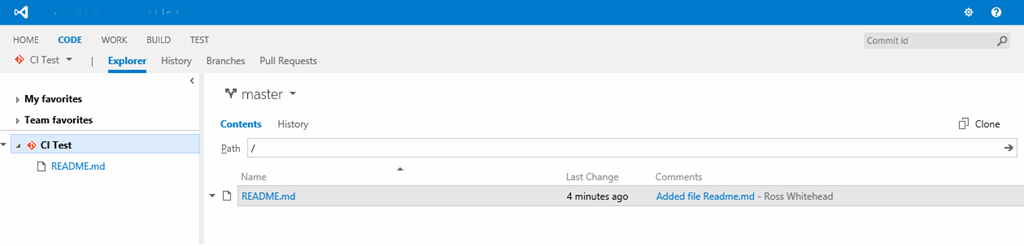
The main project page for the work of our team will be displayed. Now you need to initialize the Git repository. Go to the CODE page and click "Create a ReadMe file". The repository is initialized and the master branch is created. For example, I will configure continuous integration on this thread:
In the screenshot we can see the master branch with the README.md file:
Opening a project in Visual Studio, cloning a Git repository and creating a solution.
Now open the project for the team in Visual Studio and clone the repository to create a local copy.
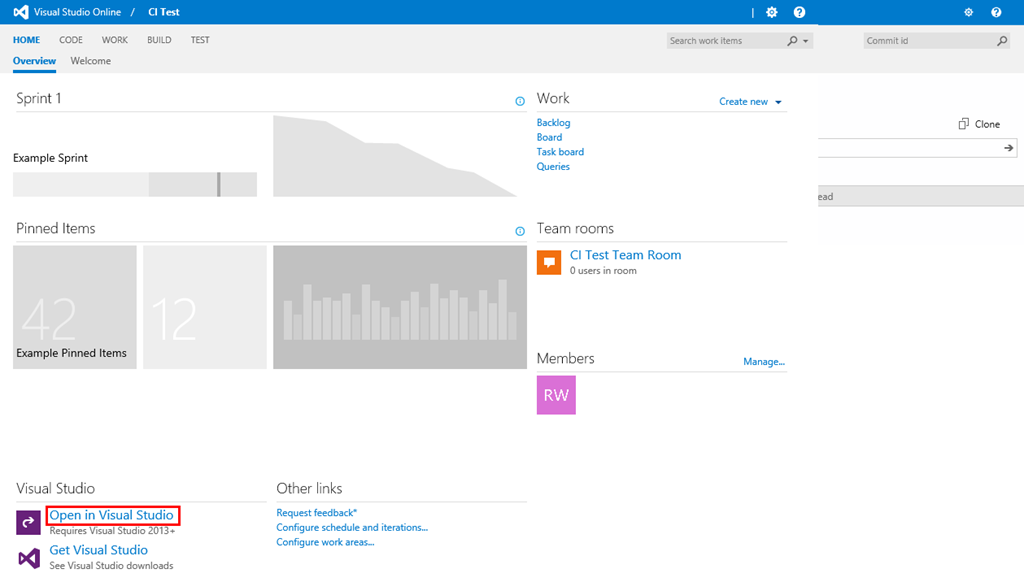
Go to the main page of the project in VSO and click "Open in Visual Studio":
Visual Studio opens a connection to a VSO project.
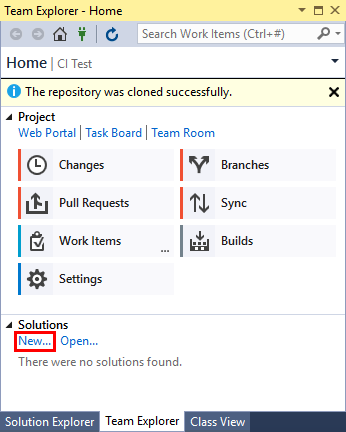
In the Team Explorer window, enter the address of the local repository and click the “Clone” button:

Now click “New” to create a new solution:
Select the ASP.NET Web Application project template, specify the project name and click “OK”:

Select the ASP.NET 5 Preview Web Application template and click on “OK”:

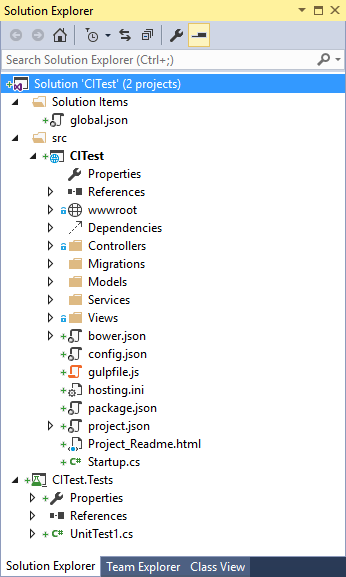
Now add a project containing unit tests. Right-click on the solution in Solution Explorer, select “Add New Project” and select the Unit Test Project template. My project is called CITest.Tests.
The solution is as follows:
The UnitTest1 class was created with the only method TestMethod1. TestMethod1 will be passed, because it has no implementation.
Add the second method TestMethod2, with the expression Assert.Fail. The second method will not be passed and will just show that the test performer has successfully identified and launched the necessary tests.
using System; using Microsoft.VisualStudio.TestTools.UnitTesting; namespace CITest.Tests { [TestClass] public class UnitTest1 { [TestMethod] public void TestMethod1() { } [TestMethod] public void TestMethod2() { Assert.Fail("failing a test"); } } } Save the changes and run the build.
Now we need to commit (commit) the solutions to the local repository and send from local to remote. In order to do this, go to the Changed tab in the Team Explorer window, add a comment to the commit and select the option “Commit and Push”.
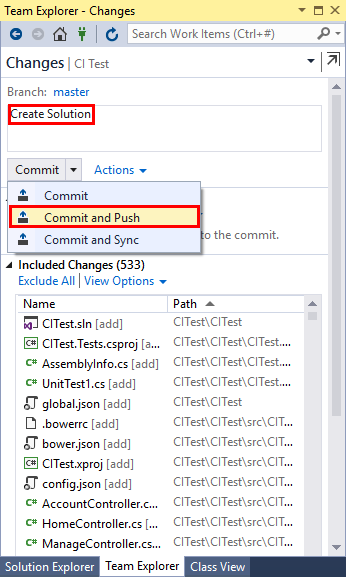
The master branch of the remote Git repository now contains a solution that includes a web application and a project with tests.
Creating a build process definition
Now we will create the build process definition in the VSO.
Go to the project “BUILD” page for the team to work and press the "+" button.

Select the Visual Studio template and click OK.
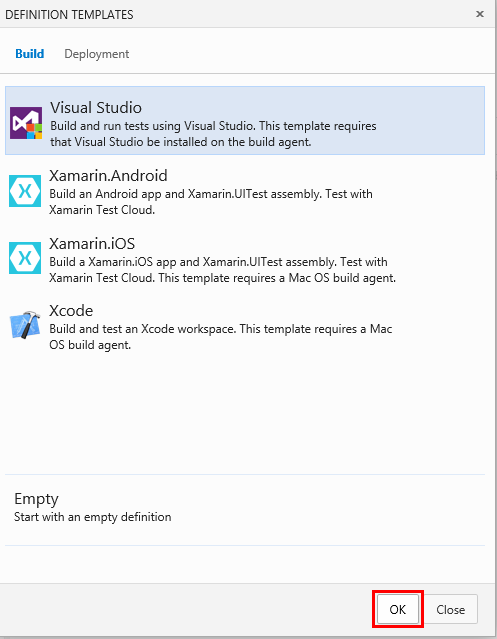
The Visual Studio template for defining an assembly contains 4 assembly steps:
- Visual Studio Build - build solutions
- Visual Studio Test - run tests
- Index Sources & Publish Symbols - indexing source code and publishing symbols in .pdb files
- Publish Build Artifacts - publish build artifacts (dlls, pdb, and xml documentation files)
Now let's leave everything as it is, by default, click “Save” and specify the name for the definition being created.
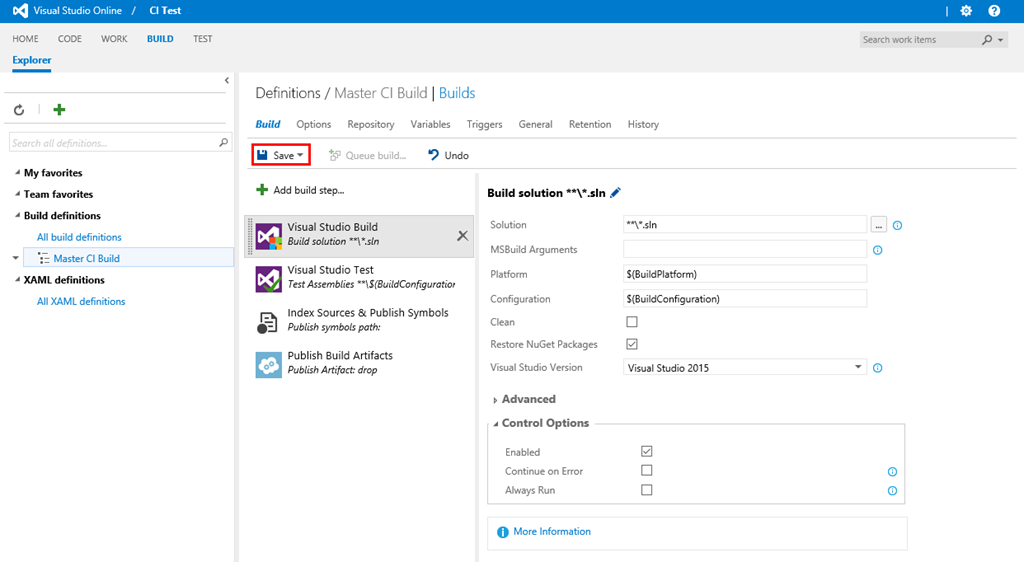
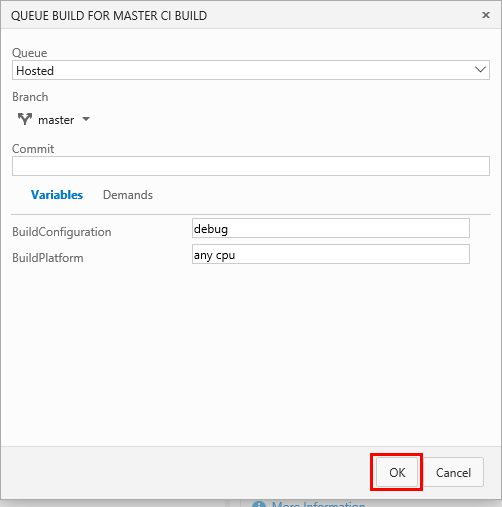
To test, click “Queue build”:

We accept the default settings and click "OK".
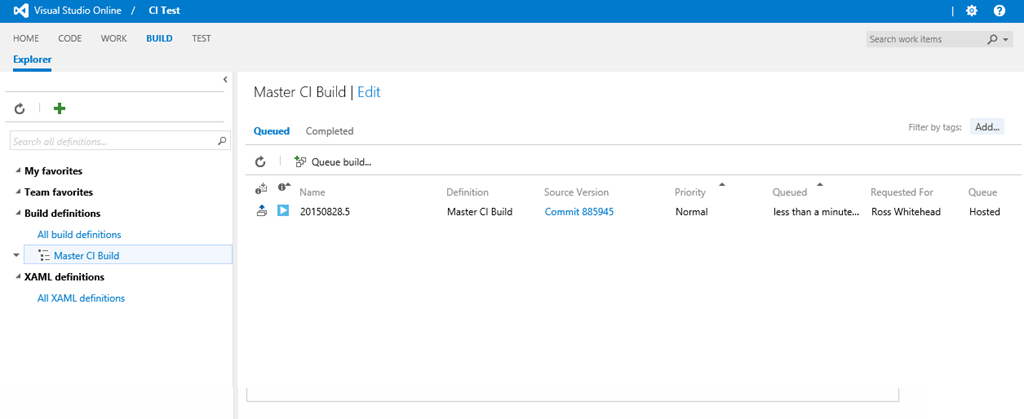
We fall into the browser assembly process (BUILD-> Explorer). The assembly enters the queue and, as soon as the process is launched, we will see information about it in the output window:
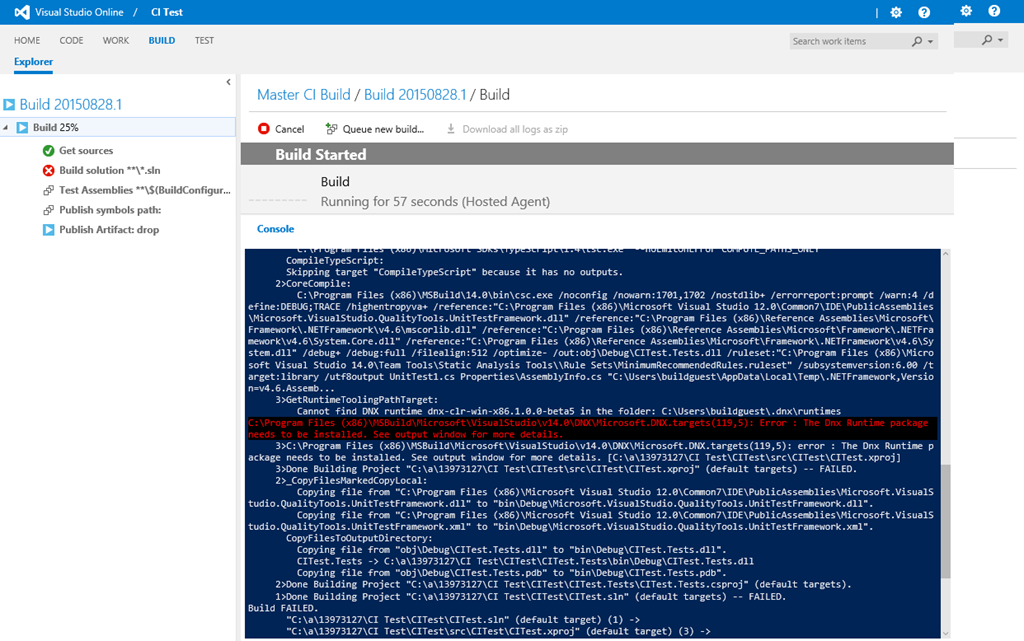
The build failed at the Build Solution step with the following error - The Dnx Runtime package needs to be installed.
The reason for this error is that we start the build process on a remote server and we need to set the appropriate DNX environment that our solution will choose to build.
Let's go back to Visual Studio and add a new file to our solution. Let's call Prebuild.ps1 and add the following Powershell script to it:
DownloadString('https://raw.githubusercontent.com/aspnet/Home/dev/dnvminstall.ps1'))} # load up the global.json so we can find the DNX version $globalJson = Get-Content -Path $PSScriptRoot\global.json -Raw -ErrorAction Ignore | ConvertFrom-Json -ErrorAction Ignore if($globalJson) { $dnxVersion = $globalJson.sdk.version } else { Write-Warning "Unable to locate global.json to determine using 'latest'" $dnxVersion = "latest" } # install DNX # only installs the default (x86, clr) runtime of the framework. # If you need additional architectures or runtimes you should add additional calls # ex: & $env:USERPROFILE\.dnx\bin\dnvm install $dnxVersion -r coreclr & $env:USERPROFILE\.dnx\bin\dnvm install $dnxVersion -Persistent # run DNU restore on all project.json files in the src folder including 2>1 to redirect stderr to stdout for badly behaved tools Get-ChildItem -Path $PSScriptRoot\src -Filter project.json -Recurse | ForEach-Object { & dnu restore $_.FullName 2>1 } The script runs DNVM, determines the version of DNX from the global file . json our solution, installs DNX and then restores the dependencies of the project contained in the project.json file.
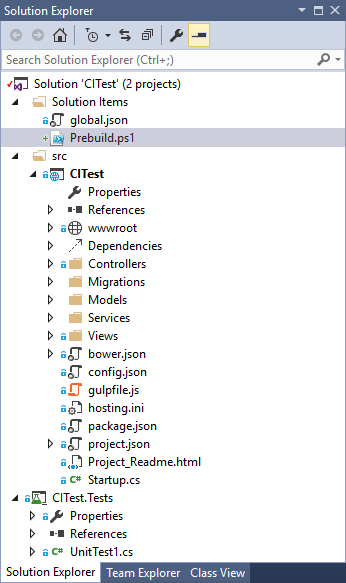
After adding the Prebuild.ps1 file, the solution will look like this:
Make commit changes to the local repository and send to the remote.
Now you need to add a step with the Powershell script to the assembly definition.
Let's go back to the VSO and edit the build steps. Click "+" and add a Powershell step.

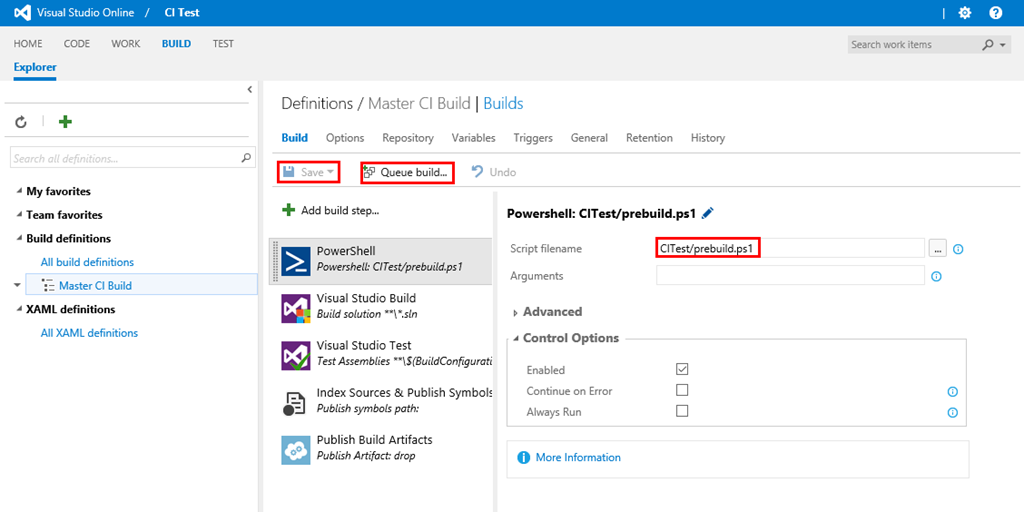
Move the task with the Powershell script to the top of the list of build steps so that it runs first. Click "Script" and select the file Prebuild.ps1. Click “Save” and then “Queue build” to test:
Now all assembly steps are completed successfully:
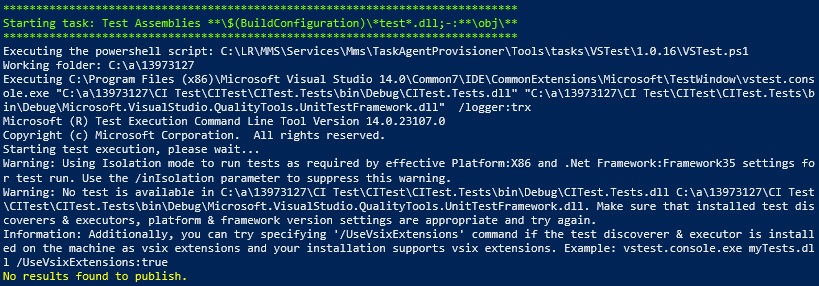
However, if we decide to see the results of the Test step in more detail, we will see a warning - No results found to publish. But we added 2 methods to the solution.
The answer is contained in the following "Executing" expression, which indicates that vstest.console was executed for 2 test files - CITest.Tests.dll, which is good. And Microsoft.VisualStudio.QualityTools.UnitTestFramework.dll, which is bad.
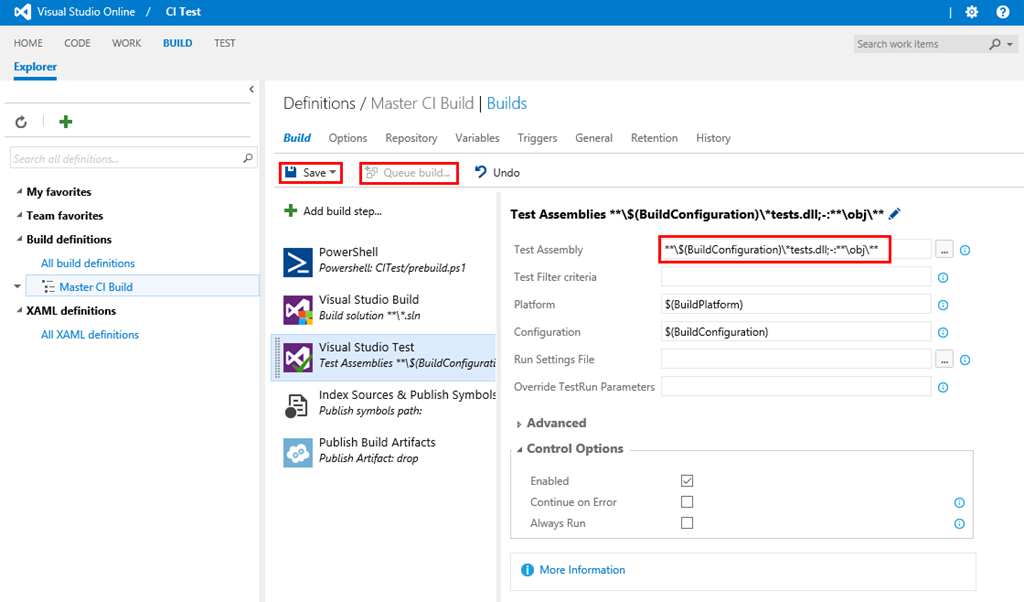
You need to change the Test build step to exclude the UnitTestFramework.dll file
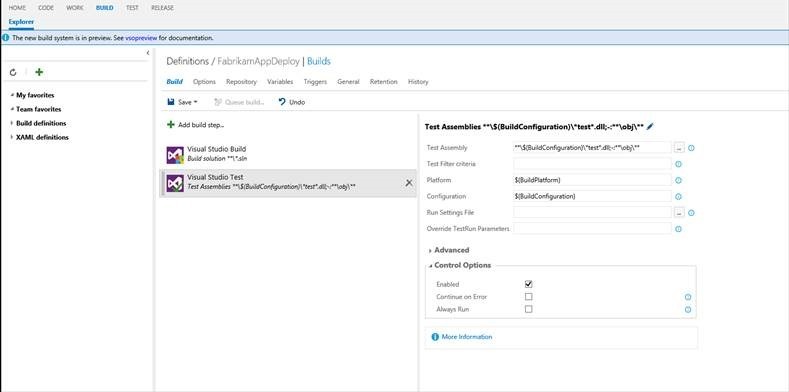
Edit the build definition, select the Test step and change the Test Assembly path from the current ** \ $ (BuildConfiguration) \ * test * .dll; -: ** \ obj \ ** to the next ** \ $ (BuildConfiguration) \ * tests. dll; -: ** \ obj \ **.
Click “Save” and “Queue Build”:
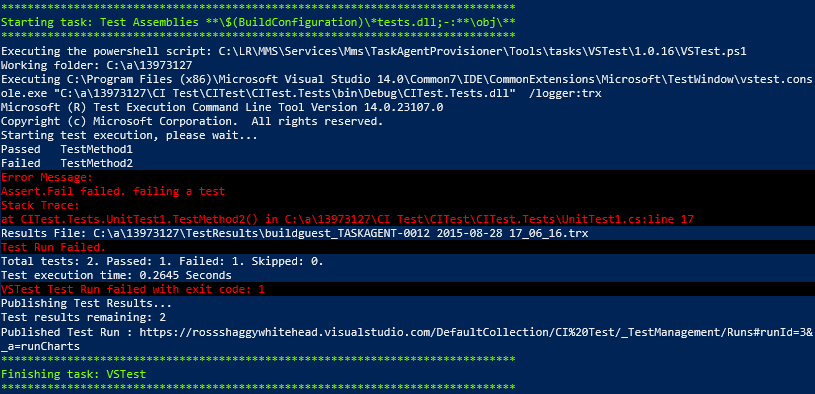
The build failed. But this is exactly what we wanted. TestMethod2 contains the expression Assert.Fail () and therefore we provoked the failure of the Test step, as seen in the screenshot. We caused this failure to prove that tests run correctly:
Configure continuous integration, trigger to build and deploy artifacts
Now in the assembly definition, we have a preliminary step that downloads DNX, then a step that provides a solution build and a Test step that fails, thanks to the TestMethod2 method.
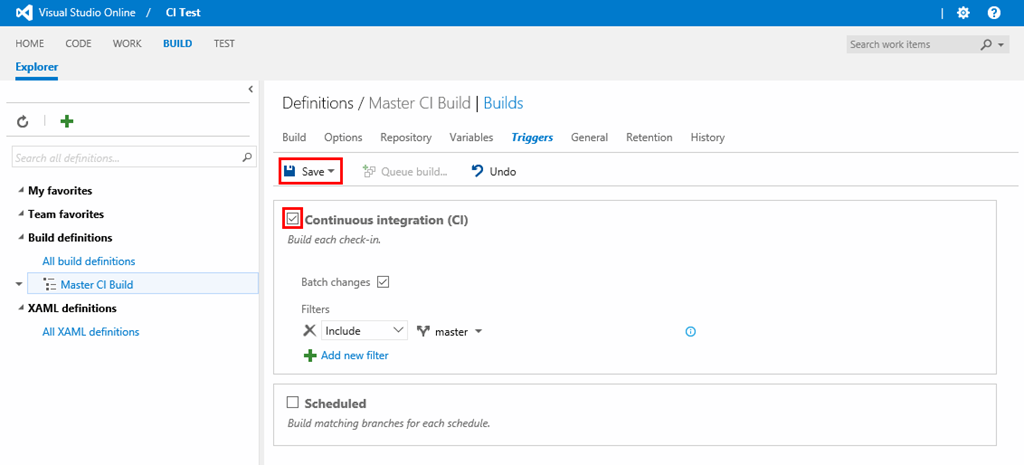
Now it's time to configure continuous integration and make changes to the UnitTest1 class. Then we will commit and send the changes to the repository, which should serve as a trigger to start the build.
Edit the assembly definition and go to the Triggers tab. Select Continuous Integration (CI) and click "Save":
Edit the UnitTest1.cs file in Visual Studio and remove the TestMethod2 method. Then we commit and send the changes.
Let's go back to the VSO and go to the BUILD page. In the Queued list, we should see the assembly awaiting launch:
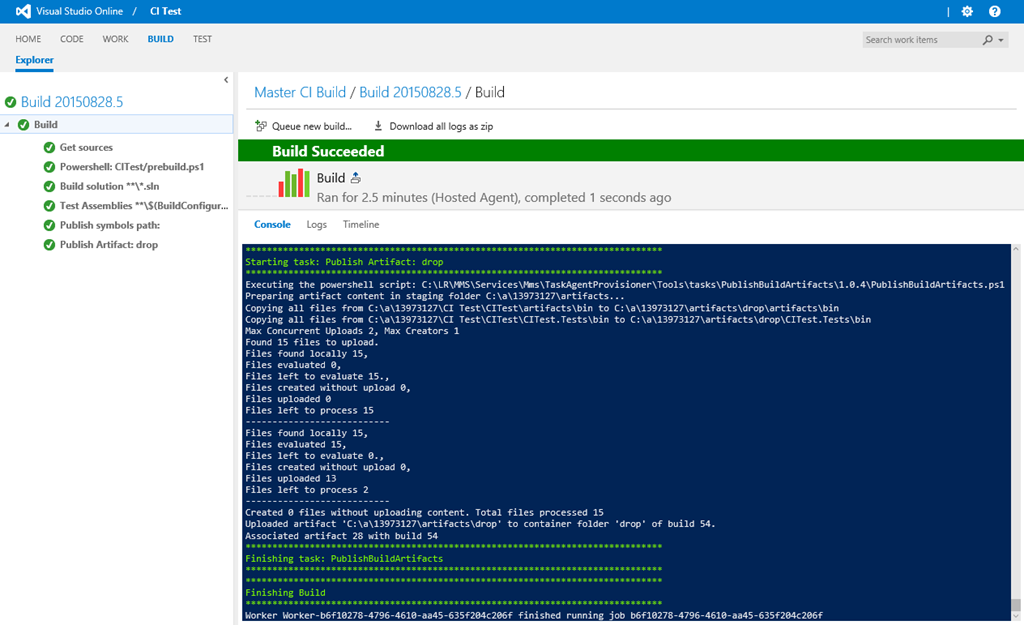
All steps are successful.
DNX was successfully installed on the remote host where the assembly is being made. The decision has gathered. All tests are run and passed. Character files are generated. Finally, the build artifacts are published.
That is, we have a new, tested application build.
Deploying build artifacts to a web application server
If we host our web application in Azure, we need to add an Azure Web Application Deployment step to the build process definition and in this case, the build artifacts will be automatically deployed to Azure when the application is successfully built and tested.
Alternatively, we can manually download the build artifacts and then copy them to the correct server. In order to do this, go to the list of completed assemblies and open the necessary one. Then select the Artifacts tab and click "Download". The resulting .zip file will contain the necessary files.
Tests
So, we have a website. Let's see how you can test it.
In preparation for the launch of assembly definitions, we mean the preparation of an assembly agent. The link presents the steps to configure the build agent.
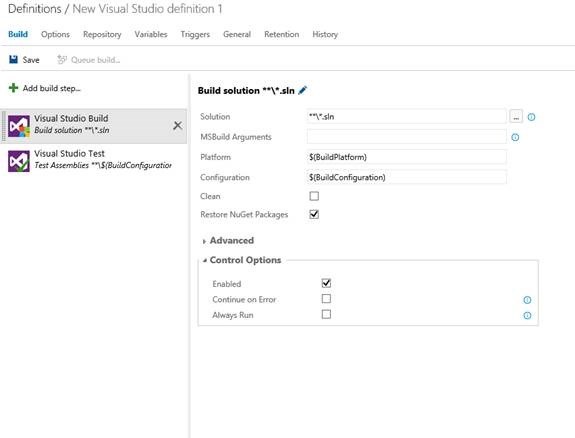
Create a build process definition and select the Visual Studio template:

Selecting a Visual Studio template automatically adds the Build Task and Unit Tesk Task. Now fill in the parameters required for each of the tasks. Task Build task takes a solution that needs to be built and configuration options. As mentioned earlier, this solution contains the application code, the code for the unit tests, as well as the automatic Selenium tests that we want to run, as one of the steps to build validation:
At the end, add the required parameters required for the Unit Test - Test Assembly task and the Test Filter criterion. Note that in this task we take the dll of unit tests, number all the tests and run them automatically. You can enable the Test Filter criterion and use the filter by test case type if you need to run specific tests. Another important point is that the unit tests in Visual Studio Test Task are always run on the server where the build takes place and do not require additional settings for deployment:
Using Visual Studio Online to manage tests
Configuring virtual machines for application deployment and running tests
Once the build is complete and the unit tests are completed, the next step is to deploy the application (website) and run the functional tests.
The following components are necessary for this:
- Ready and configured Windows Server 2012 R2 with IIS installed for web site deployment or Microsoft Azure Website.
- A set of virtual machines with installed browsers (Chrome, Firefox and IE) to automatically run Selenium tests on these machines.
You must ensure that these virtual machines are configured for remote access via Powershell .
Once the virtual machines are ready, go to the Test Hub-> Machine page to create the necessary configuration as shown in the screenshot. Specify the name for the group of virtual machines and the FQDN / IP address of the IIS / Web server of the virtual machine. It is also necessary to enter the administrator's login and password for future settings:
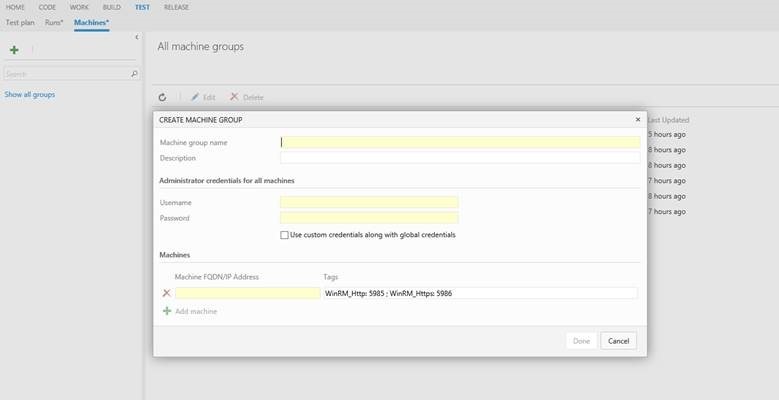
For the test environment, specify the name and add all the IP addresses of the machines that have already been configured with the necessary browsers. As mentioned earlier, the automated test system is able to perform all tests on a distributed basis and can scale to a different number of virtual machines.
As a result, in the virtual machine hub there will be one application in the test environment and the test environment itself, for example, in this example it is “Application Under Test” and “Test Machines”, respectively.
Application Deployment and Testing Settings
Now we will add a task for deploying the application to a web server and a task for remotely running integration tests on virtual machines.
We will use the same build definition, simply adding new steps to implement continuous deployment.
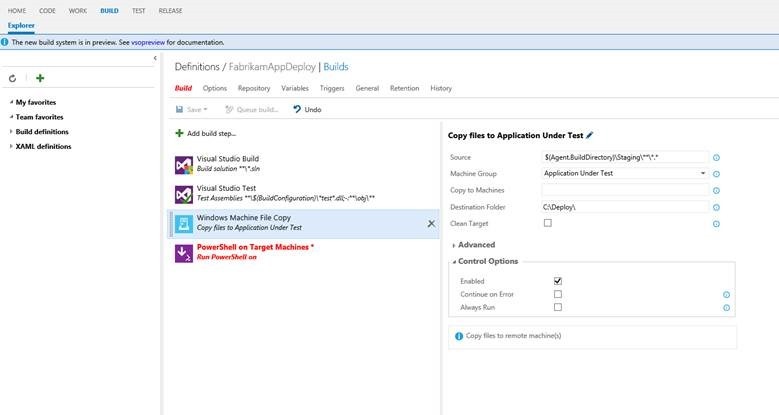
Deploy a web site using Powershell
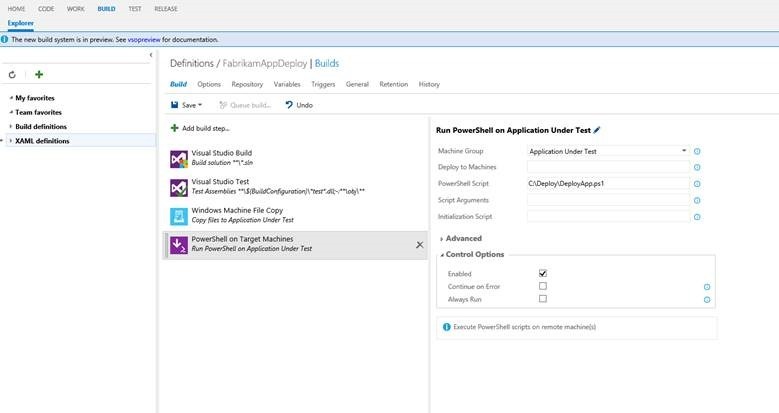
To begin, copy all the files of the website in the right place. Click “Add build step”, add the task “Windows Machine File Copy” and fill in the parameters for copying files. Now add “Run Powershell on Target Machine Tasks” to the definition for deploying / configuring the application environment. To deploy a web application on a web server, select “Application under Test” as a group of virtual machines, we configured them earlier. Select the Powershell task to deploy the website. Make sure that this script is included in the solution / project. This task will execute a Powershell script on a remote machine to configure the website and other additional steps:
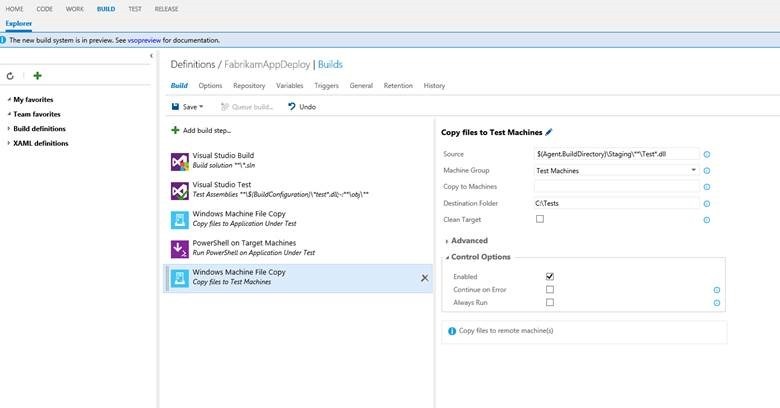
Copying tests to the test environment
Add the “Copy Files” task to the assembly definition for copying all test files to the “Test Machines” group.
You can choose any location, the example uses “C: \ Tests”
Configuring Visual Studio Test Agent
To perform actions on remote machines, first you need to create and configure a test agent. To do this, create a task in which we will write information about the remote machines.
Unlike previous versions of Visual Studio, there is no need to manually copy and configure the controller and test agents on the test environment machines:

Running tests on remote virtual machines
When the setup is complete, the last task will need to add “Run Visual Studio Tests using Test Agent” to run the tests. In this task, we specify the information of the Test Assembly and a filter for running the tests. As part of the build verification, we want to run P0 Selenium tests, so you need to filter the builds using SeleniumTests * .dll as a test build.
We can include the runsettings file with tests and any test run parameters as input. Below we specify for tests data on where the application was deployed using the variable $ (addurl):

Once the tasks are added and configured, you must save the build process definition.
Placing the assembly in a queue, running tests and analyzing test results.
Now that the set of all tasks is ready in the build process definition, you can run it by placing the assembly in a queue. Before doing this, you need to make sure that the build server and the pool of test machines are configured correctly.
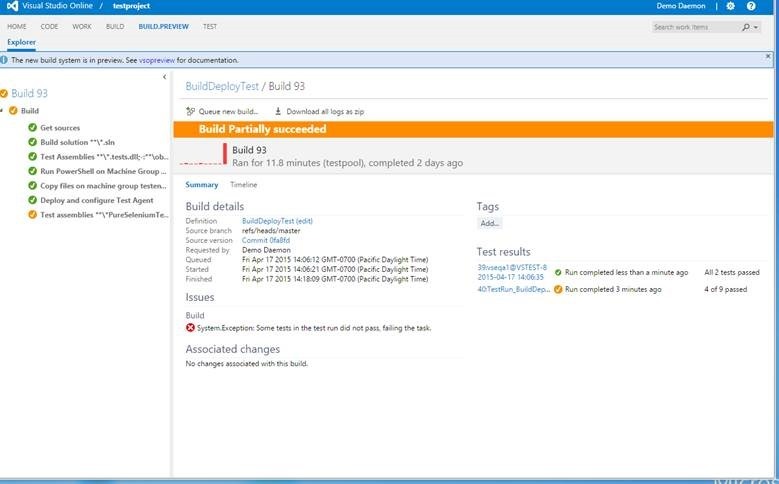
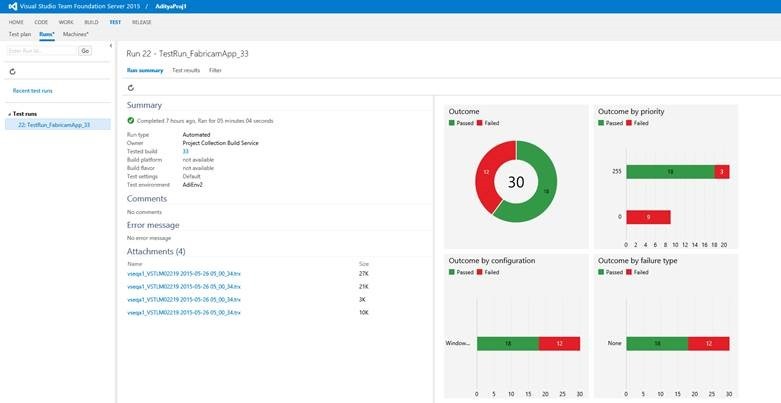
Once the build is complete, VSO provides an overview of the build results with all the necessary information for later decision making.
The build results contain the following information:
- The results of the steps and the selection of their color in the left side of the panel, as well as details in the right.
- By clicking on each step, detailed log entries are available.
- From the test results, you can see that all the unit tests have been passed, but there are problems with integration tests.
Clicking on "Test Results" allows you to go to the results of running tests.
The Test Run page contains a set of graphs and mechanisms for more in-depth study of the results:
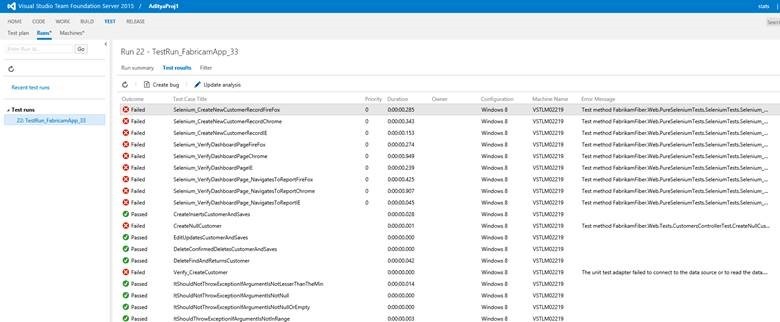
When you go to Test Results, you can also see the information for each test - the name of the test, the test parameters, the author, the virtual machine where it was run, etc.
For each test not passed, the option “Update Analysis” is available for its analysis. The following screenshot shows that IE Selenium tests failed. If you click "Create Bug", then all the information on the test will automatically be added to the created element:
Settings for continuous integration
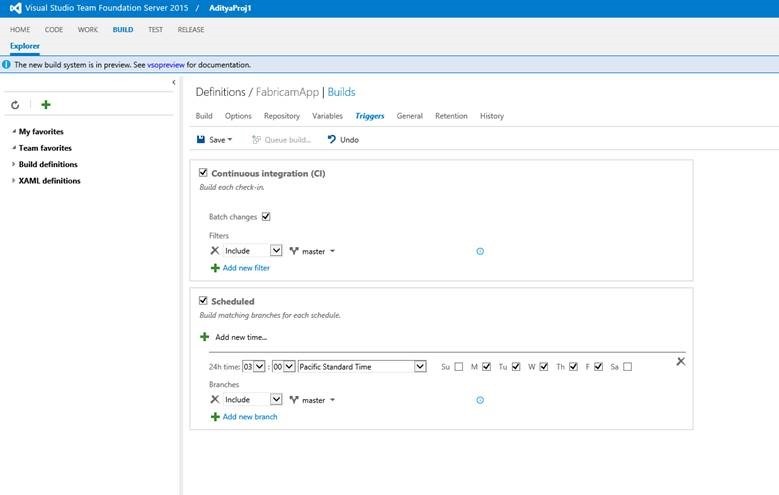
Now that all tests have been studied and defects are registered, you can configure the build process definition to automatically start the continuous integration process, unit tests and integration tests for each check-in.
There are two ways to configure:
- Select “Continuous Integration” to run the process for each check.
- Select a special launch on a schedule to check after making all changes.
You can choose both options, as shown in the screenshot:
Thus, using a similar definition of the build process, we were able to configure the continuous integration process to automatically start the build, then run the unit tests and validate the build.
Conclusion
Finally, using Visual Studio Online we managed to solve several problems:
- Creating a simple build process definition that includes unit testing and automated tests
- Set up a test environment and test agents
- Received a report on the results of the assembly and run tests
- Customized build process using continuous integration approach
useful links
- Video materials: continuous integration and DevOps using Visual Studio
- Visual Studio Online: official website and documentation
- Visual Studio 2015: free offers for developers
Source: https://habr.com/ru/post/270229/
All Articles