AllcountJS: Making a simple CRM with a web interface and REST API in 15 minutes
Suppose my company calls someone and sells something and I need a simple CRM that will allow you to keep a directory of contacts and visually track their status in terms of sales.
Now we will make such a system from scratch in minutes. For this we will use the Allcountjs framework.
The most impatient can immediately look at the result .
')
Since this is the first article in Russian about AllcountJS, I’ll say a few words about the framework itself.
AllcountJS is an open source framework for the rapid development of web and mobile applications on Node.js. AllcountJS is built on the MEAN stack (MongoDB, Express, AngularJS, NodeJS). Support is being developed not only for MongoDB, but also for other databases, primarily SQL.
The central part of the AllcountJS application is the configuration .js file with a declarative description of the application structure: entities, relationships between them, access rights, etc.
CRUD operations to entities, user management, setting permissions, and REST API for all functions of the application - all this is available immediately, without the need to write additional code.
The basic web interface of the application is generated automatically. Naturally, it can be modified and modified as you wish - only the knowledge of AngularJS and the jade template language is needed. If the capabilities of the framework are insufficient, it is possible to extend the functionality through the use of dependency injection mechanism.
You can start working with AllcountJS in several ways: as a standalone application, as a module of another NodeJS application, or launching an application on AllcountJS.com.
The easiest way to see AllcountJS in action is to simply launch one of the demo applications in the gallery .
Consider the option with a separate application. To do this, MongoDB, NodeJS and Git must be installed. (if you have Ubuntu, then you can see the installation screencast ). To install AllcountJS, run:
Next, open app-config / main.js in the application directory and replace its contents with the following code:
Now let's take a closer look at what this code does.
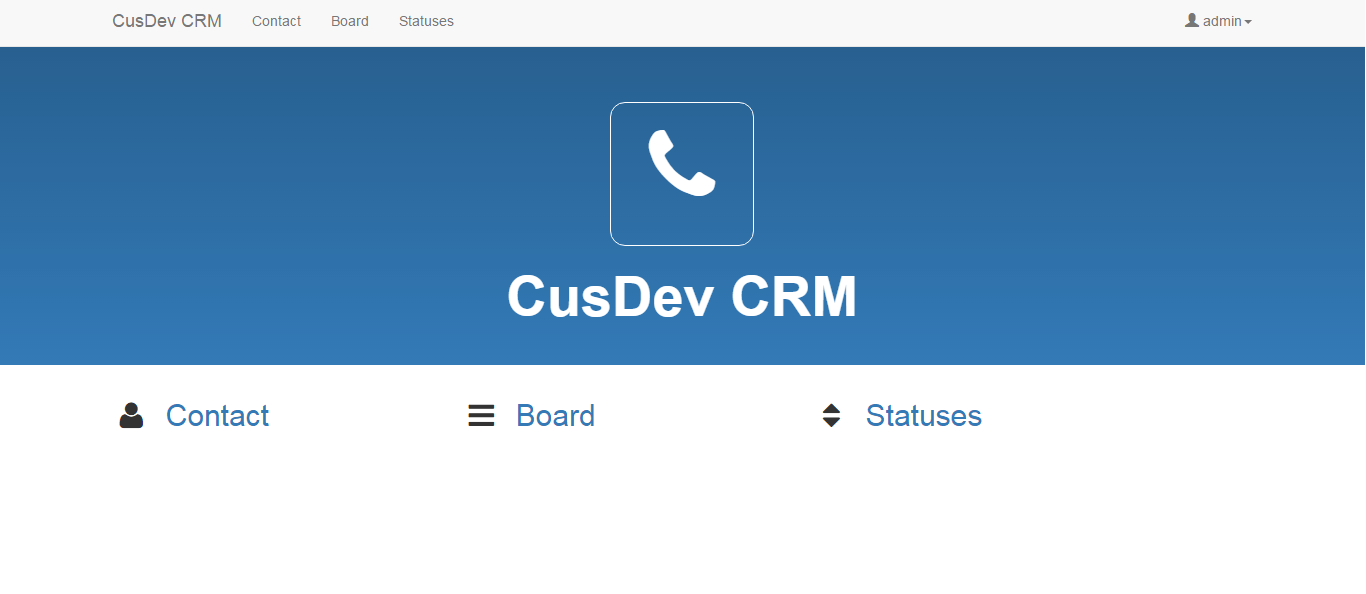
The entire application configuration is located within a single method. The name and icon of the application are set using the appName and appIcon properties. AllcountJS uses Font Awesome icons. You can choose any icon and use it in the application simply by referring to it by name. When linking to the icon, you must drop the fa- prefix. We will take the usual telephone icon for our “CusDev CRM”.
The onlyAuthenticated property is responsible for setting the authentication. It determines the possibility of using the application by unregistered users. We do not want everyone to have access to CRM, so:
Next in the configuration is the menuItems item, but we will return to it after we describe the entities and their representations.
Now we are ready to describe our business entities.
We describe the Contact entity. Let the contact have two required text fields - Name and Company. Several text boxes with information about the methods of communication, the date of the last contact and the current status of the contact.
The status field is a link to the status entity in which the contact may be located (for example, “Wrote”, “Answered,” “Ready for a meeting”).
Each entity can have views. They are set in the view property. Views in AllcountJS are similar to views in SQL. They do not take up additional space in the database, but you can work with them as with ordinary entities. Views can be used to provide special behavior, interface, and access rights.
In our case, we will use views to make a special UI in the form of an interactive whiteboard for displaying contacts. Let us assign the FlowBoard view to the contact and inside it, in the customView property, the UI template board.
It refers to a .jade file containing the template code. AllcountJS uses the jade template engine to generate the final HTML for the web interfaces. Read more about jade at jade-lang.com
AllcountJS comes with a kanban board template with drag-and-drop. Our board representation is its extension. Create a file board.jade with the following code inside:

Now we have reached the menu of our application. It is set in the menuItems property and consists of references to entities and views.
If we have any other application that needs to be integrated with our CRM, then this will not be a problem, because All functions of the application are available through the REST API.
First you need to get a token to access. Suppose our CRM is located at https: // localhost: 9080 , in which case you need to send an HTTP POST request to
https: // localhost: 9080 / api / sign-in
With such JSON content in the body:
In response, a similar answer will be returned:
Now you can, for example, get a list of all contacts. To do this, send an HTTP GET request, but with a header
X-Access-Token in which we will transfer the received token from the previous request.
On https: // localhost: 9080 / api / entity / FlowBoard
or directly to https: // localhost: 9080 / api / entity / Contact
In response, you will receive a list of all contacts in JSON format. Naturally, you can also delete, create and update your contacts through the API.
In the article, an example of a simple CRM shows only a small part of the capabilities of AllcountJS. In the demo application, in addition to the above, there is also Russian localization, which can be disabled by entering forcelocale: “en” in the section with general settings. And the script completes the configuration by adding test data.
In the following articles we will continue to acquaint you with the device and the capabilities of the framework. In the next article we will show how to make a mobile application to our CRM. Too fast enough. Who can not wait to learn more and who is not afraid of English - welcome to the official website allcountjs.com .
Now we will make such a system from scratch in minutes. For this we will use the Allcountjs framework.
The most impatient can immediately look at the result .
')
What is AllcountJS?
Since this is the first article in Russian about AllcountJS, I’ll say a few words about the framework itself.
AllcountJS is an open source framework for the rapid development of web and mobile applications on Node.js. AllcountJS is built on the MEAN stack (MongoDB, Express, AngularJS, NodeJS). Support is being developed not only for MongoDB, but also for other databases, primarily SQL.
The central part of the AllcountJS application is the configuration .js file with a declarative description of the application structure: entities, relationships between them, access rights, etc.
CRUD operations to entities, user management, setting permissions, and REST API for all functions of the application - all this is available immediately, without the need to write additional code.
The basic web interface of the application is generated automatically. Naturally, it can be modified and modified as you wish - only the knowledge of AngularJS and the jade template language is needed. If the capabilities of the framework are insufficient, it is possible to extend the functionality through the use of dependency injection mechanism.
Install and Run
You can start working with AllcountJS in several ways: as a standalone application, as a module of another NodeJS application, or launching an application on AllcountJS.com.
The easiest way to see AllcountJS in action is to simply launch one of the demo applications in the gallery .
Consider the option with a separate application. To do this, MongoDB, NodeJS and Git must be installed. (if you have Ubuntu, then you can see the installation screencast ). To install AllcountJS, run:
npm install -g allcountjs-cli allcountjs init cusdevcrm-allcount cd cusdevcrm-allcount npm install Next, open app-config / main.js in the application directory and replace its contents with the following code:
A.app({ appName: "CusDev CRM", appIcon: "phone", onlyAuthenticated: true, menuItems: [ { name: "Contact", entityTypeId: "Contact", icon: "user" }, { name: "Board", entityTypeId: "FlowBoard", icon: "bars" }, { name: "Statuses", entityTypeId: "Status", icon: "sort" } ], entities: function(Fields) { return { Contact: { fields: { name: Fields.text("Name").required(), company: Fields.text("Company").required(), site: Fields.text("Site"), email: Fields.text("Email"), skype: Fields.text("Skype"), phone: Fields.text("Phone"), lastContactDate: Fields.date('Last contact date'), status: Fields.fixedReference("Status", "Status") }, views: { FlowBoard: { customView: "board" } } }, Status: { fields: { name: Fields.text("Name").required(), order: Fields.integer("Order").required() }, sorting: [['order', 1]], referenceName: "name" } } }, }); Now let's take a closer look at what this code does.
General application settings
The entire application configuration is located within a single method. The name and icon of the application are set using the appName and appIcon properties. AllcountJS uses Font Awesome icons. You can choose any icon and use it in the application simply by referring to it by name. When linking to the icon, you must drop the fa- prefix. We will take the usual telephone icon for our “CusDev CRM”.
appName: "CusDev CRM", appIcon: "phone", The onlyAuthenticated property is responsible for setting the authentication. It determines the possibility of using the application by unregistered users. We do not want everyone to have access to CRM, so:
onlyAuthenticated: true Next in the configuration is the menuItems item, but we will return to it after we describe the entities and their representations.
Contacts and statuses
Now we are ready to describe our business entities.
We describe the Contact entity. Let the contact have two required text fields - Name and Company. Several text boxes with information about the methods of communication, the date of the last contact and the current status of the contact.
The status field is a link to the status entity in which the contact may be located (for example, “Wrote”, “Answered,” “Ready for a meeting”).
entities: function(Fields) { return { Contact: { fields: { name: Fields.text("Name").required(), company: Fields.text("Company").required(), site: Fields.text("Site"), email: Fields.text("Email"), skype: Fields.text("Skype"), phone: Fields.text("Phone"), lastContactDate: Fields.date('Last contact date'), status: Fields.fixedReference("Status", "Status") } }, Status: { fields: { name: Fields.text("Name").required(), order: Fields.integer("Order").required() }, sorting: [['order', 1]], referenceName: "name" } } } Display on the board
Each entity can have views. They are set in the view property. Views in AllcountJS are similar to views in SQL. They do not take up additional space in the database, but you can work with them as with ordinary entities. Views can be used to provide special behavior, interface, and access rights.
In our case, we will use views to make a special UI in the form of an interactive whiteboard for displaying contacts. Let us assign the FlowBoard view to the contact and inside it, in the customView property, the UI template board.
views: { FlowBoard: { customView: "board" } } It refers to a .jade file containing the template code. AllcountJS uses the jade template engine to generate the final HTML for the web interfaces. Read more about jade at jade-lang.com
AllcountJS comes with a kanban board template with drag-and-drop. Our board representation is its extension. Create a file board.jade with the following code inside:
extends project/card-board block panelBody .panel-body h4 {{item.name}} p {{item.company}} p {{item.lastContactDate | date}} Menu
Now we have reached the menu of our application. It is set in the menuItems property and consists of references to entities and views.
menuItems: [ { name: "Contact", entityTypeId: "Contact", icon: "user" }, { name: "Board", entityTypeId: "FlowBoard", icon: "bars" }, { name: "Statuses", entityTypeId: "Status", icon: "sort" } ] REST API
If we have any other application that needs to be integrated with our CRM, then this will not be a problem, because All functions of the application are available through the REST API.
First you need to get a token to access. Suppose our CRM is located at https: // localhost: 9080 , in which case you need to send an HTTP POST request to
https: // localhost: 9080 / api / sign-in
With such JSON content in the body:
{"username": "admin", "password": "admin"} In response, a similar answer will be returned:
{"token":"56026b8ad7939dcb552a1668:PSDhU6x_VeIzqPYtIATXzEdMTLE"} Now you can, for example, get a list of all contacts. To do this, send an HTTP GET request, but with a header
X-Access-Token in which we will transfer the received token from the previous request.
On https: // localhost: 9080 / api / entity / FlowBoard
or directly to https: // localhost: 9080 / api / entity / Contact
In response, you will receive a list of all contacts in JSON format. Naturally, you can also delete, create and update your contacts through the API.
AllcountJS can do more
In the article, an example of a simple CRM shows only a small part of the capabilities of AllcountJS. In the demo application, in addition to the above, there is also Russian localization, which can be disabled by entering forcelocale: “en” in the section with general settings. And the script completes the configuration by adding test data.
In the following articles we will continue to acquaint you with the device and the capabilities of the framework. In the next article we will show how to make a mobile application to our CRM. Too fast enough. Who can not wait to learn more and who is not afraid of English - welcome to the official website allcountjs.com .
Source: https://habr.com/ru/post/270119/
All Articles