Multi-colored terminals

In this post, I will talk about some tricks that will adorn the everyday life of any Linux system administrator (and not only). They are all related to the bash shell variable PS1. The variable PS1 defines how the prompt for entering new commands will look like. And each user can override it as he wishes, for example, in the file ~ / .bashrc (which is executed when bash is started and is used for including for configuration).
To begin, consider a simple option, my favorite command line format.
PS1='\tj\j \u@\h:\w\n\$ ' The result will be like this:
17:42:46 j0 olleg@petrel:~ $ This is a common use of the PS1 variable, but if I hadn’t started with this, the story would have been incomplete. Usually, in a PS1 variable, using special character sequences, determine the format of the prompt for entering commands. A detailed list of these sequences can be found in the documentation for bash, in this example:
')
- \ t - the output of the "current time", in fact, it turns out the time to complete the execution of the previous command, it is convenient when before your eyes.
- j \ j - displays the character j and after it the number of running jobs, i.e. processes in the background. It is also convenient to have in front of your eyes so that we may not forget about them when you are going to close the terminal.
- \ u @ \ h is the username and server name. If you work with several servers through remote terminals, so as not to be confused.
- \ w - after the colon - working directory.
- \ n - since the line turned out to be informative though (something like the status of the bar), but long, we invite you to enter commands from the new line, and this top line will be clearly separated from the result of the previous command.
- \ $ - on the new line the character will be displayed either $ for a regular user or # for root and separating it with a space can invite new command.
It would seem, what more could you want ... But then it will be more interesting. The fact is that with the help of special control characters you can set the color of the displayed text, the color of the cursor, and even redefine the title bar at such graphic terminals as Gnome2. And, in my opinion, it is quite convenient when the terminals running on different servers are separated by color. For me, each server is associated with some color and in this color we will paint the command line and the cursor on each server.
My .bashrc is divided into two files, the .bashrc itself contains the general code for all servers, and the .bash_local contains the command line settings unique to this server. .bash_local I will insert a special directive into .bashrc. Let's start with .bash_local. In the context of this article, there I will have two lines that define the color of this server:
# .bash_local # change cursor and prompt color cursor_color='#0087FF' prompt_color='33' Just putting color codes into variables. But, as you noticed, the way to set the color for the cursor and for the command line text is different. For some reason, the historical happened. To understand which color is encoded by which code, there is a suitable picture.
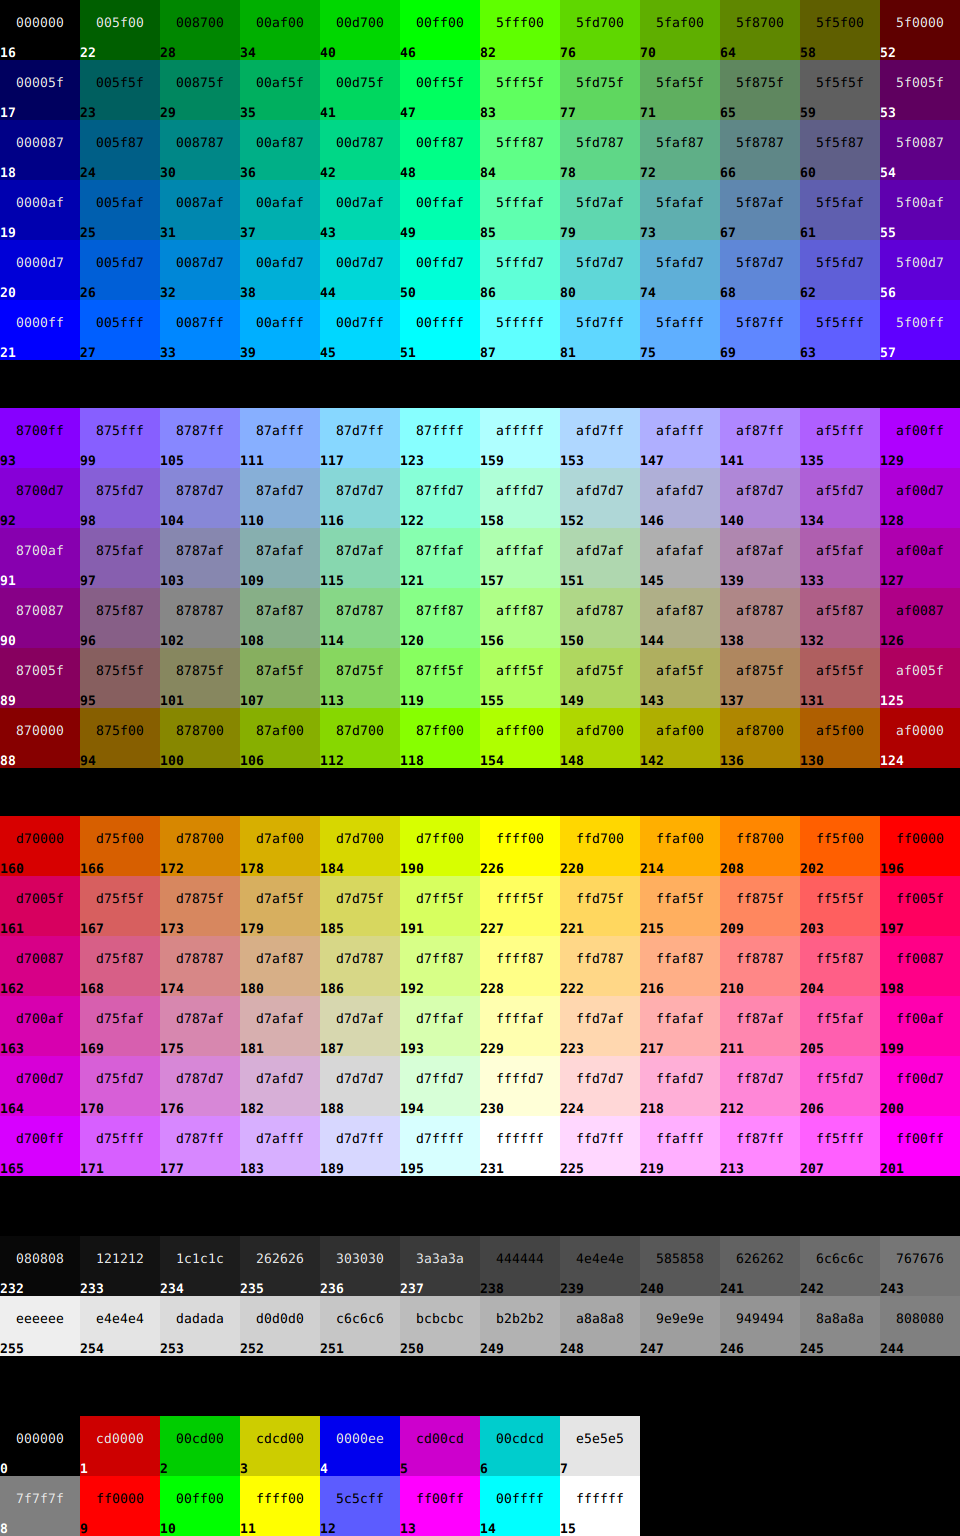
In the middle - the color designation for the color of the cursor, the bottom - the color designation for the text. As you can see, I use sea-green for the text and the cursor. Since the name of the server is petrel (“petrel”), then I associate it with this color.
Now .bashrc, I also show it not completely, but only what is related to the topic:
# .bashrc # local stuff [[ -f ~/.bash_local ]] && . ~/.bash_local Here I insert the code from .bash_local into a common file. Thus, the previously described variables with the server color are determined.
# set to red root_cursor_color='#FF0000' root_prompt_color='196' I define two more variables with a pure red color, it will be used for marking terminals of a privileged user (root).
#my favorite PS1 case "$TERM" in xterm*|rxvt*) PS1='\[\e[38;5;'$prompt_color'm\]\tj\j \u@\h:\w\n' [[ $UID == 0 ]] && { prompt_color=$root_prompt_color;cursor_color=$root_cursor_color; } PS1="$PS1"'\[\e[m\e]12;'$cursor_color'\a\e[38;5;'$prompt_color'm\]\$ \[\e[m\]' ;; *) PS1='\tj\j \u@\h:\w\n\$ ' ;; esac It checks which terminal is used. For any unknown or non-supporting color, an invitation without a color (PS1 = '\ tj \ j \ u @ \ h: \ w \ n \ $') will be used as I described it at the beginning of the article. But if the terminal name starts with xterm or rxvt, for example, the Gnome terminal positions itself, for example, we begin to tinker with color. The first line - set the text color - the color of the server and print the first line of the command prompt. It will always be painted in the color of the server. The second line is to check whether we are working under a non-privileged or privileged user (root). If root, then redefine colors to red. The third line - form the second line of the invitation and determine the color of the cursor in the terminal. Those. there we will get either $ and a space-separated cursor, both colored in the color of the server, if the user is normal. Either red # and a red cursor through the space, if it is root.
# If this is an xterm set the title to user@host:dir case "$TERM" in xterm*|rxvt*) PS1="\[\e]0;${debian_chroot:+($debian_chroot)}\u@\h: \w\a\]$PS1" ;; *) ;; esac And this, frankly, one to one is copied from the original .bashrc from Debian. I know that this code modifies the title bar at the window, it places information about the user, the server and the home directory. But since this code was not invented by me, I will not comment on it.
As a result, we should succeed as in the picture at the very beginning of the publication.
Source: https://habr.com/ru/post/269967/
All Articles