From 0 to 1. We understand with Redux
When Redux version 1.0 was released, I decided to spend some time on a series of stories about my experience with it. Recently, I had to choose the “implementation of Flux” for a client application and am still happy to work with Redux.
Redux positions itself as a predictable state container for JavaScript applications. Redaks is inspired by Flux and Elm . If you used Flux before, I advise you to read what Redux has in common with it in the " Predecessors " section of the new (excellent!) Documentation.
Redux offers to think of an application as an initial state modifiable by a sequence of actions, which I consider to be a really good approach for complex web applications that opens up many possibilities.
Of course, you can find more information about Redux, its architecture and the role of each component in the documentation .
')
Today we will focus on step-by-step building your first application using Redox and React: create a simple list of friends from scratch.
You can find the finished code here .
This article is written for people with no experience with Redux. Development experience with Flux is also optional. I will give references to documents when we are confronted with new concepts.
The author of Redux, Daniel Abramov, created a great build for development with React, Webpack, ES6 / 7 and React Hot Loader, which you can find here .
There are builds already installed with Redux, but I think it is important to understand the role of each library.
Now you can open the application at http: // localhost: 3000 . As you can see, “hello world” is ready!
We need to install three packages:
Although what we are going to do is quite simple, let's create a directory structure as for a real application.
We will see in more detail the role of each of the directories when we create the application. We moved App.js to the containers directory, so we need to set up the statement statement in index.js.
Turn on devtools
We need to enable devtools only for the development environment, so we modify webpack.config.js like this:
When we start our application with
We do two things here. We override createStore using the created function that allows us to apply multiple store enhancers , such as devTools. We also enable the renderDevTools function, which renders the DebugPanel.
Application Container
Now we need to modify App.js to connect with redux. For this we will use the react-redux Provider. This will make our repository instance available to all components that reside in the Provider component. No need to worry about a strange looking function, its purpose is to use the “context” of the React function to create a repository accessible to all children (components).
To create the repository, we use the
ES6 syntax
In our application, App.js is an external wrapper for Redux and FriendListApp is the root component for our application. After creating a simple 'Hello world' in FriendListApp.js, we can finally start our application with redux and devTools. You should get it (no styles).
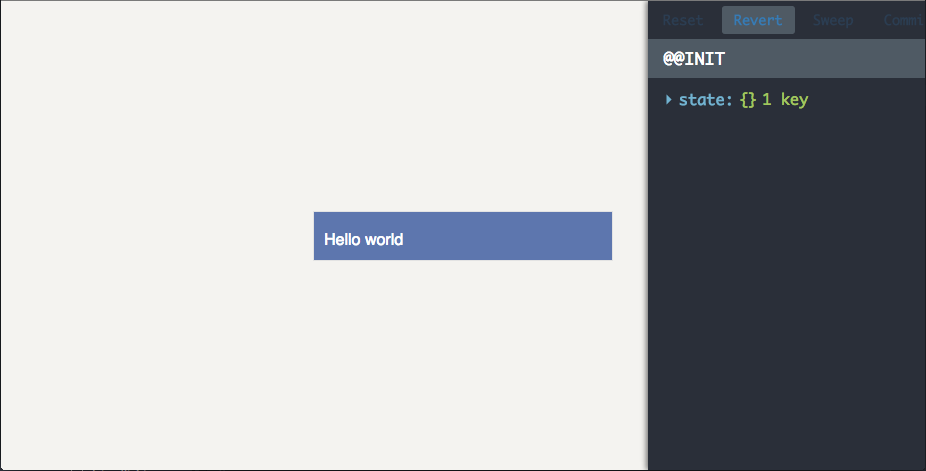
Although this is just the 'Hello world' application, we have Hot Reloading enabled, i.e. You can modify the text and get an automatic update on the screen. As you can see, the devtools on the right shows empty vaults. Fill them in!
Now that all the settings have been made, we can focus on the application itself.
Actions are a structure that passes data from your application to the repository. By convention, actions must have a
As you can see, this is a very expressive way of defining the scope of our application, which will allow us to add friends, mark them as “favorites” or remove them from our list.
Action generators are functions that create actions. In Redux, action generators are pure functions, which makes them portable and easy to test, because they have no side effects.
We will put them in the action folder, but do not forget that these are different concepts.
As you can see, the actions are pretty minimalistic. To add an element, we report all properties (here we deal only with name), and for others we refer to id. In a more complex application, we might have dealt with asynchronous actions, but this is a topic for another article ...
Reducers are responsible for modifying application states. These are pure functions with the following view
We, for a start, define the state view of our application in
A state can be anything we want, we can just save an array of friends. But this solution doesn’t scale well, so we’ll use the id and map friends array. About this you can read in normalizr .
Now we need to write a current reducer. We will use the features of ES6 to set default arguments to handle cases where the state is undefined. This will help you understand how to write a reducer, in this case I use a switch.
If you are not familiar with the syntax of ES6 / 7, then it may be difficult to read. Since we need to return the new state of the object, usually using an Object.assign or Spread operator .
What happens here: we define a new id. In the real application, we may take it from the server, or at least make sure that it is unique. Then we use
Computed properties are convenient ES6 features that make it easier for us to create dynamic keys in friendsById objects with
As you can see, despite the syntax, which can be confusing at first, the logic is simple. You set the state and get back the new state. Important: do not change the previous state at any point of this process.
Okay, let's go back and create reduers for the other two actions:
I added lodash to simplify object management. As usual, in these two examples, it is important not to change the previous state, so we use a function that returns a new object. For example, instead of
You may also notice that the spread operator allows us to manipulate only those states that we need to change.
Redux doesn't care how you store the data, so you can use Immutable.js .
Now you can play with the repository bypassing the interface by manually calling dispatch in our App.js.
You will see actions in devTools, you can play with them in real time.

Since This lesson is not about that, I missed the creation of React-components and focused only on Redax. We have three simple components:
Why redux?
Redux positions itself as a predictable state container for JavaScript applications. Redaks is inspired by Flux and Elm . If you used Flux before, I advise you to read what Redux has in common with it in the " Predecessors " section of the new (excellent!) Documentation.
Redux offers to think of an application as an initial state modifiable by a sequence of actions, which I consider to be a really good approach for complex web applications that opens up many possibilities.
Of course, you can find more information about Redux, its architecture and the role of each component in the documentation .
')
Create a friend list with React and Redux
Today we will focus on step-by-step building your first application using Redox and React: create a simple list of friends from scratch.
You can find the finished code here .
For whom?
This article is written for people with no experience with Redux. Development experience with Flux is also optional. I will give references to documents when we are confronted with new concepts.
1. Installation
The author of Redux, Daniel Abramov, created a great build for development with React, Webpack, ES6 / 7 and React Hot Loader, which you can find here .
There are builds already installed with Redux, but I think it is important to understand the role of each library.
$ git clone https://github.com/gaearon/react-hot-boilerplate.git friendlist $ cd friendlist && npm install $ npm start Now you can open the application at http: // localhost: 3000 . As you can see, “hello world” is ready!
1.1 Add redux, react-redux and redux-devtools
We need to install three packages:
- Redux: the library itself
- React-redux: bundle with React
- Redux-devtools: optional, provides some useful development tools.
$ npm install --save redux@1.0.0-rc react-redux $ npm install --save-dev redux-devtools 1.2 Directory structure
Although what we are going to do is quite simple, let's create a directory structure as for a real application.
+-- src | +-- actions | +-- index.js | +-- components | +-- index.js | +-- constants | +-- ActionTypes.js | +-- containers | +-- App.js | +-- FriendListApp.js | +-- reducers | +-- index.js | +-- friendlist.js | +-- utils | +-- index.js +-- index.html +-- app.css We will see in more detail the role of each of the directories when we create the application. We moved App.js to the containers directory, so we need to set up the statement statement in index.js.
1.3 Connecting Redux
Turn on devtools
We need to enable devtools only for the development environment, so we modify webpack.config.js like this:
/* webpack.config.js */ var devFlagPlugin = new webpack.DefinePlugin({ __DEV__: JSON.stringify(JSON.parse(process.env.DEBUG || 'false')) }); [...] plugins: [ new webpack.HotModuleReplacementPlugin(), new webpack.NoErrorsPlugin(), devFlagPlugin ] When we start our application with
DEBUG=true npm start , this will enable the __DEV__ flag, which we can use in our application. We can connect devtools as follows: /* src/utils/devTools.js */ import React from 'react'; import { createStore as initialCreateStore, compose } from 'redux'; export let createStore = initialCreateStore; if (__DEV__) { createStore = compose( require('redux-devtools').devTools(), require('redux-devtools').persistState( window.location.href.match(/[?&]debug_session=([^&]+)\b/) ), createStore ); } export function renderDevTools(store) { if (__DEV__) { let {DevTools, DebugPanel, LogMonitor} = require('redux-devtools/lib/react'); return ( <DebugPanel top right bottom> <DevTools store={store} monitor={LogMonitor} /> </DebugPanel> ); } return null; } We do two things here. We override createStore using the created function that allows us to apply multiple store enhancers , such as devTools. We also enable the renderDevTools function, which renders the DebugPanel.
Application Container
Now we need to modify App.js to connect with redux. For this we will use the react-redux Provider. This will make our repository instance available to all components that reside in the Provider component. No need to worry about a strange looking function, its purpose is to use the “context” of the React function to create a repository accessible to all children (components).
/* src/containers/App.js */ import React, { Component } from 'react'; import { combineReducers } from 'redux'; import { Provider } from 'react-redux'; import { createStore, renderDevTools } from '../utils/devTools'; import FriendListApp from './FriendListApp'; import * as reducers from '../reducers'; const reducer = combineReducers(reducers); const store = createStore(reducer); To create the repository, we use the
createStore function, which we defined in the devTools file, as a map of all our reducers.ES6 syntax
import * as reducers allows us to get an object in the form {key: fn (state, action), ...}. This is great for setting arguments for combineReducers . export default class App extends Component { render() { return ( <div> <Provider store={store}> {() => <FriendListApp /> } </Provider> {renderDevTools(store)} </div> ); } } In our application, App.js is an external wrapper for Redux and FriendListApp is the root component for our application. After creating a simple 'Hello world' in FriendListApp.js, we can finally start our application with redux and devTools. You should get it (no styles).
Although this is just the 'Hello world' application, we have Hot Reloading enabled, i.e. You can modify the text and get an automatic update on the screen. As you can see, the devtools on the right shows empty vaults. Fill them in!
2. Create an application
Now that all the settings have been made, we can focus on the application itself.
2.1 Actions and action generators
Actions are a structure that passes data from your application to the repository. By convention, actions must have a
type string field that indicates the type of action being performed. Defining this type in another module is a good practice, and it makes us think in advance about what we will do in our application. /* src/constants/ActionTypes.js */ export const ADD_FRIEND = 'ADD_FRIEND'; export const STAR_FRIEND = 'STAR_FRIEND'; export const DELETE_FRIEND = 'DELETE_FRIEND'; As you can see, this is a very expressive way of defining the scope of our application, which will allow us to add friends, mark them as “favorites” or remove them from our list.
Action generators are functions that create actions. In Redux, action generators are pure functions, which makes them portable and easy to test, because they have no side effects.
We will put them in the action folder, but do not forget that these are different concepts.
/* src/actions/FriendsActions.js */ import * as types from '../constants/ActionTypes'; export function addFriend(name) { return { type: types.ADD_FRIEND, name }; } export function deleteFriend(id) { return { type: types.DELETE_FRIEND, id }; } export function starFriend(id) { return { type: types.STAR_FRIEND, id }; } As you can see, the actions are pretty minimalistic. To add an element, we report all properties (here we deal only with name), and for others we refer to id. In a more complex application, we might have dealt with asynchronous actions, but this is a topic for another article ...
2.2 Reducers
Reducers are responsible for modifying application states. These are pure functions with the following view
(previousState, action) => newState . It is very important to understand that you should never (never at all) change the initial state in the reducer. Instead, you can create new objects based on the previousState properties. Otherwise, this may have undesirable consequences. Also, this is not the place to handle side effects, such as routing or asynchronous calls.We, for a start, define the state view of our application in
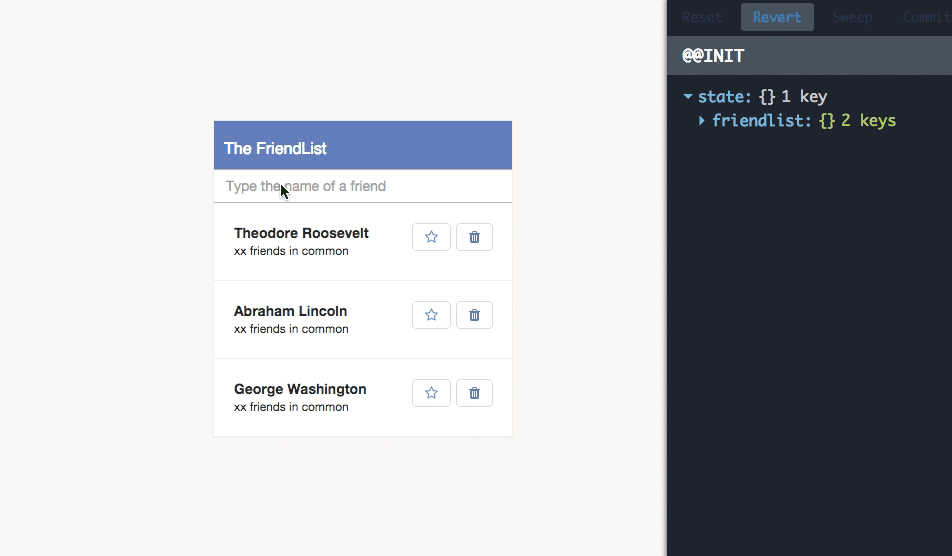
initialState : /* src/reducers/friends.js */ const initialState = { friends: [1, 2, 3], friendsById: { 1: { id: 1, name: 'Theodore Roosevelt' }, 2: { id: 2, name: 'Abraham Lincoln' }, 3: { id: 3, name: 'George Washington' } } }; A state can be anything we want, we can just save an array of friends. But this solution doesn’t scale well, so we’ll use the id and map friends array. About this you can read in normalizr .
Now we need to write a current reducer. We will use the features of ES6 to set default arguments to handle cases where the state is undefined. This will help you understand how to write a reducer, in this case I use a switch.
export default function friends(state = initialState, action) { switch (action.type) { case types.ADD_FRIEND: const newId = state.friends[state.friends.length-1] + 1; return { friends: state.friends.concat(newId), friendsById: { ...state.friendsById, [newId]: { id: newId, name: action.name } } } default: return state; } } If you are not familiar with the syntax of ES6 / 7, then it may be difficult to read. Since we need to return the new state of the object, usually using an Object.assign or Spread operator .
What happens here: we define a new id. In the real application, we may take it from the server, or at least make sure that it is unique. Then we use
concat to add this new id to our id list. Concat will add a new array and will not change the original one.Computed properties are convenient ES6 features that make it easier for us to create dynamic keys in friendsById objects with
[newId] .As you can see, despite the syntax, which can be confusing at first, the logic is simple. You set the state and get back the new state. Important: do not change the previous state at any point of this process.
Okay, let's go back and create reduers for the other two actions:
import omit from 'lodash/object/omit'; import assign from 'lodash/object/assign'; import mapValues from 'lodash/object/mapValues'; /* ... */ case types.DELETE_FRIEND: return { ...state, friends: state.friends.filter(id => id !== action.id), friendsById: omit(state.friendsById, action.id) } case types.STAR_FRIEND: return { ...state, friendsById: mapValues(state.friendsById, (friend) => { return friend.id === action.id ? assign({}, friend, { starred: !friend.starred }) : friend }) } I added lodash to simplify object management. As usual, in these two examples, it is important not to change the previous state, so we use a function that returns a new object. For example, instead of
delete state.friendsById[action.id] , we use the _.omit function.You may also notice that the spread operator allows us to manipulate only those states that we need to change.
Redux doesn't care how you store the data, so you can use Immutable.js .
Now you can play with the repository bypassing the interface by manually calling dispatch in our App.js.
/* src/containers/App.js */ import { addFriend, deleteFriend, starFriend } from '../actions/FriendsActions'; store.dispatch(addFriend('Barack Obama')); store.dispatch(deleteFriend(1)); store.dispatch(starFriend(4)); You will see actions in devTools, you can play with them in real time.
3. Create an interface
Since This lesson is not about that, I missed the creation of React-components and focused only on Redax. We have three simple components:
- FriendList friends list
- friends: array friends array
FriendListItem element of one friend- name: string friend's name
starred: booleanshows an asterisk if a friend is marked as selectedstarFriend: functioncall that is triggered when a user clicks on asterisksdeleteFriend: functioncall that is triggered when the user clicks on the trash
AddFriendInput field for entering new namesaddFriend: functioncall that is triggered when you press enter
In Redux, it is considered good practice to make most of the components “stupid” as possible. Those. the fewer components associated with Redux, the better.
Here FriendListApp will be the only “smart” component.import { bindActionCreators } from 'redux'; import { connect } from 'react-redux'; import * as FriendsActions from '../actions/FriendsActions'; import { FriendList, AddFriendInput } from '../components'; @connect(state => ({ friendlist: state.friendlist })) export default class FriendListApp extends Component {
This is part of the new syntax of ES7, called the decorator. This is a convenient way to call a higher order function. Will be equivalent toconnect(select)(FriendListApp);whereselectis a function that returns what we have done here.static propTypes = { friendsById: PropTypes.object.isRequired, dispatch: PropTypes.func.isRequired } render () { const { friendlist: { friendsById }, dispatch } = this.props; const actions = bindActionCreators(FriendsActions, dispatch); return ( <div className={styles.friendListApp}> <h1>The FriendList</h1> <AddFriendInput addFriend={actions.addFriend} /> <FriendList friends={friendsById} actions={actions} /> </div> ); } }
We usebindActionCreatorsto wrap our action generators with a call to dispatch. The goal is to pass action generators to our other components without providing a dispatch object (keeping them stupid).
What happens next is the standard approach for React. We will bind functions to the onClick, onChange, or onKeyDown properties to handle user actions.
If you are interested in how to do this, you can view the entire code .
Now you can feel the magic of the redux / react application. As depicted in the GIF, you log all actions.
It is more convenient to develop when you can perform some actions, find bugs, come back, correct them and repeat the already corrected sequence ...
Transfer.
Original article http://www.jchapron.com/2015/08/14/getting-started-with-redux/ . - friends: array friends array
Source: https://habr.com/ru/post/269831/
All Articles