Application Lifecycle in Windows 8.1 and UWP
In Windows Store applications, the life cycle is quite similar to the picture. It is quite simple and contains only 3 states: NotRunning - Running - Suspended
For myself, I mentally identify him with "Do not dig - Dig - Smoke". Experienced hard workers know that you can no longer return to work. Experienced developers save the state of the application at the Suspending event and return it later to its original state when the application resumes.
In Windows UWP applications (Windows 10), everything is exactly the same, but new features have appeared.
Let's first break down the total for 8.1 and UWP. The following diagram shows the life cycle of the application. It also shows how the transitions between states are called.
')

On the other hand, the life process of the application is shown in the following figure:

From the Suspended state, the application can go to the Running state, or if the system requires resources, the application can be terminated.
There are only 3 states, although the enumeration of ApplicationExecutionState states contains more members: NotRunning, Running, Suspended, Terminated , ClosedByUser .
The last 2 enumeration members will help us, when activating an application, obtain information about how the application was completed using the IActivatedEventArgs.PreviousExecutionState argument of the OnActivated event or the OnLaunched event. If the application is running on the desktop, then it switches to the Suspended mode after the user minimizes the application. In tablet mode, the application pauses after switching to another application (in 8 and 8.1, it takes several seconds to pause, in 10-ke everything happens much faster).
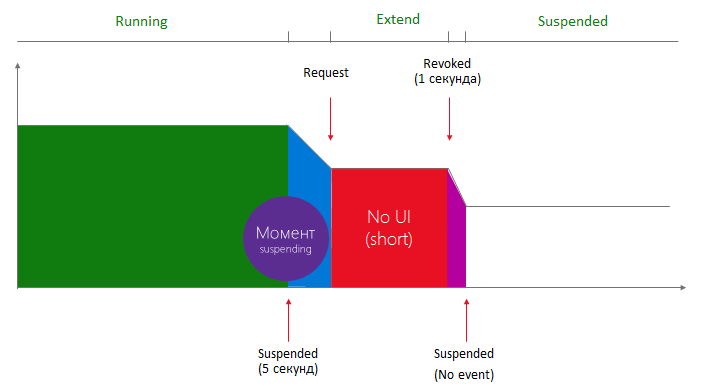
Here is such a leapfrog may occur over time, starting with the launch and ending with the completion of the application:
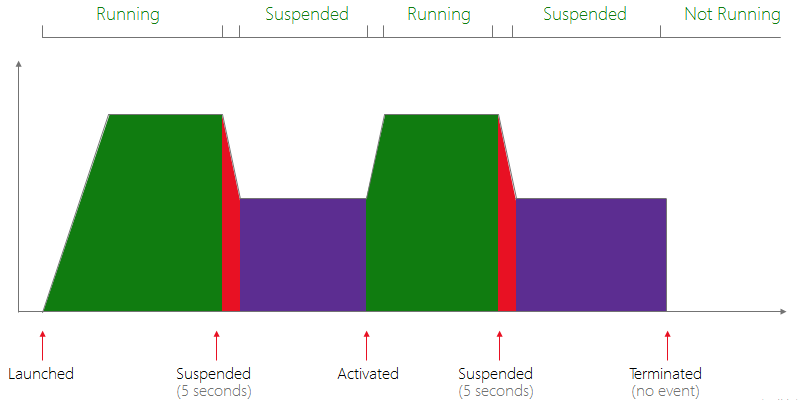
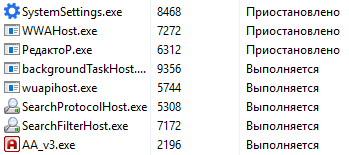
As you can guess from this image, the application has a maximum of 5 seconds to complete its work before going to the Suspended state. If you are using Windows 10, then in the task manager on the “Details” tab you can see a list of processes, as well as applications that are currently in the “Suspended” state, i.e. Suspended. In Windows 8.1, information about the status of the application can also be found in the task manager.
In order to test the Suspending and Resuming code, you can display a panel with transitions to the application modes. To do this, in the "View" menu - "Toolbars" select "Debug Location". And then with the help of such a panel, we will be able to trigger the necessary life cycle event.
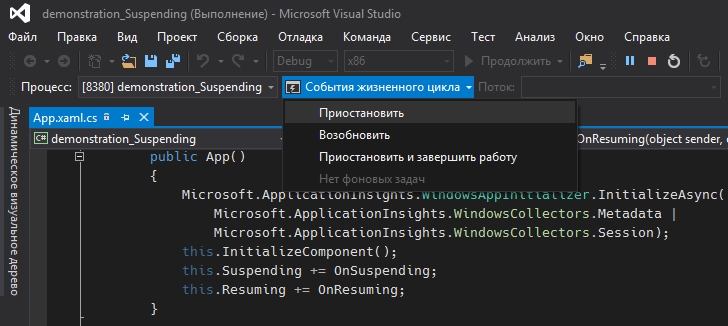
Let's take a look at how to save the state of an application in C # code. First, after the application is initialized, we add an event handler (a method with the correct signature).
public App() { this.InitializeComponent(); this.Suspending += OnSuspending; } The method of saving data itself looks like this:
private async void OnSuspending(object sender, SuspendingEventArgs e) { var deferral = e.SuspendingOperation.GetDeferral(); //TODO: . , : Windows.Storage.ApplicationData.Current.LocalSettings.Values["NumberOfN"] = n; deferral.Complete(); } Note that the method code contains deferral, which is somewhat similar to a transaction. If the OS needs to shut down the application, it will wait for the execution of all the code enclosed between the deferral declaration and its termination. But remember that you have only 5 seconds to save data.
Similar to the Suspending event, there is a Resuming event. Using it, you can catch the event of the restoration of the application from the Suspended state. But note that the Resuming event will occur only if the application is restored. If it is restarted, this event will not be executed, so depending on your needs, you can add OnLaunched or OnActivated event handling to the code (with all its variations — OnFileActivated, OnSearchActivated, etc.).
For example:
protected override void OnLaunched(LaunchActivatedEventArgs e) { if (Windows.Storage.ApplicationData.Current.LocalSettings.Values.ContainsKey("NumberOfN")) { n = (int)Windows.Storage.ApplicationData.Current.LocalSettings.Values["NumberOfN"]; } // ...... } If you use OnLaunched or OnActivated, you can check the past state of the application:
protected override void OnLaunched(LaunchActivatedEventArgs e) { switch (e.PreviousExecutionState) { case ApplicationExecutionState.Suspended: { // - break; } case ApplicationExecutionState.Terminated: { // - break; } case ApplicationExecutionState.ClosedByUser: { // - break; } case ApplicationExecutionState.NotRunning: { // - break; } } // … - } Everything that has now been written is suitable for both Windows 8.1 applications and Windows UWP applications.
Now about what feature was added in 10-ke. Approximately this scheme is relevant for UWP:
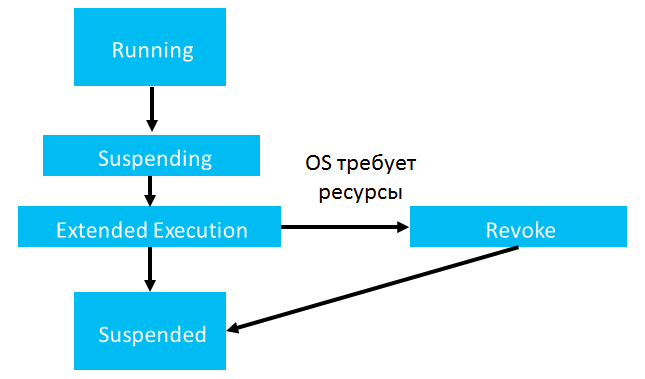
As you can see, the ability to extend the process of transition to the Suspended state has been added. As a rule, not for long, but even a couple of seconds in such cases plays a role. If the application is in the Extended Execution state and the operating system wants to free up resources by shutting down the application, Revoke is triggered - this is the ability to do something before the application is terminated. To perform Revoke you are given no more than a second. Why do you need Revoke if it is so short? A typical example is to save the flag somewhere and warn the user the next time that not all of the latest data was successfully saved when the application was paused.
By the way, if it was already said more than once about Extended Execution, then some subtleties were hardly mentioned. I tried to figure it out and tell you about them.
Extended execution can be used to achieve two goals. The first is to extend the process of saving settings at the Suspending event, and the second is the use in a certain type of applications that can run indefinitely with the Extended Execution. This is for example applications that track the current location, play audio or VOIP applications. In this case, the execution of the application will be something similar to the background task. It will be happening in the background and will not have access to the UI. In case of Extended Execution, it is necessary to indicate the reason why the application should be continued. This can be ExtendedExecutionReason.LocationTracking or SavingData or Unspecified .
You can extend the process of saving settings when the application is paused during the Suspending event itself.
private async void OnSuspending(object sender, SuspendingEventArgs e) { var deferral = e.SuspendingOperation.GetDeferral(); using (var session = new ExtendedExecutionSession()) { session.Reason = ExtendedExecutionReason.SavingData; session.Description = " "; session.Revoked += ExtensionRevoked; var result = await session.RequestExtensionAsync(); if (result == ExtendedExecutionResult.Denied) await SavingBasicData(); // 5- else await SavingData(); // } deferral.Complete(); } async Task SavingData() { // Windows.Storage.ApplicationData.Current.LocalSettings.Values["NumberOfN"] = n; // await Task.Delay(7000); } async Task SavingBasicData() { // Windows.Storage.ApplicationData.Current.LocalSettings.Values["NumberOfN"] = n; // await Task.Delay(4000); } private void ExtensionRevoked(object sender, ExtendedExecutionRevokedEventArgs args) { // Extended Execution } This method allows us to extend the process of "falling asleep" application in order to save all the required data.
The second method allows us to extend the execution of the application code by entering the code in advance with a special request (not in OnSuspending). It is advisable to execute the query as early as possible, for example, in the OnNavigatedTo () event or in Loaded ().
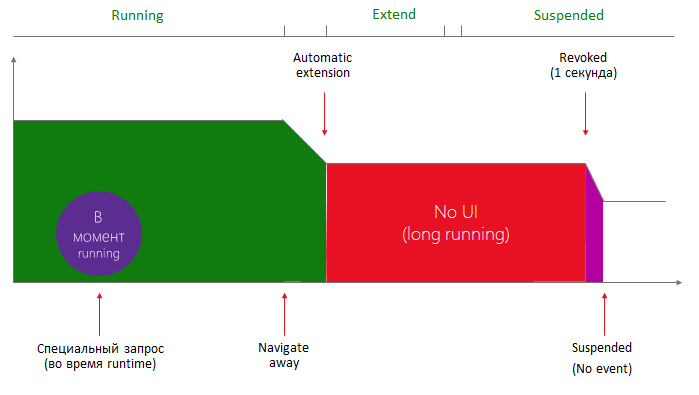
This method is somewhat similar to the background task, since with it the application runs for a long time, if not always. This is just the way for geolocation tracking applications and the like. A limited number of such applications can be executed simultaneously in the system, so that when registering Extended Execution a failure is possible.
I found a pretty good example here: I figured it out, tried it, and now I’ll tell you.
In order to work with geolocation, we will need to tick the “Location” item in the application manifest on the “Opportunities” tab. After that, let's start by adding links to the namespaces in MainPage:
using Windows.Devices.Geolocation; using Windows.UI.Notifications; using Windows.Data.Xml.Dom; using Windows.ApplicationModel.ExtendedExecution; Then add the variable to the class scope:
ExtendedExecutionSession _session; In the XAML file in the very first Page tag add Loaded = “Page_Loaded”. And further in the code of the Page_Loaded method:
private async void Page_Loaded(object sender, RoutedEventArgs e) { if (_session == null) { _session = new ExtendedExecutionSession { Reason = ExtendedExecutionReason.LocationTracking }; _session.Description = " "; if (await _session.RequestExtensionAsync() == ExtendedExecutionResult.Allowed) { Windows.Storage.ApplicationData.Current.LocalSettings.Values["LocationAllowed"] = 1; } else { Windows.Storage.ApplicationData.Current.LocalSettings.Values["LocationAllowed"] = 0; } } Geolocator locator = new Geolocator(); locator.DesiredAccuracyInMeters = 0; locator.MovementThreshold = 100; // 100 locator.DesiredAccuracy = PositionAccuracy.High; locator.PositionChanged += Locator_PositionChanged; } Here we initialize the ExtendedExecutionSession and request permission to perform the extension of the application life. Depending on whether we are allowed or not, we write the value 1 or 0 in the settings. After, during the application operation, we can thus determine whether execution is allowed in the background or not. This is done for example only. In a real working application, logging can be implemented in some other way.
Next, we create an object of the Geolocator type and assign the Locator_PositionChanged method to the PositionChanged event, which happens if the current location changes by at least 100 meters. In this method, we implement the mapping toast notifications:
private void Locator_PositionChanged(Geolocator sender, PositionChangedEventArgs args) { string xml = $@" <toast activationType='foreground' launch='args'> <visual> <binding template='ToastGeneric'> <text> </text> <text>: {args.Position.Coordinate.Point.Position.Latitude} - : {args.Position.Coordinate.Point.Position.Longitude}</text> </binding> </visual> </toast>"; XmlDocument doc = new XmlDocument(); doc.LoadXml(xml); ToastNotification notification = new ToastNotification(doc); ToastNotifier notifier = ToastNotificationManager.CreateToastNotifier(); notifier.Show(notification); } Do not forget that the execution of the Extended Execution may be denied. This is done in order for the device to be able to find the line between energy saving, high performance and functionality running in the background.
After shutting down the charge-saving mode on the phone and disallowing most applications to run in the background (so that the pool was not busy), I could test the application in action.
Source: https://habr.com/ru/post/269399/
All Articles