Cache in Drupal from A to Z
Introduction
The pages of the sites are getting bigger in size, and the question of asynchronous content loading on them arises. But if for images there is a library for their simple loading after loading the main page, then with asynchronous loading of HTML parts of the page (blocks), everything is much more complicated. For example: to implement asynchronous block loading in Drupal without loss of site performance, you need to understand how caching works, how to use it and how to optimize it. And after that, according to the planned “Lazy Loading” plan, load the blocks of the site.
Cache in Drupal - introduction
 The cache in Drupal is an intermediate buffer that stores frequently requested data that can be returned to the user with the least amount of system resources and maximum speed. This buffer can be a table (s) in a database, a file with data on a hard disk, or a set of key-value in a network logged data repository. Any storage option that can be integrated with PHP to cache a web application on Drupal will do.
')
One example of using cache in Drupal is the menu cache. In most cases, the menu is not a frequently changeable part of the site. It makes no sense to rebuild each time (get all the items, their dependence on each other, display them in a template) menu for display to the user when he enters the new page of the site. Moreover, if this is a menu of a catalog of 1000 items, it can be rebuilt for output for a long time. Why make the user wait? Therefore, Drupal caches the once built menu for the time specified by the administrator and caches it to the user, avoiding a long menu rebuilding operation.
Drupal contains a built-in cache (in its basic modules), which can be configured on the page: / admin / settings / performance. You need to remember to periodically clean it when you add new functionality in any of your developments (whether they are templates or modules).
You can clear the cache in several ways:
Cache in Drupal - cache segments
 Drupal cache is divided into segments, and not stored in a single place. By default, each cache segment is stored as a separate table in the database. This allows you to move frequently updated cache segments to other cache storage systems, such as Memcached or Boost. It also improves the performance of the cache - in smaller amounts of data work with records occur faster. Moreover, with certain actions, the cache can be partially cleared (segment).
Drupal has many different cache segments. Cache segments are similar for versions 7.XX and 6.XX:
1. {cache} - a segment for shared cache storage. This includes data that cannot be classified, or there is no point in creating a new cache segment for them.
2. {cache_block} - added when the Block module is turned on (included in the kernel). When the Drupal theme region is loaded, data is loaded for all blocks of this region and, if necessary, the block is built or displayed from the cache, skipping the hook_block_view () hook. It should be noted that caching for blocks is disabled if the modules for working with access to the material that use hook_node_access () are enabled. It is also necessary to know that when programmatically creating a block via hook_block_info (), you can control the caching parameters for the block (for more details, see the documentation).
3. {cache_filter} - the Filter module creates its own table for storing the cache for the text processed by filters. The more complex the filter, the more CPU time is spent on text processing. Therefore, whenever possible, all calls to check_markup () are cached. The cache ID for the {cache_filter} table is built according to the format_name rule: language: hash_text.
4. {cache_form} - if the rest of the cached data is stored to speed up the operation of the site, then this cache does not affect the performance in any way. It is necessary for forms built using the Forms API to be completely safe in terms of vulnerabilities. Each time a form is built, it is stored in the {cache_form} segment. If there are a lot of forms and visitors, then {cache_form} tends to grow to impressive sizes, if you do not run cron to clear the cache every hour or two.
5. {cache_menu} - enabled when the Menu module is enabled and is a repository of links from all the menus created via the interface. Cache ID is built according to the rule links: name_name: tree-data: language: hash_parameters.
6. {cache_page} - stores cached page data for anonymous users. If a cache is found for the current page, only 2 hooks will be called: hook_boot () and hook_exit (). The rest of the hooks (including hook_init () and others) will be skipped. This is exactly the cache that is enabled on the site in the performance settings section (admin / config / development / performance) by ticking “Cache pages for anonymous users”.
7. {cache_update} - Update manager module adds this segment. It stores all release data for the included modules.
Cache segments available in Drupal version 7.XX (not in version 6.XX) :
1. {cache_path} - stores the correspondence between the system path and its aliases for faster search of the alias by the system path.
2. {cache_image} - it is reserved by the Image module and can be used as a storage of information about the various manipulations of images.
3. {cache_bootstrap} - a cache segment in which data initialized when Drupal is loaded is stored.
4. {cache_field} - this segment stores data for all fields (fields). Cache ID is formed according to the rule field: entity_type: entity_id.
Also, third-party modules can create their own cache segments. For example, segments for modules hacked, l10n_update, token, views:
It is worth mentioning the Ctools object cache, which is not related to the kernel and is created by the CTools module. The CTools object cache is a segment of the cache that provides its space for storing large objects that are currently being edited. For example, the cache of the modified view before its saving in the Views module is stored in the CTools object cache. Unlike other cache segments, it has an additional sid field (Session ID) - the identifier of the current user session. Thanks to him, the changed data is visible only to the user who changed the object. This segment does not have an expire field and is not deleted when the cache is cleared through the interface, but is cleared once a day by Cron, removing the week-old cache from this segment.
Page life cycle
 When a page is requested from the web server by the user's browser, the following occurs (using the example of Drupal version 7.XX):
The Drupal kernel is initially loaded with one of the parameters:
More details can be found in the drupal_bootstrap () function from the bootstrap.inc file located in the includes folder.
When running drupal_bootstrap () with the parameter DRUPAL_BOOTSTRAP_FULL, the following is performed:
After that, the menu_execute_active_handler () function is called, which defines the navigation menus and converts page requests to function calls associated with paths on the site. Also inside this function, a call is made:
In general:
Software work with cache in Drupal 7.X
 The most common way to work with the cache is to save the data of the developed module to the cache using the function cache_set. And also extracting them from it using the cache_get function.
You can clear the cache data called my_module_data by calling one of the functions:
Via the site’s admin interface, this can be done on the page: example.com/admin/config/development/performance by clicking the Clear cache button.
If you want the data to be cached for a specific time and do not depend on pressing the clear cache button on the example.com/admin/config/development/performance page, then it is enough to add an additional parameter to the cache_set function - how many seconds to cache the data.
Drupal allows you to create your own cache segments for data storage. Create a module for this: mymodule. To do this in the site directory: ./sites/default/modules create a folder: mymodule. In it, we will create a file describing the module mymodule.info with the contents:
We will also create a file mymodule.install in which, using hook_schema (), we will create a new table to store the data of our cache segment:
The last step before starting to use the cache_set function with an indication of the segment we created is to create the mymodule.module file and take care of automatically resetting the cache when you click the cache clear button on the page example.com/admin/config/development/performance .
We include the module on the page example.com/admin/modules , after which, for example, we will save the data in our own segment of the cache created by the module:
There is a little-known function cache_is_empty, with which you can find out if any data is stored in the cache with the specified name:
How to work with the cache in Drupal 6.X and 8.X, you can always see in the submodule cache_example, module: examples from page: www.drupal.org/project/examples .
Cache removal from database
 Segment cache can be migrated, for example to Memcached or Redis.
Each repository has its own supporters. Evgeniy Maslovskiy (Spleshka, www.drupal.org/u/spleshka ), who helped write the article, is a supporter of Memcached, and his website describes in detail the integration of Memcached and Drupal. In the module of integration with Memcached described by it there are additional advantages over other solutions: it is bypassing the connection to the database when receiving the cache and bypassing calls to hook_exit () and hook_boostrap () in other modules.
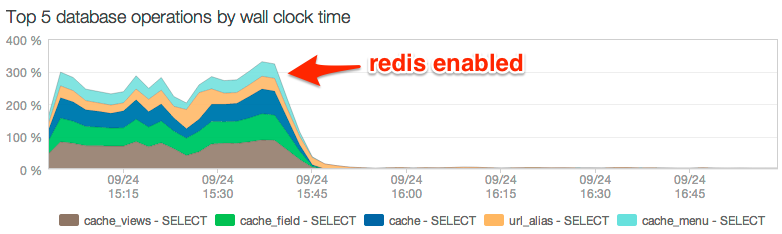
In this article, we’ll consider making cache in Redis, which I like more simple setup compared to Memcached. A comparative tests of the speeds of both storages will be discussed in another article.
Redis settings on the server can be found on the Internet. The module for integration with Drupal will be downloaded from www.drupal.org/project/redis and unpacked to the directory ./sites/all/modules. After that, we make changes to the Drupal configuration file ./sites/default/settings.php, adding the lines to it:
Do not forget to read the README.txt file in the module folder, since it describes all the module settings.
Where can this be applied?
One of the options for applying the described knowledge is the removal of part of the site data into blocks that load after the main page load, both to speed up the site load and to speed up the overall site operation. All you need to do is to take the Ajax Blocks module as a basis, integrate it with the High-performance JavaScript callback handler module, and place the data cache in your Redis repository using this article.
Conclusion
This article did not get a description of a large number of caching modules written by the community and posted on www.drupal.org . If you like the article, vote for it, and then in the next article I will try to include a bonus in the form of a review of caching in Drupal 8. And also consider the topic of use in Drupal as a cache store Redis or Elasticsearch with a frontend on Silex and AngularJS.
The pages of the sites are getting bigger in size, and the question of asynchronous content loading on them arises. But if for images there is a library for their simple loading after loading the main page, then with asynchronous loading of HTML parts of the page (blocks), everything is much more complicated. For example: to implement asynchronous block loading in Drupal without loss of site performance, you need to understand how caching works, how to use it and how to optimize it. And after that, according to the planned “Lazy Loading” plan, load the blocks of the site.
Cache in Drupal - introduction
The cache in Drupal is an intermediate buffer that stores frequently requested data that can be returned to the user with the least amount of system resources and maximum speed. This buffer can be a table (s) in a database, a file with data on a hard disk, or a set of key-value in a network logged data repository. Any storage option that can be integrated with PHP to cache a web application on Drupal will do.')
One example of using cache in Drupal is the menu cache. In most cases, the menu is not a frequently changeable part of the site. It makes no sense to rebuild each time (get all the items, their dependence on each other, display them in a template) menu for display to the user when he enters the new page of the site. Moreover, if this is a menu of a catalog of 1000 items, it can be rebuilt for output for a long time. Why make the user wait? Therefore, Drupal caches the once built menu for the time specified by the administrator and caches it to the user, avoiding a long menu rebuilding operation.
Drupal contains a built-in cache (in its basic modules), which can be configured on the page: / admin / settings / performance. You need to remember to periodically clean it when you add new functionality in any of your developments (whether they are templates or modules).
You can clear the cache in several ways:
- Using the "Clear Cache" button on the / admin / settings / performance page
- Install the admin_menu module and select Flush all caches in the leftmost tab (Clear all caches)
- Using the “Empty cache” link to clear the Devel Block block (Devel module)
- Having executed the Drush command: drush cache-clear theme (only the theme cache is cleaned)
- Programmatically, by calling the drupal_rebuild_theme function (only the theme cache is cleared)
Cache in Drupal - cache segments
Drupal cache is divided into segments, and not stored in a single place. By default, each cache segment is stored as a separate table in the database. This allows you to move frequently updated cache segments to other cache storage systems, such as Memcached or Boost. It also improves the performance of the cache - in smaller amounts of data work with records occur faster. Moreover, with certain actions, the cache can be partially cleared (segment).Drupal has many different cache segments. Cache segments are similar for versions 7.XX and 6.XX:
1. {cache} - a segment for shared cache storage. This includes data that cannot be classified, or there is no point in creating a new cache segment for them.
2. {cache_block} - added when the Block module is turned on (included in the kernel). When the Drupal theme region is loaded, data is loaded for all blocks of this region and, if necessary, the block is built or displayed from the cache, skipping the hook_block_view () hook. It should be noted that caching for blocks is disabled if the modules for working with access to the material that use hook_node_access () are enabled. It is also necessary to know that when programmatically creating a block via hook_block_info (), you can control the caching parameters for the block (for more details, see the documentation).
3. {cache_filter} - the Filter module creates its own table for storing the cache for the text processed by filters. The more complex the filter, the more CPU time is spent on text processing. Therefore, whenever possible, all calls to check_markup () are cached. The cache ID for the {cache_filter} table is built according to the format_name rule: language: hash_text.
4. {cache_form} - if the rest of the cached data is stored to speed up the operation of the site, then this cache does not affect the performance in any way. It is necessary for forms built using the Forms API to be completely safe in terms of vulnerabilities. Each time a form is built, it is stored in the {cache_form} segment. If there are a lot of forms and visitors, then {cache_form} tends to grow to impressive sizes, if you do not run cron to clear the cache every hour or two.
5. {cache_menu} - enabled when the Menu module is enabled and is a repository of links from all the menus created via the interface. Cache ID is built according to the rule links: name_name: tree-data: language: hash_parameters.
6. {cache_page} - stores cached page data for anonymous users. If a cache is found for the current page, only 2 hooks will be called: hook_boot () and hook_exit (). The rest of the hooks (including hook_init () and others) will be skipped. This is exactly the cache that is enabled on the site in the performance settings section (admin / config / development / performance) by ticking “Cache pages for anonymous users”.
7. {cache_update} - Update manager module adds this segment. It stores all release data for the included modules.
Cache segments available in Drupal version 7.XX (not in version 6.XX) :
1. {cache_path} - stores the correspondence between the system path and its aliases for faster search of the alias by the system path.
2. {cache_image} - it is reserved by the Image module and can be used as a storage of information about the various manipulations of images.
3. {cache_bootstrap} - a cache segment in which data initialized when Drupal is loaded is stored.
4. {cache_field} - this segment stores data for all fields (fields). Cache ID is formed according to the rule field: entity_type: entity_id.
Also, third-party modules can create their own cache segments. For example, segments for modules hacked, l10n_update, token, views:
- cache_hacked
- cache_l10n_update
- cache_token
- cache_views
- cache_views_data
It is worth mentioning the Ctools object cache, which is not related to the kernel and is created by the CTools module. The CTools object cache is a segment of the cache that provides its space for storing large objects that are currently being edited. For example, the cache of the modified view before its saving in the Views module is stored in the CTools object cache. Unlike other cache segments, it has an additional sid field (Session ID) - the identifier of the current user session. Thanks to him, the changed data is visible only to the user who changed the object. This segment does not have an expire field and is not deleted when the cache is cleared through the interface, but is cleared once a day by Cron, removing the week-old cache from this segment.
Page life cycle
When a page is requested from the web server by the user's browser, the following occurs (using the example of Drupal version 7.XX):The Drupal kernel is initially loaded with one of the parameters:
- DRUPAL_BOOTSTRAP_CONFIGURATION : Initializes only the configuration.
- DRUPAL_BOOTSTRAP_PAGE_CACHE : Initialization of the caching layer.
- DRUPAL_BOOTSTRAP_DATABASE : Initialization of the database layer.
- DRUPAL_BOOTSTRAP_VARIABLES : Initialization of a layer of variables.
- DRUPAL_BOOTSTRAP_SESSION : Initialization of work with sessions.
- DRUPAL_BOOTSTRAP_PAGE_HEADER : Initialization of the header layer.
- DRUPAL_BOOTSTRAP_LANGUAGE : Initialization of the page language layer.
- DRUPAL_BOOTSTRAP_FULL : Fully loads Drupal. And also adds the function of checking and correcting the entered data.
More details can be found in the drupal_bootstrap () function from the bootstrap.inc file located in the includes folder.
When running drupal_bootstrap () with the parameter DRUPAL_BOOTSTRAP_FULL, the following is performed:
- Connection of system functions files.
- Initialization of all layers and primary settings.
- Connection of files of all included modules.
- Initialization of variables and system functions for working with paths and their aliases in Drupal.
- Initialization of the included theme.
- Performed by executing module_invoke_all (). Implements an API for loading and interacting with Drupal modules, registering all the hooks of the currently enabled modules.
After that, the menu_execute_active_handler () function is called, which defines the navigation menus and converts page requests to function calls associated with paths on the site. Also inside this function, a call is made:
- Functions drupal_deliver_html_page (), which returns these pages as HTML to the user's browser. Inside this function, the drupal_render () function is called, which not only outputs the data, but also saves it to one of the cache segments and retrieves it from there if available instead of re-generating the page using the template engine.
- The drupal_page_footer () function, which sets the page cache ('cache_path' and 'cache_bootstrap'), if necessary, and allows modules to respond when the page is closed by hook_exit (). Immediately, if necessary, run Cron.
In general:
- All the necessary variables and functions are initialized.
- It checks to see if there is a cache at the given URL ({cache_page}). If it is, it is returned, otherwise further actions are performed.
- It checks whether there is a cache of fields ({cache_field}), content ({cache_filter}), menu ({cache_menu}), blocks ({cache_block}), as well as images ({cache_image}) and aliases ({cache_path}). If the cache is not available, then an operation is performed to obtain and process the necessary data and save it to the cache. The received data is transmitted to the theme function.
- The theme function builds the page and caches it at the given URL ({cache_page}).
- Data is returned to the user.
Software work with cache in Drupal 7.X
The most common way to work with the cache is to save the data of the developed module to the cache using the function cache_set. And also extracting them from it using the cache_get function.<?php // , : my_module_data. if ($cache = cache_get('my_module_data')) { // , . return $cache->data; } else { // , . $my_data = ' '; // : my_module_data : {cache}. cache_set('my_module_data', $my_data, 'cache'); // . return $my_data; } ?> You can clear the cache data called my_module_data by calling one of the functions:
<?php // // ( ). cache_clear_all(); // {my_module_data}. cache_clear_all('*', 'my_module_data', TRUE); // {my_module_data} , // Cache ID c 'my_module'. cache_clear_all('my_module', 'my_module_data', TRUE); ?> Via the site’s admin interface, this can be done on the page: example.com/admin/config/development/performance by clicking the Clear cache button.
If you want the data to be cached for a specific time and do not depend on pressing the clear cache button on the example.com/admin/config/development/performance page, then it is enough to add an additional parameter to the cache_set function - how many seconds to cache the data.
<?php cache_set('my_module_data', $my_data, 'cache', time() + 360); ?> Drupal allows you to create your own cache segments for data storage. Create a module for this: mymodule. To do this in the site directory: ./sites/default/modules create a folder: mymodule. In it, we will create a file describing the module mymodule.info with the contents:
name = My module description = " ." core = 7.x version = 7.x-1.x-dev files[] = mymodule.module We will also create a file mymodule.install in which, using hook_schema (), we will create a new table to store the data of our cache segment:
<?php /** * Implements hook_schema(). */ function mymodule_schema() { // : {cache}. // // . $schema['mymodule'] = drupal_get_schema_unprocessed('system', 'cache'); $schema['mymodule']['description'] = 'Cache table stores some example data.'; return $schema; } The last step before starting to use the cache_set function with an indication of the segment we created is to create the mymodule.module file and take care of automatically resetting the cache when you click the cache clear button on the page example.com/admin/config/development/performance .
<?php /** * Implements hook_flush_caches(). */ function mymodule_flush_caches() { // . return array('mymodule'); } We include the module on the page example.com/admin/modules , after which, for example, we will save the data in our own segment of the cache created by the module:
<?php cache_set('my_module_data', ' ', 'mymodule'); ?> There is a little-known function cache_is_empty, with which you can find out if any data is stored in the cache with the specified name:
<?php cache_is_empty('my_module'); ?> How to work with the cache in Drupal 6.X and 8.X, you can always see in the submodule cache_example, module: examples from page: www.drupal.org/project/examples .
Cache removal from database
Segment cache can be migrated, for example to Memcached or Redis.Each repository has its own supporters. Evgeniy Maslovskiy (Spleshka, www.drupal.org/u/spleshka ), who helped write the article, is a supporter of Memcached, and his website describes in detail the integration of Memcached and Drupal. In the module of integration with Memcached described by it there are additional advantages over other solutions: it is bypassing the connection to the database when receiving the cache and bypassing calls to hook_exit () and hook_boostrap () in other modules.
In this article, we’ll consider making cache in Redis, which I like more simple setup compared to Memcached. A comparative tests of the speeds of both storages will be discussed in another article.
Redis settings on the server can be found on the Internet. The module for integration with Drupal will be downloaded from www.drupal.org/project/redis and unpacked to the directory ./sites/all/modules. After that, we make changes to the Drupal configuration file ./sites/default/settings.php, adding the lines to it:
$conf['redis_client_interface'] = 'PhpRedis'; $conf['redis_client_host'] = $relationships['redis'][0]['host']; $conf['redis_client_port'] = $relationships['redis'][0]['port']; // PHP Redis. $conf['redis_client_interface'] = 'PhpRedis'; $conf['cache_backends'][] = 'sites/all/modules/redis/redis.autoload.inc'; $conf['cache_default_class'] = 'Redis_Cache'; // {cache_form} . $conf['cache_class_cache_form'] = 'DrupalDatabaseCache'; // : {mymodule} // Redis. $conf['cache_class_mymodule'] = 'Redis_Cache'; Do not forget to read the README.txt file in the module folder, since it describes all the module settings.
Where can this be applied?
One of the options for applying the described knowledge is the removal of part of the site data into blocks that load after the main page load, both to speed up the site load and to speed up the overall site operation. All you need to do is to take the Ajax Blocks module as a basis, integrate it with the High-performance JavaScript callback handler module, and place the data cache in your Redis repository using this article.
Conclusion
This article did not get a description of a large number of caching modules written by the community and posted on www.drupal.org . If you like the article, vote for it, and then in the next article I will try to include a bonus in the form of a review of caching in Drupal 8. And also consider the topic of use in Drupal as a cache store Redis or Elasticsearch with a frontend on Silex and AngularJS.
Source: https://habr.com/ru/post/269385/
All Articles