Escene HS108 compact phone review
 The compact phone Escene HS108 is a model in the Escene line intended for use in places where the space for placing the phone is limited or constant use of the phone is not required. HS108 along with US102P have become the most used phones in hotel rooms!
The phone is the simplest and most compact in the entire Escene lineup. The concept of “simplicity” does not include the absence of any functions; on the contrary, all the necessary functions, such as transfer, hold, forwarding, light indication, and others, are present in this phone. But with the maintenance and installation, everything is very simple - the phone is simply configurable, PoE powered, so you do not need a separate electrical outlet for its installation, and its dimensions make it possible to install it almost anywhere, either on a vertical surface or on a horizontal surface. . This phone looks more like a compact analog phone, but it is a real IP phone with an RJ-45 connector. Despite its very small size and lack of a screen, the phone can easily replace an analog phone, especially if the company uses an IP PBX, there is no need to use a combination of a VoIP gateway with an analog phone.
Positive features
- Specially designed for use in hotels and similar premises.
- It has a compact design.
- PoE support IEEE802.3af class 0.
- High quality body materials.
- The possibility of wall mounting.
- Simplicity of setup due to the clear interface.
- Russified web-interface.
- Ability to adapt the phone to work with SIP-compatible equipment.
- Availability of all necessary basic DVO (additional types of service).
Functionality
')
- Direct SIP connection to Virtual IP PBXs (for example, Broadworks, MFI RTU, Metaswitch, Alcatel-Lucent) and to office IP PBXs (for example, Asterisk, 3CX IP PBX, Avaya IP Office, Huawei).
- One Ethernet port (PC / LAN) with VLAN support.
- Easy installation and operation.
- Support for two simultaneous calls on a SIP account.
- Call Hold, Transfer and Call Forwarding, as well as other advanced features.
- High definition audio support Voice HD (G.722 codec).
- Built-in VPN client.
- Encryption of SIPS signaling and SRTP traffic media.
- Russified web-interface phone.
- Autotune using HTTP / TFTP / FTP protocols, TR069.
Specifications
VoIP
- RFC 3261 standard SIP server, Asterisk, Avaya, Cisco, Broadsoft, RTU MFI, 3CX IP PBX, Panasonic SIP-PBX, Huawei, Metaswitch, Alcatel-Lucent, Yeastar and others.
- Encryption of SIPS signaling traffic and SRTP media traffic.
- Audio codecs: G.711 u / a, G.722 (HD Voice), G.729a, G.723.
- DTMF: In-Band, RFC2833, SIP Info, Auto
- QoS: TOS, Jiffer Buffer, VAD, CNG, G.168 (32ms).
- DNS SRV support.
- One SIP account (SIP account) with the possibility of registration on two independent SIP-servers and the possibility of automatic switching in case of loss of registration.
- Two simultaneous calls to the phone.
Data transfer
- 1 * RJ45 10 / 100M Ethernet Interface (LAN)
- Support VLAN QoS (802.1pq) / QoS.
- IP addressing: DHCP client or static IP destination.
- NAT Traversal: STUN mode
- Built-in VPN client L2TP or OpenVPN (SSL VPN).
- Network protocols HTTP, BOOTP, FTP, TFTP, IEEE 802.1Q, IEEE 802.1X.
Physical parameters
- Indicator of the line status and indication of the new voice mail message (on the handset).
- 14 buttons on the panel.
- Button "Redial".
- Speakerphone button.
- Flash button.
- Connector for RJ-9 tube connection.
Additional services (additional features)
- Waiting for a second call, a queue (if it supports an IP PBX), call transfer, call forwarding, call hold, call pickup, callback, call repetition.
- Multilateral conference (if supports IP PBX).
- Voice mail (if the function is supported by IP PBX).
Control
- Protocols update: FTP / HTTPS / HTTP / TFTP / PnP auto-tuning (PnP auto-provision).
- Configuration: via web-interface / auto-provision
- SNMP V1 / 2, TR069
- Debugging: web interface.
Nutrition
- Power over Ethernet (802.3af, class 0) via LAN port.
- Power consumption up to 1.5 watts.
Package, appearance and packaging
The phone is delivered in a cardboard box, on the side of the package there is a sticker with the model number and barcode of the device. Inside the phone is neatly packed, there is nothing superfluous in the box. Obviously, this equipment reduces the cost of the phone.

Phone kit
- Telephone set.
- Handset.
- Handset cord.
- RJ45 patch cord to connect to the network.
- Instruction and warranty card.
I draw your attention that the power of the phone is possible only with the help of PoE, other power options are not provided.

Front panel and hardware buttons
The phone has a form factor of the handset on which the buttons are located. On the front of the handset, under the speaker, the suspension lever is located; below the transparent plastic screen is an insert that can be used to describe the phone, for example, (write its internal number). Next, 12 keypad and below are two “Flash” buttons for using additional functions, and the “Redial” redial button. On the reverse side there is a lamp - a light indicator that flashes when an incoming call arrives on the phone or when there are new voicemail messages.

Back of phone
The phone consists of two parts - stand and handset. Delivery is the "brains" of the phone. On the back panel is a standard sticker with the model number, serial number and MAC address. The stand has only two connectors - RJ-45 for power supply and connection to the local network and RJ-9 for connecting the handset. On the reverse side of the stand there is a groove in which the network cable is laid. For mounting to the wall on the stand there are two mounting holes.
 RJ-9 connector |  RJ-45 connector |  The back panel of the phone stand with the connected wires |
The image shows the stand (rear panel) with the wires connected. Wires do not interfere, the phone lies flat on the table.
 |  |  |
So the phone looks assembled, good quality plastic, the handset fits comfortably in your hand. When the phone first appears in the hands, it feels how compact it is. Despite the small weight of the stand, if you remove or hang up, the stand does not “bounce” and does not move - it lies flat on the table. With the phone in a vertical position, the handset does not fall off the stand even if it is shaken and steadily rests on the suspension arm.
Phone setup
So, after connecting the phone to the switch port with PoE, it flashes with an indicator on the handset, the port activity diode also starts to flash on the switch. The local network must have a DHCP server. The phone does not have a screen where you can see its settings or IP address, by default (with factory settings) it tries to get IP via DHCP. In order to check what address the IP phone received, you need to remove the phone from the stand, then PRESS the suspension arm (hang up the phone) and, without releasing, enter the combination 1 * 1 * 2 , immediately after pressing the last digit, the phone will play the current IP address in English. In my case it is 192.168.1.40.
Now you can connect to the phone using a web browser.
Phone web interface
To access the web interface from a computer that has access to the network where the phone is located, enter the IP address of the phone in the address bar of the web browser, in my case it is 192.168.1.40.
Default login and password:
root root 
We get to the main menu of the web configurator of the phone. For convenience of setting, we immediately select the Russian language in the bottom left menu.
The menu is divided into several groups:
- Network settings (interfaces, VLAN, VPN, etc.).
- VoIP settings (SIP records and additional functions for signaling and media traffic).
- Settings for additional phone functions (codecs, dial plan, sound, etc.).
- Service settings (logging, reset and reboot, configuration management and software updates, etc.)

The choice of the Russian language and the menu.
Phone status
Menu "Phone Status"

The menu refers to the service settings, allows you to get detailed information about the status of settings and statistics of the phone, such as time in operation, the status and health of the network connection, the status of the registration of SIP-lines, the firmware version and others.
Network settings
Menu "Network" -> "LAN port"

Basic Settings Tab
You can set one of three connection methods: DHCP, static IP, or PPPoE.
Advanced Settings Tab
The important setting is HTTP and Telnet ports. They should be made non-standard if the phone is on a non-trusted network (for example, with an external IP address on the Internet). Also here you can configure Paging - group notification.
Menu "Network" -> "Advanced Settings"
VPN Settings tab

If you need to connect your phone via a secure VPN channel, this can be done directly from the phone, without buying additional equipment (for example, a VPN router), the phone supports L2TP and OpenVPN (SSL VPN). This is a very useful feature for several reasons.
Firstly, if you have several phones that need to be delivered to a remote office, there is no need to buy a VPN hub at each remote location, you just need to configure the VPN client built into the phone. Further, through the tunnel to register his phone on the IP PBX in the central office.
Secondly, VPN improves security, more and more administrators are thinking about how to protect terminals that are on the Internet, two problems are becoming more acute: the danger of hacking the terminal and the difficulty of accessing telecoms operators to configure it, because often the terminal is behind NAT. Using a VPN client solves both of these problems, so this useful feature will become increasingly popular. In the example, using the VPN type L2TP, a connection to the vpn.ucexpert.ru server was created.
VLAN Settings Tab

In a corporate network, it is recommended to isolate the computer network traffic from the voice network traffic, this is most often implemented using two VLANs. The phone supports VLAN.
VoIP Settings
The phone allows you to manage a large number of SIP signaling settings and settings for RTP media traffic.
Menu "SIP accounts" -> "Account 1"
Tab "Basic"
In addition to the standard SIP account settings - User Name (UserID), Name (AuthID) and password, there are some additional settings.

In addition to the primary IP address of the SIP server, you can add an additional IP SIP server. In case of unsuccessful registration during the timeout, which by default is 32 seconds, the address of the additional SIP server will be used for registration.
Calls tab

Here you can specify additional settings to overcome NAT, enable DNS SRV.
Security tab

The phone supports encryption of RTP and SIP signaling traffic using TLS protocol.
Menu "Phone Settings" -> "Basic"
Tab "Basic"
Here you can set up various functions of the phone, such as the “Hotline” - when you pick up the handset, the preset number is automatically dialed, this function is very useful in a hotel, since the user may not always know the hotel reception number.
The important setting is DTMF type - by default it is set to RFC2833.

Calls tab

In this menu, global functions for the phone are configured.
If you set up the SIP settings here, they will be applied automatically; the settings of the “Local SIP port” and “RTP port range” can be useful for properly configuring the firewall.
In case the call transfer is required to be performed with a special key combination (old code), instead of the standard SIP message 302, this can be specified in the setting “Special code for call transfer”. A useful setting that allows you not to break the connection in the conference, if it left the initiator. You can set call forwarding by condition (busy and “no answer”) and unconditional.
You can pick up the call by explicitly dialing a combination on the telephone keypad.
The important setting is “Return Code on Failure” and “Return Code at DND”, by default IP PBX returns SIP message 603 Decline, these messages can be changed to others, if necessary for correct interpretation of the reason for the release.
Tab "Forwarding VOIP calls"

The tab is set forwarding: unconditional, if the subscriber did not answer or the line is busy.
Menu "Phone Settings" -> "Advanced Settings"
“Sound - Basic” and “Sound - Extended” tabs
Here you can set the volume of the telephone, speaker and ringing tone. Also the microphone and handset volume settings. By default, when calling, the phone claims all possible codecs. If necessary, unused codecs can be disabled. Here you can enable echo cancellation and VAD. Moreover, you can download your own ringtone.

Service Settings
Menu "Phone Settings" -> "Basic"

You can copy configuration files using three different protocols. FTP, TFTP and HTTP - the choice of a particular protocol is a matter of taste and convenience. Software update is extremely simple, you need to select the firmware file, then click update. If the version of the downloaded firmware of the phone is lower than the installed one, a window will appear with the inscription “Filename is illegal”. In the menu, you can also restart the phone or reset it to the factory settings.
Menu "Phone Settings" -> "Advanced Settings"
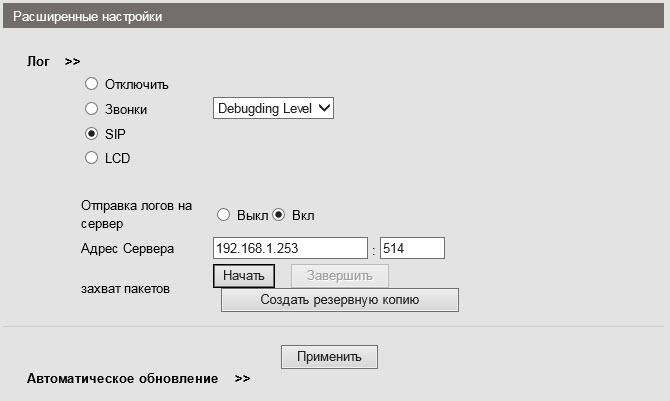
To debug the phone, you can enable logging by specifying the necessary logs. You can view them in two ways:
- In the same menu, enable sending logs to the syslog server.
- Download file c logs.
Also, the phone has the ability to collect network dump packages into pcap files, which can then be analyzed using a sniffer, for example, Wireshark, this is an extremely effective debugging tool.
To start capturing packets, click the “Start” button. When finished, click the “Finish” button. To download the received dump, click the "Create backup" button.
Also on the “Automatic Update” tab, you can configure the phone's firmware update according to the TFTP / FTP / HTTP / HTTPS protocols.
Security menu
Here you can set a login and password for the administrator and user of the phone, as well as download an SSL certificate
Setting up connection to IP PBX Asterisk using web-interface
Suppose we need to configure two extensions (two SIP accounts). For example, the first entry on the IP PBX Asterisk, the second on the virtual IP PBX:
IP Asterisk= 10.10.10.1 UserID=10 password= QOXZuTcZ38qlBsr SIP (Asterisk)= 10.10.10.1 In the Asterisk sip.conf configuration, this will be equivalent to:
[10] deny=0.0.0.0/0.0.0.0 secret= QOXZuTcZ38qlBsr dtmfmode=rfc2833 canreinvite=no context=from-internal host=dynamic type=friend nat=yes port=5060 qualify=yes callgroup=01 pickupgroup=01 allow=g722 dial=SIP/10 mailbox=10@device permit=0.0.0.0/0.0.0.0 callerid=device <10> callcounter=yes faxdetect=no Equivalently, when configured in the Free-PBX web interface, using the first line as an example:
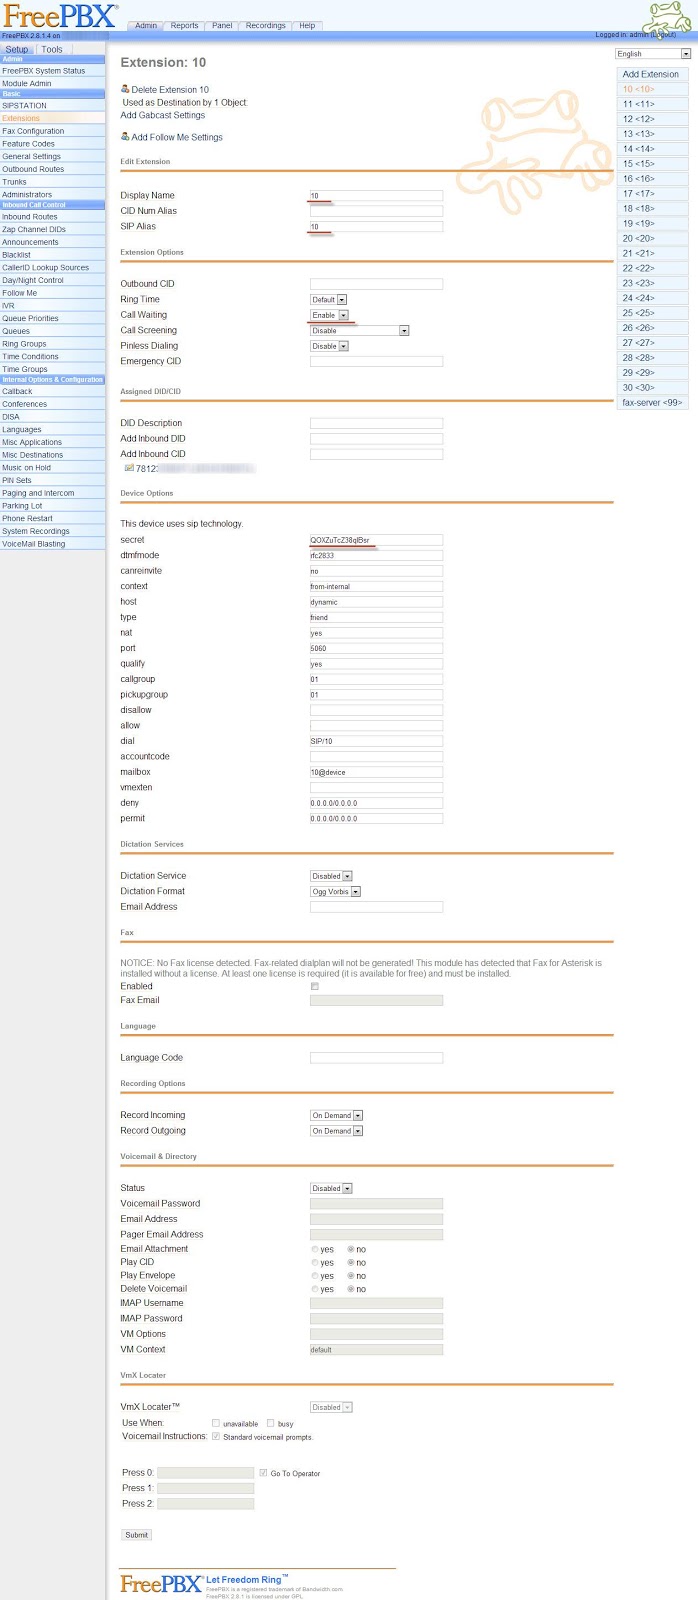

To work with Asterisk, just configure the Username (Username) = 10, password (Password) = QOXZuTcZ38qlBsr and SIP Server (SIP Server) = 10.10.10.1. You can add a label (Label) that will be displayed on the phone screen.
You can reduce the re-registration time from standard 3600 seconds to 600 seconds, this is especially true if the IP PBX is located outside the office, for example, Virtual PBX. If the phone is on a local network and the IP PBX is on the Internet, no special settings are usually required to overcome NAT. Next, click the "Apply" button.
Exactly the same must be done with the second line, for example, the city number 78126470011 on the WestCall LTD SIP server. Let's register it on a virtual PBX with a non-standard SIP port 9966:
userid=78126470011 authid=6470011 password= eIoMzKsf sip =uc.westcall.net port=9966 
To specify a non-standard SIP port (other than 5060), you must explicitly specify it in the SIP server line: uc.westcall.net:9966. Next, click the "Apply" button.
In case of successful registration, the corresponding display will appear on the phone screen, so information on the status of line registration is available on the Status menu page:
Account 1: Registered
In order to use the DVO buttons (transfer, hold), no additional configuration is required.
To transfer a call, during a call, press the “Flash” button, you will hear the “Station Answer” signal, the subscriber with whom you are talking will be put on hold (for example, music will play in his handset), then dial the number of the subscriber who needs To transfer a call, having heard the signal “Call Control”, you can either hang up - transfer without consultation, or wait for the called party to answer and press the “Flash” button again - transfer with consultation.
findings
IP phone Escene HS108 is a worthy representative of the line of specialized phones Escene. Although the device is a model intended primarily for use in hotels, it is also suitable for a wide range of other tasks, as it is one of the most compact IP-phones currently on the market. Despite its small size, the device has a large number of advantages, such as a pleasant appearance, good workmanship and ease of use. The ease of setup, stability and high quality sound also makes this model worthy of attention.
Key features of the phone include:
- Specially designed for use in hotels and similar premises.
- Ultra-compact dimensions of the device with high ergonomics.
- Support of all necessary basic DVOs (transfer, forwarding, holding, hot line, etc.).
- High-quality body materials.
- Simplicity of setup and further service.
- Power supply by PoE only.
- Intuitive Russified web interface.
Source: https://habr.com/ru/post/269233/
All Articles