Plesk 12.5 Hosting Control Panel Overview
Recently, a popular hosting control panel Odin Plesk 12.5 has been updated. This version has significantly improved the user interface and added security features, including Server Shield Plus and MagicSpam. Server administrators will appreciate the updated interface design (including mobile devices), which simplifies user interaction and access to recovery tools.
If you use classic hosting and you don’t already have enough features and speed, Plesk will help you get the usual hosting interface on a VPS or in the cloud , as well as many useful additional features to automate site maintenance and security.
What distinguishes the Plesk 12.5 update? It has become really more convenient and easier. Even if you have tried Plesk before and are using something else, we highly recommend looking at this version. The difference, as they say, is obvious. We give out a trial version of the cloud server at the end of the article so that you can test the new Plesk.
')
In this article, we will learn more about the new features of Plesk 12.5 and consider the process of updating Plesk from the previous version and the process of installing Plesk on a clean server.
New features in Plesk 12.5 include:
From the supported software, you can mention: Debian 8, CloudLinux 7, RHEL 7, CentOS7, Apache 2.4 (MPM event), MariaDB 10, PostgreSQL 9.4, the full set of PHP versions (5.2-5.6), phpMyAdmin 4.4.9, ProFTPD 1.3. 5a, Passenger 5.0.10, Dovecot 2.2.18, Courier 4.16.1, Postfix 2.11.5, Roundcube 1.1.2, Nginx 1.9.2, Fail2ban 0.9.2, MySQL 5.5.41, and so on.
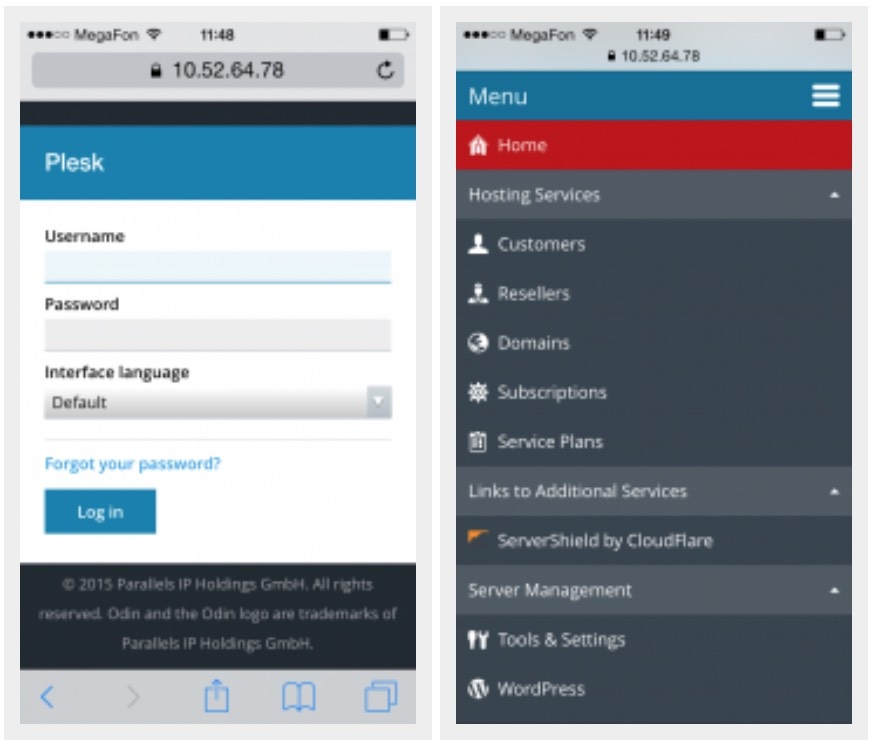
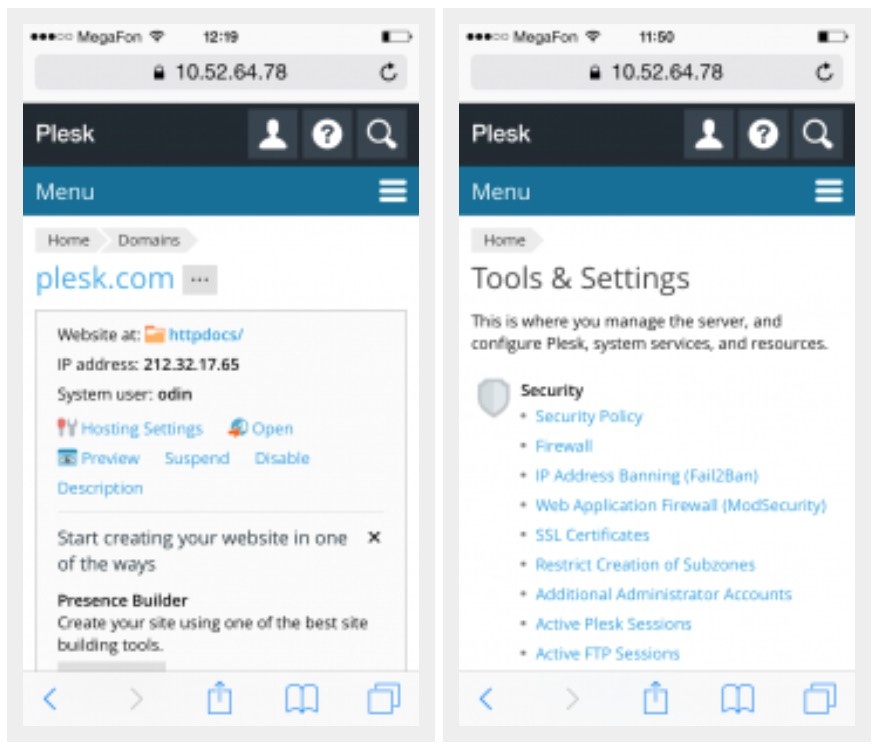
If you log in to Plesk from a mobile device, you will see an adapted control panel interface. Now something urgent can be done directly from the phone or from the tablet.
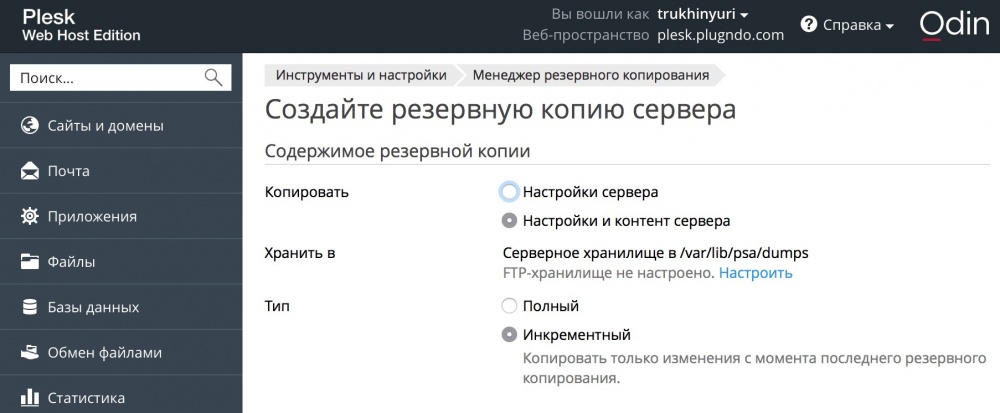
In Plesk 12.5, the backup has been significantly reworked. The most welcome change is the support of incremental backups. Incremental backups are made much faster and take up less disk space.
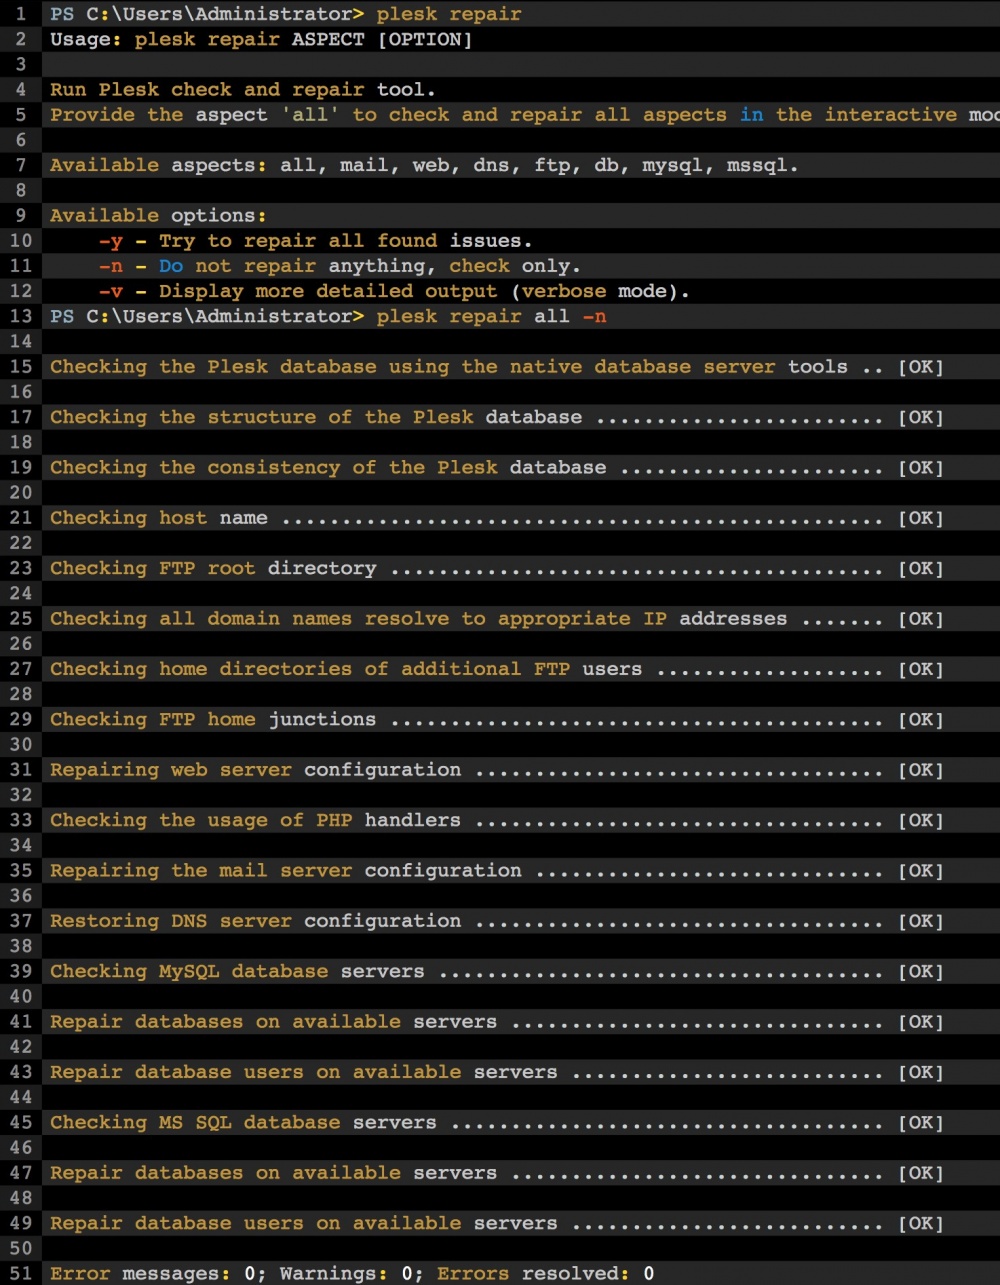
In the ideal world, programs do not fall, databases always remain complete, file storages do not degrade, but Plesk works in the real world, where all this can happen. Therefore, self-healing tools are built into plesk that automatically find and fix problems. In Plesk 12.5, these tools can be used out of the box for both Linux and Windows.
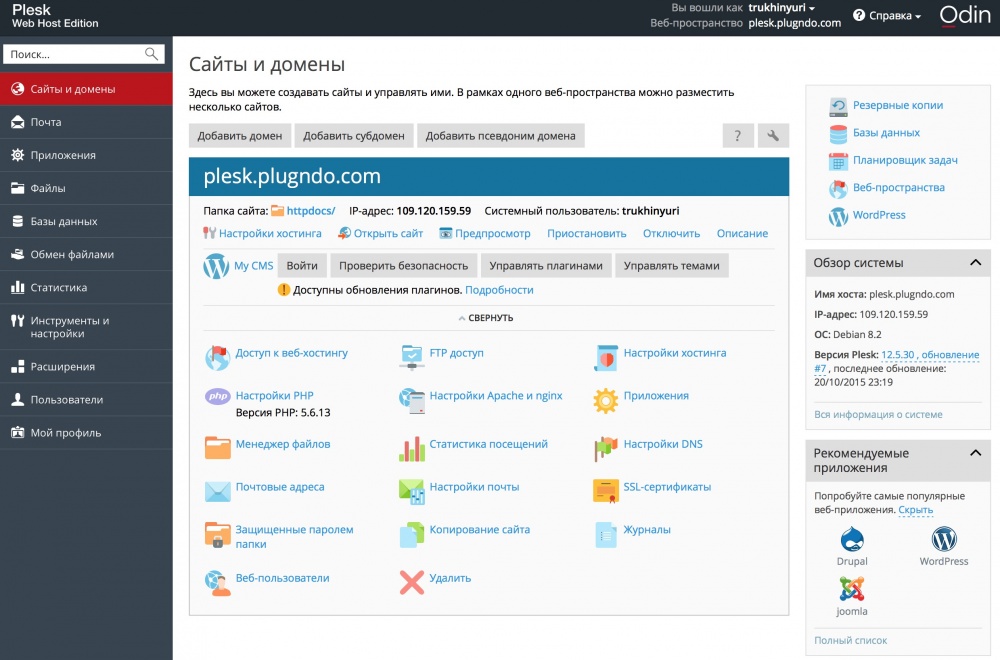
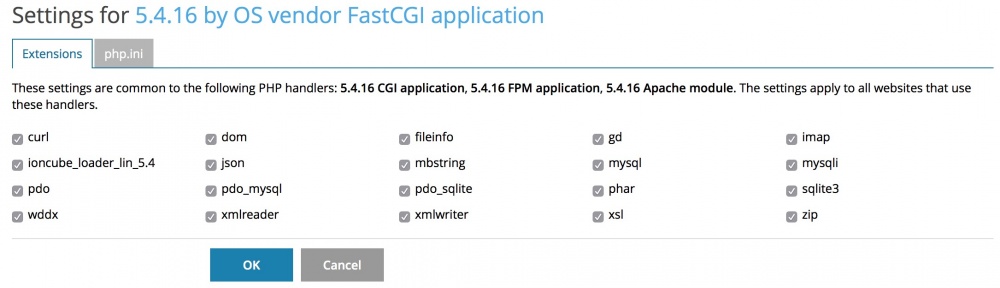
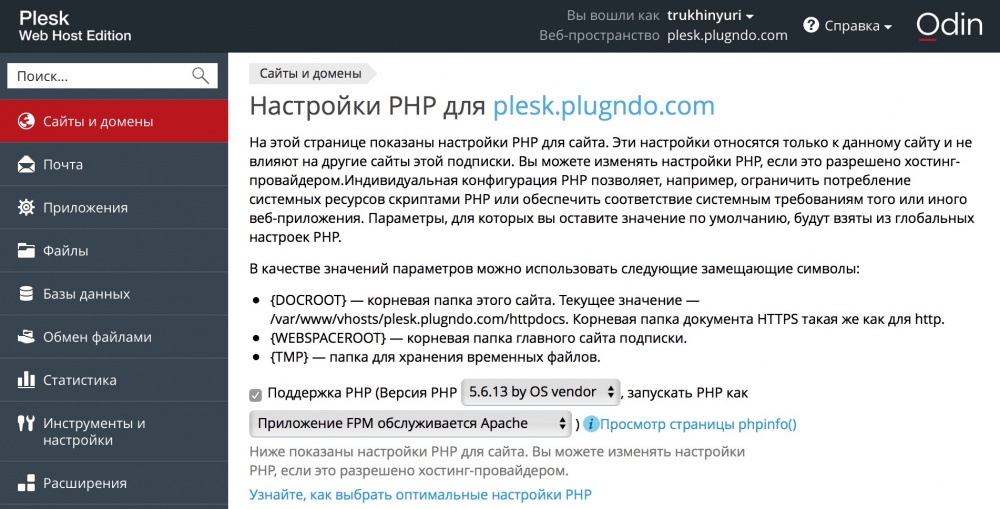
Previously, Plesk already had support for various versions of PHP and it was installed with different versions of PHP included. Now you can manage all these versions of PHP from the Plesk control panel: enable and disable PHP – handlers, edit php.ini and change the settings of PHP extensions.
Very little feature that makes life easier for users. Perhaps all PHP developers created a single-line PHP file.
, launched it and then forgot to delete. If you want to view hosting information, just click on the link.
Plesk ensures that the file is deleted after you look at it.
Using the code editor, you can quickly fix small errors on the site.
Viewing logs in real time, when messages can be filtered, will help you find errors in sites.
If you are already using Plesk, go to Tools & Settings > Updates and Upgrades Settings and select the Early Adopters Release channel.
Then go to Tools & Settings > Updates and Upgrades and upgrade to the latest version of Plesk 12.5.
After the upgrade, you can take full advantage of Plesk 12.5.
You will need a server with Debian 8 for installation. You can use InfoboxCloud cloud or VPS from Infobox . The cloud allows you to change the amount of resources (CPU, Ram, Storage) available to servers at any time and pay only for allocated resources. VPS is more economical if you know exactly how many resources you need for your server for a month.
Now that you have a VPS or cloud server, connect to it via SSH .
In the A – DNS records, direct the domain on which our first site will be located to the dedicated server ip-address.

Update the OS on the server and install curl:
If you want to install Plesk without any questions in the usual configuration, enter the command:
After the installation is complete, you can open the Plesk web interface at:
You will see a login window. For the first login, use the login and password of the server administrator that you use to access via SSH.

You will see the license agreement. Accept it by clicking Accept.

Choose how you will use Plesk.

You will be prompted to select the default interface. If you yourself are engaged in hosting client sites or your own sites, select “Power User View”. If you want to give your users access to Plesk, select “Service Provider View”.

Now you need to specify the domain name for the server that will be used for management. To do this, in any of your service domain, send an A – record to the dedicated ip – address of the server in DNS. Specify this domain when configuring Plesk.
Make sure the Default IP address matches the dedicated IP address of the server. The second address in the list is the address on the internal network. Also set an administrator password to not use the root – password from the server for login. The username for logging in to Plesk will be “admin”.

Specify admin contact information.

Plesk will ask you to enter a license key or order a 14-day free trial.
If you need to get a trial Plesk key, it is available at this link .
After entering the key, you will need to add a system user to access the web space via FTP and SSH.

Plesk was successfully installed and configured. You already have access to the first site on the domain that you sent to the server with Plesk.

Go to the “Tools & Settings” section and in the “Plesk Apperance” group select “Languages”.

Select the Russian language and click “Make default”.

Log out of the control panel and log in again.

Now the default language is Russian.

In this article, we looked at some of the new features of Plesk 12.5, the upgrade process from the previous version, and the installation process on a clean server. In the following articles, we will continue to look at Plesk with real-world usage examples.
Already now you can try Plesk 12.5 for free in the InfoboxCloud cloud. To do this, email us your name and the desired region of the cloud: Moscow, St. Petersburg or Amsterdam. The validity period of the trial version is 14 days.
If you can not leave comments on Habré, write to us in the Community .
Successful work!
If you use classic hosting and you don’t already have enough features and speed, Plesk will help you get the usual hosting interface on a VPS or in the cloud , as well as many useful additional features to automate site maintenance and security.
What distinguishes the Plesk 12.5 update? It has become really more convenient and easier. Even if you have tried Plesk before and are using something else, we highly recommend looking at this version. The difference, as they say, is obvious. We give out a trial version of the cloud server at the end of the article so that you can test the new Plesk.
')
In this article, we will learn more about the new features of Plesk 12.5 and consider the process of updating Plesk from the previous version and the process of installing Plesk on a clean server.
New opportunities
New features in Plesk 12.5 include:
- Improvements to the main functions: The new interface allows users to more easily deploy and manage websites from a single platform. In particular, the process of setting up PHP and databases has been improved, incremental backups have been added. Improved migration tools make it easier to migrate from older versions or migrate from cPanel.
- Improved maintainability : Plesk servers are easier to maintain for users with little experience in setting up servers.
- Self-Repair Tools : Many problems are now fixed automatically without the need to contact technical support.
- Easier to maintain dozens and hundreds of sites : Using the built-in toolkit for Wordpress, you can manage themes and extensions for many installations at the same time.
- Sidekick.pro : an extension that helps you learn about new features without contacting support. Built-in tutorials teach the user step by step through tasks using text, voice and visual cues.
- Updated security with the ability to add Server Shield Plus : CloudFlare Web Application Firewall stops threats before they reach the server, works at the network level, does not require installation, and any additional equipment or software. Also, MagicSpam is now included in the e – mail security package.
From the supported software, you can mention: Debian 8, CloudLinux 7, RHEL 7, CentOS7, Apache 2.4 (MPM event), MariaDB 10, PostgreSQL 9.4, the full set of PHP versions (5.2-5.6), phpMyAdmin 4.4.9, ProFTPD 1.3. 5a, Passenger 5.0.10, Dovecot 2.2.18, Courier 4.16.1, Postfix 2.11.5, Roundcube 1.1.2, Nginx 1.9.2, Fail2ban 0.9.2, MySQL 5.5.41, and so on.
Mobile support
If you log in to Plesk from a mobile device, you will see an adapted control panel interface. Now something urgent can be done directly from the phone or from the tablet.
Recycled Backup
In Plesk 12.5, the backup has been significantly reworked. The most welcome change is the support of incremental backups. Incremental backups are made much faster and take up less disk space.
Self-healing
In the ideal world, programs do not fall, databases always remain complete, file storages do not degrade, but Plesk works in the real world, where all this can happen. Therefore, self-healing tools are built into plesk that automatically find and fix problems. In Plesk 12.5, these tools can be used out of the box for both Linux and Windows.
Setting up different versions of PHP from the control panel
Previously, Plesk already had support for various versions of PHP and it was installed with different versions of PHP included. Now you can manage all these versions of PHP from the Plesk control panel: enable and disable PHP – handlers, edit php.ini and change the settings of PHP extensions.
PHPInfo
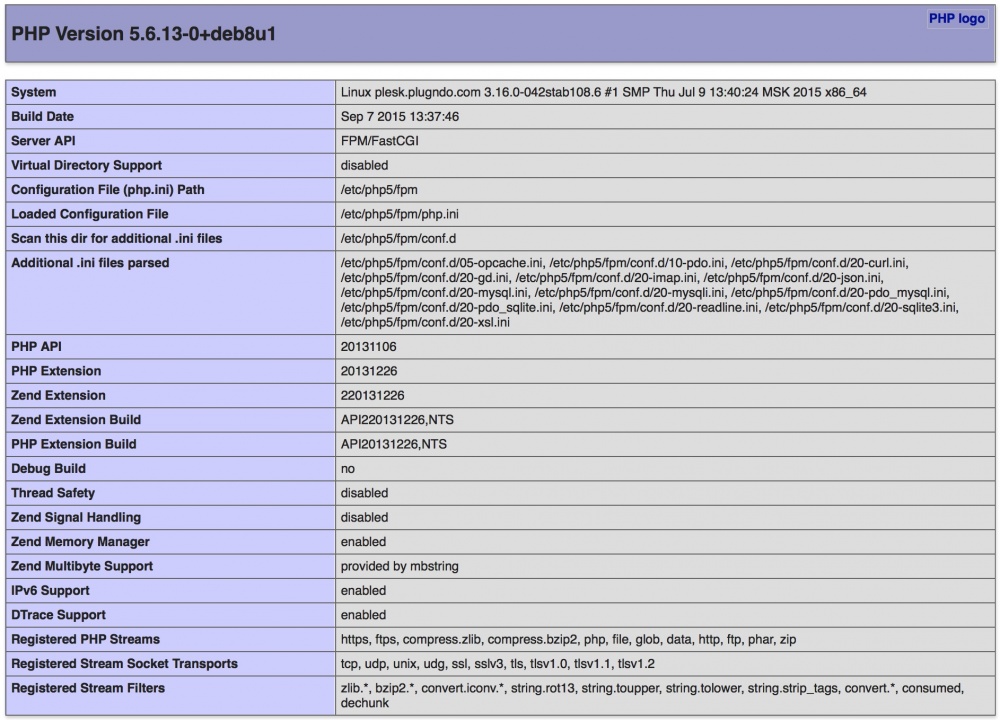
Very little feature that makes life easier for users. Perhaps all PHP developers created a single-line PHP file.
<?php phpinfo(); ?> , launched it and then forgot to delete. If you want to view hosting information, just click on the link.
Plesk ensures that the file is deleted after you look at it.
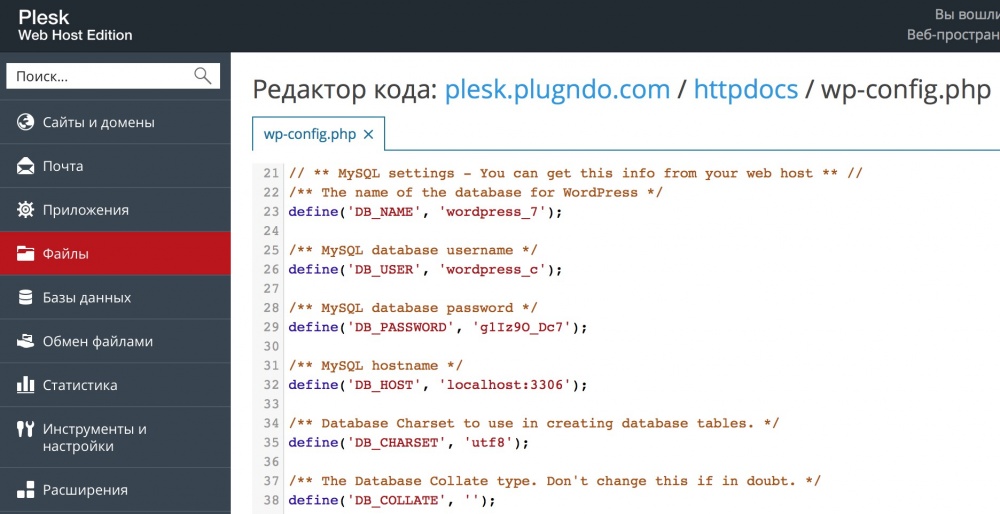
Code editor
Using the code editor, you can quickly fix small errors on the site.
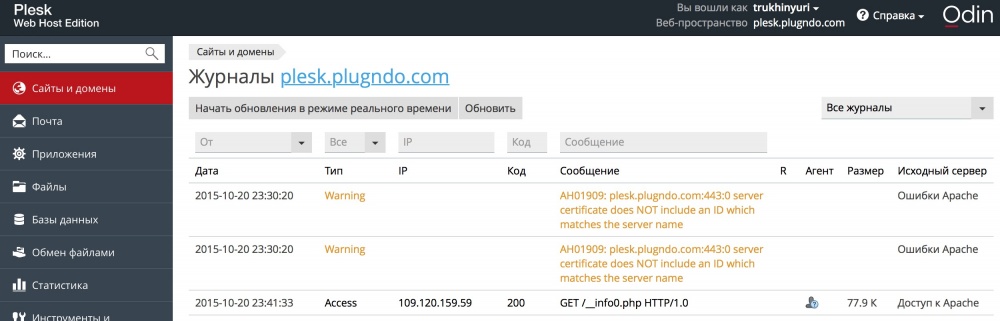
The ability to view logs in real time
Viewing logs in real time, when messages can be filtered, will help you find errors in sites.
Upgrade to Plesk 12.5
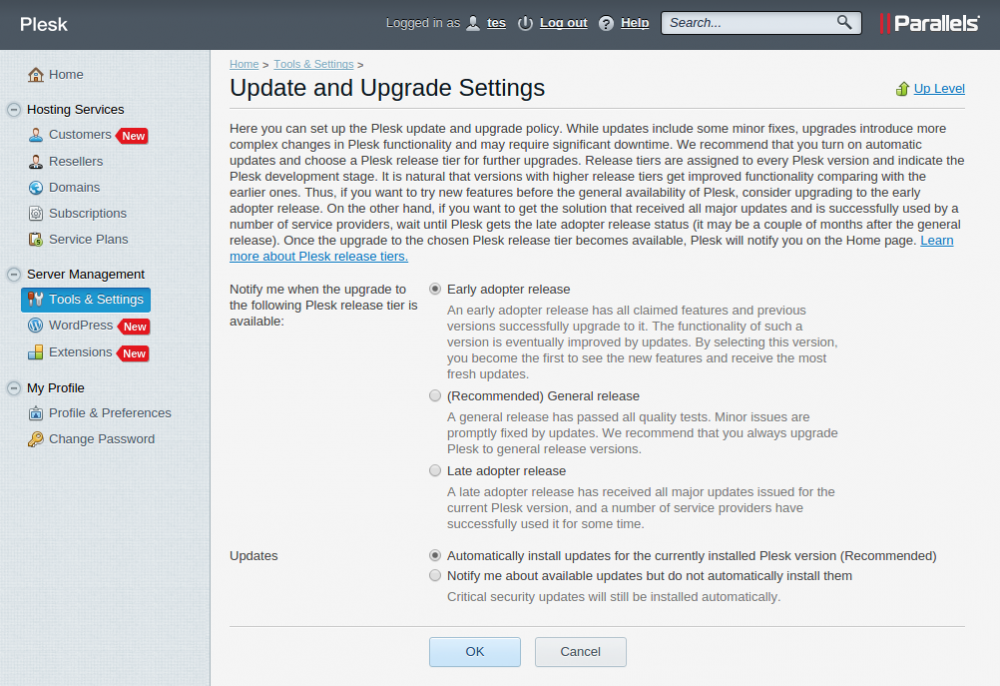
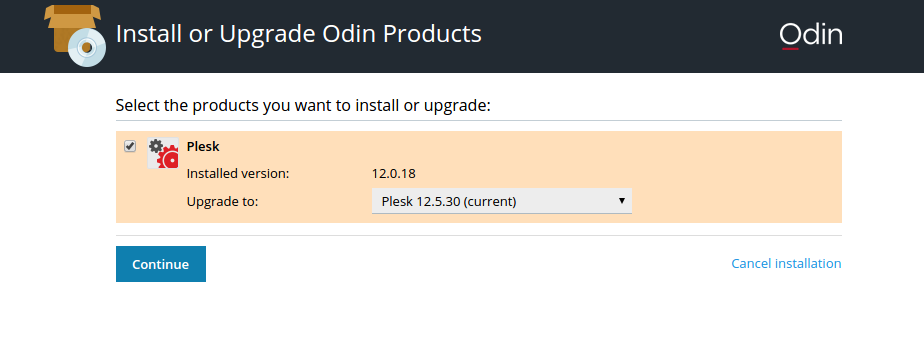
If you are already using Plesk, go to Tools & Settings > Updates and Upgrades Settings and select the Early Adopters Release channel.
Then go to Tools & Settings > Updates and Upgrades and upgrade to the latest version of Plesk 12.5.
After the upgrade, you can take full advantage of Plesk 12.5.
Server creation
You will need a server with Debian 8 for installation. You can use InfoboxCloud cloud or VPS from Infobox . The cloud allows you to change the amount of resources (CPU, Ram, Storage) available to servers at any time and pay only for allocated resources. VPS is more economical if you know exactly how many resources you need for your server for a month.
How to create a cloud server
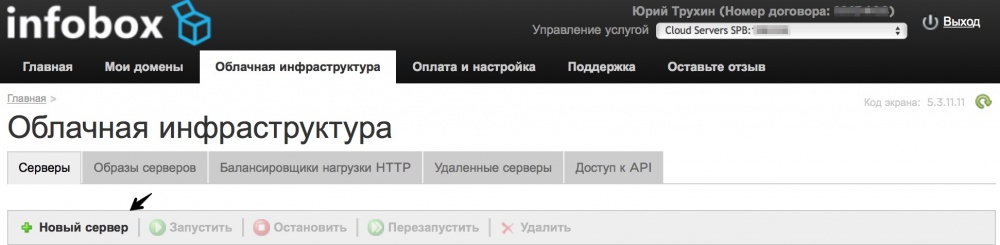
After ordering the cloud, go to the control panel and click " New Server ".
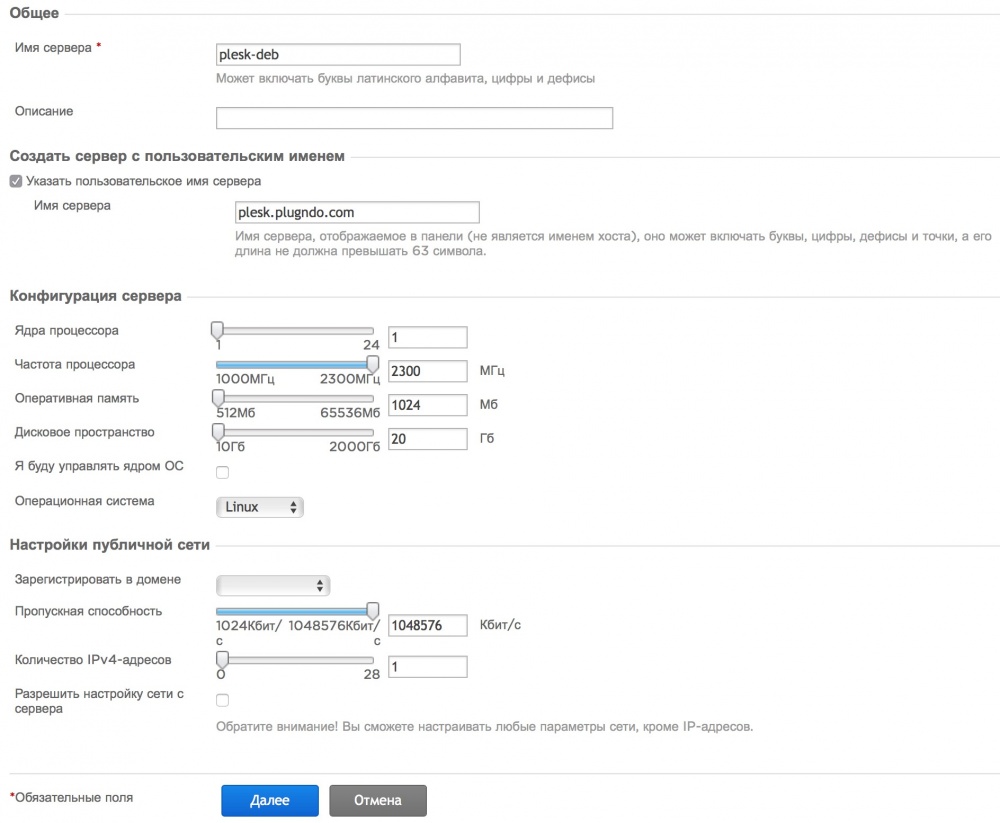
As the user server name, specify the domain on which your first site will be located. Set the required amount of resources to the server. Do not forget to set at least 1 public ip – address to the server and sufficient network speed and click “Next”.
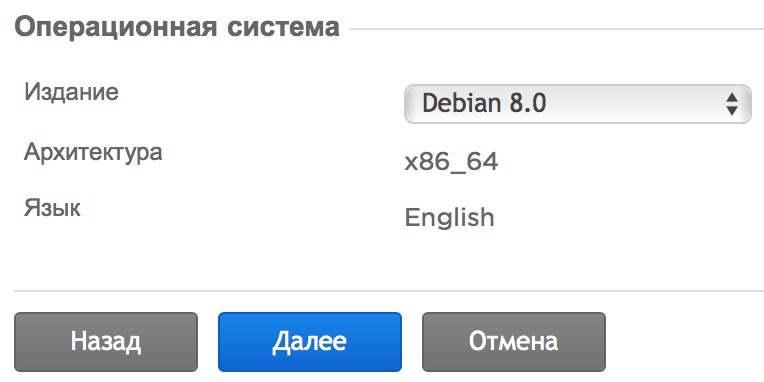
Select Debian 8 OS and click next.
Now just confirm the selected parameters by clicking "Finish". You will receive an email to access the server.
As the user server name, specify the domain on which your first site will be located. Set the required amount of resources to the server. Do not forget to set at least 1 public ip – address to the server and sufficient network speed and click “Next”.
Select Debian 8 OS and click next.
Now just confirm the selected parameters by clicking "Finish". You will receive an email to access the server.
Now that you have a VPS or cloud server, connect to it via SSH .
Installing Plesk 12.5
In the A – DNS records, direct the domain on which our first site will be located to the dedicated server ip-address.
Update the OS on the server and install curl:
apt-key update && apt-get update && apt-get -y upgrade && apt-get install -y curl If you want to install Plesk without any questions in the usual configuration, enter the command:
bash <(curl -s autoinstall.plesk.com/one-click-installer) Installing Plesk in manual mode
Start the Plesk installation with the command:
You will be prompted to read the license agreement. To continue, type "N" and press "Enter."


bash <(curl -s autoinstall.plesk.com/plesk-installer) You will be prompted to read the license agreement. To continue, type "N" and press "Enter."
- You will be prompted to choose where to install Plesk. We will install it from the official Odin server. To do this, type N and press Enter .
- You will be informed that the product will be installed on / root / parallels. N > Enter .
- You will be prompted to configure HTTP proxy. N > Enter .
- Finally, they will ask us which product you want to install. 1 > Enter .
- Now you need to select the product version. N > Enter
- Would you like to make Odin products better? Yes > Enter
- Further it will be offered to select the components installed by Plesk. You can choose Full to explore all the possibilities. 3 > Enter . N > Enter .
- The maximum installation of Plesk takes up 2.7 GB of disk space. If this is too much for you, press P> Enter and select another installation option. If appropriate, press N> Enter.
- The final step invites experienced users to choose which packages to install from the complete set. If you do not know what you need, press N > Enter .
After the installation is complete, you can open the Plesk web interface at:
https://_:8443 where as domainname use the name of your domain, which you sent via DNS to the dedicated ip – address of your server.You will see a login window. For the first login, use the login and password of the server administrator that you use to access via SSH.
You will see the license agreement. Accept it by clicking Accept.
Choose how you will use Plesk.
You will be prompted to select the default interface. If you yourself are engaged in hosting client sites or your own sites, select “Power User View”. If you want to give your users access to Plesk, select “Service Provider View”.
Now you need to specify the domain name for the server that will be used for management. To do this, in any of your service domain, send an A – record to the dedicated ip – address of the server in DNS. Specify this domain when configuring Plesk.
Make sure the Default IP address matches the dedicated IP address of the server. The second address in the list is the address on the internal network. Also set an administrator password to not use the root – password from the server for login. The username for logging in to Plesk will be “admin”.
Specify admin contact information.
Plesk will ask you to enter a license key or order a 14-day free trial.
How to order a Plesk license key
In the InfoboxCloud control panel on the main page, click "Order a new service."

Select the section "Rent licenses".

Add to the basket the necessary edition. Editorial comparisons were conducted in a Plesk 12 review .

Accept the terms of the contract and click "Checkout"

After ordering, you will receive a Plesk key to your email.

Select the section "Rent licenses".
Add to the basket the necessary edition. Editorial comparisons were conducted in a Plesk 12 review .
Accept the terms of the contract and click "Checkout"
After ordering, you will receive a Plesk key to your email.
If you need to get a trial Plesk key, it is available at this link .
After entering the key, you will need to add a system user to access the web space via FTP and SSH.
Plesk was successfully installed and configured. You already have access to the first site on the domain that you sent to the server with Plesk.
We include Russian by default
Go to the “Tools & Settings” section and in the “Plesk Apperance” group select “Languages”.
Select the Russian language and click “Make default”.
Log out of the control panel and log in again.
Now the default language is Russian.
Conclusion
In this article, we looked at some of the new features of Plesk 12.5, the upgrade process from the previous version, and the installation process on a clean server. In the following articles, we will continue to look at Plesk with real-world usage examples.
Already now you can try Plesk 12.5 for free in the InfoboxCloud cloud. To do this, email us your name and the desired region of the cloud: Moscow, St. Petersburg or Amsterdam. The validity period of the trial version is 14 days.
If you can not leave comments on Habré, write to us in the Community .
Successful work!
Source: https://habr.com/ru/post/269219/
All Articles