Creating GUI Applications in PHP

The topic of developing GUI applications in PHP today is probably not surprising anyone. There is more than one solution for this, there are both developing projects and dead ones. But this post will not be about those and not about others, but about a new extension for PHP - the PHPQt5 library, or rather its more advanced reincarnation - about PQEngine .
PS PHPQt5 has nothing to do with the better-known php-qt library!
Foreword
In fact, PQEngine is a SAPI module, but it is positioned as an engine that implements the interface for executing php scripts using the Zend API and provides access to part of the Qt framework.
So far, unfortunately, to a very small part of it. We can distinguish the main ones: Qt ( Widgets ) visual components, Layouts , signal-> slot connection system ( connect () ), event management ( QEvents ), and multithreading provided by the QThread class.
Creating a project
To simplify the creation and assembly of projects there is a very easy to use utility - PQBuilder . This application is 99% written in PHP and demonstrates the modest capabilities of the PQEngine engine.
You can download the utility on the official website of the PHPQt5 library: http://phpqt.ru/download/pqbuilder
')
Project Collector Interface:
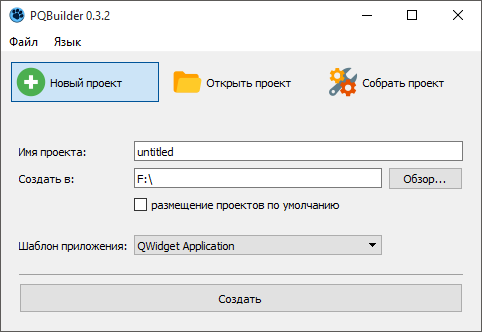
All that is required of us is to specify the name of the project, the path of its placement and the template. Depending on the chosen template, the collector will create a php file with the base code, which will be enough to launch the future application, then open Explorer in the project folder, where we will see only two files and one folder:
- main.php - the main project file with the application source code;
- % projectname% .pqb - the PQBuilder project file, which stores some information about the created project;
- build - project build directory.
Created project with QWidget Application template
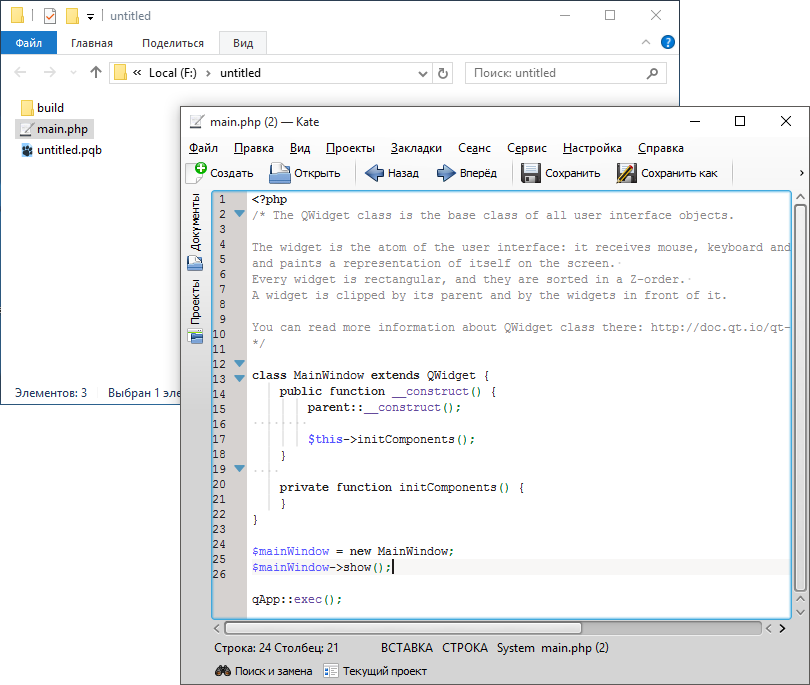
The code that we see in the screenshot was copied from the template and upon execution will show an empty form.
Note 1
In fact, it is not necessary to inherit from QWidget to run a form, the proposed code is just an example. The only required section of the code here is qApp :: exec (); , where qApp is a reference to an instance of the QApplication class, and the exec () function provides a transition to the main Qt event event loop, thereby preventing PHP from terminating until the exit () or quit () function is called, or All visible application forms will not be closed.
The most elementary way to show Qt form looks like this:
The most elementary way to show Qt form looks like this:
<?php $widget = new QWidget; $widget->show(); qApp::exec(); Apart from the fact that the Collector moved us to the project directory, he activated the build tab, where we can only select the icon for the future application and the build template.
Note 2
At the time of this writing, there were 3 project build templates. Briefly about each:
- Simple (app)
- build a simple application, without the use of encryption and packaging. The main PHP file of the project is copied to the working directory of the application, while the source code of the PHP file remains open. - Simple + manifest (app-manifest)
- build a simple application with the connection file Manifest. You can read about the Manifest file, what it is for and how to make it, on the Microsoft website. - Packed (packedapp)
- The most interesting application build method, in which the main PHP file is encrypted and packaged into application resources by compilation. This allows you to protect the source code of the program. The big disadvantage of this template is that it allows you to pack only the main.php file, other resources (images, text, etc.) remain in the folder with the project.
For my project, I chose the Simple template - it is very convenient at the development stage in terms of the fact that for the project debug you don’t have to rebuild the application each time.
By clicking on the project build button, PQBuilder will launch a compiler, which will last from 10 to 30 seconds, then the directory of the assembled project will open and, if the compilation process is successful, we will see the newly minted executable file.
Note 3
If the exe file does not appear, it means that errors occurred during the compilation. The collector does not provide information about compilation errors, but it is available in a log file that is in the directory one level up: make.log . Typically, an error message can be found at the end of the file. Perhaps the study of this log will help you identify the error and eliminate it.
To release the application, we need only 4 files: exe-file, pqengine.dll, php5ts.dll and main.php. The rest of the files in the project directory are temporary files created by the compiler, they can be safely deleted.
Application development
Note 4
Due to the fact that all classes registered in the PQEngine engine implement the interfaces of the standard Qt classes, the engine can theoretically swallow some examples from the official Qt documentation, it is enough to remove the types of variables and sign the $ sign to them. But nevertheless, some functions remain unavailable, or differ in the set and types of input and output values.
You can view the full list of methods of a particular class in the PQEngine header files, they are located in the directory with the installed collector:
% install_path% \ PQBuilder \ pqenginedll \ pqclasses
All methods starting with the Q_INVOKABLE macro are available for calling from PHP code, and they perform exactly what is written in the official Qt documentation.
We will continue the development of the application with the proposed template code directly in the directory with the collected project. Open the build \ app \ release \ main.php file in your favorite editor, go to the body of the initComponents () function and proceed:
- First, create and install a layout for our form.Note 5PQEngine provides three types of layout:
- QVBoxLayout - vertical layout of widgets;
- QHBoxLayout - horizontal layout of widgets;
- QGridLayout - the location of the widgets in the grid.
private function initComponents() { $layout = new QGridLayout; $this->setLayout($layout); } - Then add a few buttons:
private function initComponents() { $layout = new QGridLayout; $this->setLayout($layout); $button1 = new QPushButton($this); // $this - . /* . text, * setText(); * . 4 */ $button1->text = ' '; /* . * 2 : * (QEvent) */ $button1->onClicked = function($sender, $action) { QMessageBox::information($this, ' ', ', !'); }; $button2 = new QPushButton($this); $button2->text = ' PQEngine'; $button2->onClicked = function($sender, $action) { aboutPQ(); // PQEngine }; $button3 = new QPushButton($this); $button3->text = ''; /* connect(). * : * . php * PHPQt5: * http://phpqt.ru/documentation/functions/connect */ $button3->connect(SIGNAL('clicked(bool)'), $this, SLOT('quitButtonClicked(bool)')); } // - public function quitButtonClicked($sender, $checked) { $this->close(); } - And finally, add all these buttons to the created linker:
/* ... */ $button3->connect(SIGNAL('clicked(bool)'), $this, SLOT('quitButtonClicked(bool)')); /* addWidget 3 5 : * addWidget($widget, $row, $column, $rowSpan = 1, $columnSpan = 1), : * $widget - ; * $row - ; * $column - ; * $rowSpan - , ; * $columnSpan - , ; */ $layout->addWidget($button1, 0, 0); $layout->addWidget($button2, 0, 1); $layout->addWidget($button3, 1, 0, 1, 2); /* * , - */ $layout->addWidget(new QWidget, 2, 0);
Now, in order to see the result, it is not necessary to reassemble the project again.
Just save the source code and run the executable exe-file, which was compiled earlier.
Be careful!
The template ( Simple ) selected in this example allows you to work in this way, because, in essence, the application is only assembled in order to attach the icon selected by the user in the Project Build tab to the application.
BUT! Be attentive and careful! Do not forget that we made all the changes in the directory with the compiled project, so if in PQBuilder you collect this project again, all the code will be overwritten!
BUT! Be attentive and careful! Do not forget that we made all the changes in the directory with the compiled project, so if in PQBuilder you collect this project again, all the code will be overwritten!
PS
Such a focus would not have happened if we had assembled an application with the " Packed " template, because there the source PHP code is attached to the resources of the executable file, so each time the source code would change, we would have to reassemble the project.
And that should have turned out:

Project archive (unpack and open untitled.pqb file)
Source: https://habr.com/ru/post/269199/
All Articles