Part 2. Publishing apps in the Office Store

In the process of publishing in the store you face several tasks:
- Create an app for Office Store
- Create an account in the Sales Dashboard (using a Microsoft account) at https://sellerdashboard.microsoft.com/registration
- Decide on the price of the application and, if necessary, provide information about your tax profile.
- Add the app to one or more supported languages and countries.
- You can add and save applications even when the account is not yet approved.
- Publish apps for the Store when the account is approved and paid apps when the tax and payment information is filled.
- Submit your App for Store Approval
- The status can be observed in the control panel, the need to make changes is reported there.
- After approval, the application will appear in the store in 1-3 days.
- Track your metrics and manage your money.
Step 1. Create your application
We will not discuss in this article how to create applications for Office and SharePoint. This is covered in detail in other materials published in our series. Let's just say about some of the nuances.
')
To learn how to get started, visit http://dev.office.com/getting-started
To develop an application, you can choose different IDEs, for example, Visual Studio 2015. Do not forget to download Office Developer Tools from http://visualstudio.com . The same tool will help you create an Application Package / Manifest. To the application manifest was ready for publication, it is worth considering the following recommendations:
- While downloading an application, be careful in choosing the name of the application, since:
- The name in the manifest is the name that the user will see after installing the application in Office or SharePoint
- The name in the Sales Dashboard is how the app will be called in the Store.
- The mismatch of these two names may confuse the user.
- Use the Manifest Display Name (Office Applications) or Title Element (SharePoint Applications)
- You need to download the icons for the App Store twice, in two different places.
- Provider-hosted SharePoint Store applications require the use of Seller Dash for Client IDs and Secrets
- Client IDs and Secrets allow remote application components to access SharePoint data without user permissions
- When you make apps for the Store, you cannot use SharePoint to create IDs and Secrets
- These elements created with SD are then added to the web.config and manifest files in your project in Visual Studio.
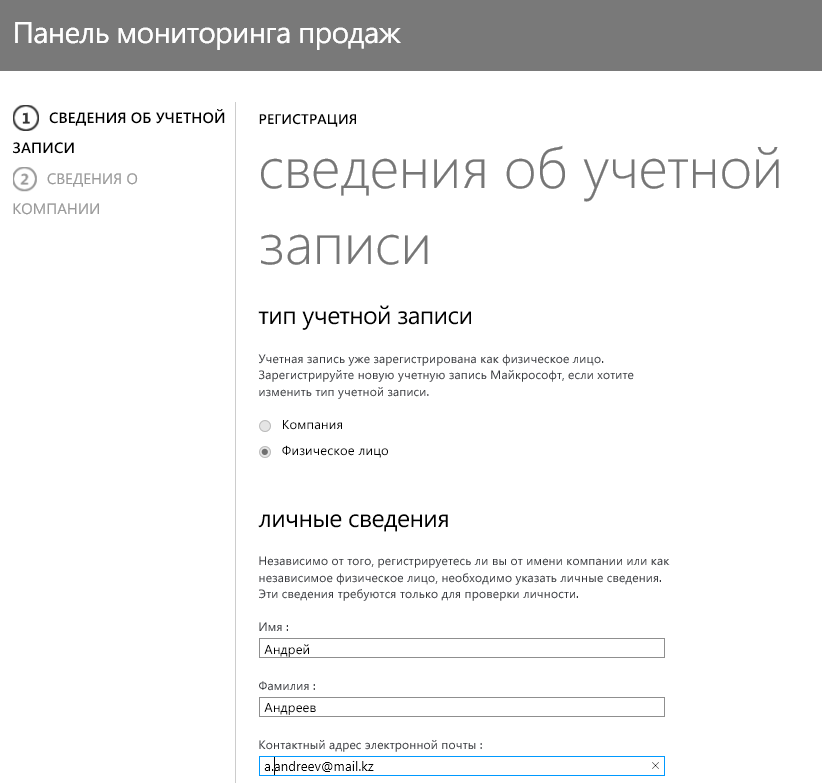
Step 2. Creating an Account in the Sales Dashboard
If you plan to publish applications or add-ons in the Office Store, you first need to create a user or organization account in the Sales Dashboard. If you want to sell your solutions, you also need to add payout details.
Note: If your company is already registered with Microsoft stores using a Microsoft account, you must use the same account to register with the Sales Dashboard. You cannot register a company in the Sales Dashboard using another Microsoft account. The information provided must correspond to the information provided at Microsoft stores using this account. For example, you must specify the same company name and address.
When registering, please note that selecting the account type once (individual or organization), you can not change it later. You will have to create a new account.
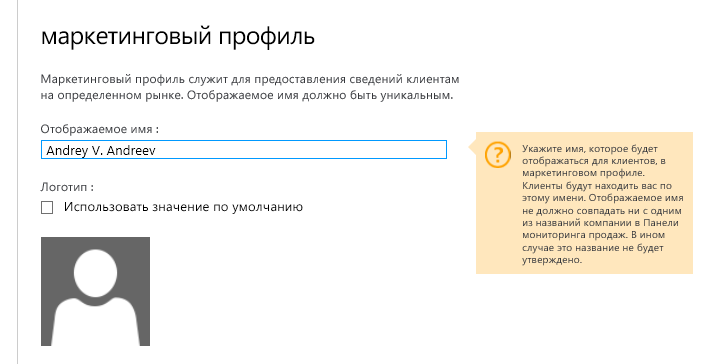
Your account also includes a marketing profile. From your marketing profile, customers will learn about your experiences, as well as how your applications and add-ons will help them cope with their business tasks. A well-thought-out marketing profile will increase your chances to interest potential customers. Do not forget about grammar, about the uniqueness of information, about its completeness. This will help to get approval for registration.
Do not forget to use the recommendations of Microsoft. From you can find in the relevant section of the documentation (see, for example, https://msdn.microsoft.com/RU-RU/library/jj635874.aspx )
Let's take a step by step process of creating an account in the Sales Monitoring Panel.
- Sign in to the Sales Dashboard using a Microsoft account. If you or your company does not have a Microsoft account, click the Register button. You can only associate one Microsoft account with a company.
- Enter your personal information. If you are creating a company account, provide the contact details of the company administrator by filling in the First Name, Last Name and Contact E-mail fields.
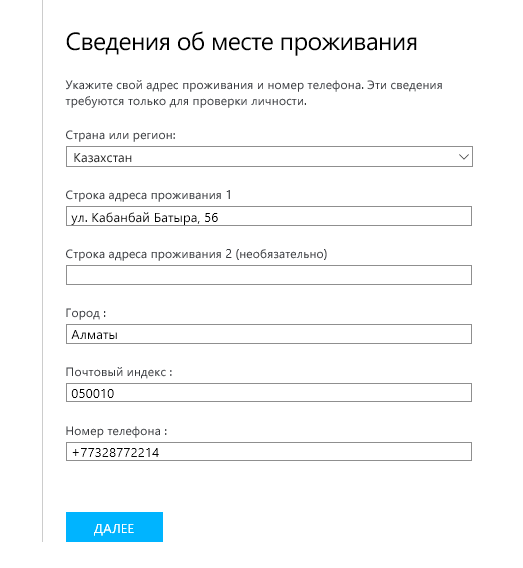
- Specify information about the place of residence or the legal address of the company.
- In the account type section, make sure that the correct item is selected, and then click NEXT
- On the next page fill out your marketing profile.
- You need to choose a display name. This is the name by which customers will recognize you in the Office Store. Do not forget that the name must be unique throughout the Store, otherwise it will not be approved.
- Next, you need to add your logo. You can leave the “default logo”, but if you want users to recognize you right away from the picture, try to create something impressive and memorable. The size of the image should be 96x96 pixels, weight - no more than 250 kV. Do not forget to check the logo for viruses before downloading.
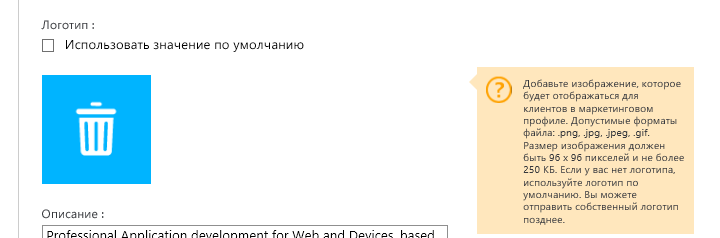
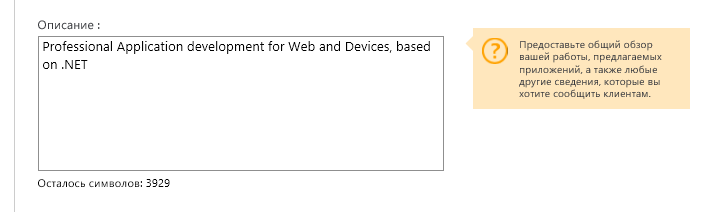
- Give a description of you or your company. In the description, specify what will be important for the client to know about you, in order to start trusting you, as a professional, enough to select your application and install it in your business environment. Think about what would have impressed you if you read such a description. The text should be simple, not contain complex formatting. If you want to add clauses, you can use hyphens or [#LI] and [/ # LI] tags. And again I remind you, check the grammar.
- Specify a website where customers can learn more about you and your application. You must be the owner of the site and the site must be working. URL must begin with http: // or https: //
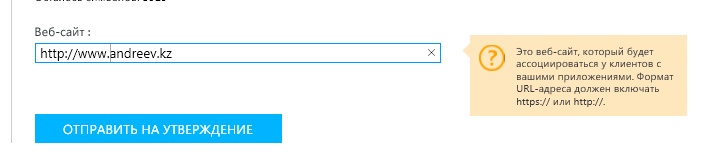
- Click the "Submit for approval" button.
The process of creating a company account and an individual record differ very slightly.
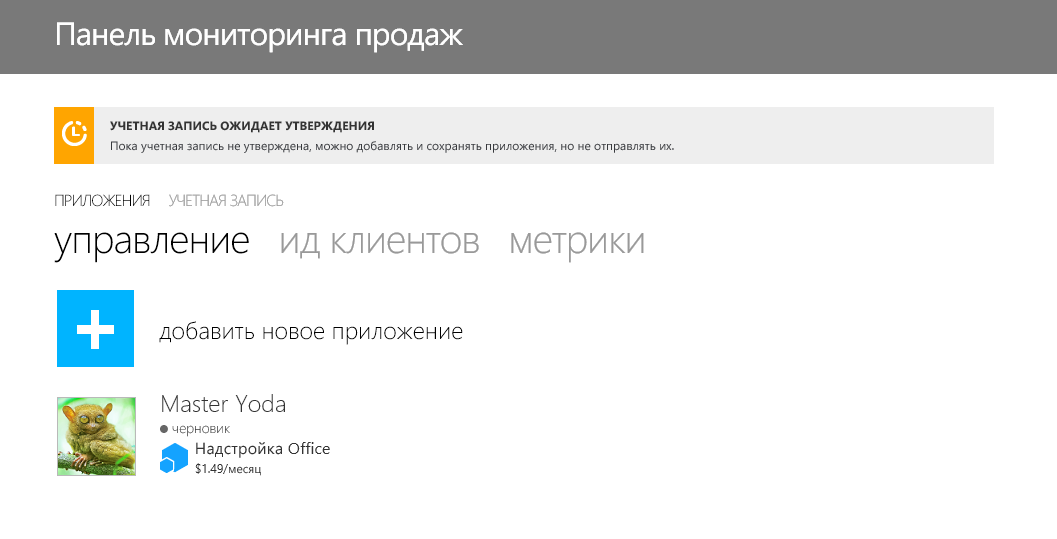
At the end of the process on the dashboard we will see the following picture: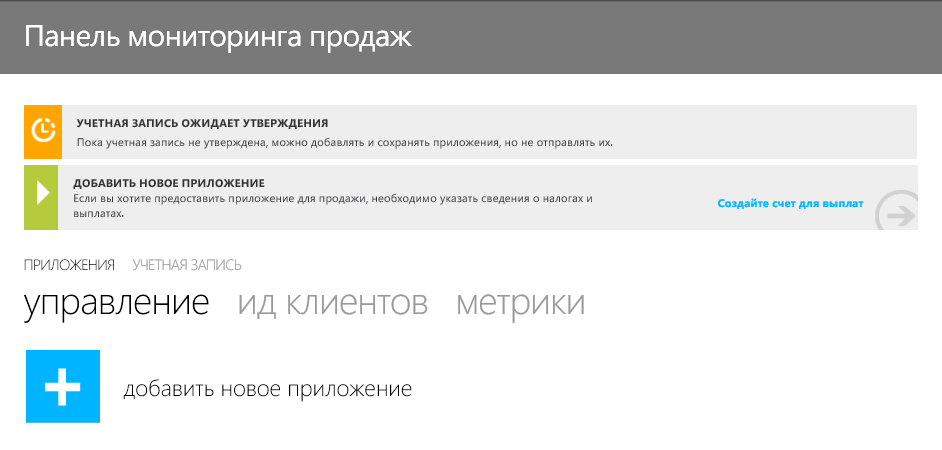
It now remains to wait for the application to be reviewed and approved. How long will it take to wait?
From one day to two weeks. If in two weeks the status of the application will still be in the state “ACCOUNT EXPECTS APPROVAL” - contact technical support.
What will be checked?
Phase 1. Identity check
- Are you who you say you are? This step protects developers from impersonators, and gives customers a guarantee that they receive data from a trusted source.
- Is the subscriber affiliated with the company and authorized to publish the applications?
- Is the address provided (yours or company)?
Phase 2. Information audit
- Check Marketing Profile
- Name / Company Name. We check the uniqueness of the name
- Web site. Checks if the site exists and if you own it.
- Company contacts. We contact the company and check whether the working contact is provided.
- Microsoft Account. If this account was used in other Microsoft stores, then by whom
- Logo. Size, format, content
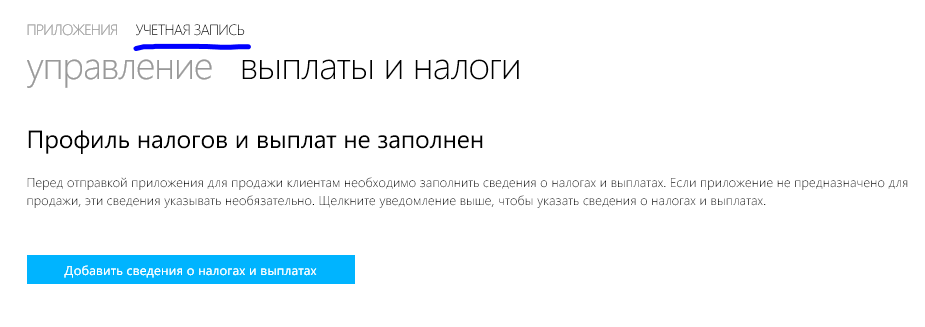
While you are waiting for the verification and approval of your application to create an account, you can fill out a financial profile.
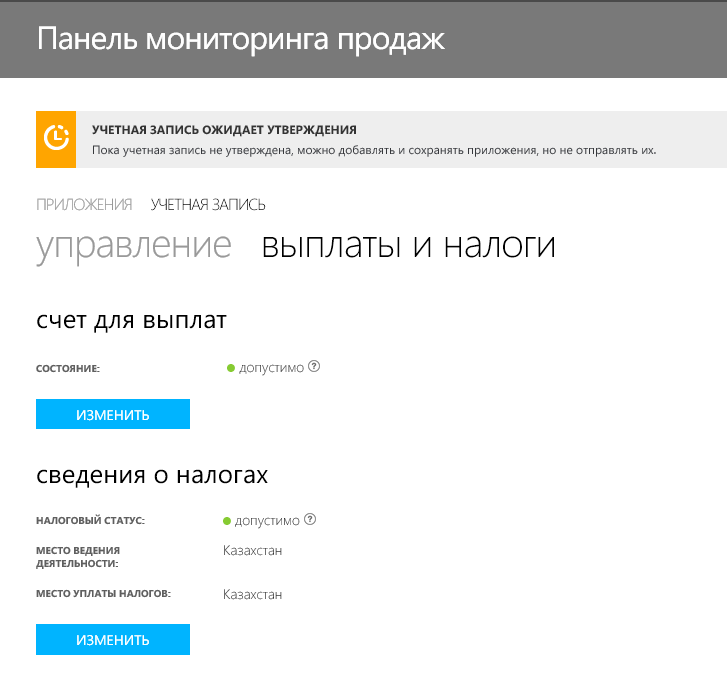
Payments and taxes
- Select the tab “Payments and taxes”
- Choose a payment method. If you have the opportunity to choose, for example, between a bank account and PayPal. If not, accept what is
- Add billing information. You need to know the SWIFT code of your bank (you can find it on the bank’s website, details, or ask your account manager, for example). The name of the account holder will not add complexity, as you most likely know him well. The IBAN number can be found in the statement of the account, for example, or on the Internet banking site. You can find out by calling or visiting your bank. Also, other requisites are needed (for Kazakhstan, for example, these are IIN and TIN)
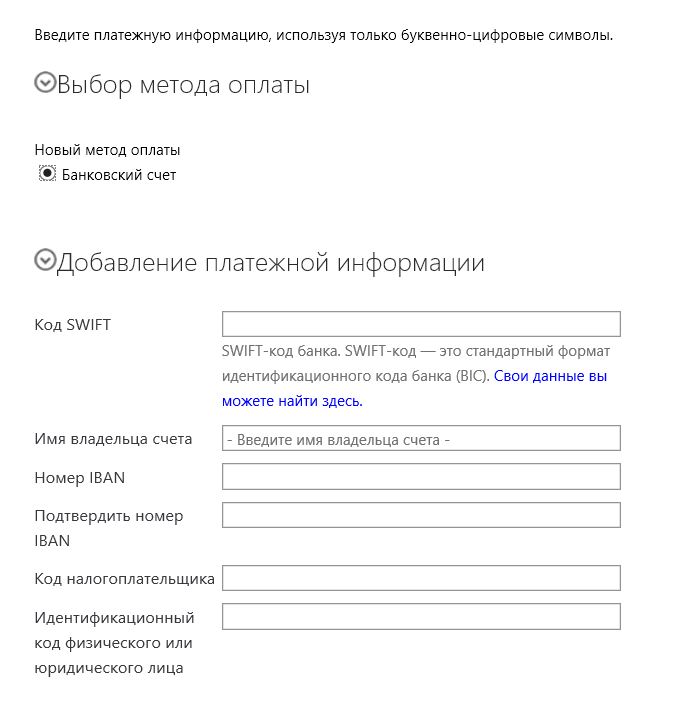
- Enter your billing address. It's simple. One caveat - use only Latin. Cyrillic is not accepted.
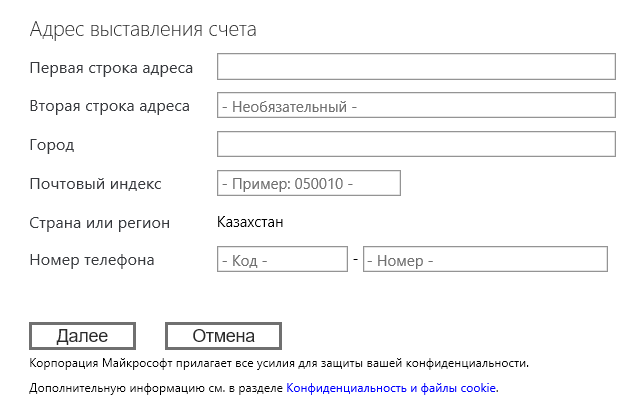
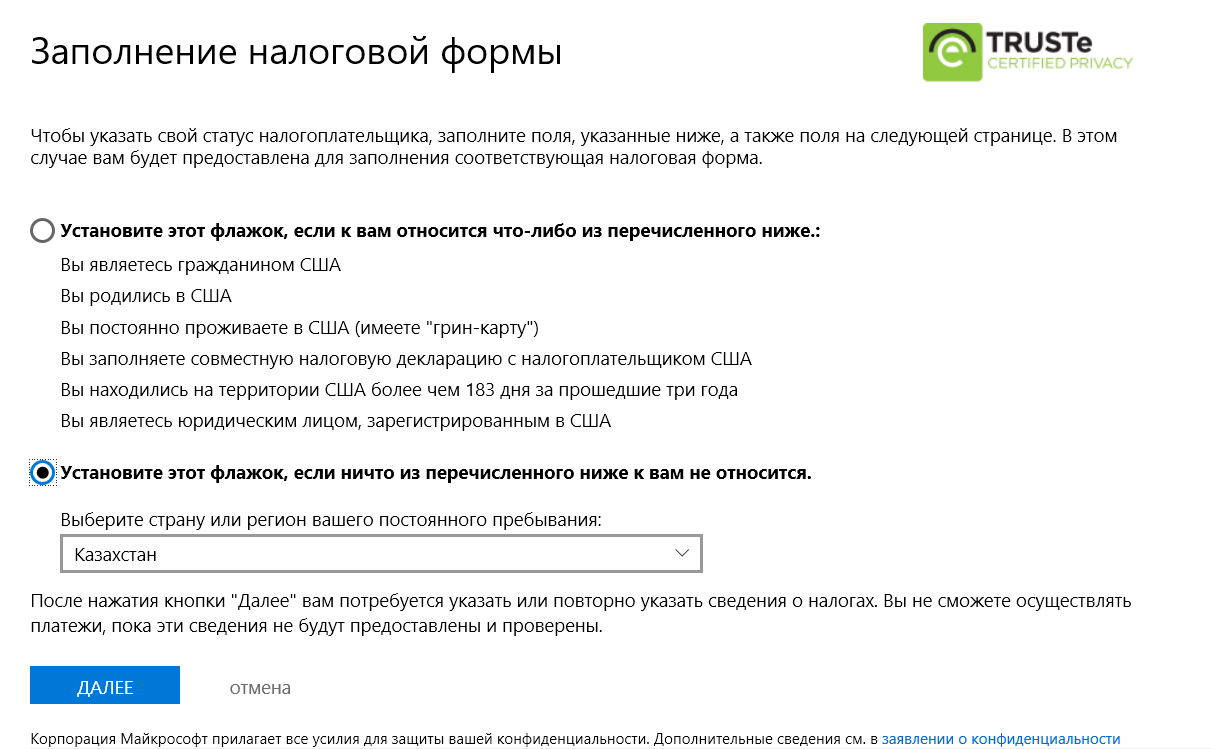
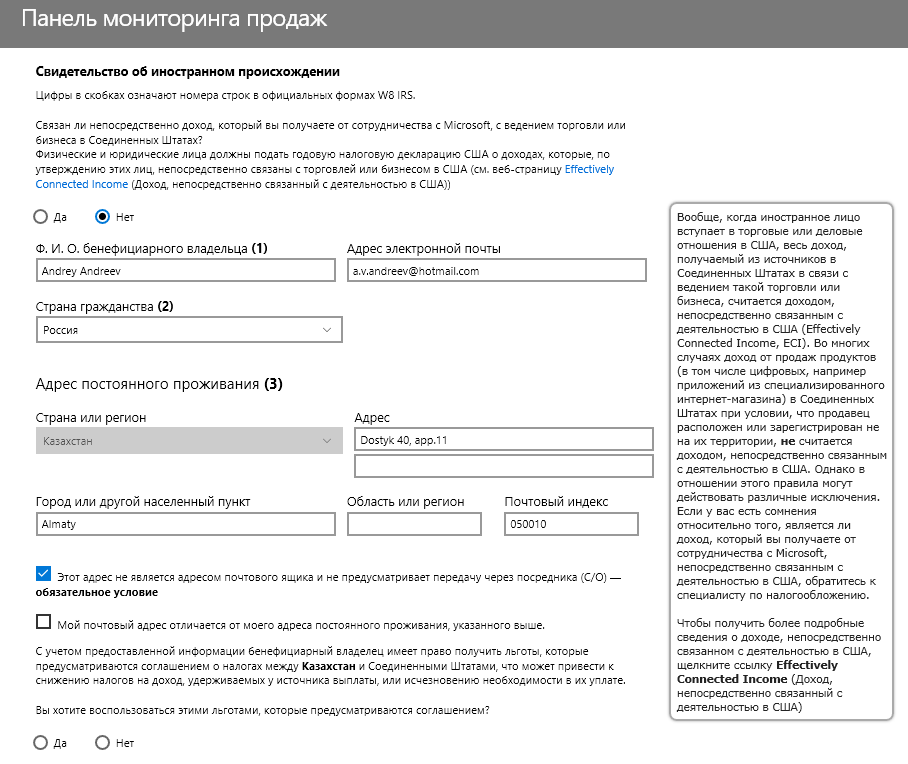
- After that, clicking the "Next" button, fill out the tax form and certificate of foreign origin (if you are not a US resident).
- If everything is filled in correctly, you can publish paid applications and receive money for them.
Since the approval of the application for creating an account takes a long time, try to fill in all the fields in the application correctly so that you do not have to correct the comments and wait for approval again and again.
Comment. If you make changes to your account, the approval process starts from the beginning.
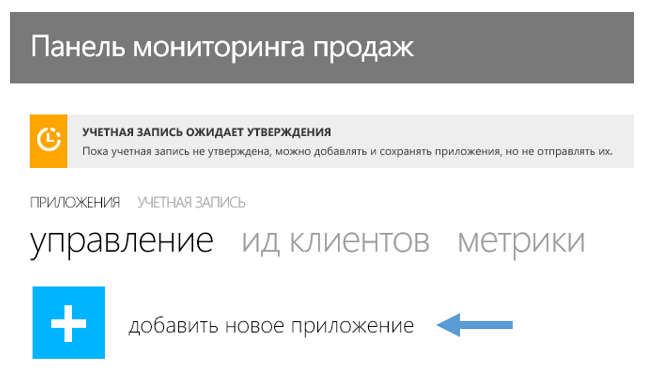
Step 3. Adding an application
Publishing an application is a fairly simple procedure. After you have prepared it for publication in the Office Store, you will need to make several decisions.
- Decide which languages and markets you want to support. Minimum - localized metadata in the Store. Better is to localize the user interface. Do not forget that adding languages to an application imposes an obligation on you to support users using this language.
- Decide on the price of the application. The available options are free of charge, pay per user (one-time or monthly subscription) or simply a paid version with the possibility of trial use. SharePoint and email applications offer additional options. Parameters of trial versions are completely determined by the developer.
Something worth preparing before you start publishing.
- Formulations for all text entries
- The title of the application, Title, Short and Long Description, everything is localized as needed.
- Valid Metadata
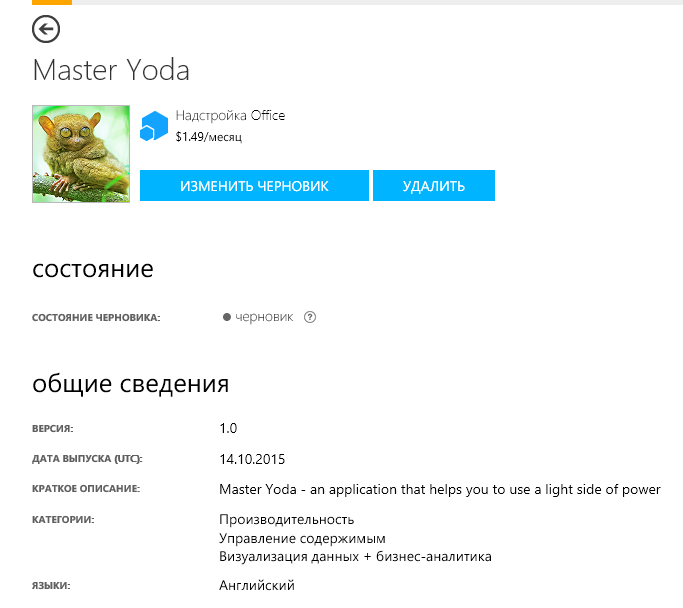
- Application Version Number, Release Date, 1-3 Categories in which the application will be visible in the Store
- Correct application logo and 1-5 screenshots
- Notes for testers so that they can correctly test your application (not for the public, of course)
- Include valid user data, links and instructions.
- Links to your documentation and Privacy Policy
- Optional: links to the demo video and custom End-User License Agreement
Let's look at the process of publishing the application, so to speak, in pictures.
- Go to the Dashboard and click "Add a new application"
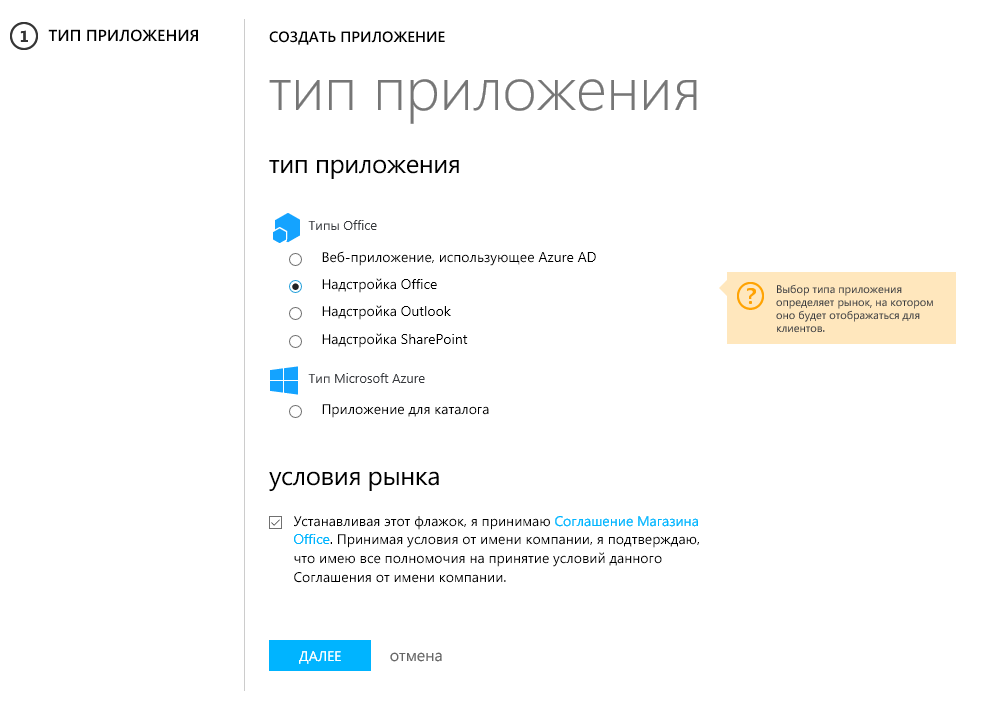
- Select application type. If this is your first time creating an application or add-in of a specific type for the Store, the Agreement will appear. In the “Market Conditions” section, read the agreement and, if you agree, check the box and click NEXT or Cancel.
- On the overview page, do the following:
- In the general information section, specify information such as Application name, version, and release date, depending on the type of application or add-in. For SharePoint add-ons, the number specified in the Version field must fully match the version number in the sent manifest file. The value in the Release Date field is the date that will be displayed as the release date of the application or add-in. If you send an update and choose a date in the future, your application or add-in will not show up in the Office Store until the date is selected. If your application or add-on was available in the Office Store, they will be hidden from users until the release date of the updated version.
- Please select at least one category. You can choose up to three categories that will help customers find your add-in by filtering the list in the Office Store. If you have selected the category “Education” for an application or add-in, you must comply with policy 7.17 of verification policies .

- In the logo section, select the tile Logo Application and send the logo file. In Office add-ins, only one logo is associated with the add-in. If it needs to be localized, localized add-ons will need to be sent separately with logos in each language.

- Depending on the type of sending, do one of the following actions:
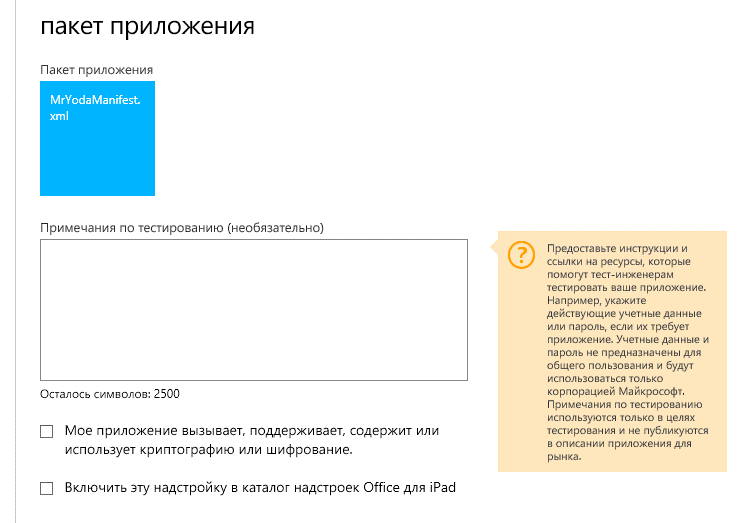
- for Office Add-in, in the Application Package section , select the Application Package tile and send the manifest file for the add-in;
- for the SharePoint Add-in, in the Application Package section , select the Application Package tile and send the add-in.
- In the Testing Notes section, enter directions and links to resources or videos that show an application or add-on that will help testers validate your application. For example, you can provide valid credentials or a password, if necessary. The credentials and passwords are not intended for general use and will be used only by Microsoft. Your data in the Testing Notes section are for approval only and will not be published in the store list. If you provide detailed Testing Notes, they can help in approving the application. For web applications, in testing notes, provide a single sign-on URL to help the tester find the application.
- If an application or add-on calls, supports, contains, or uses cryptography or encryption, select the checkbox that the application calls, supports, contains, or uses cryptography or encryption . Check the details and select Yes or No.
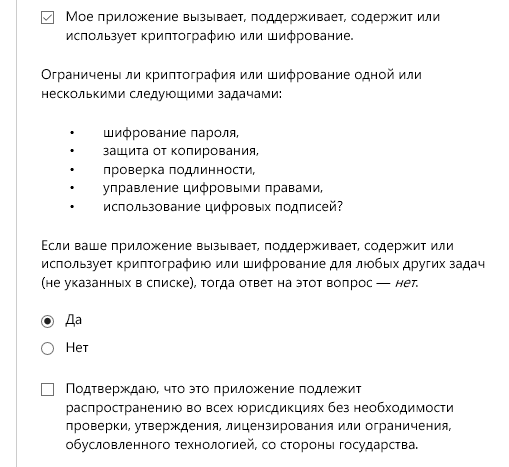
For more information about encryption, see EAR Controls for Elements Using Encryption . - If the add-on is compatible with iOS, select the Include this add-in checkbox in the Office for iPad add-ons box. In the Apple ID field, enter your Apple Developer ID.
IOS-compatible add-ins must meet additional verification requirements. For more information, see Check policies for applications and add-ins sent to the Office Store (version 1.8).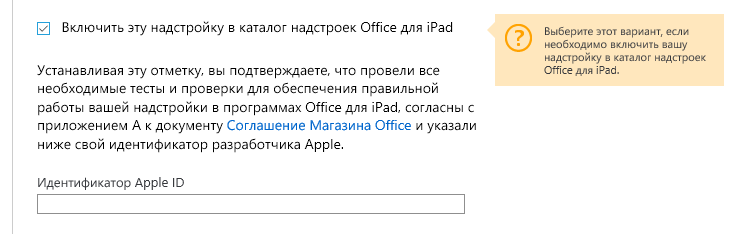
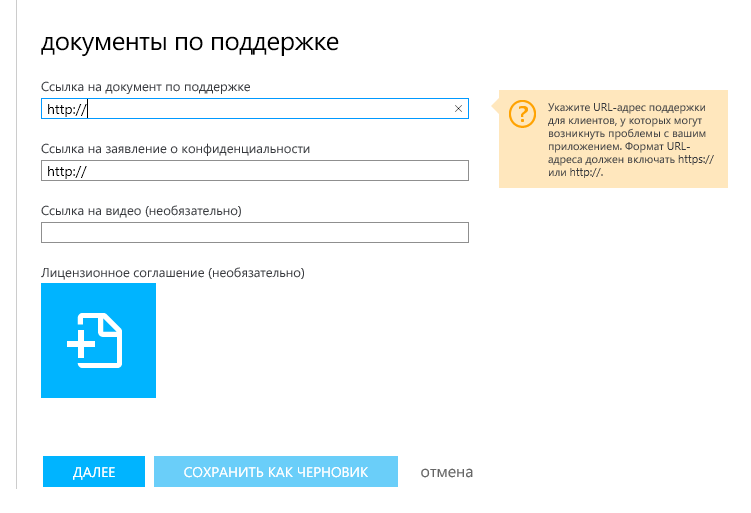
- In the reference documentation section, enter a link to the reference documentation website. Include http: // or in the URL. Additionally, you can provide a link to the privacy document, a link to the video, and a modified end user license agreement. If you do not change the license agreement, the store will provide it for you.
- Click Next, SAVE AS A DRAFT or CANCEL
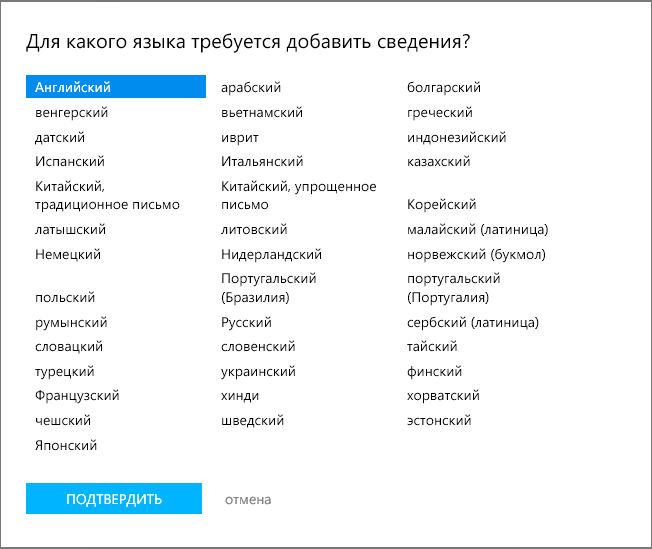
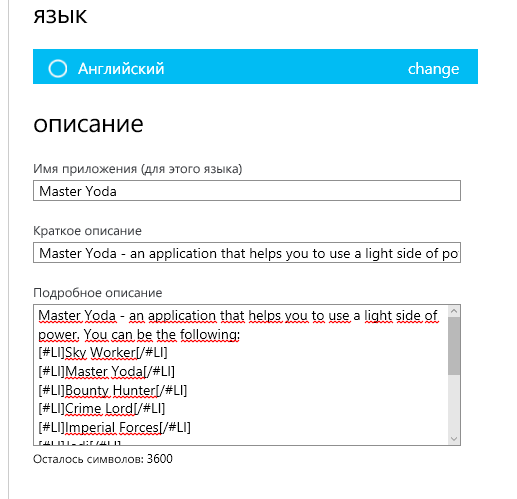
- On the next page, Details , you must select the language settings.
- In the Language Selection drop-down list , select the language that the application or add-in supports, and click CONFIRM .
- In the description section, specify the add-in name , a brief description and a detailed description in the appropriate language. For example, if you selected English in the previous step, enter the Application Name, a brief description and a detailed description in English.
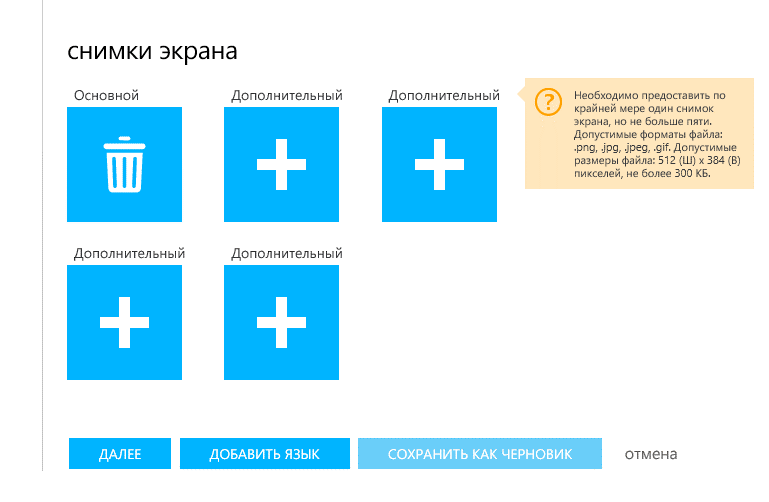
- In the screenshots section , select Primary to send at least one screen capture . You can send up to five images. Each screenshot should be in PNG, JPG, JPEG, or GIF format, contain 512 pixels in width and 384 pixels in height, and be no larger than 300 KB.
- In the Language Selection drop-down list , select the language that the application or add-in supports, and click CONFIRM .
- Click Next, SAVE AS A DRAFT or CANCEL.
- On the Access Blocking page , select the countries and regions in which the application or add-in should not be displayed and sold, if they exist.
- Check the Block application purchase in certain countries or regions box.
- Click SELECT COUNTRIES OR REGIONS .
- In the Select countries and regions to block dialog box, select the countries or regions for which you want to prohibit the purchase of an application or add-in.
- After selecting the countries or regions you want, click the LOCK COUNTRIES OR REGIONS or Cancel button . If you block a particular country or region, users in that region will not be able to acquire and use the application or add-on.
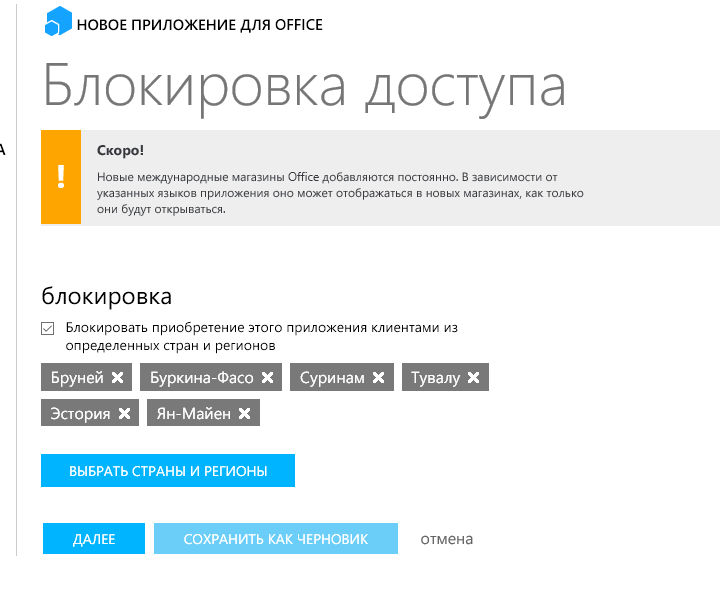
- Click Next, SAVE AS A DRAFT or CANCEL .
- On the Pricing page, specify the price for the add-in. If you are submitting a web application, leave the default value selected. This application is free (web applications are always free).
Select one of the following options:- This application is free (by default) .
- This application is intended for a one-time purchase and select Price per user .
- The application is provided for a paid subscription and set the value of the Price per user parameter.
The price of the superstructure is set in accordance with its level. Unable to set a price for each language. Only the price category is given.
In the case of paid or subscription add-ons, indicate whether you provide a trial version for them. To offer a trial version:- In the availability of the trial version , check the box My application is available as a trial version.
- In the Trial version expiration drop-down list, select the duration of the trial period.
- In the Trial version users drop-down list, specify the number of users for whom you want to enable the trial version.
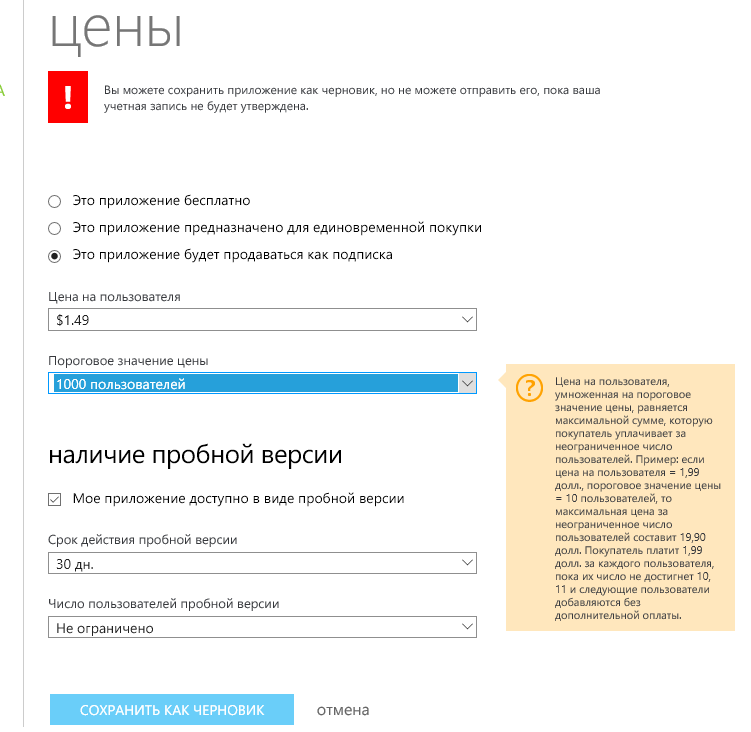
- Press the button SAVE AS A DRAFT or CANCEL .
After you finish the design of the application, a new entry for the newly created application (draft) will appear on your Sales Dashboard. Once your account has been approved, you can submit the application and add-in from draft by clicking on the Submit button that appears for approval .
If you need to edit an application, change some parameters before publishing, add new languages or change prices and markets, you can always change it:

about the author
Andreyev Andrey - Technical Evangelist at Microsoft.
The permanent place of deployment is the Microsoft office in Kazakhstan, Almaty. The unchangeable speaker, and often the organizer, of various events related to mobile development, IoT, cloud and web technologies in Kazakhstan and Uzbekistan. Several times he performed in Russia, Kyrgyzstan, Armenia, Azerbaijan, Georgia.
Source: https://habr.com/ru/post/269183/
All Articles