Free cloud hosting for students in Microsoft Azure
We already wrote in our blog about free cloud hosting of Microsoft Azure for students. Now it's time to share this news with the community!
As part of the Microsoft Azure cloud, there was always the ability to host free Azure Web Sites, but to get access to the cloud, registration with a credit card was necessary, which stopped many. Now, students within the DreamSpark program can access Azure Web Sites and some other Microsoft Azure cloud features without a credit card. This means that free cloud hosting is available to all students and schoolchildren, where they can place not only their applications on ASP.NET, PHP, Python, Node.js and other technologies, but also develop sites on content management systems like WordPress and Joomla! Detailed instructions and a short video course is available at studentazure.ru .
What are the main advantages of Microsoft Azure cloud hosting for students?
')
Below we will look at an example of how you can easily deploy your WordPress blog in the Microsoft Azure cloud.
First of all, you need to register: create (if you do not have it) a Microsoft Account, verify yourself as a student on DreamSpark.ru (via your VKontakte or studio ticket), and then go through a separate registration process on Microsoft Azure. All these steps are shown in this video .
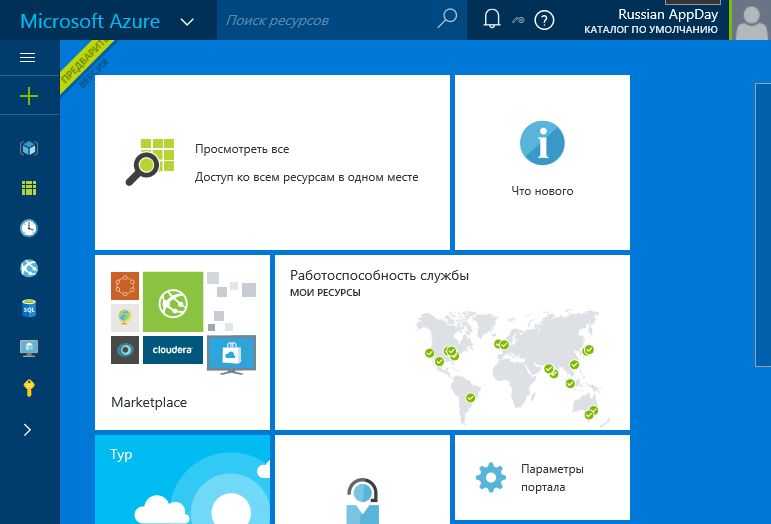
Further, to access all cloud resources, use the portal portal.azure.com , which you log in with your Microsoft Account. Here is what it looks like:
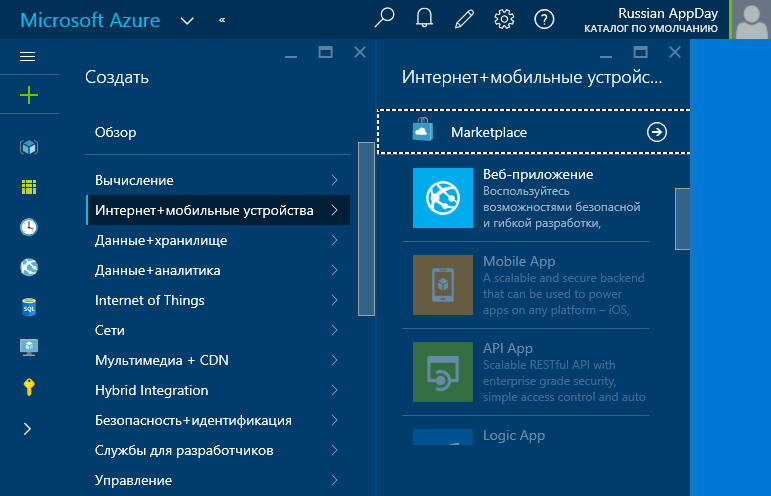
The + button on the left allows you to start creating some cloud resources. Within the framework of a free cloud offer, there are two main types of resources available to students: web applications and the MySQL database. For example, how to start creating a web application:
By creating a web application in this way, you can load code into it in any supported programming languages: ASP.NET (C #), PHP, Python, Node.js, and others. This can be done via FTP (having received your login / password through the control panel), using Web Deploy technology, or directly from Visual Studio (see this video for an example) or WebMatrix (the process is shown here ).
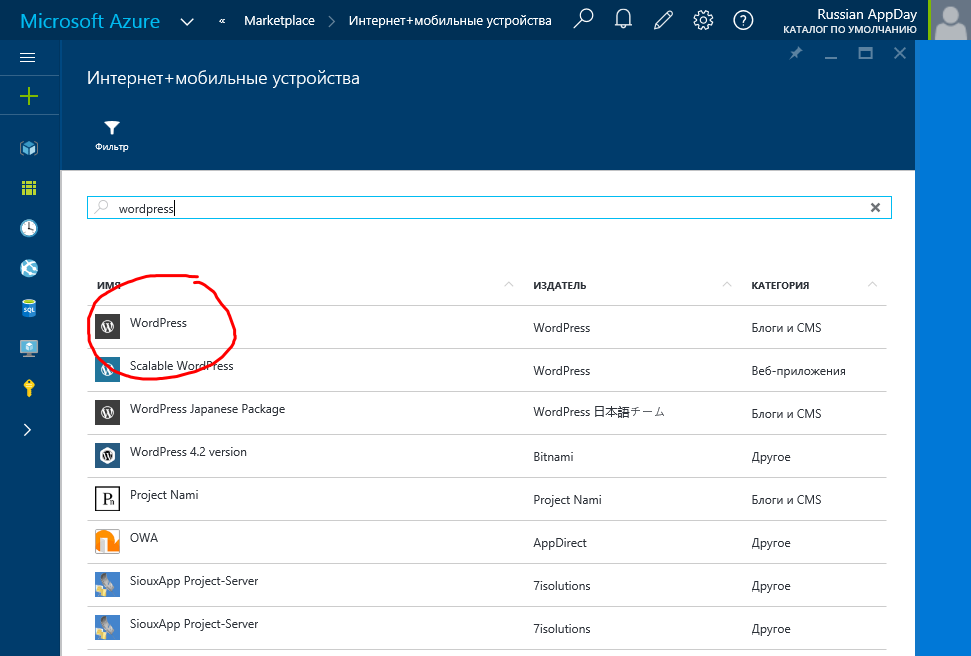
However, if you do not know how to create web applications or you do not want to understand how a ready application is loaded and configured, you can deploy applications from the market (Marketplace). To do this, select the appropriate option in the portal (Marketplace) - a large list of applications available for installation opens up for us. Many of them can not be successfully installed in the student version of the cloud due to the lack of certain capabilities, but one of the most popular site engines - WordPress - will work. To find it, the easiest way is to use the search:
Next, select WordPress and click the "Create" button in the next dialog. A window opens with the parameters of the site, which must be filled. In addition to the name of the website (which will be created in the domain .azurewebsites.net), we also need to click on the sections "MySQL Database" and "Legal Conditions (ClearDB)".
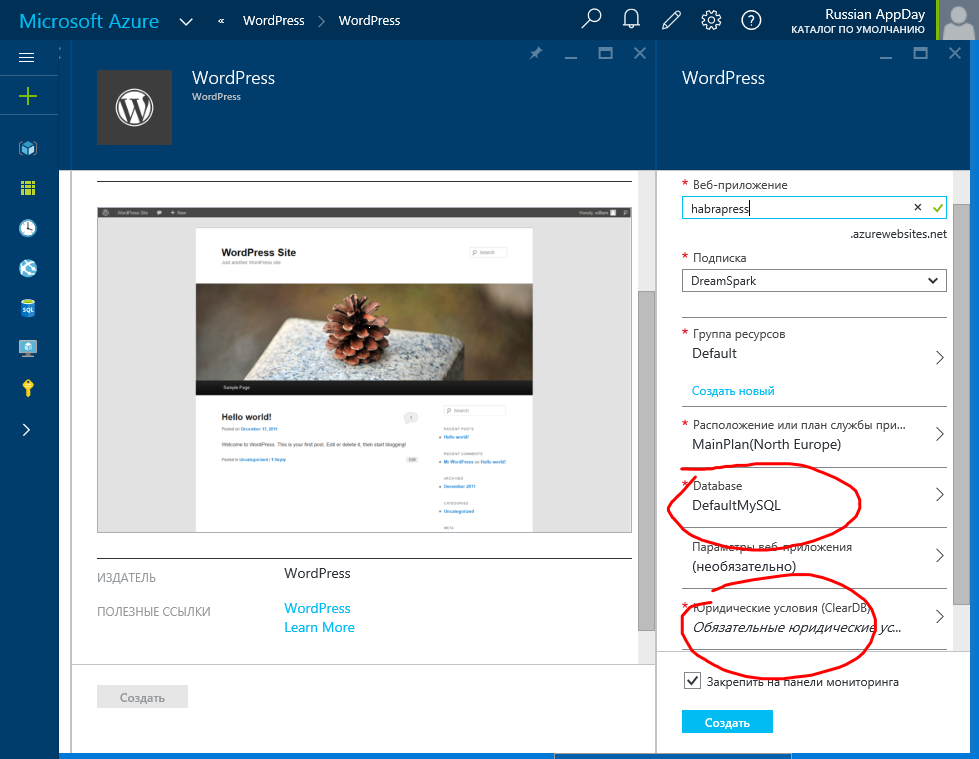
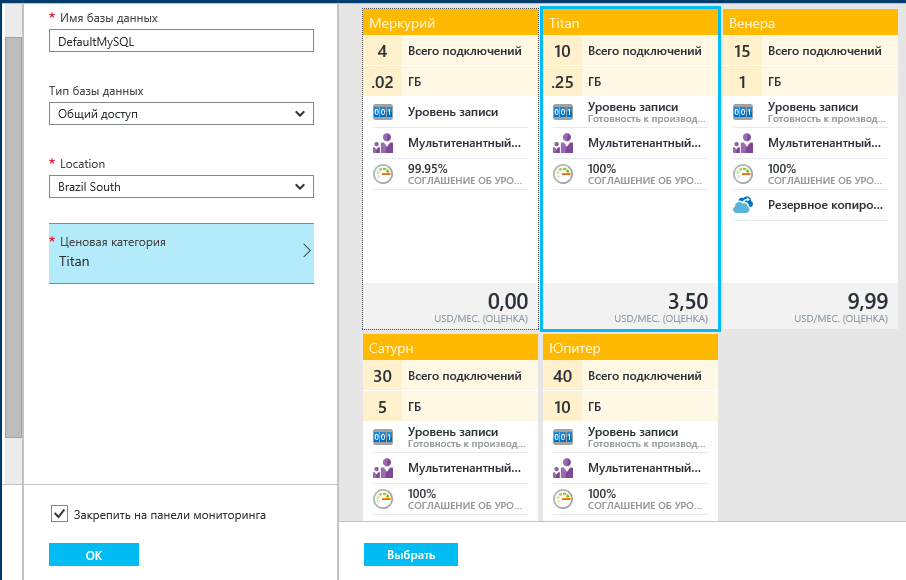
In the Legal Terms section, you just need to agree to the given conditions by clicking the OK button. In the MySQL section it is important to choose the price category of the database - by default it is offered by Titan, costing $ 3.50 per month - when you try to create such a database on a free hosting, an error will occur. Therefore, select the category "Mercury".
The remaining settings can be not changed, although it will be useful to change the location of the servers so that the database and the website itself are located in the same data center somewhere in Europe (Northern or Western Europe).
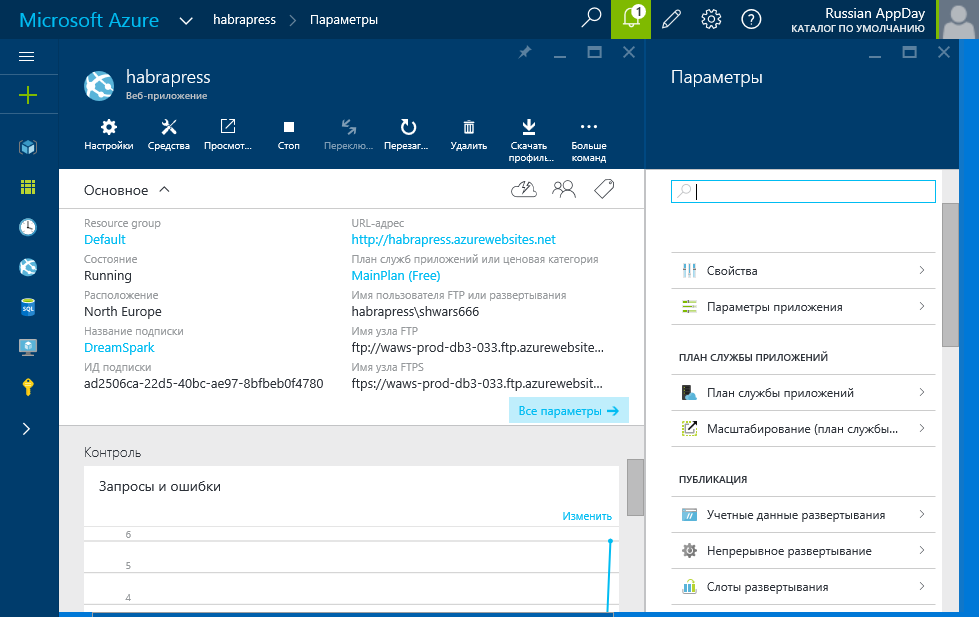
This completes the site configuration, we click “create” and wait a few minutes while the virtual machine with Windows OS is deployed in the cloud, WordPress is installed on it, and MySQL database is created separately in the ClearDB data center. All this takes a couple of minutes, after which our site is ready:
In the control panel of the site, you see different ways to access the content of the site: via FTP (this method may not be immediately available, but it can be configured), or by downloading a publishing profile, this is a file that can be imported into WebMatrix or Visual Studio to automatically publish content . This can be useful for creating your own web applications; in the case of deploying a ready-made WordPress, you don’t need to do anything.
Go to the address of the newly created site and see the settings panel of the newly installed WordPress:

Then we answer a couple of standard questions, and our blog is ready:
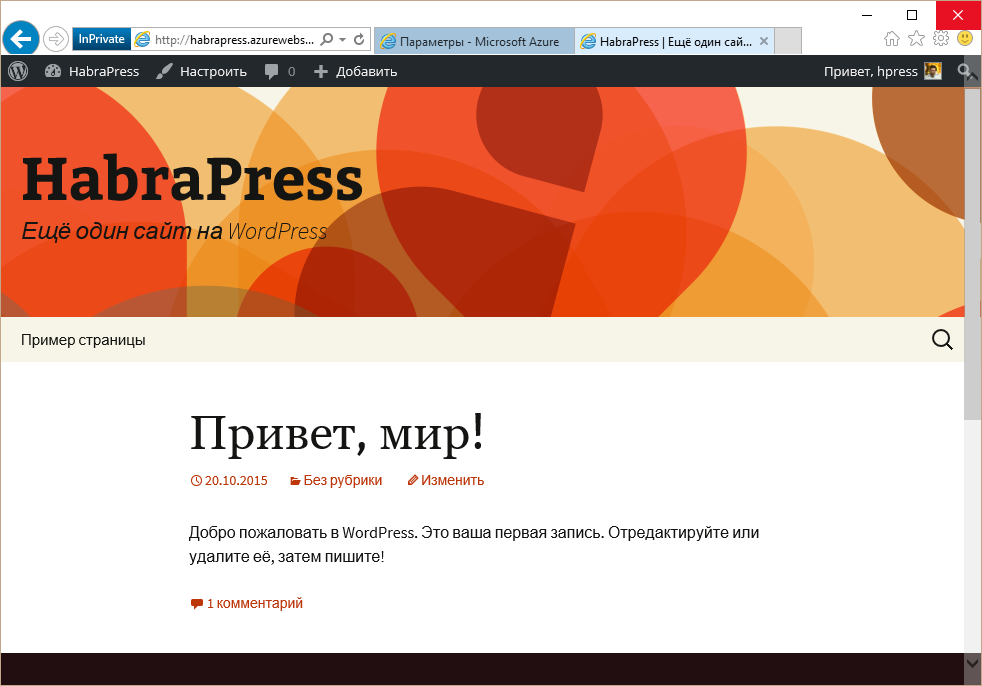
In such a simple way, in a few minutes we deployed a content management system in the cloud! Such a site will be a decoration and addition to any project!
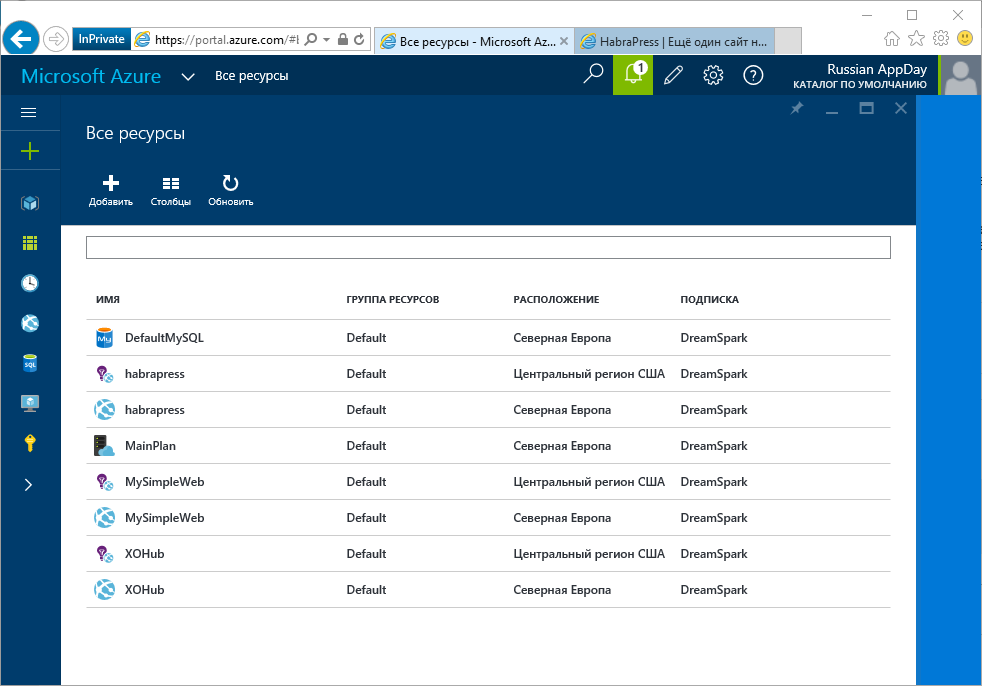
Free cloud hosting allows you to create up to 10 free sites and one database of limited size, so if the site is no longer needed, or if you created it for training purposes, it should be deleted. The delete button is in the control panel of the site, and all the resources that you used in the cloud can be viewed in the Azure control panel:
Cloud hosting is a great offer for all students and schoolchildren! Tell your friends about him so that they too can take advantage of this wonderful offer!
As part of the Microsoft Azure cloud, there was always the ability to host free Azure Web Sites, but to get access to the cloud, registration with a credit card was necessary, which stopped many. Now, students within the DreamSpark program can access Azure Web Sites and some other Microsoft Azure cloud features without a credit card. This means that free cloud hosting is available to all students and schoolchildren, where they can place not only their applications on ASP.NET, PHP, Python, Node.js and other technologies, but also develop sites on content management systems like WordPress and Joomla! Detailed instructions and a short video course is available at studentazure.ru .
What are the main advantages of Microsoft Azure cloud hosting for students?
')
- In the cloud it is very easy to deploy ready-made site templates. For example, to create your own blog on WordPress or content management system on Joomla will take several minutes.
- The cloud can be used to host learning sites on different technologies: ASP.NET, PHP, Python, Node.js, etc.
- Working with the cloud, you learn to use the most modern technologies, the knowledge of which will be useful to you after graduation.
- The cloud is available for students and schoolchildren for free and without a credit card (only e-mail and mobile phone number will be required for registration)
Below we will look at an example of how you can easily deploy your WordPress blog in the Microsoft Azure cloud.
First of all, you need to register: create (if you do not have it) a Microsoft Account, verify yourself as a student on DreamSpark.ru (via your VKontakte or studio ticket), and then go through a separate registration process on Microsoft Azure. All these steps are shown in this video .
Further, to access all cloud resources, use the portal portal.azure.com , which you log in with your Microsoft Account. Here is what it looks like:
The + button on the left allows you to start creating some cloud resources. Within the framework of a free cloud offer, there are two main types of resources available to students: web applications and the MySQL database. For example, how to start creating a web application:
By creating a web application in this way, you can load code into it in any supported programming languages: ASP.NET (C #), PHP, Python, Node.js, and others. This can be done via FTP (having received your login / password through the control panel), using Web Deploy technology, or directly from Visual Studio (see this video for an example) or WebMatrix (the process is shown here ).
However, if you do not know how to create web applications or you do not want to understand how a ready application is loaded and configured, you can deploy applications from the market (Marketplace). To do this, select the appropriate option in the portal (Marketplace) - a large list of applications available for installation opens up for us. Many of them can not be successfully installed in the student version of the cloud due to the lack of certain capabilities, but one of the most popular site engines - WordPress - will work. To find it, the easiest way is to use the search:
Next, select WordPress and click the "Create" button in the next dialog. A window opens with the parameters of the site, which must be filled. In addition to the name of the website (which will be created in the domain .azurewebsites.net), we also need to click on the sections "MySQL Database" and "Legal Conditions (ClearDB)".
In the Legal Terms section, you just need to agree to the given conditions by clicking the OK button. In the MySQL section it is important to choose the price category of the database - by default it is offered by Titan, costing $ 3.50 per month - when you try to create such a database on a free hosting, an error will occur. Therefore, select the category "Mercury".
The remaining settings can be not changed, although it will be useful to change the location of the servers so that the database and the website itself are located in the same data center somewhere in Europe (Northern or Western Europe).
This completes the site configuration, we click “create” and wait a few minutes while the virtual machine with Windows OS is deployed in the cloud, WordPress is installed on it, and MySQL database is created separately in the ClearDB data center. All this takes a couple of minutes, after which our site is ready:
In the control panel of the site, you see different ways to access the content of the site: via FTP (this method may not be immediately available, but it can be configured), or by downloading a publishing profile, this is a file that can be imported into WebMatrix or Visual Studio to automatically publish content . This can be useful for creating your own web applications; in the case of deploying a ready-made WordPress, you don’t need to do anything.
Go to the address of the newly created site and see the settings panel of the newly installed WordPress:
Then we answer a couple of standard questions, and our blog is ready:
In such a simple way, in a few minutes we deployed a content management system in the cloud! Such a site will be a decoration and addition to any project!
Free cloud hosting allows you to create up to 10 free sites and one database of limited size, so if the site is no longer needed, or if you created it for training purposes, it should be deleted. The delete button is in the control panel of the site, and all the resources that you used in the cloud can be viewed in the Azure control panel:
Cloud hosting is a great offer for all students and schoolchildren! Tell your friends about him so that they too can take advantage of this wonderful offer!
Source: https://habr.com/ru/post/269159/
All Articles