How to create your own browser for Windows 10 on HTML and JavaScript
Over the past few months, we have made many improvements to the Microsoft Edge rendering engine (EdgeHTML), with particular emphasis on compatibility with modern browsers and compliance with new and upcoming standards. In addition to being a core Microsoft Edge browser, EdgeHTML is also available for applications on the Universal Windows Platform (UWP) via the WebView control . Today we want to tell how you can use WebView to create your browser in Windows 10.
Using standard web technologies, including JavaScript, HTML and CSS, we created a simple UWP application that contains WebView inside and implements basic functionality: navigation and work with favorites. Such techniques can be used in any UWP application for transparent integration of web content.
Our example is based on the powerful WebView control. In addition to a comprehensive set of APIs, this element also allows you to overcome some of the limitations inherent in an iframe, for example, frame tracking (when a certain website changes its behavior when executed inside an iframe) and the difficulty in determining the loading of a document. In addition, x-ms-webview , as defined by WebView in HTML, provides access to functionality that is not available in the iframe, in particular, improved access to local content and the ability to take snapshots of content. When you use the WebView control, you get the same engine as in Microsoft Edge.
')
As it was written above, the browser is based on the WebView control for HTML, and JavaScript is mainly used to create and animate the user interface. The project was created in Visual Studio 2015 and is a universal Windows application in JavaScript.
In addition to JavaScript, we also used some HTML and CSS, as well as a number of lines of C ++ code to support keyboard shortcuts, but this is not required in the simple case.
We also use the new features of the new ECMAScript 2015 (ES2015), supported in Chakra, a JavaScript engine running in Microsoft Edge and the WebView control. ES2015 allowed us to reduce the number of generated and template code, thereby greatly simplifying the implementation of the idea. We used the following ES2015 features when creating the application: Array.from () , Array.prototype.find () , arrow functions , properties , const , for-of , let , Map , Object.assign () , Promises , property shorthands , Proxies , spread operator , String.prototype.includes () , String.prototype.startsWith () , Symbols , template strings and Unicode code point escapes .
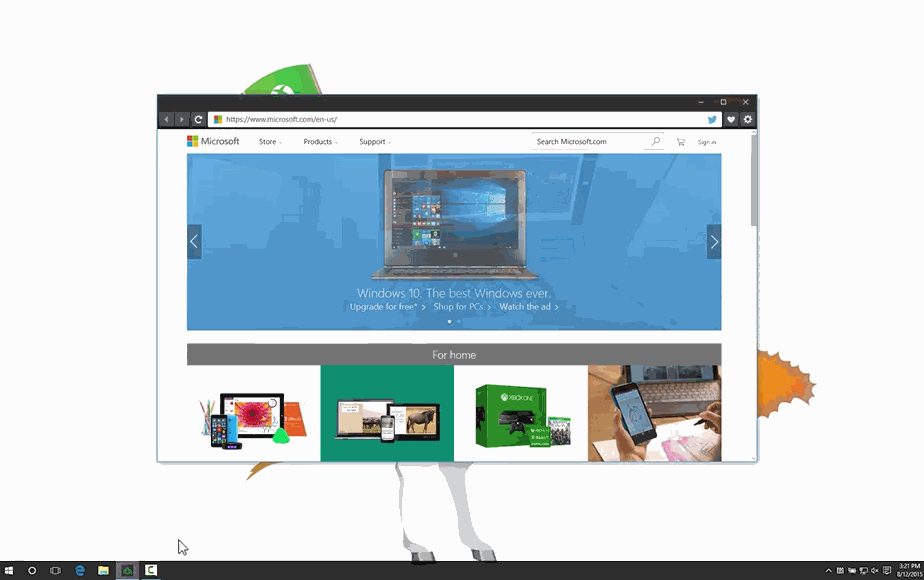
The user interface includes the following ten components:
We also implemented several additional features to make working with the browser even more enjoyable:
Introduced for JavaScript applications in Windows 8.1, the WebView control, sometimes also referred to by the name of the x-ms-webview tag , allows you to host web content within your Windows application. It is available for both HTML and XAML . To get started, just place the corresponding element in the page code.
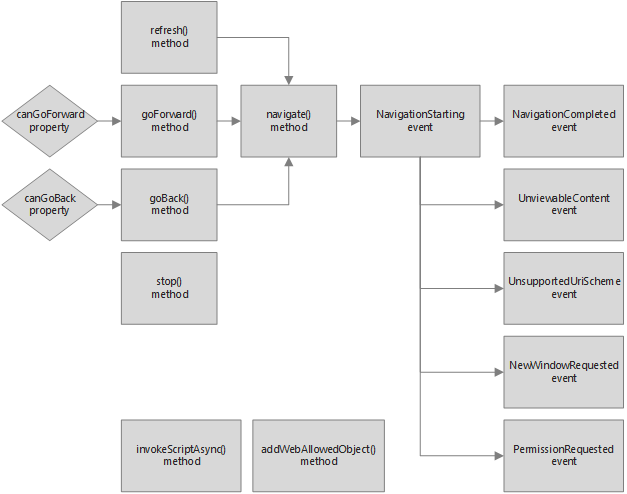
We will use 15 different x-ms-webview APIs. All but two of them control the navigation between pages with some sense. Let's see how you can use these interfaces to create various UI elements.
When you press the back button, the browser returns the previous page from the browser history, if available. Similarly, when you press the forward button, the browser returns the next page from the history, if it is also available. To implement this logic, we use the methods goBack () and goForward () , respectively. These functions will automatically navigate to the correct page from the navigation stack.
After moving to a certain page, we also update the current state of the buttons to prevent the “possibility” of navigation when we reach one of the ends of the navigation stack. In other words, we disable the forward or backward navigation buttons by checking the properties of canGoBack or canGoForward for equality to false .
The refresh and stop buttons are slightly different from the rest of the navigation bar components in that they use the same place in the UI. When the page loads, pressing the button will stop the download, hide the “progress ring” and display the update icon. Conversely, when the page is loaded, clicking on the button will launch the page update and (in another part of the code) will display the stop icon. We use the refresh () or stop () methods depending on current conditions.
In general, the implementation of the address bar can be very simple. When the URL is entered in the text field, pressing Enter will invoke the navigate () method, using the contents of the input element of the address bar as a parameter.
However, modern browsers have gone much further and introduce additional functionality for the convenience of users. This adds some complexity to the implementation - and it all depends on the scenarios that you want to support.
Here is an example of the script that we tried to implement. Suppose the value “microsoft.com” is entered in the address bar. The address is not complete. If this value is passed to the navigate () method, it will fail. Our browser must know that the URL is not complete, and be able to determine which protocol to substitute: http or https. Moreover, it is possible that the value entered was not intended to be an address. For example, we could type “seahawks” in the address bar, hoping that, like in many browsers, the string also works as a search field. The browser should understand that the value is not an address, and try to “find” it in the search engine.
A favicon request is not a trivial task, since there are several ways in which an icon can be defined. The easiest way is to check the root of the website for the presence of the file “favicon.ico”. However, some sites may be on a subdomain and therefore have a great icon. For example, the icon on “microsoft.com” is different from the icon on “windows.microsoft.com”. To eliminate ambiguity, you can use another method - check the page layout for the presence of link-tech inside a document with a rel-attribute equal to “icon” or “shortcut icon”.
We use the invokeScriptAsync () method to insert a script inside the WebView control that will return a string if successful. Our script searches the page for all elements with a link-tech, checks if the rel-attribute contains the word “icon”, and in case of a match, returns the value of the “href” attribute back to the application.
As mentioned above, we use in our code the capabilities of the new ES2015 specification. You may have noticed the use of the arrow notation in many of the examples above, as well as a number of other possibilities. The inserted script is an excellent example of improving the code achieved by supporting ES2015.
Unlike the capabilities that we implemented above, supporting shortcuts will require a small piece of C ++ or C # code wrapped in the Windows Runtime (WinRT) component.
To determine the hotkey press to perform certain actions, for example, to select the address bar when pressing Ctrl + L or to switch to full screen mode by F11, we need to insert another script into WebView. To do this, we use the invokeScriptAsync () method, which we already mentioned above. However, we need to somehow report back to the application layer when certain keys are pressed.
Using the addWebAllowedObject () method, we can set a method for injected code through which it will be possible to transmit the pressed keys to the application layer in JavaScript. It is also important to understand that in Windows 10, the WebView control runs in a separate thread. We need to create a dispatcher that will send events to the UI stream so that the application layer can process them.
Now that we’ve figured out the key APIs of WebView, let's enhance the look of our browser a bit.
Using the Windows Runtime API, we can change the ApplicationView.TitleBar property to customize the color palette of all application header components. In our browser, when the application loads, we change the colors so that they match the navigation bar. We also update the colors when opening the menu to fit the menu background. Each color must be specified as an object with RGBA properties. For convenience, we have created an auxiliary function that generates the necessary format from a hexadecimal string record.
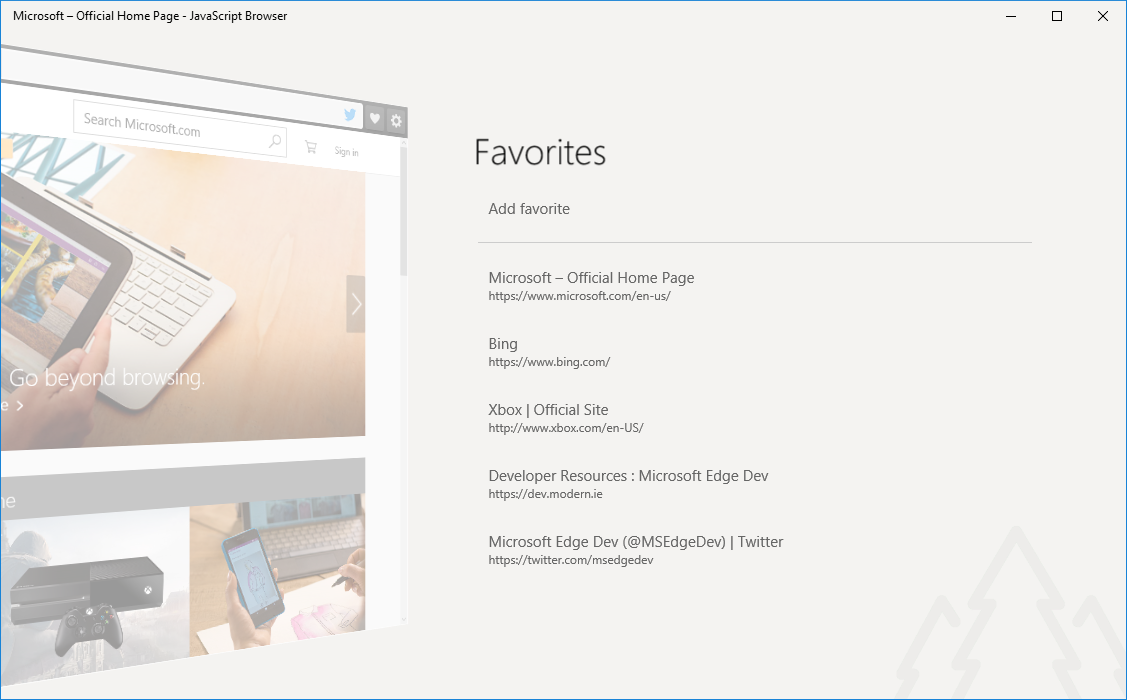
Indication of progress, as well as the settings menu and favorites use CSS transitions for animation. From the settings menu, temporary web data can be cleared using the clearTemporaryWebDataAsync () method. And in the favorites menu, the displayed list is stored in a JSON file in the root folder of the relocatable application data store .
The full code sample is available in our GitHub repository. You can also try the demo browser by installing the appropriate application from the Windows Store, or by deploying the application from the project for Visual Studio.
With WebView, we were able to create a simple browser using web standards, literally in a day. I wonder what you can create for Windows 10?
Using standard web technologies, including JavaScript, HTML and CSS, we created a simple UWP application that contains WebView inside and implements basic functionality: navigation and work with favorites. Such techniques can be used in any UWP application for transparent integration of web content.
Our example is based on the powerful WebView control. In addition to a comprehensive set of APIs, this element also allows you to overcome some of the limitations inherent in an iframe, for example, frame tracking (when a certain website changes its behavior when executed inside an iframe) and the difficulty in determining the loading of a document. In addition, x-ms-webview , as defined by WebView in HTML, provides access to functionality that is not available in the iframe, in particular, improved access to local content and the ability to take snapshots of content. When you use the WebView control, you get the same engine as in Microsoft Edge.
')
Create a browser
As it was written above, the browser is based on the WebView control for HTML, and JavaScript is mainly used to create and animate the user interface. The project was created in Visual Studio 2015 and is a universal Windows application in JavaScript.
In addition to JavaScript, we also used some HTML and CSS, as well as a number of lines of C ++ code to support keyboard shortcuts, but this is not required in the simple case.
We also use the new features of the new ECMAScript 2015 (ES2015), supported in Chakra, a JavaScript engine running in Microsoft Edge and the WebView control. ES2015 allowed us to reduce the number of generated and template code, thereby greatly simplifying the implementation of the idea. We used the following ES2015 features when creating the application: Array.from () , Array.prototype.find () , arrow functions , properties , const , for-of , let , Map , Object.assign () , Promises , property shorthands , Proxies , spread operator , String.prototype.includes () , String.prototype.startsWith () , Symbols , template strings and Unicode code point escapes .
User interface
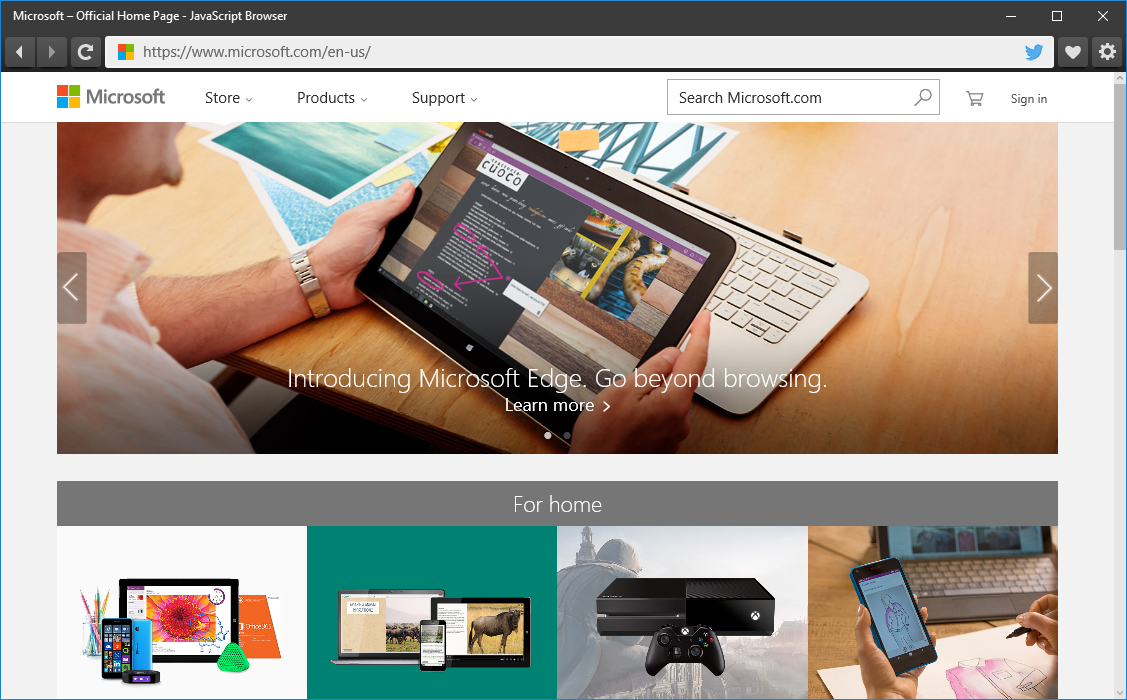
The user interface includes the following ten components:
- Headline
- Back button
- Forward button
- Update button
- Favicon
- Address bar
- Tweet Button
- Button and favorites menu
- Button and settings menu
- WebView control
Additional functionality
We also implemented several additional features to make working with the browser even more enjoyable:
- Keyboard shortcuts: pressing F11 takes you to full-screen mode, ESC exits full-screen mode, Ctrl + L selects the address bar;
- CSS transitions for menu animation
- Cache management
- Manage your favorites
- Analysis of the entered addresses - for example, “bing.com” translates into http (s): //bing.com, and “seahawks” searches in Bing
- Automatically change the selection of the address bar with focus
- Responsive design
Using WebView
<div class="navbar"> <!-- ... --> </div> <x-ms-webview id="WebView"></x-ms-webview> Introduced for JavaScript applications in Windows 8.1, the WebView control, sometimes also referred to by the name of the x-ms-webview tag , allows you to host web content within your Windows application. It is available for both HTML and XAML . To get started, just place the corresponding element in the page code.
Browser Development
We will use 15 different x-ms-webview APIs. All but two of them control the navigation between pages with some sense. Let's see how you can use these interfaces to create various UI elements.
Control buttons back and forth
When you press the back button, the browser returns the previous page from the browser history, if available. Similarly, when you press the forward button, the browser returns the next page from the history, if it is also available. To implement this logic, we use the methods goBack () and goForward () , respectively. These functions will automatically navigate to the correct page from the navigation stack.
After moving to a certain page, we also update the current state of the buttons to prevent the “possibility” of navigation when we reach one of the ends of the navigation stack. In other words, we disable the forward or backward navigation buttons by checking the properties of canGoBack or canGoForward for equality to false .
// Update the navigation state this.updateNavState = () => { this.backButton.disabled = !this.webview.canGoBack; this.forwardButton.disabled = !this.webview.canGoForward; }; // Listen for the back button to navigate backwards this.backButton.addEventListener("click", () => this.webview.goBack()); // Listen for the forward button to navigate forwards this.forwardButton.addEventListener("click", () => this.webview.goForward()); Manage update and stop buttons
The refresh and stop buttons are slightly different from the rest of the navigation bar components in that they use the same place in the UI. When the page loads, pressing the button will stop the download, hide the “progress ring” and display the update icon. Conversely, when the page is loaded, clicking on the button will launch the page update and (in another part of the code) will display the stop icon. We use the refresh () or stop () methods depending on current conditions.
// Listen for the stop/refresh button to stop navigation/refresh the page this.stopButton.addEventListener("click", () => { if (this.loading) { this.webview.stop(); this.showProgressRing(false); this.showRefresh(); } else { this.webview.refresh(); } }); Address bar management
In general, the implementation of the address bar can be very simple. When the URL is entered in the text field, pressing Enter will invoke the navigate () method, using the contents of the input element of the address bar as a parameter.
However, modern browsers have gone much further and introduce additional functionality for the convenience of users. This adds some complexity to the implementation - and it all depends on the scenarios that you want to support.
const RE_VALIDATE_URL = /^[-:.&#+()[\]$'*;@~!,?%=\/\w]+$/; // Attempt a function function attempt(func) { try { return func(); } catch (e) { return e; } } // Navigate to the specified absolute URL function navigate(webview, url, silent) { let resp = attempt(() => webview.navigate(url)); // ... } // Navigate to the specified location this.navigateTo = loc => { // ... // Check if the input value contains illegal characters let isUrl = RE_VALIDATE_URL.test(loc); if (isUrl && navigate(this.webview, loc, true)) { return; } // ... Fallback logic (eg prepending http(s) to the URL, querying Bing.com, etc.) }; // Listen for the Enter key in the address bar to navigate to the specified URL this.urlInput.addEventListener("keypress", e => { if (e.keyCode === 13) { this.navigateTo(urlInput.value); } }); Here is an example of the script that we tried to implement. Suppose the value “microsoft.com” is entered in the address bar. The address is not complete. If this value is passed to the navigate () method, it will fail. Our browser must know that the URL is not complete, and be able to determine which protocol to substitute: http or https. Moreover, it is possible that the value entered was not intended to be an address. For example, we could type “seahawks” in the address bar, hoping that, like in many browsers, the string also works as a search field. The browser should understand that the value is not an address, and try to “find” it in the search engine.
Favicon mapping
A favicon request is not a trivial task, since there are several ways in which an icon can be defined. The easiest way is to check the root of the website for the presence of the file “favicon.ico”. However, some sites may be on a subdomain and therefore have a great icon. For example, the icon on “microsoft.com” is different from the icon on “windows.microsoft.com”. To eliminate ambiguity, you can use another method - check the page layout for the presence of link-tech inside a document with a rel-attribute equal to “icon” or “shortcut icon”.
We use the invokeScriptAsync () method to insert a script inside the WebView control that will return a string if successful. Our script searches the page for all elements with a link-tech, checks if the rel-attribute contains the word “icon”, and in case of a match, returns the value of the “href” attribute back to the application.
// Check if a file exists at the specified URL function fileExists(url) { return new Promise(resolve => Windows.Web.Http.HttpClient() .getAsync(new URI(url), Windows.Web.Http.HttpCompletionOption.responseHeadersRead) .done(e => resolve(e.isSuccessStatusCode), () => resolve(false)) ); } // Show the favicon if available this.getFavicon = loc => { let host = new URI(loc).host; // Exit for cached ico location // ... let protocol = loc.split(":")[0]; // Hide favicon when the host cannot be resolved or the protocol is not http(s) // ... loc = `${protocol}://${host}/favicon.ico`; // Check if there is a favicon in the root directory fileExists(loc).then(exists => { if (exists) { console.log(`Favicon found: ${loc}`); this.favicon.src = loc; return; } // Asynchronously check for a favicon in the web page markup console.log("Favicon not found in root. Checking the markup..."); let script = "Object(Array.from(document.getElementsByTagName('link')).find(link => link.rel.includes('icon'))).href"; let asyncOp = this.webview.invokeScriptAsync("eval", script); asyncOp.oncomplete = e => { loc = e.target.result || ""; if (loc) { console.log(`Found favicon in markup: ${loc}`); this.favicon.src = loc; } else { this.hideFavicon(); } }; asyncOp.onerror = e => { console.error(`Unable to find favicon in markup: ${e.message}`); }; asyncOp.start(); }); }; As mentioned above, we use in our code the capabilities of the new ES2015 specification. You may have noticed the use of the arrow notation in many of the examples above, as well as a number of other possibilities. The inserted script is an excellent example of improving the code achieved by supporting ES2015.
// Before (ES < 6): "(function () {var n = document.getElementsByTagName('link'); for (var i = 0; i < n.length; i++) { if (n[i].rel.indexOf('icon') > -1) { return n[i].href; }}})();" // After (ES6): "Object(Array.from(document.getElementsByTagName('link')).find(link => link.rel.includes('icon'))).href" Keyboard support
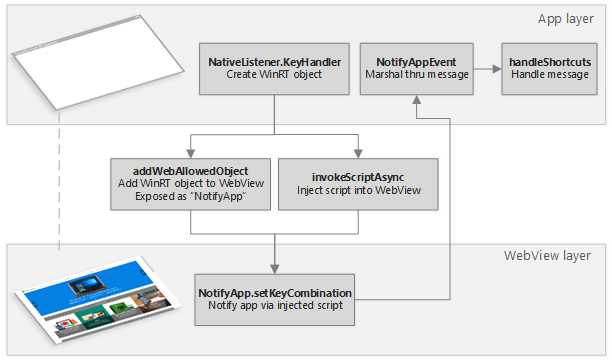
Unlike the capabilities that we implemented above, supporting shortcuts will require a small piece of C ++ or C # code wrapped in the Windows Runtime (WinRT) component.
To determine the hotkey press to perform certain actions, for example, to select the address bar when pressing Ctrl + L or to switch to full screen mode by F11, we need to insert another script into WebView. To do this, we use the invokeScriptAsync () method, which we already mentioned above. However, we need to somehow report back to the application layer when certain keys are pressed.
Using the addWebAllowedObject () method, we can set a method for injected code through which it will be possible to transmit the pressed keys to the application layer in JavaScript. It is also important to understand that in Windows 10, the WebView control runs in a separate thread. We need to create a dispatcher that will send events to the UI stream so that the application layer can process them.
KeyHandler::KeyHandler() { // Must run on App UI thread m_dispatcher = Windows::UI::Core::CoreWindow::GetForCurrentThread()->Dispatcher; } void KeyHandler::setKeyCombination(int keyPress) { m_dispatcher->RunAsync( CoreDispatcherPriority::Normal, ref new DispatchedHandler([this, keyPress] { NotifyAppEvent(keyPress); })); } // Create the C++ Windows Runtime Component let winRTObject = new NativeListener.KeyHandler(); // Listen for an app notification from the WinRT object winRTObject.onnotifyappevent = e => this.handleShortcuts(e.target); // Expose the native WinRT object on the page's global object this.webview.addWebAllowedObject("NotifyApp", winRTObject); // ... // Inject fullscreen mode hot key listener into the WebView with every page load this.webview.addEventListener("MSWebViewDOMContentLoaded", () => { let asyncOp = this.webview.invokeScriptAsync("eval", ` addEventListener("keydown", e => { let k = e.keyCode; if (k === ${this.KEYS.ESC} || k === ${this.KEYS.F11} || (e.ctrlKey && k === ${this.KEYS.L})) { NotifyApp.setKeyCombination(k); } }); `); asyncOp.onerror = e => console.error(`Unable to listen for fullscreen hot keys: ${e.message}`); asyncOp.start(); }); Browser Appearance
Now that we’ve figured out the key APIs of WebView, let's enhance the look of our browser a bit.
Header branding
Using the Windows Runtime API, we can change the ApplicationView.TitleBar property to customize the color palette of all application header components. In our browser, when the application loads, we change the colors so that they match the navigation bar. We also update the colors when opening the menu to fit the menu background. Each color must be specified as an object with RGBA properties. For convenience, we have created an auxiliary function that generates the necessary format from a hexadecimal string record.
//// browser.js // Use a proxy to workaround a WinRT issue with Object.assign this.titleBar = new Proxy(Windows.UI.ViewManagement.ApplicationView.getForCurrentView().titleBar, { "get": (target, key) => target[key], "set": (target, key, value) => (target[key] = value, true) }); //// title-bar.js // Set your default colors const BRAND = hexStrToRGBA("#3B3B3B"); const GRAY = hexStrToRGBA("#666"); const WHITE = hexStrToRGBA("#FFF"); // Set the default title bar colors this.setDefaultAppBarColors = () => { Object.assign(this.titleBar, { "foregroundColor": BRAND, "backgroundColor": BRAND, "buttonForegroundColor": WHITE, "buttonBackgroundColor": BRAND, "buttonHoverForegroundColor": WHITE, "buttonHoverBackgroundColor": GRAY, "buttonPressedForegroundColor": BRAND, "buttonPressedBackgroundColor": WHITE, "inactiveForegroundColor": BRAND, "inactiveBackgroundColor": BRAND, "buttonInactiveForegroundColor": GRAY, "buttonInactiveBackgroundColor": BRAND, "buttonInactiveHoverForegroundColor": WHITE, "buttonInactiveHoverBackgroundColor": BRAND, "buttonPressedForegroundColor": BRAND, "buttonPressedBackgroundColor": BRAND }); }; Other features
Indication of progress, as well as the settings menu and favorites use CSS transitions for animation. From the settings menu, temporary web data can be cleared using the clearTemporaryWebDataAsync () method. And in the favorites menu, the displayed list is stored in a JSON file in the root folder of the relocatable application data store .
Source
The full code sample is available in our GitHub repository. You can also try the demo browser by installing the appropriate application from the Windows Store, or by deploying the application from the project for Visual Studio.
Create your application for Windows 10
With WebView, we were able to create a simple browser using web standards, literally in a day. I wonder what you can create for Windows 10?
Source: https://habr.com/ru/post/269143/
All Articles