How to become a cloud IP PBX provider - Step-by-Step Guide
Now almost anyone can become a cloud PBX operator. In the previous article, we talked about how to do this, having only one server, today we will discuss the situation when there are several servers (cluster) and you need centralized management.

')
You can manage your PBX through the 3CX Partner Portal. You can dynamically create and delete individual telephone exchanges. Step by step it looks like this:
Step 1: Create a Google Cloud Account
The 3CX Affiliate Portal uses Google Cloud DNS to automatically create the necessary records. First you need to create a Google Cloud account, read more here:
https://cloud.google.com/dns/
After you have done this, on the portal, go to the Virtual PBX Instances> Virtual PBX Settings section, the Google Cloud DNS Settings section and fill in the required fields:
Before creating a PBX you need to make at least one server cluster. A cluster is a group of servers, each of which can be located in different data centers, different regions or just a server with different characteristics or SLA. To create a virtual PBX, the server with the lowest load is always selected.

1. Go to the Server Clusters tab.
2. Click Add to retrieve the new cluster.
3. Enter a Cluster Code - a unique internal 4-character code, consists of letters and numbers, is needed to identify the cluster. Used to refer to a cluster in Web Forms
4. Description - A plain text description.
5. Hosted Instance Domain - the domain name of the cluster. Hotel PBXs will be subdomains, for example, user1.pbx.mycompany.eu. Usually, you need to install a trusted SSL certificate for the domain and all servers in the cluster.
6. DNS Managed zone : you need to get a Google DNS Account.
Download and install 3CX Phone System 14 on each of the servers. When installing, be sure to select the Multiple option. This will set up to 25 on each of the servers. When all servers are installed, you can start adding PBX.
1. In 3CX ERP, go to Virtual PBX Instances> Virtual PBX Servers.
2. Click Add and enter the server details:
• Server Cluster - select a cluster from the drop-down list. In the example, we select a cluster in Asia.
• Unique name - internal server name. It may be the same as the FQDN.
• FQDN - domain name. Do not specify an IP address. If you are using an SSL certificate from a provider such as Thawte or Verisign, you must specify the domain name corresponding to the certificate (for example, *. Mycompany.eu);
The Partner Portal itself will create DNS records of type CNAME for user PBXs.
Please note that Portal will not create an A type record. It is the administrator’s responsibility.
• System Id - by default 'phonesystem'. This is the name of a specific PBX;
• Password - Password from PBX. Own for each installation;
• Omit from pool - Needed for tests. By default, the Portal creates, deletes and edits PBX data. Enable this option if you exit delete and create an IP PBX through Cloud Manager.
• Untrusted SSL — A validated SSL certificate is required when installing the 3CX Phone System or 3CX can generate an unacknowledged native SSL certificate. Enable this option if you are planning a certificate from 3CX.
3. Repeat the steps to add more servers.
To add a telephone exchange:
1. Click Virtual PBX instances> Add
2. Select a cluster.
3. Select on which of the cluster servers the PBX will be added.
4. Enter Tenant ID - this can be the name of the company.
5. Specify a contact person and email.
6. Specify the quota for voice mail and for recording conversations in MB. The default is 1 GB for each of the features.
7. If the PBX needs to activate the license, check the “Use the following license key” box and enter the end-user data.
8. Click OK to create the PBX.
9. Access data will be sent by email.
You can manage all virtual PBXs via this interface:

To check the status of the PBX, click [Request Status]:

What is needed for this?
- Downloading a free hosting platform here . (it doesn't cost anything)
- Register as a 3CX partner here , because centralized management goes through the Partner Portal (this is also free)
- Multiple servers or virtual machines
')
Method 1: Creating an IP PBX through the Partner Portal (ERP)
You can manage your PBX through the 3CX Partner Portal. You can dynamically create and delete individual telephone exchanges. Step by step it looks like this:
Step 1: Create a Google Cloud Account
The 3CX Affiliate Portal uses Google Cloud DNS to automatically create the necessary records. First you need to create a Google Cloud account, read more here:
https://cloud.google.com/dns/
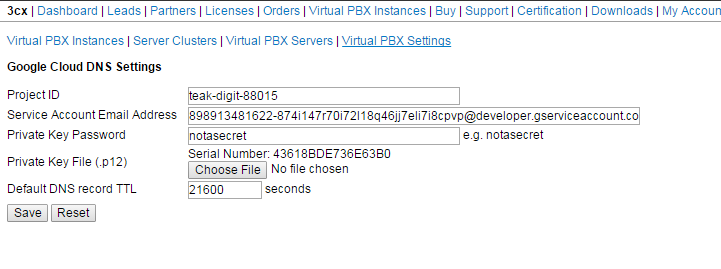
After you have done this, on the portal, go to the Virtual PBX Instances> Virtual PBX Settings section, the Google Cloud DNS Settings section and fill in the required fields:
- Project ID - you need to take from the Google Cloud developer console (https://console.developers.google.com/);
- Service Account Email Address - You need to create a service account for the Google Cloud project, this is done through APIs & Auth> Credentials . A public / private key file (.p12) will be created with which the Partner Portal will log in to Google Cloud. You will receive a Server Account Client ID and email address as a service identifier. Enter this email here;
- Private Key File - load the file in public / private key;
- Private Key Password - The private key is encrypted with a password. Specify it in this field. Unless otherwise specified, the default password is “notasecret” (you can change it).
- This is the default TTL.
Step 2: Create a cluster
Before creating a PBX you need to make at least one server cluster. A cluster is a group of servers, each of which can be located in different data centers, different regions or just a server with different characteristics or SLA. To create a virtual PBX, the server with the lowest load is always selected.
1. Go to the Server Clusters tab.
2. Click Add to retrieve the new cluster.
3. Enter a Cluster Code - a unique internal 4-character code, consists of letters and numbers, is needed to identify the cluster. Used to refer to a cluster in Web Forms
4. Description - A plain text description.
5. Hosted Instance Domain - the domain name of the cluster. Hotel PBXs will be subdomains, for example, user1.pbx.mycompany.eu. Usually, you need to install a trusted SSL certificate for the domain and all servers in the cluster.
6. DNS Managed zone : you need to get a Google DNS Account.
Step 3: Creating a Virtual PBX Server
Download and install 3CX Phone System 14 on each of the servers. When installing, be sure to select the Multiple option. This will set up to 25 on each of the servers. When all servers are installed, you can start adding PBX.
1. In 3CX ERP, go to Virtual PBX Instances> Virtual PBX Servers.
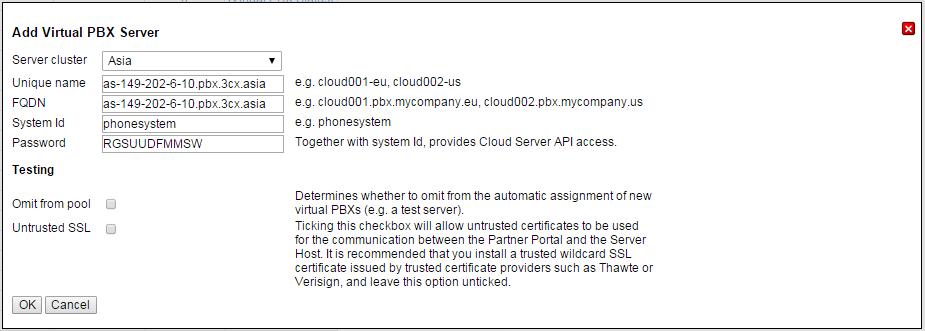
2. Click Add and enter the server details:
• Server Cluster - select a cluster from the drop-down list. In the example, we select a cluster in Asia.
• Unique name - internal server name. It may be the same as the FQDN.
• FQDN - domain name. Do not specify an IP address. If you are using an SSL certificate from a provider such as Thawte or Verisign, you must specify the domain name corresponding to the certificate (for example, *. Mycompany.eu);
The Partner Portal itself will create DNS records of type CNAME for user PBXs.
Please note that Portal will not create an A type record. It is the administrator’s responsibility.
• System Id - by default 'phonesystem'. This is the name of a specific PBX;
• Password - Password from PBX. Own for each installation;
• Omit from pool - Needed for tests. By default, the Portal creates, deletes and edits PBX data. Enable this option if you exit delete and create an IP PBX through Cloud Manager.
• Untrusted SSL — A validated SSL certificate is required when installing the 3CX Phone System or 3CX can generate an unacknowledged native SSL certificate. Enable this option if you are planning a certificate from 3CX.
3. Repeat the steps to add more servers.
Step 4: Creating a Virtual PBX
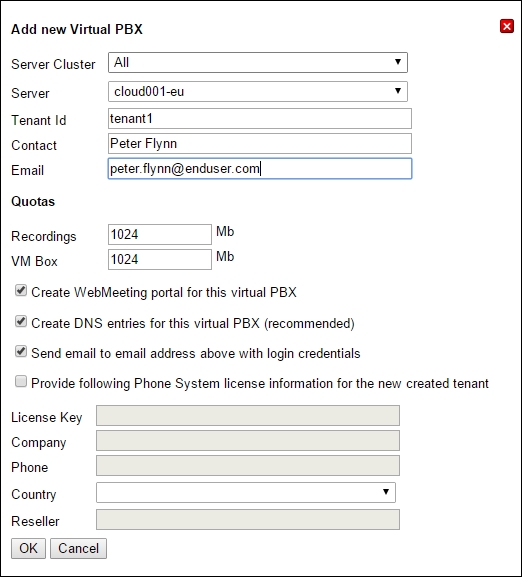
To add a telephone exchange:
1. Click Virtual PBX instances> Add
2. Select a cluster.
3. Select on which of the cluster servers the PBX will be added.
4. Enter Tenant ID - this can be the name of the company.
5. Specify a contact person and email.
6. Specify the quota for voice mail and for recording conversations in MB. The default is 1 GB for each of the features.
7. If the PBX needs to activate the license, check the “Use the following license key” box and enter the end-user data.
8. Click OK to create the PBX.
9. Access data will be sent by email.
Virtual PBX Management
You can manage all virtual PBXs via this interface:
To check the status of the PBX, click [Request Status]:
Source: https://habr.com/ru/post/268965/
All Articles