Google Cloud Endpoints in Java: A Guide. part 1
Google Cloud Endpoints is an add-on to Google App Engine (GAE) for creating APIs for web and mobile applications, making development easier and including out-of-box protection against DoS attacks, OAuth 2.0 authentication, a web interface for testing APIs, SSL, automatic scalability (the site will not fall under the habr effect), and the ability to use the services available on the Google App Engine (sending and receiving email and XMPP messages, downloading data from the Internet (URL Fetch service), scheduled tasks (Task Queues and Scheduled Tasks) and others.)
GAE is free within the framework of the initial quotas, which allow you to try and test the service, and also to ensure the free operation of a website that does not have large loads. At exhaustion of quotas service becomes paid.
The idea of the service is that it does all or most of the work of the system administrator, plus some of the work of the programmer. This service may be of interest to startups, as it allows small forces and in a short time to launch a working project.
')
The Objectify framework provides convenient tools for working with the database built into GAE, and the angular-google-gapi module for connecting a web application to AngularJS with user authorization.
There are a lot of pictures and text under the cut, and it is assumed that the reader is familiar with Java Servlets.
First you need to create a project on GAE. This will require a google account. You can use the existing one or create a new one. Google policy allows the creation of multiple accounts for one person. Google warns when an application requests user information (OAuth consent screen), then information about the application can transfer information about the developer, including his email address, and this is not any email address, but the account @ gmail.com under which they work with GAE, so it’s probably worth starting separate accounts for different projects, since Google Chrome allows you to switch between them conveniently.
Go to the Google developer console: console.developers.google.com and log in using the selected Google account, click "Create an empty project", select the project name and project ID. The project will be available at http: // {project ID} .appspot.com
For example: hello-habrahabr-api.appspot.com
ID must be unique. Moreover, if {project ID} @ gmail.com is busy, then this ID will already be marked as “busy” for GAE. That is, you can create {project ID} .appspot.com and {project ID} @ gmail.com at the same time.

After the project is created, it will be available in the developer console:

For this tutorial, we will create two projects in the Google Developer Console: hello-habrahabr-api.appspot.com, which will be the API (Google Endpoints itself), and hello-habrahabr-webapp.appspot.com, on which we will host the web client. I do this for clarity, the separation of fronend and backend could be created on the same domain.
In the developer’s console of our Cloud Endpoints project hello-habrahabr-api.appspot.com, select APIs & auth> Credentials> Add Credentials> OAuth 2.0 Client ID> Configure consent screen from the menu.

In the settings, the developer's email address is automatically inserted, we also indicate the name of the application (Product name) (mandatory), and (optionally) the web page address, logo and other data.
In the menu, select APIs & auth> Credentials> Add Credentials> OAuth 2.0 Client ID and specify the type of application for which we create the client ID. In this guide, we will look at creating a web application, so we select the Web application, and click “Create”.
We indicate:
- web application name (any)
- domain (s) from which Javascript can access the API (Authorized JavaScript origins) it can be any domain. It is possible the same on which Cloud Endpoints works. It should be borne in mind that Cloud Endpoints does not work on the user's domain yet, only on .appspot.com. But a web application that accesses the API can work on any domain.
- Authorized redirect URIs: do not use
Click “Create”, we get “client ID” and “client secret” - we will need them for the web application.
We will need:
1. Java 7 (Java 8 is not yet GAE supported)
Java installation: www.java.com/en/download/manual_java7.jsp
For Ubuntu / Debian:
2. Maven
Installation: maven.apache.org/install.html
On Linux (latest version 3.3.3):
For Ubuntu / Debian (version 3.0.5 is now on depositories):
Check the version of Maven and Java:
3. IDE or code editor - to taste. Eclipse and IntelliJ IDEA Ultimate have plugins for working with GAE, but testing offline on your machine for Cloud Endpoints will not work anyway (although the documentation indicates what it should), so you need to use separate projects to separate the code in the development and running system. or use the opportunity provided by GAE to work with different versions of the project.
Instead of GAE-plugins, it is easier and more convenient (IMHO) to use Maven on the command line, so IntelliJ IDEA Community Edtion is quite suitable - there is a built-in terminal, and that’s all you need. You can install TM Terminal in Eclipse.
4. Google App Engine SDK . If necessary, you can download it here .
But when using Maven, it downloads the Google App Engine SDK automatically.
Go to the directory in which we will create the project directory. Avoid directories with non-standard characters in the name and a very long path, this can cause errors in Maven.
To create a project blank, use Maven and Endpoints Skeleton Archetype :
Enter “2” (select
Select the version (by default - the last).
Define value for property 'groupId': - enter groupId, this is the unique identifier of our application, following the Maven Guide to naming conventions on groupId, artifactId and version - as a rule, the domain name is used in the reverse order, but taking into account the valid symbols package name rules - then in my case, instead of com.appspot.hello-habrahabr-api, you must enter com.appspot.hellohabrahabrapi or com.appspot.hello_habrahabr_api (I chose the latter).
Define value for property 'artifactId' - enter the short name of the project, for example hello-habrahabr-api (here hyphen is allowed). This will be the name of the .war (.jar) file without the version number (the file name will be hello-habrahabr-api- {version number} .war).
Define value for property 'version' - enter the version number, for GAE the version number should be without points, for example, not 1.0.3, but 1-0-3. This is due to the fact that on GAE versions of the project are available at the address of the form {version number. {Project ID} .appspot.com.
Also, GAE uses the format {instance number. {Standard version}. {Project ID} .appspot.com - therefore, it is recommended to start the version name with a letter, for example, v-1-0 or ver-1-0, to distinguish the instance running .
For this reason, the default option offered by Maven - 1.0-SNAPSHOT - is better to replace the format that is suitable for GAE standards.
Define value for property 'package' - usually accept the default proposed (will meet the groupId).
Confirm the selected settings: Y (yes, by default).
If everything is done correctly, we get a message about a successful build:
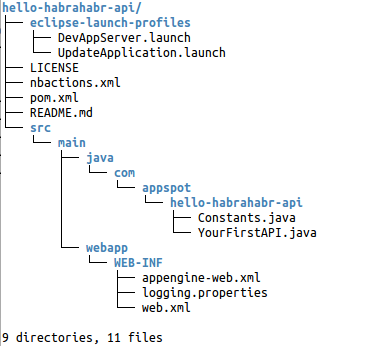
Maven will create a folder whose name will meet artifactId with project files. The folder has the following structure:
First we need to edit pom.xml which contains the Maven settings for our project. In the code:
AT
We prescribe the version of Maven that we have installed, in my case I replace 3.1.0 with 3.3.3.
In src / main / webapp / WEB-INF / appengine-web.xml:
{app.id} and {app.version} are replaced accordingly with {project ID} and version (needs to be replaced, automatically from pom.xml it will not take the value).
We collect the project:
If the build was unsuccessful, look for errors in the settings. If - successful, upload the project to GAE:
When you first start, Maven will download the Google App Engine SDK, and save it to ~ / .m2 / repository / com / google / appengine / appengine-java-sdk / {version number} (on Linux).
Also, when you first start from the console, you will need to log in to GAE, a dialog will open in the browser window:

When you click on the button, in a new window, the code appears that needs to be copied and entered into the console.
User authentication tokens are stored in ~ / .appcfg_oauth2_tokens_java. If you get the message 404 when you try to login, it does not exist (app_id = u '{your-app-ID}') - this is probably due to the fact that you were logged in under a different account. Rename (or delete) this file and try again.
If the mvn appengine: update command is executed successfully (“BUILD SUCCESS”), then the initial settings have been made successfully.
There was a bug when downloading in version 1.9.21, which could be fixed as follows: in pom.xml in all local we replace appengine.version with appengine.sdk.version (see code.google.com/p/googleappengine/issues/detail ? id = 12009 ) In the current version (1.9.27), the bug does not appear, but knowing just in case will not hurt.
In version 1.9.27 at boot you can get the message:
Despite this warning, the download should succeed.
On GAE it is possible to place a free private Git repository for your code. The repository is only a repository, the code is not deployed from it, the .war file is executed on the server which was compiled and loaded using Maven.
First, we initialize the git repository in the project directory:
Go to the developer console: console.developers.google.com/project , and select our project.
Select in the menu: Source code> Browse. The site will offer to create a Git repository. Click “Get started”
You can copy the code from an existing repository to Github or Bitbucket, download (push) code from your computer, or clone (clone) the project code from GAE to your computer. Choose "push". We receive instructions:
1. Install Google Cloud SDK
Installation Instructions . For Linux / Mac OS X:
In the future, the settings can be changed with the command: gcloud config.
Show settings:
Edit settings:
Erase Google Cloud SDK settings:
For example:
gcloud config unset account - erase account in settings
gcloud config unset project - erase the project name in the settings
2. We perform authentication
On Linux / Mac OS X:
3. Add a remote git repository GAE
git remote add google source.developers.google.com/p {project ID} /
4. Upload to remote repository
To clone the repository from the GAE cloud to a local machine, we need:
Install Google Cloud SDK as above.
Perform authentication:
Clone the repository to a local machine (the instructions on the site suggesting gcloud init {project ID} for this purpose are outdated):
Go to the created directory, write and commit the code in the local repository, and
To automate the work, you can use the following script (something like commit.push.build.and.upload.sh):
If you have to switch between projects, a script should be placed in the project directory for quick and easy change of settings (set.account.sh):
Launch your favorite editor or IDE.
For IntelliJ IDEA:
To work with GAE, we need Maven version 3.1.0 and higher, in IntelliJ IDEA, it is now the default 3.0.5. If necessary, we change, indicating the directory in which we have the latest version of Maven installed, for example /usr/local/apache-maven/apache-maven-3.3.3 (you can check it with the command: echo $ M2_HOME).
inport project -> specify the project directory -> Import project from external model -> Maven -> you can leave the default settings -> Import Project -> specify the SDK (Java 1.7) -> Finish.
First of all, let's look at how WEB-INF / web.xml looks. In our case:
Note that all requests to the API are sent to: / _ah / spi / * and are processed by the com.google.api.server.spi.SystemServiceServlet (SystemServiceServlet) servlet.
One of the main "chips" Cloud Endpoints - a web interface for testing API (API Explorer) is available at {project ID} .appspot.com / _ah / api / explorer.
To model the data received and issued by the API used JavaBean, i.e. eligible classes:
* public (public) constructor without parameters. In this case, the constructor must be specified in an explicit form, although in the examples on Google it is missed, but in practice it does not work without a constructor.
* all properties of the class are private, access via get / set (for boolean, getter must also begin with get, and not as generated by the IDE).
* class must be serializable (you can omit it explicitly).
Create two classes:
UserForm.java:
And MessageToUser.java:
Now we write class for the first API method. Edit YourFirstApi.java, and paste the following code there:
Now deploy (mvn clean install && mvn appengine: update) and open in the web browser the address https: // {project ID} .appspot.com / _ah / api / explorer, in my case hello-habrahabr-api.appspot.com / _ah / api / explorer .
We click on the name of our API (if we create several classes in Api annotation - there will be several) and see the methods contained in this API (class methods with the @ApiMethod annotation):
By clicking on the field “Request body” we can fill in the request data received by the api-method:
Then we can choose “Autorize and execute” - and then we will need to pass authorization using Google account (@ gmail.com) or choose “Execute without OAuth”, because our API does not use authorization at all, we will see identical results with authorization and without:

"- Show headers -" is clickable in Response.
Logs are available at: console.developers.google.com/project/ Your project ID} / logs.
Settings in the /src/main/webapp/WEB-INF/logging.properties file and /src/main/webapp/WEB-INF/appengine-web.xml.
In order for our class to issue messages to the log, you need a class API:
one.
2
3. In the method add:
In Constants.java add:
and
This is necessary for testing OAuth-protected API methods in APIs Explorer.
Our Constants.java will look like this:
Now create a new class:
And write it in the init-param of the SystemServiceServlet servlet in web.xml:
Deploy the project, and see API Explorer:
We see a new API in the list by clicking on it we see a list of its methods.
Click on the method name:

Now, if we click "Execute without OAuth" we get an Exception:

If you click “Autorize and execute” - you need to log in using your Google account. In Response, we get email, nickname, and userId (a unique Google user number).
The class object com.google.appengine.api.users.User is supplied by GAE and contains information about the current user, if the user is not authorized, correspondingly null. Thus, we can perform authorization using the Google Account login-password.
As mentioned on Habré ( Sometimes less is better - why only Google authorization ? , Usability of authorization forms ) a project can do without its own processing of logins and passwords.
In my opinion, this is the right approach, primarily from a security point of view. Naturally, we can do "registration" on the site after entering additional information, payment, etc.
Creating a frontend on AngularJS will be covered in the next article.
UPD:
continued:
Google Cloud Endpoints in Java: A Guide. Part 2 (Frontend)
Google Cloud Endpoints in Java: A Guide. part 3
Working with the database in Google App Engine / Google Cloud Endpoints in Java: Objectify framework
Google Cloud Storage with Java: images and other files in the clouds
GAE is free within the framework of the initial quotas, which allow you to try and test the service, and also to ensure the free operation of a website that does not have large loads. At exhaustion of quotas service becomes paid.
The idea of the service is that it does all or most of the work of the system administrator, plus some of the work of the programmer. This service may be of interest to startups, as it allows small forces and in a short time to launch a working project.
')
The Objectify framework provides convenient tools for working with the database built into GAE, and the angular-google-gapi module for connecting a web application to AngularJS with user authorization.
There are a lot of pictures and text under the cut, and it is assumed that the reader is familiar with Java Servlets.
check in
First you need to create a project on GAE. This will require a google account. You can use the existing one or create a new one. Google policy allows the creation of multiple accounts for one person. Google warns when an application requests user information (OAuth consent screen), then information about the application can transfer information about the developer, including his email address, and this is not any email address, but the account @ gmail.com under which they work with GAE, so it’s probably worth starting separate accounts for different projects, since Google Chrome allows you to switch between them conveniently.
Go to the Google developer console: console.developers.google.com and log in using the selected Google account, click "Create an empty project", select the project name and project ID. The project will be available at http: // {project ID} .appspot.com
For example: hello-habrahabr-api.appspot.com
ID must be unique. Moreover, if {project ID} @ gmail.com is busy, then this ID will already be marked as “busy” for GAE. That is, you can create {project ID} .appspot.com and {project ID} @ gmail.com at the same time.
After the project is created, it will be available in the developer console:
For this tutorial, we will create two projects in the Google Developer Console: hello-habrahabr-api.appspot.com, which will be the API (Google Endpoints itself), and hello-habrahabr-webapp.appspot.com, on which we will host the web client. I do this for clarity, the separation of fronend and backend could be created on the same domain.
In the developer’s console of our Cloud Endpoints project hello-habrahabr-api.appspot.com, select APIs & auth> Credentials> Add Credentials> OAuth 2.0 Client ID> Configure consent screen from the menu.
In the settings, the developer's email address is automatically inserted, we also indicate the name of the application (Product name) (mandatory), and (optionally) the web page address, logo and other data.
In the menu, select APIs & auth> Credentials> Add Credentials> OAuth 2.0 Client ID and specify the type of application for which we create the client ID. In this guide, we will look at creating a web application, so we select the Web application, and click “Create”.
We indicate:
- web application name (any)
- domain (s) from which Javascript can access the API (Authorized JavaScript origins) it can be any domain. It is possible the same on which Cloud Endpoints works. It should be borne in mind that Cloud Endpoints does not work on the user's domain yet, only on .appspot.com. But a web application that accesses the API can work on any domain.
- Authorized redirect URIs: do not use
Click “Create”, we get “client ID” and “client secret” - we will need them for the web application.
Preparation and adjustment of the working environment.
We will need:
1. Java 7 (Java 8 is not yet GAE supported)
Java installation: www.java.com/en/download/manual_java7.jsp
For Ubuntu / Debian:
sudo add-apt-repository ppa:webupd8team/java sudo apt-get update && sudo apt-get install oracle-java7-installer 2. Maven
Installation: maven.apache.org/install.html
On Linux (latest version 3.3.3):
sudo mkdir /usr/local/apache-maven/ cd /usr/local/apache-maven && sudo wget http://www.eu.apache.org/dist/maven/maven-3/3.3.3/binaries/apache-maven-3.3.3-bin.tar.gz && sudo tar xvf apache-maven-3.3.3-bin.tar.gz echo 'export M2_HOME=/usr/local/apache-maven/apache-maven-3.3.3' >> ~/.bashrc source ~/.bashrc For Ubuntu / Debian (version 3.0.5 is now on depositories):
sudo apt-get install maven Check the version of Maven and Java:
maven -version 3. IDE or code editor - to taste. Eclipse and IntelliJ IDEA Ultimate have plugins for working with GAE, but testing offline on your machine for Cloud Endpoints will not work anyway (although the documentation indicates what it should), so you need to use separate projects to separate the code in the development and running system. or use the opportunity provided by GAE to work with different versions of the project.
Instead of GAE-plugins, it is easier and more convenient (IMHO) to use Maven on the command line, so IntelliJ IDEA Community Edtion is quite suitable - there is a built-in terminal, and that’s all you need. You can install TM Terminal in Eclipse.
4. Google App Engine SDK . If necessary, you can download it here .
mkdir ~/GAE-SDK && cd ~/GAE-SDK wget https://storage.googleapis.com/appengine-sdks/featured/appengine-java-sdk-1.9.27.zip && unzip appengine-java-sdk-1.9.27.zip But when using Maven, it downloads the Google App Engine SDK automatically.
Create the backend base
Go to the directory in which we will create the project directory. Avoid directories with non-standard characters in the name and a very long path, this can cause errors in Maven.
To create a project blank, use Maven and Endpoints Skeleton Archetype :
mvn archetype:generate -Dappengine-version=1.9.27 -Dfilter=com.google.appengine.archetypes: Enter “2” (select
2: remote -> com.google.appengine.archetypes:endpoints-skeleton-archetype (A skeleton project using Cloud Endpoints with Google App Engine Java) ).Select the version (by default - the last).
Define value for property 'groupId': - enter groupId, this is the unique identifier of our application, following the Maven Guide to naming conventions on groupId, artifactId and version - as a rule, the domain name is used in the reverse order, but taking into account the valid symbols package name rules - then in my case, instead of com.appspot.hello-habrahabr-api, you must enter com.appspot.hellohabrahabrapi or com.appspot.hello_habrahabr_api (I chose the latter).
Define value for property 'artifactId' - enter the short name of the project, for example hello-habrahabr-api (here hyphen is allowed). This will be the name of the .war (.jar) file without the version number (the file name will be hello-habrahabr-api- {version number} .war).
Define value for property 'version' - enter the version number, for GAE the version number should be without points, for example, not 1.0.3, but 1-0-3. This is due to the fact that on GAE versions of the project are available at the address of the form {version number. {Project ID} .appspot.com.
Also, GAE uses the format {instance number. {Standard version}. {Project ID} .appspot.com - therefore, it is recommended to start the version name with a letter, for example, v-1-0 or ver-1-0, to distinguish the instance running .
For this reason, the default option offered by Maven - 1.0-SNAPSHOT - is better to replace the format that is suitable for GAE standards.
Define value for property 'package' - usually accept the default proposed (will meet the groupId).
Confirm the selected settings: Y (yes, by default).
If everything is done correctly, we get a message about a successful build:
[INFO] ------------------------------------------------------------------------ [INFO] BUILD SUCCESS [INFO] ------------------------------------------------------------------------ [INFO] Total time: 03:08 min [INFO] Finished at: 2015-10-06T02:42:33+03:00 [INFO] Final Memory: 16M/108M [INFO] ------------------------------------------------------------------------ Maven will create a folder whose name will meet artifactId with project files. The folder has the following structure:
pom.xml
First we need to edit pom.xml which contains the Maven settings for our project. In the code:
<properties> <app.id>your-app-id</app.id> <app.version>1</app.version> </properties> your-app-id should be replaced with {project ID}, in my case, this is hello-habrahabr-api (note: if you don’t see the Services API at ... / _ ah / api / explorer, you may have forgotten to replace app.id) and <app.version> ver-1-0 </app.version> are aligned with ver-1-0AT
<prerequisites> <maven>3.1.0</maven> </prerequisites> We prescribe the version of Maven that we have installed, in my case I replace 3.1.0 with 3.3.3.
src / main / webapp / WEB-INF / appengine-web.xml
In src / main / webapp / WEB-INF / appengine-web.xml:
<application>${app.id}</application> <version>${app.version}</version> {app.id} and {app.version} are replaced accordingly with {project ID} and version (needs to be replaced, automatically from pom.xml it will not take the value).
We collect the project:
mvn clean install If the build was unsuccessful, look for errors in the settings. If - successful, upload the project to GAE:
mvn appengine:update When you first start, Maven will download the Google App Engine SDK, and save it to ~ / .m2 / repository / com / google / appengine / appengine-java-sdk / {version number} (on Linux).
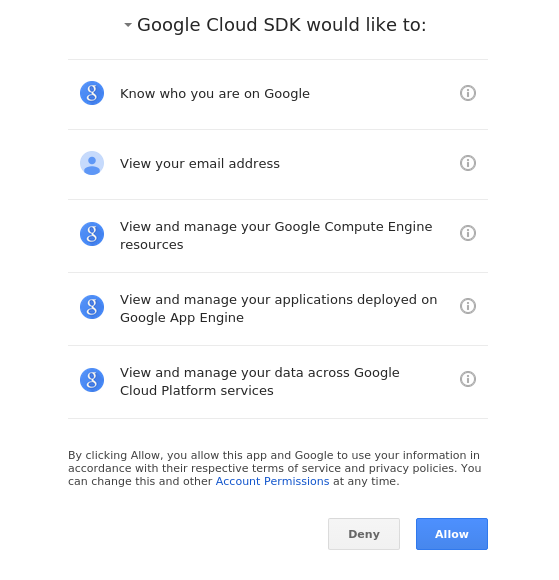
Also, when you first start from the console, you will need to log in to GAE, a dialog will open in the browser window:
When you click on the button, in a new window, the code appears that needs to be copied and entered into the console.
User authentication tokens are stored in ~ / .appcfg_oauth2_tokens_java. If you get the message 404 when you try to login, it does not exist (app_id = u '{your-app-ID}') - this is probably due to the fact that you were logged in under a different account. Rename (or delete) this file and try again.
If the mvn appengine: update command is executed successfully (“BUILD SUCCESS”), then the initial settings have been made successfully.
There was a bug when downloading in version 1.9.21, which could be fixed as follows: in pom.xml in all local we replace appengine.version with appengine.sdk.version (see code.google.com/p/googleappengine/issues/detail ? id = 12009 ) In the current version (1.9.27), the bug does not appear, but knowing just in case will not hurt.
In version 1.9.27 at boot you can get the message:
******************************************************** The API version in this SDK is no longer supported on the server! ----------- Latest SDK: Release: 1.9.27 Timestamp: Tue Aug 18 21:28:24 IDT 2015 API versions: [1] ----------- Your SDK: Release: 1.9.27 Timestamp: Wed Sep 02 23:29:33 IDT 2015 API versions: [1.0] ----------- Please visit https://developers.google.com/appengine/downloads for the latest SDK. ******************************************************** Despite this warning, the download should succeed.
Configure Git to GAE
On GAE it is possible to place a free private Git repository for your code. The repository is only a repository, the code is not deployed from it, the .war file is executed on the server which was compiled and loaded using Maven.
First, we initialize the git repository in the project directory:
git init git add src/ pom.xml README.md git commit -a Go to the developer console: console.developers.google.com/project , and select our project.
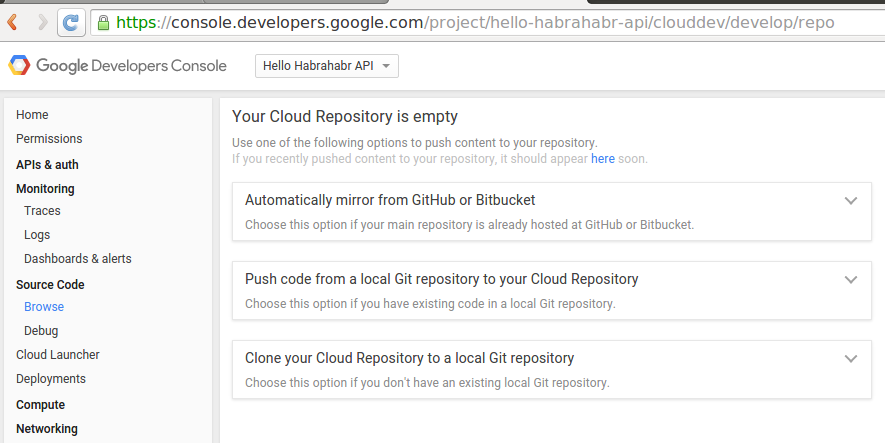
Select in the menu: Source code> Browse. The site will offer to create a Git repository. Click “Get started”
You can copy the code from an existing repository to Github or Bitbucket, download (push) code from your computer, or clone (clone) the project code from GAE to your computer. Choose "push". We receive instructions:
1. Install Google Cloud SDK
Installation Instructions . For Linux / Mac OS X:
curl https://sdk.cloud.google.com | bash # exec -l $SHELL gcloud init # Google, In the future, the settings can be changed with the command: gcloud config.
Show settings:
gcloud config list Edit settings:
gcloud config set Erase Google Cloud SDK settings:
gcloud config unset For example:
gcloud config unset account - erase account in settings
gcloud config unset project - erase the project name in the settings
2. We perform authentication
On Linux / Mac OS X:
gcloud auth login # Google git config credential.helper gcloud.sh 3. Add a remote git repository GAE
git remote add google source.developers.google.com/p {project ID} /
git remote add google https://source.developers.google.com/p/hello-habrahabr-api/ 4. Upload to remote repository
git push --all google To clone the repository from the GAE cloud to a local machine, we need:
Install Google Cloud SDK as above.
Perform authentication:
gcloud auth login Clone the repository to a local machine (the instructions on the site suggesting gcloud init {project ID} for this purpose are outdated):
gcloud source repos clone default {ID } Go to the created directory, write and commit the code in the local repository, and
git push -u google master To automate the work, you can use the following script (something like commit.push.build.and.upload.sh):
mvn clean git add * # .gitignore git commit -a git push --all google # mvn install mvn appengine:update If you have to switch between projects, a script should be placed in the project directory for quick and easy change of settings (set.account.sh):
gcloud config set account "{ @mgmail.com}" gcloud config set project "{ ID}" gcloud config list rm ~/.appcfg_oauth2_tokens_java Getting to writing API
Launch your favorite editor or IDE.
For IntelliJ IDEA:
To work with GAE, we need Maven version 3.1.0 and higher, in IntelliJ IDEA, it is now the default 3.0.5. If necessary, we change, indicating the directory in which we have the latest version of Maven installed, for example /usr/local/apache-maven/apache-maven-3.3.3 (you can check it with the command: echo $ M2_HOME).
inport project -> specify the project directory -> Import project from external model -> Maven -> you can leave the default settings -> Import Project -> specify the SDK (Java 1.7) -> Finish.
First of all, let's look at how WEB-INF / web.xml looks. In our case:
<?xml version="1.0" encoding="utf-8" standalone="no"?> <web-app xmlns="http://java.sun.com/xml/ns/javaee" xmlns:web="http://java.sun.com/xml/ns/javaee/web-app_2_5.xsd" xmlns:xsi="http://www.w3.org/2001/XMLSchema-instance" version="2.5" xsi:schemaLocation="http://java.sun.com/xml/ns/javaee http://java.sun.com/xml/ns/javaee/web-app_2_5.xsd"> <servlet> <servlet-name>SystemServiceServlet</servlet-name> <servlet-class>com.google.api.server.spi.SystemServiceServlet</servlet-class> <init-param> <param-name>services</param-name> <param-value>com.appspot.hello_habrahabr_api.YourFirstAPI</param-value> </init-param> </servlet> <servlet-mapping> <servlet-name>SystemServiceServlet</servlet-name> <url-pattern>/_ah/spi/*</url-pattern> </servlet-mapping> <welcome-file-list> <welcome-file>index.html</welcome-file> </welcome-file-list> </web-app> Note that all requests to the API are sent to: / _ah / spi / * and are processed by the com.google.api.server.spi.SystemServiceServlet (SystemServiceServlet) servlet.
One of the main "chips" Cloud Endpoints - a web interface for testing API (API Explorer) is available at {project ID} .appspot.com / _ah / api / explorer.
To model the data received and issued by the API used JavaBean, i.e. eligible classes:
* public (public) constructor without parameters. In this case, the constructor must be specified in an explicit form, although in the examples on Google it is missed, but in practice it does not work without a constructor.
* all properties of the class are private, access via get / set (for boolean, getter must also begin with get, and not as generated by the IDE).
* class must be serializable (you can omit it explicitly).
Create two classes:
UserForm.java:
package com.appspot.hello_habrahabr_api; public class UserForm { private String name; private int age; private boolean ishuman; public UserForm() { } public String getName() { return name; } public void setName(String name) { this.name = name; } public int getAge() { return age; } public void setAge(int age) { this.age = age; } public boolean getIshuman() { return ishuman; } // not just ishuman() for boolean // as will be created using getters and setters generation // in IntelliJ IDEA and Eclipse public void setIshuman(boolean ishuman) { this.ishuman = ishuman; } } And MessageToUser.java:
package com.appspot.hello_habrahabr_api; public class MessageToUser { private String name; private String message; private int usernumber; private boolean isregistered; public MessageToUser() { } public String getName() { return name; } public void setName(String name) { this.name = name; } public String getMessage() { return message; } public void setMessage(String message) { this.message = message; } public int getUsernumber() { return usernumber; } public void setUsernumber(int usernumber) { this.usernumber = usernumber; } public boolean getIsregistered() { return isregistered; } // not "isregistered()" as suggested by IDE's getter/setter generator public void setIsregistered(boolean isregistered) { this.isregistered = isregistered; } } Now we write class for the first API method. Edit YourFirstApi.java, and paste the following code there:
package com.appspot.hello_habrahabr_api; import com.google.api.server.spi.config.Api; import com.google.api.server.spi.config.ApiMethod; import com.google.api.server.spi.config.ApiMethod.HttpMethod; @Api( name = "myApi", version = "v1", scopes = {Constants.EMAIL_SCOPE}, description = "first API for this application." ) public class YourFirstAPI { @ApiMethod( name = "register", path = "register", httpMethod = HttpMethod.POST ) @SuppressWarnings("unused") public MessageToUser userInfo( final UserForm userForm ) { MessageToUser messageToUser = new MessageToUser(); messageToUser.setMessage("Hi, " + userForm.getName() + ", you are registered on our site"); messageToUser.setUsernumber(1); messageToUser.setIsregistered(true); return messageToUser; } } API web interface (APIs Explorer)
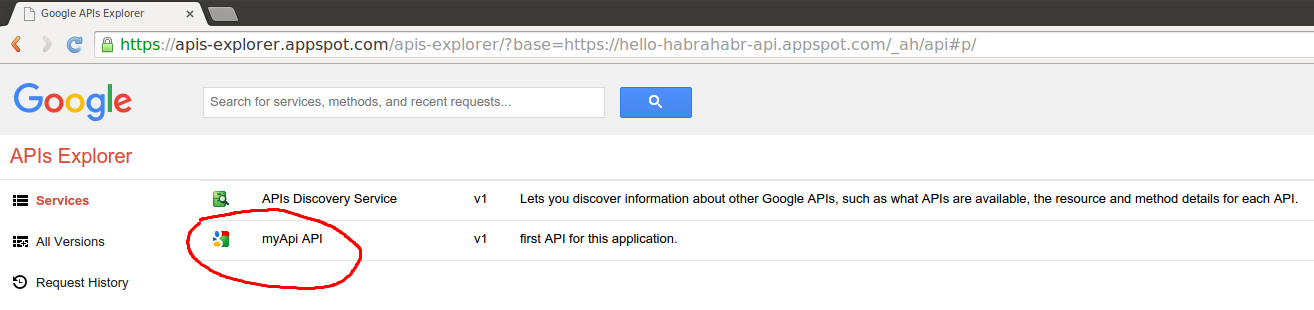
Now deploy (mvn clean install && mvn appengine: update) and open in the web browser the address https: // {project ID} .appspot.com / _ah / api / explorer, in my case hello-habrahabr-api.appspot.com / _ah / api / explorer .
We click on the name of our API (if we create several classes in Api annotation - there will be several) and see the methods contained in this API (class methods with the @ApiMethod annotation):
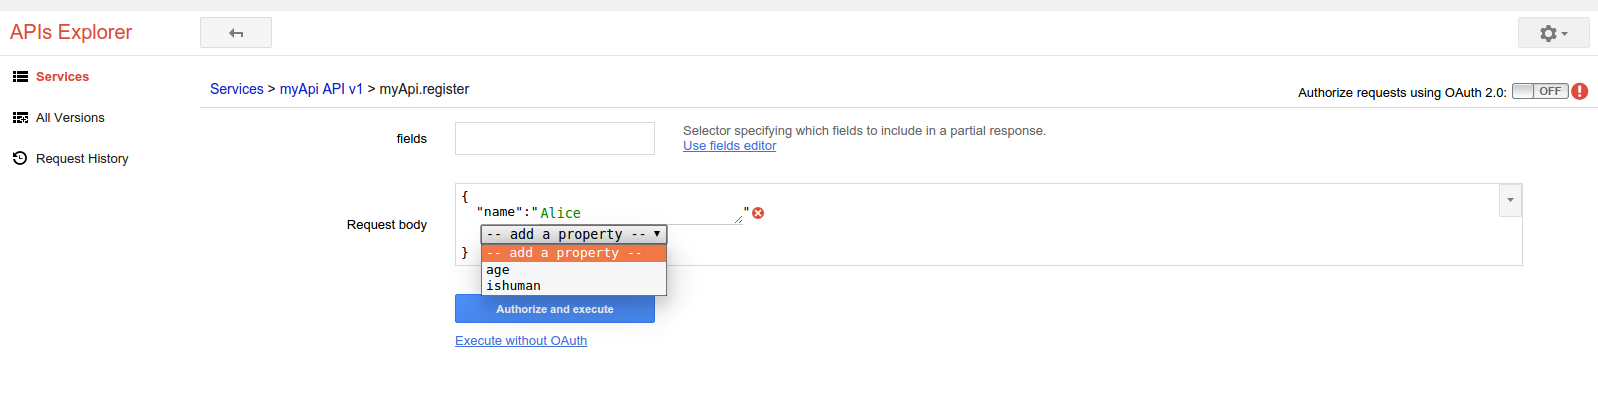
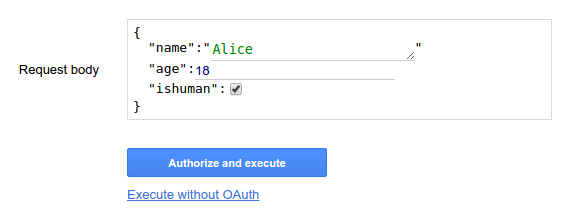
By clicking on the field “Request body” we can fill in the request data received by the api-method:
Then we can choose “Autorize and execute” - and then we will need to pass authorization using Google account (@ gmail.com) or choose “Execute without OAuth”, because our API does not use authorization at all, we will see identical results with authorization and without:
"- Show headers -" is clickable in Response.
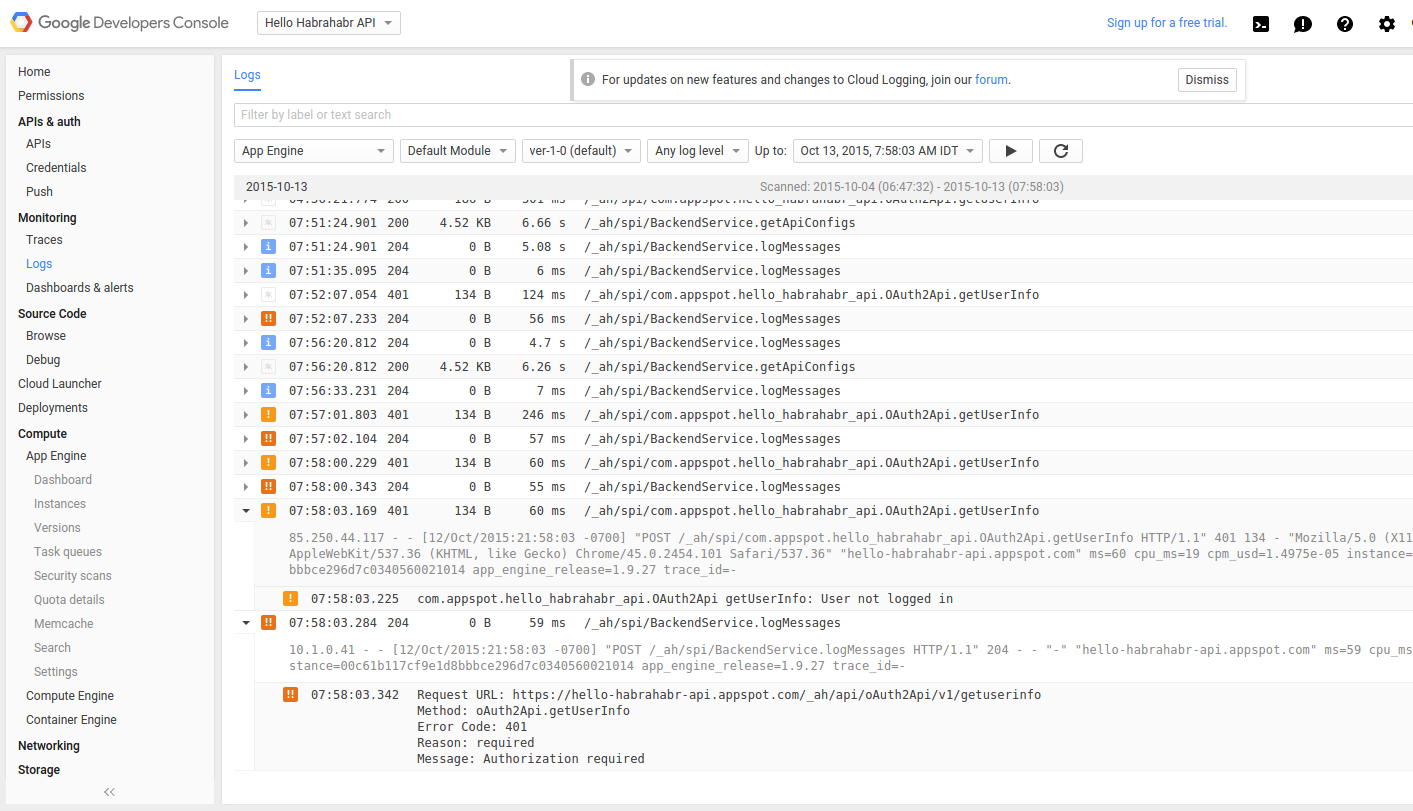
Logging
Logs are available at: console.developers.google.com/project/ Your project ID} / logs.
Settings in the /src/main/webapp/WEB-INF/logging.properties file and /src/main/webapp/WEB-INF/appengine-web.xml.
In order for our class to issue messages to the log, you need a class API:
one.
import java.util.logging.Logger; 2
@SuppressWarnings("unused") private static final Logger LOG = Logger.getLogger({ }.class.getName()); 3. In the method add:
LOG.info(""); Authorize OAuth 2.0 using your google account (@ gmail.com)
In Constants.java add:
import com.google.api.server.spi.Constant and
public static final String API_EXPLORER_CLIENT_ID = Constant.API_EXPLORER_CLIENT_ID This is necessary for testing OAuth-protected API methods in APIs Explorer.
Our Constants.java will look like this:
package com.appspot.hello_habrahabr_api; import com.google.api.server.spi.Constant; /** * Contains the client IDs and scopes for allowed clients consuming your API. */ public class Constants { public static final String WEB_CLIENT_ID = "replace this with your web client ID"; public static final String ANDROID_CLIENT_ID = "replace this with your Android client ID"; public static final String IOS_CLIENT_ID = "replace this with your iOS client ID"; public static final String ANDROID_AUDIENCE = WEB_CLIENT_ID; public static final String EMAIL_SCOPE = "https://www.googleapis.com/auth/userinfo.email"; public static final String API_EXPLORER_CLIENT_ID = Constant.API_EXPLORER_CLIENT_ID; } Now create a new class:
package com.appspot.hello_habrahabr_api; import com.google.api.server.spi.config.Api; import com.google.api.server.spi.config.ApiMethod; import com.google.api.server.spi.config.ApiMethod.HttpMethod; import com.google.api.server.spi.response.UnauthorizedException; import com.google.appengine.api.users.User; // https://cloud.google.com/appengine/docs/java/javadoc/index?com/google/appengine/api/users/User.html import java.util.logging.Logger; @Api( name = "oAuth2Api", // The api name must match '[az]+[A-Za-z0-9]*' version = "v1", description = "API using OAuth2" ) public class OAuth2Api { @SuppressWarnings("unused") private static final Logger LOG = Logger.getLogger(OAuth2Api.class.getName()); @ApiMethod( name = "getUserInfo", path = "getuserinfo", httpMethod = HttpMethod.POST ) @SuppressWarnings("unused") public User getUserInfo(User user) throws UnauthorizedException { if (user == null) { LOG.warning("[warning] User not logged in"); throw new UnauthorizedException("Authorization required"); } return user; } } And write it in the init-param of the SystemServiceServlet servlet in web.xml:
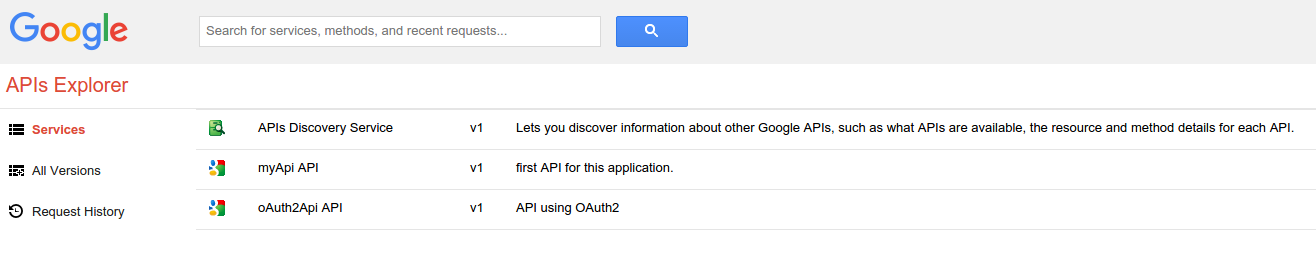
<servlet> <servlet-name>SystemServiceServlet</servlet-name> <servlet-class>com.google.api.server.spi.SystemServiceServlet</servlet-class> <init-param> <param-name>services</param-name> <param-value> com.appspot.hello_habrahabr_api.YourFirstAPI, com.appspot.hello_habrahabr_api.OAuth2Api </param-value> </init-param> </servlet> Deploy the project, and see API Explorer:
We see a new API in the list by clicking on it we see a list of its methods.
Click on the method name:
Now, if we click "Execute without OAuth" we get an Exception:
If you click “Autorize and execute” - you need to log in using your Google account. In Response, we get email, nickname, and userId (a unique Google user number).
The class object com.google.appengine.api.users.User is supplied by GAE and contains information about the current user, if the user is not authorized, correspondingly null. Thus, we can perform authorization using the Google Account login-password.
As mentioned on Habré ( Sometimes less is better - why only Google authorization ? , Usability of authorization forms ) a project can do without its own processing of logins and passwords.
In my opinion, this is the right approach, primarily from a security point of view. Naturally, we can do "registration" on the site after entering additional information, payment, etc.
Creating a frontend on AngularJS will be covered in the next article.
UPD:
continued:
Google Cloud Endpoints in Java: A Guide. Part 2 (Frontend)
Google Cloud Endpoints in Java: A Guide. part 3
Working with the database in Google App Engine / Google Cloud Endpoints in Java: Objectify framework
Google Cloud Storage with Java: images and other files in the clouds
Source: https://habr.com/ru/post/268863/
All Articles