How to install Nutanix CE under VMware ESXi

After launching our Nutanix Community Edition, the free, “soft” version of Nutanix, which can be installed on an arbitrary, user-defined hardware, I often had to answer the questions: “What if we don’t have a suitable physical server? Can I put it as a “virtual applause”, inside the hypervisor, on a virtual machine? ”
In the summer, the developers compiled a version that learned to work in nested virtualization mode, that is, a CVM virtual machine running in the KVM hypervisor, which, in turn, works in the VMware ESXi hypervisor, and this latter emulates the right hardware for our hypervisor.
')
Here's how to do it:
First, you need a server under the ESXi hypervisor and enough memory. The CVM of each node will take 16GB, and you will need to leave some more for your VMs themselves in a Nutanix CE environment.
The minimum number of nodes in CE is one (and, of course, there will be no fault tolerance), the maximum is four. Two is not supported, respectively, three options: one (without fault tolerance), three and four.
Here is an example of a server on which the described method was tested:
2 x 8 core Intel Xeon E5-2680
384GB RAM
500GB SSD
1024GB HDD
VMWare ESXi 5.5 U2
Remember, however, that, in any case, you will need SSDs in the server. Yes, there is a way to “fool”, and make ESXi and Nutanix consider the HDD slipped by you as an SSD, but nothing good will come of it, believe me, so only an SSD. It does not have to be an Intel S3700 / S3610 server, as we use, but it must be a disk of sufficient size and with good speed, otherwise you will not see performance.
Prepare the boot disk. You downloaded an installation disk image from the Nutanix CE forum that looks something like this: ce-2015.06.08-beta.img .
Now rename it to a file with the name: ce-flat.vmdk .
Create a disk descriptor file: ce.vmdk
The contents of the disk descriptor file (for version ce-2015.06.08-beta) you can use this:
# Disk DescriptorFile version=4 encoding="UTF-8" CID=a63adc2a parentCID=ffffffff isNativeSnapshot="no" createType="vmfs" # Extent description RW 14540800 VMFS "ce-flat.vmdk" # The Disk Data Base #DDB ddb.adapterType = "lsilogic" ddb.geometry.cylinders = "905" ddb.geometry.heads = "255" ddb.geometry.sectors = "63" ddb.longContentID = "2e046b033cecaa929776efb0a63adc2a" ddb.uuid = "60 00 C2 9b 69 2f c9 76-74 c4 07 9e 10 87 3b f9" ddb.virtualHWVersion = "10" Now create a virtual machine.
Create a new VM, select CentOS 4/5/6/7 (64bit) as the type.
Let's set the number of vCPU - 12 (minimum - 4, but not recommended).
Set the amount of RAM - 128GB (minimum - 16).
Set HDD volume to 900GB , mapping on SCSI0: 0 (minimum - 500GB)
Set the amount of SSD to 350GB , mapping on SCSI0: 1 (minimum - 200GB)
Choose an Intel E1000 NIC.
Now you can go to the datastor for SCP, and fill in our ce-flat.vmdk and ce.vmdk
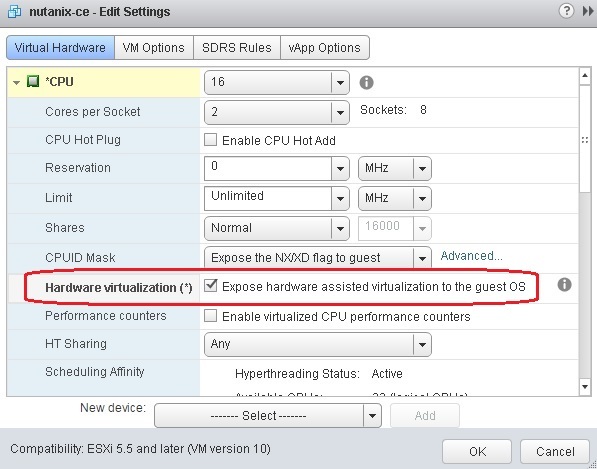
Edit the VM settings. Install VM settings - CPU -> Hardware virtualization -> Expose hardware assisted virtualization to the guest OS.
Add a new SATA controller.
We mount our vmdk on this controller.
Now you can start the VM and install CE.
We start VM, and we enter its BIOS, having pressed when loading F2.
Install as a boot device SATA-controller.
Loading.
As you already know, CE uses CentOS-based KVM as the hypervisor. Other options on CE we do not. But, with the KVM Management Tool, available in the GUI, it is quite convenient to work in KVM.
After downloading and prior to installation, you can make several optional settings:
Edit the file /home/install/phx_iso/phoenix/sysUtil.py, specifying (changing) the lines there: "SSD_rdIOPS_thresh = 5000" and "SSD_wrIOPS_thresh = 5000", this will help if you have a not quite suitable SSD.
Edit the size of memory allocated for the needs of the CVM.
There, in the /home/install/phx_iso/phoenix/sysUtil.py file, edit the line “SVM_GB_RAM = 16” (this is the amount of memory that will be allocated to the CVM in gigabytes).
Remember, however, that memory for CVM is urgently needed, and reducing its volume can significantly reduce speed.
Login to the console: root, password: nutanix / 4u (10 characters, all small, the eighth - slash).
We start the installation by logging in as the install user.
Promiscous Mode should be enabled on the vSwitch switch to which VMs with Nutanix CE are connected, otherwise CVM will not be seen.
Is done. For example, using such a nested install, we managed to put Nutanix CE under ESXi 5.5U2 on an HP ProLiant server, which is not suitable for installing CE equipment.
However, remember that the performance of such a solution may be far from what it can show "on hardware", however, to "see" or learn how, you can use this option.
Source: https://habr.com/ru/post/268823/
All Articles