Installing the PROXY server on DD-WRT
How to install DD-WRT on the router will not tell, this is full of articles. But how to install a proxy, I did not find an intelligible manual. So I decided to write my own.
In order to install third-party software without obstruction, your DD-WRT will need additional space, which is usually not enough in the router. Therefore, it is necessary to connect an additional USB flash drive to it. Since in my case the router will distribute the Internet from a 3G modem, and the USB port on my router 1, and in order not to fool with the USB hub, I inserted the microSD USB flash drive directly into the 3G modem.
Most Huawei 3G modems have a microSD connector. I have a Huawei E1820 modem from Megaphone.
')
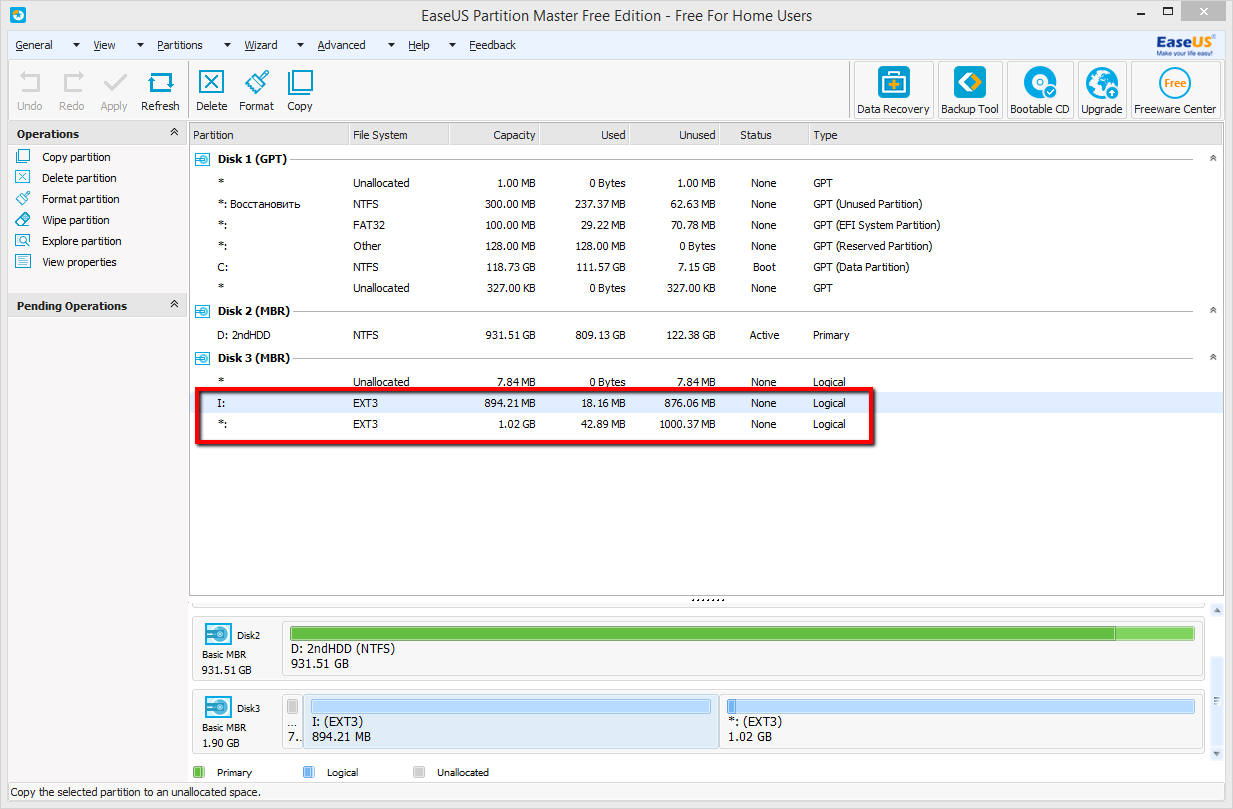
So, in order for the flash drive to work as storage for the DD-WRT system files, and this is Linux in its pure form, you must first create several partitions on our flash drive, and format them into an ext3 file system. Not everyone has linux on hand, so I'll show you how to do it under Windows.
First, install the driver that allows you to work with this file system. You can download from sourceforge.net/projects/ext2fsd - Installing this driver is optional, it is only needed if you want to work with the contents of the USB flash drive in Windows. In order to partition the disc itself, download the program EaseUS Partition Master Home Edition, which is available here: www.partition-tool.com/download.htm . The program is free for home use and is well suited for our task.
Create 3 sections:
/ opt - all our installed software will be stored here
/ jffs - here are various scripts. By the way, in the end, I have disabled this section and no longer use it.
/ swap - system swap, to increase the amount of RAM. If you are going to install software that consumes a lot of memory in your dd-wrt, it is simply necessary for you, in my case, the 60MB of memory that is in my router is enough for my proxies, so I won’t create a section for the swap.
My flash drive was 2 GB so I created two partitions, one with a capacity of 900 MB, and the second one with 1000 MB.
Next, we connect all this stuff to our router.
I have an Asus RT-N13U B1 router with one of the latest dd-wrt v3.0 firmware installed on it. Now it is necessary to mount our sections. Go to the web in the tab Services-> USB and connect our section. We put a tick in Core USB Support, USB Storage Support, Automatic Drive Mount. Copy the UUIDs of the disks into partitions so that they are automatically mounted on boot.

Next, you need to install the package control system ipkg-opt. By this time, the Internet on the router should already be configured. Turn on SSH access to the router and go to it. We execute sequentially commands.
Download the installation script:
Next, we make the installation itself:
After everything is established, we establish a proxy:
If you do not know how to use vi (like I previously learned now), you can install another nano editor:
Now we need to configure our proxy and create startup scripts. This is how my config looks, you can configure it as you need, just do not change the location of the PID file.
Edit the config:
Let's enter there:
Now create startup scripts. I don’t know for what reason, but the standard method for running scripts via /jffs/etc/config/script.startup, works only when a software reboot is in progress, but as soon as I cut the devices off the network and turn it on again, this script does not work. Perhaps this is due to the fact that my microSD is connected somehow slowly due to the fact that through a 3G modem.
This situation does not suit me, because if the light is turned off, for example, after switching on, the software I need will not start, in this case tinyproxy and I will have to first go to the router via ssh and do a software reboot and only after that everything will start. So I went a bit of a workaround, and did the launch of the main script via cron.
Create a directory for scripts:
We give the right to perform:
Create the main startup script:
We give the right to perform:
Now create a tinyproxy startup script:
Give rights to perform
Now we will add to the cron a task that will run our script after 20 seconds after the router boots. In this embodiment, all my scripts work out with a bang and the router works like a clock.
Go through the web to the tab Administration -> Management and write the following line with cron:

Save the settings and restart the router. All is ready.
In order to install third-party software without obstruction, your DD-WRT will need additional space, which is usually not enough in the router. Therefore, it is necessary to connect an additional USB flash drive to it. Since in my case the router will distribute the Internet from a 3G modem, and the USB port on my router 1, and in order not to fool with the USB hub, I inserted the microSD USB flash drive directly into the 3G modem.
Most Huawei 3G modems have a microSD connector. I have a Huawei E1820 modem from Megaphone.
')
So, in order for the flash drive to work as storage for the DD-WRT system files, and this is Linux in its pure form, you must first create several partitions on our flash drive, and format them into an ext3 file system. Not everyone has linux on hand, so I'll show you how to do it under Windows.
First, install the driver that allows you to work with this file system. You can download from sourceforge.net/projects/ext2fsd - Installing this driver is optional, it is only needed if you want to work with the contents of the USB flash drive in Windows. In order to partition the disc itself, download the program EaseUS Partition Master Home Edition, which is available here: www.partition-tool.com/download.htm . The program is free for home use and is well suited for our task.
Create 3 sections:
/ opt - all our installed software will be stored here
/ jffs - here are various scripts. By the way, in the end, I have disabled this section and no longer use it.
/ swap - system swap, to increase the amount of RAM. If you are going to install software that consumes a lot of memory in your dd-wrt, it is simply necessary for you, in my case, the 60MB of memory that is in my router is enough for my proxies, so I won’t create a section for the swap.
My flash drive was 2 GB so I created two partitions, one with a capacity of 900 MB, and the second one with 1000 MB.
Next, we connect all this stuff to our router.
I have an Asus RT-N13U B1 router with one of the latest dd-wrt v3.0 firmware installed on it. Now it is necessary to mount our sections. Go to the web in the tab Services-> USB and connect our section. We put a tick in Core USB Support, USB Storage Support, Automatic Drive Mount. Copy the UUIDs of the disks into partitions so that they are automatically mounted on boot.
Next, you need to install the package control system ipkg-opt. By this time, the Internet on the router should already be configured. Turn on SSH access to the router and go to it. We execute sequentially commands.
Download the installation script:
wget http://www.3iii.dk/linux/optware/optware-install-ddwrt.sh -O - | tr -d '\r' > /tmp/optware-install.sh Next, we make the installation itself:
sh /tmp/optware-install.sh After everything is established, we establish a proxy:
ipkg-opt install tinyproxy If you do not know how to use vi (like I previously learned now), you can install another nano editor:
ipkg-opt install nano Now we need to configure our proxy and create startup scripts. This is how my config looks, you can configure it as you need, just do not change the location of the PID file.
Edit the config:
nano /opt/etc/tinyproxy.conf Let's enter there:
User root Group root Port 8888 Timeout 600 DefaultErrorFile "/opt/share/tinyproxy/default.html" StatFile "/opt/share/tinyproxy/stats.html" LogLevel Info PidFile "/tmp/var/run/tinyproxy.pid" MaxClients 100 MinSpareServers 5 MaxSpareServers 20 StartServers 10 MaxRequestsPerChild 0 Allow 192.168.0.0/16 ViaProxyName "tinyproxy" ConnectPort 443 ConnectPort 563 Now create startup scripts. I don’t know for what reason, but the standard method for running scripts via /jffs/etc/config/script.startup, works only when a software reboot is in progress, but as soon as I cut the devices off the network and turn it on again, this script does not work. Perhaps this is due to the fact that my microSD is connected somehow slowly due to the fact that through a 3G modem.
This situation does not suit me, because if the light is turned off, for example, after switching on, the software I need will not start, in this case tinyproxy and I will have to first go to the router via ssh and do a software reboot and only after that everything will start. So I went a bit of a workaround, and did the launch of the main script via cron.
Create a directory for scripts:
mkdir /opt/etc/init.d We give the right to perform:
chmod +x /opt/etc/init.d Create the main startup script:
nano /opt/etc/init.d/start_script.sh #!/bin/sh unset LD_PRELOAD unset LD_LIBRARY_PATH [ -e /opt/etc/profile ] && mount -o bind /opt/etc/profile /etc/profile if [ -d /opt/etc/init.d ]; then for f in /opt/etc/init.d/S* ; do [ -x $f ] && $f start done fi We give the right to perform:
chmod +x /opt/etc/init.d/start_script.sh Now create a tinyproxy startup script:
nano /opt/etc/init.d/S01tinyproxy.sh #! /bin/sh NAME=tinyproxy DESC="Tiny HTTP and HTTPS proxy" case "$1" in start) if [ -e /tmp/var/run/$NAME.pid ]; then echo "$DESC: $NAME already started." exit 0 fi echo -n "Starting $DESC: $NAME" /opt/sbin/$NAME -c /opt/etc/tinyproxy.conf echo . ;; stop) if [ ! -e /tmp/var/run/$NAME.pid ]; then echo "$DESC: $NAME is not running." exit 0 fi echo -n "Stopping $DESC: $NAME" killall $NAME rm -f /tmp/var/run/$NAME.pid echo . ;; *) echo "Usage: $0 {start|stop}" >&2 exit 1 ;; esac exit 0 Give rights to perform
chmod +x /opt/etc/init.d/S01tinyproxy.sh Now we will add to the cron a task that will run our script after 20 seconds after the router boots. In this embodiment, all my scripts work out with a bang and the router works like a clock.
Go through the web to the tab Administration -> Management and write the following line with cron:
@reboot sleep 20 && /opt/etc/init.d/start_script.sh
Save the settings and restart the router. All is ready.
Source: https://habr.com/ru/post/268729/
All Articles