Rust in details: we write scalable chat from scratch, part 1
Part 1: Implementing WebSocket. Introduction
In this series of articles we will look at the process of creating a scalable chat that will work in real time.
The purpose of this review is to step through the basics of the rapidly gaining popularity of the Rust programming language in practice, with fair system interface coverage.
In the first part, we will look at the initial setting of the environment and the implementation of the simplest WebSocket server. To understand the technical details of the article, you will not need experience with the Rust language, although knowledge of the basics of the system API (POSIX) and C / C ++ will not be superfluous. Before you start reading, prepare a little time (and coffee) - the article describes everything as detailed as possible and therefore quite long.
1 Rust - the reason for choosing
I became interested in the Rust programming language because of a long-standing fascination with system programming, which is an interesting though, but also quite complicated - all because there are a lot of completely unobvious moments and tricky problems for both novice and experienced developers.
')
 And, perhaps, the most difficult problem here is safe work with memory. It is the incorrect work with memory that causes many bugs: buffer overflow , memory leaks , double memory freeings , hanging references , pointer dereferencing to already freed memory, etc. And such errors sometimes entail serious problems in security - for example, the cause of the not-long-ago sensational bug in OpenSSL, Heartbleed , is nothing more than a careless handling of memory. And this is only the tip of the iceberg - no one knows how many similar gaps lie in the software that we use every day.
C ++ has come up with several ways to solve such problems — for example, using smart pointers [1] or allocation on the stack [2] . Unfortunately, even applying such approaches, there is still a chance that, as it were, “shoot yourself a leg” - go beyond the buffer or use low-level functions for working with memory that always remain available.
That is, at the level of the language there is no obligatory condition to apply such practices - instead, it is considered that “good developers” always use them themselves and never make mistakes. However, I believe that the existence of such critical problems in the code is in no way connected with the level of developers, because people cannot thoroughly check manually large amounts of code - this is the task of the computer. To some extent, static analysis tools help here - but, again, they are used by no means all and not always.
It is for this reason that there is another fundamental method of getting rid of problems in working with memory: garbage collection is a separate complex area of knowledge in computer science. Almost all modern languages and virtual machines have some form of automatic garbage collection, and despite the fact that in most cases this is a fairly good solution, it has its drawbacks: first, automatic garbage collectors are difficult to understand and implement [3 ] . Secondly, the use of garbage collection implies a pause to free up unused memory [4] , which usually entails the need for fine-tuning to reduce waiting time in high-loaded applications.
The Rust language has a different approach to the problem - one can say the golden mean - automatic release of memory and resources without additional memory consumption or processor time and without the need to independently monitor each step. This is achieved through the use of the concepts of ownership and borrowing .
The language is based on the assertion that each value can have only one owner - that is, there can be only one variable variable pointing to a specific memory area:
let foo = vec![1, 2, 3]; // (), 1, 2, 3, // `foo`. let bar = foo; // `bar`. // `foo`, // "" - .., . This approach has interesting consequences: since the value is associated exclusively with one variable, the resources associated with this value (memory, file descriptors, sockets, etc.) are automatically released when the variable leaves the scope (which is specified by blocks of code inside the curly braces ,
{ and } ).Such artificial restrictions may seem unnecessary and unnecessarily overcomplicated, but if you think well, then, by and large, this is the “killer feature” Rust, which appeared solely for practical reasons. This approach allows Rust to look like a high-level language while maintaining the effectiveness of low-level code written in C / C ++.
However, despite all its interesting features, until recently Rust had its own serious flaws - for example, a very unstable API, in which no one could guarantee the preservation of compatibility. But the creators of the language have come a long way in almost a decade [5] , and now, with the release of a stable version 1.0, the language has evolved to a state where it can be started to be put into practice in real projects.
2 Goals
I prefer to learn new languages and concepts by developing relatively simple projects with applications in the real world. Thus, the possibilities of the language are studied precisely when they become necessary. As a project for studying Rust, I chose anonymous chat service like Chat Roulette and many others. In my opinion, this is a suitable choice for the reason that chats are usually demanding a low response time from the server and imply a large number of simultaneous connections. We will count on several thousand - so we can look at the memory consumption and performance of programs written in Rust in a real environment.
The end result should be a binary program file with scripts for deploying our server on various cloud hosting.
But before we start writing code, we need to make a small digression to clarify some points with I / O, since proper work with it is a key point when developing network services.
3 I / O options
To complete the tasks, our service needs to send and receive data through network sockets.
At first glance, the task is simple, but in fact there are many possible ways to solve it of varying complexity and varying effectiveness. The main difference between them lies in the approach to locks : the standard practice here is to stop the processor while waiting for new data to arrive in the socket.
Since we cannot build a service for one user who will block the rest, we must somehow isolate them from each other. A typical solution is to create a separate thread of execution for each user. Thus, not the whole process will be blocked, but only one of its threads. The disadvantage of this approach, despite its relative simplicity, is the increased memory consumption — each thread, when created, reserves some part of the memory for the stack [6] . In addition, the case is complicated by the need to switch the execution context - modern server processors usually have from 8 to 16 cores, and if we create more threads than hardware allows, the OS scheduler stops coping with switching tasks with sufficient speed.
Therefore, scaling a multi-threaded program to a large number of connections can be quite difficult, and in our case it is hardly reasonable at all - after all, we are planning several thousand simultaneously connected users. In the end, you have to be ready for the Habraeffect!
4 event loop
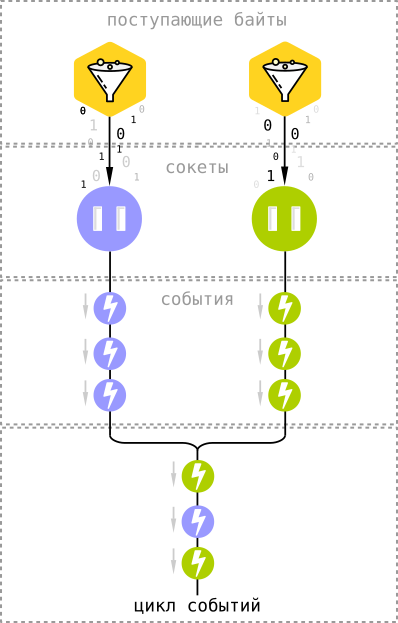 To work effectively with I / O, we will use multiplexing system APIs based on the event loop . The Linux kernel has an epoll mechanism [7] for this, and kqueue [8] in FreeBSD and OS X.
Both of these APIs are arranged in a rather similar way, and the general idea is simple: instead of waiting for new data to come to the sockets through the network, we ask the sockets to notify us of the bytes that came.
Alerts in the form of events come in a common cycle, which in this case acts as a blocker. That is, instead of constantly checking thousands of sockets for the presence of new data in them, we just wait for the sockets themselves to tell us about it - and the difference is quite significant, since quite often connected users are in standby mode, sending nothing and not getting. This is especially true for applications using WebSocket. In addition, using asynchronous I / O, we have virtually no overhead - all that is required to be stored in memory is the socket file descriptor and client status (in the case of a chat, this is several hundred bytes per connection).
A curious feature of this approach is the ability to use asynchronous I / O not only for network connections, but also, for example, to read files from disk - the event loop accepts any type of file descriptors (and sockets in the * NIX world are them).
The event loop in Node.js and the EventMachine gems in Ruby work in exactly the same way.
The same is true for the nginx web server, which uses exclusively asynchronous I / O [9] .
5 Starting a project
Further text implies that you already have Rust installed. If not, then follow the documentation on the official site .
In the standard delivery of Rust, there is a program called
cargo that performs functions similar to Maven, Composer, npm, or rake - it manages dependencies of our application, builds a project, runs tests, and most importantly, it simplifies the process of creating a new project.This is what we need at the moment, so let's try to open a terminal and type this command:
cargo new chat --bin The argument
--bin indicates to Cargo that it is necessary to create a running application, and not a library.As a result, we will have two files:
Cargo.toml src/main.rs Cargo.toml contains a description and links to project dependencies (similar to package.json in JavaScript).src/main.rs is the main source file and entry point to our program.We won't need anything else to begin with, so you can try to compile and run the program with one command -
cargo run . The same command displays errors in the code, if any.If you are a happy Emacs user, you will be happy to know that it is compatible with Cargo “out of the box” - just install therust-modepackage from the MELPA repository and configure the compile command to start thecargo build.
6 Event Handling in Rust
Let's move from theory to practice. Let's try to run a simple event loop that will wait for new messages to appear. To do this, we do not need to manually connect various system APIs - just use the existing library for working with asynchronous I / O called “ Metal IO ” or mio .
As you remember, the Cargo program handles dependencies. It loads libraries from the crates.io repository, but also allows you to get them from the Git repository directly - this option is useful in cases where we need to use the latest version of the library that has not yet been loaded into the package repository.
At the time of writing this article, only the already outdated version 0.3 is available in the repository for
mio - there are many useful changes in the development version 0.4, which are also incompatible with the old versions. Therefore, we connect it directly through GitHub, adding such lines to Cargo.toml : [dependencies.mio] git = "https://github.com/carllerche/mio" After we have defined the dependency in the project description, we will add import to
main.rs : extern crate mio; use mio::*; Using
mio is easy. First of all, let's create a loop of events by calling the EventLoop::new() function. From the empty cycle, however, there is no use, so let's immediately add event handling to our chat, defining a structure with functions that will correspond to the Handler interface.Although in the Rust language there is no support for “traditional” object-oriented programming, structures are in many ways similar to classes, and in a manner similar to classical OOP, they can implement interfaces that are regulated in the language through types .
Let's define a new structure:
struct WebSocketServer; And we realize the type
Handler for her: impl Handler for WebSocketServer { // , // Handler : // . // , // mio: type Timeout = usize; type Message = (); } Now run the event loop:
fn main() { let mut event_loop = EventLoop::new().unwrap(); // Handler: let mut handler = WebSocketServer; // ... : event_loop.run(&mut handler).unwrap(); } Here, for the first time, we encounter the use of borrowings : notice the
&mut on the last line. This means that we temporarily transfer “ownership” of a value, associating it with another variable with the possibility of changing (mutation) the data.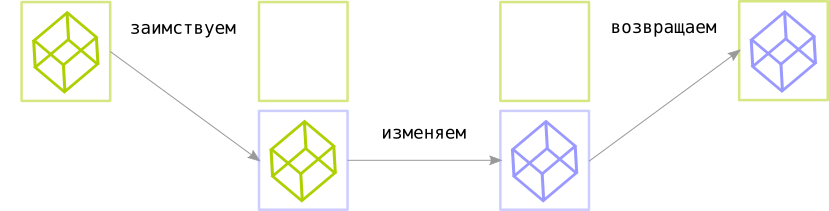
Simply put, you can imagine the principle of borrowing as follows (pseudocode):
// "" - owner: let mut owner = value; // : { let mut borrow = owner; // . // : borrow.mutate(); // : owner = borrow; } The above code is equivalent to this:
// "" - owner: let owner = value; { // : let mut borrow = &mut owner; // , . // : borrow.mutate(); // // . } For each scope , a variable can have only one mutable borrow , and even the value owner cannot read or change it until the borrowing goes out of scope.
In addition, there is a simpler way to borrow values through immutable borrow (immutable borrow) , which allow the value to be read-only. And, unlike
&mut , changeable borrowing, it does not set any limits on reading, only on writing - as long as there are unchangeable borrowings in the field of visibility, the value cannot change and be borrowed through &mut .It's okay if such a description did not seem clear enough to you - sooner or later an intuitive understanding will come, since the borrowings in Rust are used everywhere, and as you read the article you will find more practical examples.
Now let's go back to our project. Run the “
cargo run ” command and Cargo will download all necessary dependencies, compile the program (with some warnings that we can ignore for now), and launch it.As a result, we will see a terminal window with a flashing cursor. This is not a very interesting result, but at least it shows that the program is running correctly - we have successfully launched a cycle of events, although it still doesn’t do anything useful. Let's fix this situation.
To interrupt the execution of the program, use the key combination Ctrl + C.
7 TCP server
To start a TCP server that will accept connections via the WebSocket protocol, we will use the intended structure (struct) -
TcpListener from the mio::tcp package. The process of creating a server-side TCP socket is fairly straightforward - we bind to a specific address (IP + port number), listen to the socket, and accept connections. We will not depart much from him.Let's take a look at the code:
use mio::tcp::*; use std::net::SocketAddr; ... let address = "0.0.0.0:10000".parse::<SocketAddr>().unwrap(); let server_socket = TcpListener::bind(&address).unwrap(); event_loop.register(&server_socket, Token(0), EventSet::readable(), PollOpt::edge()).unwrap(); Let's look at it line by line.
First of all, we need to import into the scope of our
main.rs module a packet for working with TCP and the SocketAddr structure describing the socket address — we add these lines to the beginning of the file: use mio::tcp::*; use std::net::SocketAddr; Let's parse the string
"0.0.0.0:10000" into the structure describing the address and assign a socket to this address: let address = "0.0.0.0:10000".parse::<SocketAddr>().unwrap(); server_socket.bind(&address).unwrap(); Notice how the compiler outputs the necessary type of structure for us: since
server_socket.bind expects an argument of type SockAddr , we do not need to specify it explicitly and clutter the code — the Rust compiler is able to determine it itself.Create a listening socket and start listening:
let server_socket = TcpListener::bind(&address).unwrap(); You might also notice that we almost always call
unwrap for the result of the function — this is the error handling pattern in Rust, and we will return to this topic soon.Now let's add the created socket to the event loop:
event_loop.register(&server_socket, Token(0), EventSet::readable(), PollOpt::edge()).unwrap(); The
register call is more complicated - the function takes the following arguments:- Token is a unique identifier for the socket. When an event enters a loop, we must somehow understand which socket it belongs to - in this case, the token serves as a link between the sockets and the events generated by them. In the example above, we associate a
Token(0)token with a server socket waiting for a connection. - EventSet describes which events we subscribe to: the arrival of new data on a socket, the availability of a socket for writing, or both.
EventSet::readable()in the case of a server socket only signs us up for one event — the establishment of a connection with a new client. - PollOpt sets event subscription settings.
PollOpt::edge()means that events are triggered by a front (edge-triggered) , and not by a level (level-triggered) .
The difference between the two approaches, whose names are borrowed from electronics, is when the socket notifies us of an event that has occurred - for example, when a data receipt event occurs (that is, if we subscribe to thereadable()event) in the event of a level trigger, we get alert if the socket buffer has readable data. In the case of a signal at the front, we will receive an alert at the moment when the socket receives new data — that is, if we did not read the entire contents of the buffer while processing the event, we will not receive new alerts until new ones are received. data. A more detailed description (in English) is in response to the Stack Overflow .
Now let's compile the resulting code and run the program using the
cargo run command. In the terminal, we still will not see anything except the blinking cursor - but if we separately execute the netstat command, we will see that our socket is waiting for connections to the port number 10,000:$ netstat -ln | grep 10,000 tcp 0 0 127.0.0.1:10000 0.0.0.0:* LISTEN
8 Accepted connections
All connections using the WebSocket protocol begin with handshaking (so-called handshake ) - a special sequence of requests and responses sent over HTTP. This means that before proceeding with the implementation of WebSocket, we must teach our server to communicate using the basic protocol, HTTP / 1.1.
But we need only a small part of HTTP: a client who wants to establish a connection through WebSocket sends a request with
Connection: Upgrade and Upgrade: websocket , and we must respond to this request in a certain way. And that's all - we do not need to write a full-fledged web server with the distribution of files, static content, etc. - for this there are more advanced and suitable tools (for example, the same nginx).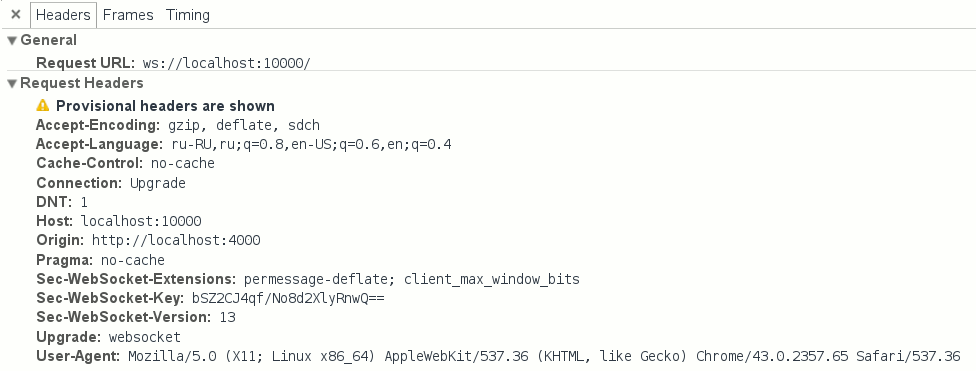
WebSocket connection request headers.
But before we start implementing HTTP, we need to write code to establish connections with clients and subscribe to events coming from them.
Consider the basic implementation:
use std::collections::HashMap; struct WebSocketServer { socket: TcpListener, clients: HashMap<Token, TcpStream>, token_counter: usize } const SERVER_TOKEN: Token = Token(0); impl Handler for WebSocketServer { type Timeout = usize; type Message = (); fn ready(&mut self, event_loop: &mut EventLoop<WebSocketServer>, token: Token, events: EventSet) { match token { SERVER_TOKEN => { let client_socket = match self.socket.accept() { Err(e) => { println!(" : {}", e); return; }, Ok(None) => panic!(" accept 'None'"), Ok(Some(sock)) => sock }; self.token_counter += 1; let new_token = Token(self.token_counter); self.clients.insert(new_token, client_socket); event_loop.register(&self.clients[&new_token], new_token, EventSet::readable(), PollOpt::edge() | PollOpt::oneshot()).unwrap(); } } } } There was a lot of code, so let's take a closer look at it - step by step.
First of all, we need to add a state to the server structure of
WebSocketServer - it will store the server socket and the sockets of the connected clients. use std::collections::HashMap; struct WebSocketServer { socket: TcpListener, clients: HashMap<Token, TcpStream>, token_counter: usize } To store client sockets, we use the
HashMap data structure from the standard collection library, std::collections is the standard implementation for hash tables (also known as dictionaries and associative arrays). As a key, we will use tokens that are already familiar to us, which should be unique for each connection.To start, we can generate tokens in a simple way - using a counter, which we will increment by one for each new connection. To do this, we need the
token_counter variable in the structure.Next, the
Handler type from the mio library comes in handy again: impl Handler for WebSocketServer In the implementation of the type, we need to override the callback function (callback) -
ready . Redefinition is understood to mean that the Handler type already contains a ready dummy function and blanks for some other callback functions. The implementation defined in the type does not, of course, do anything useful, so we need to define our own version of the function to handle the events of interest to us: fn ready(&mut self, event_loop: &mut EventLoop<WebSocketServer>, token: Token, events: EventSet) This function will be called every time the socket becomes available for reading or writing (depending on the subscription), and through its call parameters we get all the necessary information: an instance of the structure of the event cycle, the token associated with the event source (in this case, the socket), and a special structure
EventSetthat contains a set of flags with information about the event ( readable in case of notification of the availability of a socket for reading, or writable - for writing, respectively).A listening socket generates readable events.at the moment when the new client enters the waiting queue. But before we begin to connect, we need to make sure that the source of the event is the listening socket. We can easily verify this using pattern matching :
match token { SERVER_TOKEN => { ... } } What does it mean?The syntax
matchresembles the standard switch construction of “traditional” imperative programming languages, but gives much more possibilities. For example, in Java, a construct is switchlimited to a specific set of types and works only for numbers, strings, and enum enums. In Rust, however, matchit allows you to make comparisons for almost any type, including multiple values, structures, etc. In addition to matching, it matchalso allows capturing content or parts of samples in a manner similar to regular expressions.In the above example, we associate a token with a sample
Token(0)— as you remember, it is associated with a listening socket. And to make our intentions more understandable when reading the code, we defined this token as a constant SERVER_TOKEN : const SERVER_TOKEN: Token = Token(0); Thus, the example of expression
matchin this case is equivalent to this: match { Token(0) => ... }.Now that we are sure that we are dealing with a server socket, we can establish a connection with the client:
let client_socket = match self.socket.accept() { Err(e) => { println!(" : {}", e); return; }, Ok(None) => unreachable!(), Ok(Some(sock)) => sock }; Here we do the pattern matching again, this time checking the result of executing the function
accept()that returns the client socket in a type “wrapper” Result<Option<TcpStream>>. ResultThis is a special type that is fundamental to error handling in Rust — it is a wrapper around “unspecified” results, such as errors, timeouts (time-out), etc.In each case, we can decide for ourselves what to do with such results, but correctly processing all errors, although, of course, correctly, but rather tedious. Here we are assisted by a function already familiar to us
unwrap(), which provides standard behavior: interrupting program execution in the event of an error, and “unpacking” the result of executing the function from the containerResultin the event that everything is in order. Thus, using unwrap(), we mean that we are only interested in the immediate result, and the situation with the fact that the program will stop its execution in case of an error suits us.This is a valid behavior in some moments, however, in the case of
accept()it, it would be unwise to use it unwrap(), since in the case of an unsuccessful set of circumstances, a call may turn into stopping our server and disconnecting all users. Therefore, we simply output the error to the log and continue with the execution: Err(e) => { println!(" : {}", e); return; }, Type
Option- similar to the Result“wrapper”, which determines the presence or absence of any value. The absence of a value is indicated by None, otherwise, the value takes the form Some(value). As you probably guess, this type is comparable to the types of null or None in other languages, only Optionsafer due to the fact that all null values are localized and (as well as Result) require mandatory “unpacking” before use - so you will never see “Famous” mistake NullReferenceException, if you don’t want it yourself.So let's unpack the result returned
accept()by: Ok(None) => unreachable!(), In this case, the situation is when the value is
Nonenot returned as a result - accept()it will be returned only if we try to call this function as applied to the client (that is, not listening) socket. And since we are sure that we are dealing with a server-side socket, then we shouldn’t have to do this before executing this piece of code in a normal situation - so we use a special construct unreachable!()that interrupts the program with an error.We continue to compare the results with the samples:
let client_socket = match self.socket.accept() { ... Ok(Some(sock)) => sock } Here is the most interesting thing: since it
matchis not just an instruction, but an expression (that is, it matchalso returns a result), in addition to matching, it also allows you to capture values. Thus, we can use it to assign results to variables — which we do above, unpacking the value from a type Result<Option<TcpStream>>and assigning it to a variable client_socket.We save the resulting socket in a hash table, not forgetting to increase the token counter:
let new_token = Token(self.token_counter); self.clients.insert(new_token, client_socket); self.token_counter += 1; Finally, we need to subscribe to events from the socket with which we have just established a connection — let's register it in the event loop. This is done in exactly the same way as with the registration of the server socket, only now we will provide another token as parameters, and, of course, another socket:
event_loop.register(&self.clients[&new_token], new_token, EventSet::readable(), PollOpt::edge() | PollOpt::oneshot()).unwrap(); You may have noticed another difference in the set of arguments: in addition to
PollOpt::edge(), we have added a new option PollOpt::oneshot(). It instructs to temporarily remove the registration of a socket from a loop when an event is triggered, which is useful for simplifying server code. Without this option, we would need to manually monitor the current state of the socket — can we now write, can we now read, etc. Instead, we will simply register the socket every time, with the set of options and subscriptions we need at the moment. On top of that, this approach is useful for multi-threaded event cycles, but more on that next time.And finally, due to the fact that our structure
WebSocketServercomplicated, we need to change the server registration code in the event loop. The changes are quite simple and mainly concern the initialization of the new structure: let mut server = WebSocketServer { token_counter: 1, // 1 clients: HashMap::new(), // -, HashMap socket: server_socket // }; event_loop.register(&server.socket, SERVER_TOKEN, EventSet::readable(), PollOpt::edge()).unwrap(); event_loop.run(&mut server).unwrap(); 9 Parsim HTTP
Now that we have established a connection with the client, according to the protocol, we need to parse the incoming HTTP request and “ upgrade ” the connection to the WebSocket protocol.
Since this is a rather boring task, we will not do all this manually - instead, we will use the
http-muncherHTTP parsing library , adding it to the dependency list. The library adapts the HTTP parser from Node.js for Rust (which is also a parser in nginx), which allows processing requests in streaming mode, which will be very useful for TCP connections.Let's add dependencies to
Cargo.toml: [dependencies] http-muncher = "0.2.0" We will not consider the library API in detail, and immediately proceed to writing the parser:
extern crate http_muncher; use http_muncher::{Parser, ParserHandler}; struct HttpParser; impl ParserHandler for HttpParser { } struct WebSocketClient { socket: TcpStream, http_parser: Parser<HttpParser> } impl WebSocketClient { fn read(&mut self) { loop { let mut buf = [0; 2048]; match self.socket.try_read(&mut buf) { Err(e) => { println!(" : {:?}", e); return }, Ok(None) => // . break, Ok(Some(len)) => { self.http_parser.parse(&buf[0..len]); if self.http_parser.is_upgrade() { // ... break; } } } } } fn new(socket: TcpStream) -> WebSocketClient { WebSocketClient { socket: socket, http_parser: Parser::request(HttpParser) } } } And we also need to make some changes to the implementation of the function
readyin the structure WebSocketServer: match token { SERVER_TOKEN => { ... self.clients.insert(new_token, WebSocketClient::new(client_socket)); event_loop.register(&self.clients[&new_token].socket, new_token, EventSet::readable(), PollOpt::edge() | PollOpt::oneshot()).unwrap(); ... }, token => { let mut client = self.clients.get_mut(&token).unwrap(); client.read(); event_loop.reregister(&client.socket, token, EventSet::readable(), PollOpt::edge() | PollOpt::oneshot()).unwrap(); } } Let's try again to consider the new code line by line.
First we import the library and add the controlling structure for the parser:
extern crate http_muncher; use http_muncher::{Parser, ParserHandler}; struct HttpParser; impl ParserHandler for HttpParser { } Here we add a type implementation
ParserHandlerthat contains some useful callback functions (as well as Handlerfrom miothe case of a structure WebSocketServer). These callbacks are called as soon as the parser has any useful information - HTTP headers, request content, and so on. But now we just need to find out if the client sent a set of special headers to switch the HTTP connection to the WebSocket protocol. In the structure of the parser, there are already necessary functions for this, therefore, we will not redefine callbacks yet, leaving their standard implementations.However, there is one detail: the HTTP parser has its own state, which means that we will need to create a new instance of the structure.
HttpParserfor every new customer. Given that each client will keep parser status, let's create a new structure that describes an individual client: struct WebSocketClient { socket: TcpStream, http_parser: Parser<HttpParser> } Since now we can store the client socket in the same place, we can replace the definition
HashMap<Token, TcpStream>with HashMap<Token, WebSocketClient>in the server structure.In addition, it would be convenient to move the code that relates to the processing of clients in the same structure - if you keep everything in one function
ready, the code will quickly turn into “noodles”. So let's add a separate implementation readin the structure WebSocketClient: impl WebSocketClient { fn read(&mut self) { ... } } This function does not need to take any parameters - we already have a required state inside the structure itself.
Now we can start reading data from the client:
loop { let mut buf = [0; 2048]; match self.socket.try_read(&mut buf) { ... } } What's going on here?We begin an infinite loop (construction
loop { ... }), allocate 2 KB of memory for the buffer where we will write data, and try to write incoming data to it.The call
try_readmay fail, so we are matching the sample by type Result: match self.socket.try_read(&mut buf) { Err(e) => { println!(" : {:?}", e); return }, ... } Then we check if there are any more bytes to read in the TCP socket buffer:
match self.socket.try_read(&mut buf) { ... Ok(None) => // . break, ... } try_readreturns the result Ok(None)if we have read all the available data from the client. When this happens, we interrupt the endless cycle and continue to wait for new events.And finally, here is the handling of the case when the call has
try_readwritten data to our buffer: match self.socket.try_read(&mut buf) { ... Ok(Some(len)) => { self.http_parser.parse(&buf[0..len]); if self.http_parser.is_upgrade() { // ... break; } } } Here we send the data to the parser and immediately check the existing HTTP headers for the presence of a request to “switch” the connection to WebSocket mode (more precisely, we expect the header
Connection: Upgrade).The last improvement is a function
newthat we need in order to make it more convenient to create instances of the client structure WebSocketClient: fn new(socket: TcpStream) -> WebSocketClient { WebSocketClient { socket: socket, http_parser: Parser::request(HttpParser) } } This is the so-called associated function , which in its behavior is in many respects similar to the static methods from the traditional object-oriented approach, and
newwe can compare the function specifically with the designer. Here we simply create an instance WebSocketClient, but it should be understood that we can do it in the same way without the “constructor” function — this is more a matter of convenience, because without using constructor functions, the code can become often repetitive, without any particular need. In the end, the principle of DRY (“do not repeat”) was invented for a reason.There are a couple of details. Please note that we do not use the keyword
returnexplicitly - Rust allows you to automatically return the last expression of a function as its result.And this line requires an explanation:
http_parser: Parser::request(HttpParser) Here we create a new instance of the structure
Parserusing an associative function Parser::request. As an argument, we pass the created instance of the previously defined structure HttpParser.Now that we have dealt with clients, we can return to the server code, in which
readywe make the following changes in the handler : match token { SERVER_TOKEN => { ... }, token => { let mut client = self.clients.get_mut(&token).unwrap(); client.read(); event_loop.reregister(&client.socket, token, EventSet::readable(), PollOpt::edge() | PollOpt::oneshot()).unwrap(); } } We have added a new condition in
match, which handles all other tokens, besides SERVER_TOKEN- that is, events in client sockets. With the existing token, we can borrow a variable reference to the corresponding instance of the client structure from the hash table: let mut client = self.clients.get_mut(&token).unwrap(); Now let's call for this client the function
readwe defined above: client.read(); At the end, we have to re-register the client in the event loop (due
oneshot()): event_loop.reregister(&client.socket, token, EventSet::readable(), PollOpt::edge() | PollOpt::oneshot()).unwrap(); As you can see, the differences from the client socket registration procedure are minor - in fact, we simply change the name of the called function from
registerto reregister, passing all the same parameters.That's all - now we know when the client wants to establish a connection using the WebSocket protocol, and now we can think about how to respond to such requests.
10 Connection confirmation
In fact, we could send back such a simple set of headers:
HTTP/1.1 101 Switching Protocols Connection: Upgrade Upgrade: websocket If it were not for one important detail: the WebSocket protocol commits us to also send a properly composed header
Sec-WebSocket-Accept. According to the RFC , you need to do this by following certain rules - we need to get and remember the header sent by the client Sec-WebSocket-Key, add a certain static string ( "258EAFA5-E914-47DA-95CA-C5AB0DC85B11") to it, then hash the result with the SHA-1 algorithm, and finally encode it all in base64.The standard Rust library has no functions for working with SHA-1 and base64, but all the necessary libraries are in the crates.io repository , so let's add them to ours
Cargo.toml: [dependencies] ... rustc-serialize = "0.3.15" sha1 = "0.1.1" The library
rustc-serializecontains functions for encoding binary data in base64, and sha1, obviously, for hashing in SHA-1.The function that generates the response key is quite simple:
extern crate sha1; extern crate rustc_serialize; use rustc_serialize::base64::{ToBase64, STANDARD}; fn gen_key(key: &String) -> String { let mut m = sha1::Sha1::new(); let mut buf = [0u8; 20]; m.update(key.as_bytes()); m.update("258EAFA5-E914-47DA-95CA-C5AB0DC85B11".as_bytes()); m.output(&mut buf); return buf.to_base64(STANDARD); } We get the link to the string with the key as an argument of the function
gen_key, create a new instance of the SHA-1 hash, add the key sent by the client to it, then add the constant string defined in the RFC, and return the result as a string encoded in base64.But in order to use this function as intended, we first need to get a header from the client
Sec-WebSocket-Key. Let's go back to the HTTP parser from the previous section. As you remember, the type ParserHandlerallows us to redefine callbacks that are called when new headers are received. Now is the time to take advantage of this opportunity - let's improve the implementation of the relevant structure: use std::cell::RefCell; use std::rc::Rc; struct HttpParser { current_key: Option<String>, headers: Rc<RefCell<HashMap<String, String>>> } impl ParserHandler for HttpParser { fn on_header_field(&mut self, s: &[u8]) -> bool { self.current_key = Some(std::str::from_utf8(s).unwrap().to_string()); true } fn on_header_value(&mut self, s: &[u8]) -> bool { self.headers.borrow_mut() .insert(self.current_key.clone().unwrap(), std::str::from_utf8(s).unwrap().to_string()); true } fn on_headers_complete(&mut self) -> bool { false } } By itself, this code is quite simple, but here we are faced with a new important concept - co-ownership .
As you already know, in Rust a value can have only one owner, but in some moments we may need to share ownership - for example, in this case we need to find a specific header in the hash table, but at the same time we need to write these headers in the parser. Thus, we get 2 owners of the variable
headers- WebSocketClientand ParserHandler.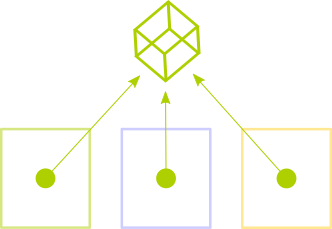 To resolve this contradiction in Rust there is a special type
 Rc- this is a wrapper with reference counting (which can be considered a type of garbage collection). Basically, we transfer ownership of the container.Rcwhich in turn we can safely share into many owners with the help of black language magic - we just clone the value Rcusing the function clone(), and the container manages the memory for us.True, there is a nuance here - a value that contains
Rc unchangeable , and due to the limitations of the compiler, we cannot somehow influence it. In fact, this is just a consequence of the Rust rule about the variability of data - you can have as many borrowings as a variable, but you can only change it if the owner is one.And here a contradiction comes again - after all, we need to add new headings to the list, despite the fact that we are sure that we change this variable only in one place, so that we do not formally break the Rust rules. Only the compiler with us on this score will not agree - when you try to change the contents
Rc, a compilation error will occur.But, of course, in the language there is a solution to this problem - it uses another type of container
RefCell. It solves it due to the mechanism of data internal variability . Simply put, RefCellit allows us to put aside all the validation rules to the runtime (runtime) - instead of having to check them statically at compile time. Thus, we will need to wrap our headers in two containers at the same time - Rc<RefCell<...>>(which, of course, looks pretty scary for unprepared minds).Let's look at these lines from the handler
HttpParser: self.headers.borrow_mut() .insert(self.current_key.clone().unwrap(), ... Such a construction is generally consistent with changeable borrowing
&mut, with the difference that all checks for limiting the number of borrowings will be carried out dynamically during program execution, so we, and not the compiler, should be closely watched, otherwise a runtime error may occur.The variable
headerswill directly own the structure WebSocketClient, so let's add new properties to it and write a new constructor function: // RefCell Rc use std::cell::RefCell; use std::rc::Rc; ... struct WebSocketClient { socket: TcpStream, http_parser: Parser<HttpParser>, // WebSocketClient: headers: Rc<RefCell<HashMap<String, String>>> } impl WebSocketClient { fn new(socket: TcpStream) -> WebSocketClient { let headers = Rc::new(RefCell::new(HashMap::new())); WebSocketClient { socket: socket, // : headers: headers.clone(), http_parser: Parser::request(HttpParser { current_key: None, // ... : headers: headers.clone() }) } } ... } Now we
WebSocketClienthave access to parsed headings, and therefore we can find among them the one that is interesting to us - Sec-WebSocket-Key. Taking into account the fact that we have a client key, the procedure for drafting an answer will not cause any difficulties. We just need to piece together a string and write it to the client socket.But since we cannot just send data to non-blocking sockets, we first need to ask the event loop to let us know about the availability of the socket for writing. This is easy to do - you need to change the set of flags
EventSetto EventSet::writable()when the socket is reregistered.Remember this line?
event_loop.reregister(&client.socket, token, EventSet::readable(), PollOpt::edge() | PollOpt::oneshot()).unwrap(); We can store a set of events of interest to us in the state of the client - we will change the structure
WebSocketClient: struct WebSocketClient { socket: TcpStream, http_parser: Parser<HttpParser>, headers: Rc<RefCell<HashMap<String, String>>>, // , `interest`: interest: EventSet } Now we will change the re-registration procedure accordingly:
event_loop.reregister(&client.socket, token, client.interest, // `EventSet` PollOpt::edge() | PollOpt::oneshot()).unwrap(); It remains for us to change the value
interestin the right places. To simplify this process, let's formalize it using connection states: #[derive(PartialEq)] enum ClientState { AwaitingHandshake, HandshakeResponse, Connected } Here we define the enumeration of all possible states for the client connected to the server. The first state
AwaitingHandshake,, means that we expect a new client to connect using HTTP. HandshakeResponsewill mean a state when we respond to the client via HTTP. And finally, the Connectedstate when we have successfully established a connection with the client and communicate with it using the WebSocket protocol.Add a state variable to the client structure:
struct WebSocketClient { socket: TcpStream, http_parser: Parser<HttpParser>, headers: Rc<RefCell<HashMap<String, String>>>, interest: EventSet, // : state: ClientState } And add the initial values of the new variables to the constructor:
impl WebSocketClient { fn new(socket: TcpStream) -> WebSocketClient { let headers = Rc::new(RefCell::new(HashMap::new())); WebSocketClient { socket: socket, ... // Initial events that interest us interest: EventSet::readable(), // Initial state state: ClientState::AwaitingHandshake } } } Now we can change the state in the function
read. Remember these lines? match self.socket.try_read(&mut buf) { ... Ok(Some(len)) => { if self.http_parser.is_upgrade() { // ... break; } } } Let's change the stub in the condition block for
is_upgrade()the code for changing the connection state: if self.http_parser.is_upgrade() { // HandshakeResponse self.state = ClientState::HandshakeResponse; // Writable // (.. ): self.interest.remove(EventSet::readable()); self.interest.insert(EventSet::writable()); break; } After we changed the set of flags of interest to
Writable, we will add the code necessary to send a response to establish the connection.We will change the function
readyin the implementation of the structure WebSocketServer. The procedure of writing the response to the socket is simple (and practically does not differ from the reading procedure), and we only need to separate one type of event from the other: fn ready(&mut self, event_loop: &mut EventLoop<WebSocketServer>, token: Token, events: EventSet) { // ? if events.is_readable() { // Move all read handling code here match token { SERVER_TOKEN => { ... }, ... } ... } // : if events.is_writable() { let mut client = self.clients.get_mut(&token).unwrap(); client.write(); event_loop.reregister(&client.socket, token, client.interest, PollOpt::edge() | PollOpt::oneshot()).unwrap(); } } Only a little remains - we need to assemble in parts and send the response line:
use std::fmt; ... impl WebSocketClient { fn write(&mut self) { // - Rc<RefCell<...>>: let headers = self.headers.borrow(); // : let response_key = gen_key(&headers.get("Sec-WebSocket-Key").unwrap()); // . // (printf , format Python, ..), // Rust - // , "" // . . let response = fmt::format(format_args!("HTTP/1.1 101 Switching Protocols\r\n\ Connection: Upgrade\r\n\ Sec-WebSocket-Accept: {}\r\n\ Upgrade: websocket\r\n\r\n", response_key)); // : self.socket.try_write(response.as_bytes()).unwrap(); // : self.state = ClientState::Connected; // `readable()` ( ): self.interest.remove(EventSet::writable()); self.interest.insert(EventSet::readable()); } } Let's try to connect to our server. Open the development console in your favorite browser (by pressing F12, for example), and enter the following code:
ws = new WebSocket('ws://127.0.0.1:10000'); if (ws.readyState == WebSocket.OPEN) { console.log('Connection is successful'); } 
It seems that everything works - we are connected to the server!
Conclusion
Our fascinating journey through the possibilities and unusual concepts of the Rust language has come to an end, but we have touched only the very beginning - the series of articles will continue (of course, the sequels will be just as long and boring! :)). We need to consider many other interesting questions: secure TLS connections, multi-threaded event cycles, load testing and optimization, and, of course, the most important thing is that we still need to finish implementing the WebSocket protocol and write the chat application itself.
But before we get to the application, you will need to do a little refactoring and separating the library code from the application code. Most likely, we will also consider publishing your library on crates.io .
All current code is available on Github, you can fork the repository and try to change something in it.
To follow the appearance of the following parts of the article I suggest to follow me on Twitter .
See you soon!
Notes
[1] It should be noted that Rust essentially uses smart pointers to the level of language - the idea of borrowing is very similar to the types
unique_ptrand shared_ptrfrom C ++.[2] For example, the coding standard for C in the NASA Jet Propulsion Laboratory and the software development standard in the automotive industry MISRA C generally prohibit the use of dynamic memory allocation via
malloc(). Instead, local variables are allocated on the stack and preallocated memory is used.[3] Simple garbage collection algorithms are fairly easy to use, but more complex options, such as multi-threaded assembly, may require a lot of effort to implement. For example, in the Go language, multithreaded garbage collection appeared only to version 1.5, which was released almost 3 years after the first one.
[4] Generally speaking, many implementations of functions
malloc()and free()have the same problem due to memory fragmentation .[5] “Graydon Hoare [...] started working on a new programming language called Rust in 2006” - InfoQ: “Interview On Rust”
[6] The man page
pthread_create(3)tells you about 2 MB on a 32-bit Linux system.[7] For comparison, epoll with other system APIs I recommend reading the publication “Comparing and Evaluating epoll, select, and poll Event Mechanisms ”, University of Waterloo, 2004 (English)
[8]“ Kqueue: A generic and scalable event notification facility ”(English)
[9]“ NGINX from the inside: born for performance and scaling ”.
I express my gratitude for the help:
podust for illustrations and proofreading.
VgaCich for reading drafts and corrections.
Source: https://habr.com/ru/post/268609/
All Articles