Using Remote API in the V-REP Robosimulator

V-REP is an environment for simulating (sandbox) different types of robots, while the user does not need to have physical access to a real machine, which saves money and time. The V-REP environment provides a convenient interface for visualizing the actions of a robot in three-dimensional virtual space much earlier than the real prototype of the robot will be created. With the help of this guide, you will be convinced that in order to work in this environment, the programmer does not need to have much technical experience in the field of robotics.
The reason for the creation of this manual was the lack of (at that time) knowledge of the Lua language, in which all the robot control scripts are written by default, and its lesser popularity. The purpose of this tutorial is to show how to use the remote API of this environment using the Python example.
To get started, download the version for Academic Purposes (Non-limited EDUCATIONAL) for your OS from the official site .
')
After installing and running the program, the main program window opens.
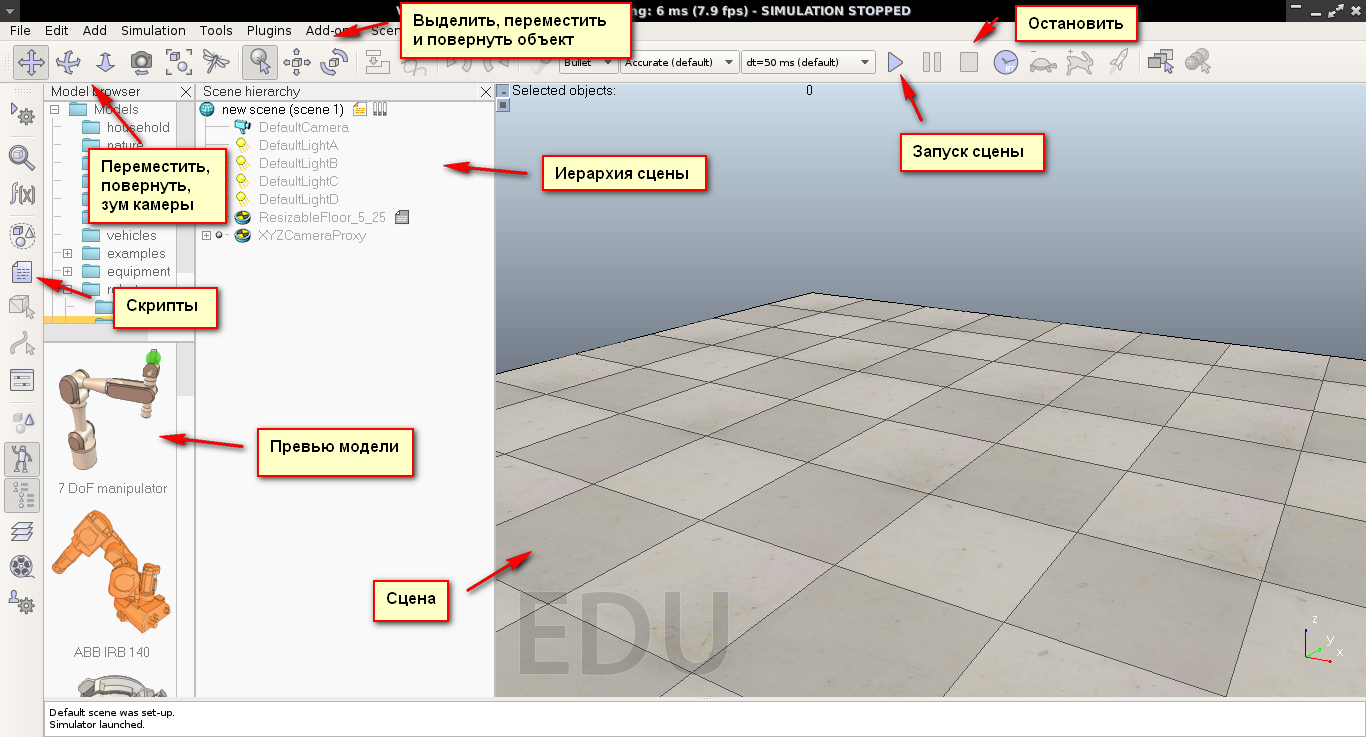
When you open the V-REP environment, it initializes the scene by default. The user can open several scenes in parallel, but only the current one is displayed.
The toolbar contains a set of buttons, the main of which are buttons for starting and stopping the scene.

Also tools for working with the camera. To move and change the viewing angle, approximation.

The following tools exist for working with elements placed on the scene: “selectability” of the object by pressing, moving and changing the angle of the object. In this case, the selected object has additional axes, for which it is convenient to move and rotate.

The scene hierarchy contains a list of open scenes. Each scene includes various objects that can consist of a whole set of sub-objects, thus building a whole hierarchy. The default scene includes: Camera, Light Sources, Extensible Floor. By clicking on the plus sign in the tree, you can view the dependent objects.

As you noticed, to the right of the name of some objects there are various icons. Thus, dependent Lua scripts are displayed, which can be viewed by double-clicking. The scene itself has a main script, which is not recommended to edit. And other objects have their own, which can be added, edited and modified according to your needs.
Let's add something to our scene. V-REP contains a whole collection of various robots that you can preview in the Model Browser (Tools | Model browser). To add the desired model, you only need to drag it onto the stage. At the same time, it is important that the scene be stopped while dragging, otherwise your changes will not be saved.

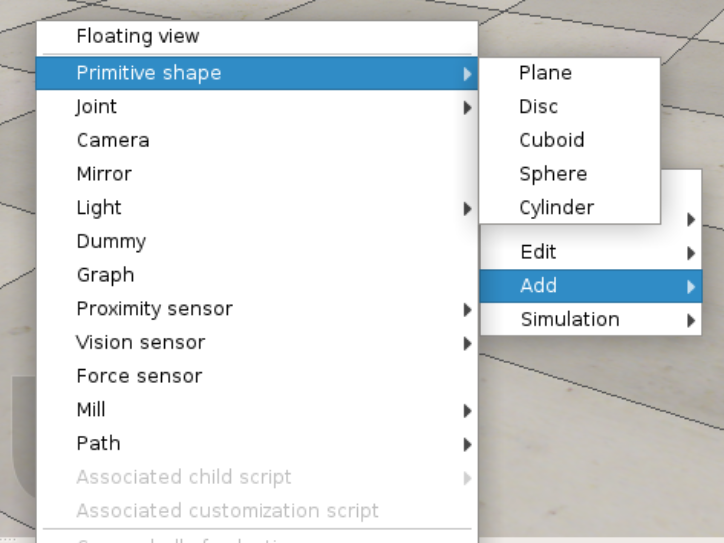
Also in the environment are available all the basic primitives, which can be added by clicking the right mouse button on the stage and selecting the appropriate menu items.
For example, add a cube to our scene by selecting Add | Primitive shape | Cuboid.
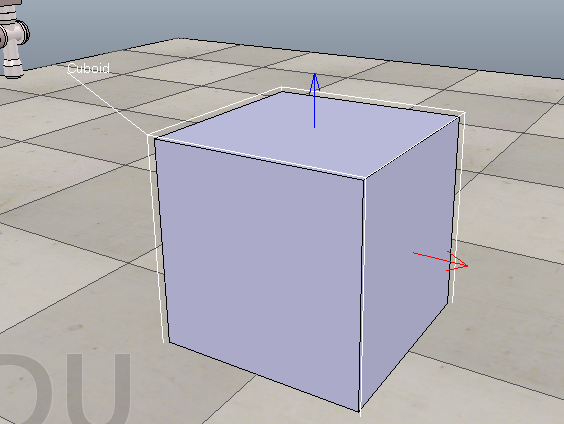
And we will set the size in the menu that appears 0.400 x 0.400 x 0.400. (Corresponding to the metric system).

Let's take a look at how to interact with V-REP through the Remote API provided by it, which allows you to write scripts for the environment in various languages, including C / C ++, Python, Java, Matlab / Octave and Urbi.
- First, create a folder for our new project.
- Then create a new scene or delete / discard the changes on the default scene.
- Save the scene, such as myFirstScene. As a result, the file myFirstScene.ttt will be created.
- Next you need to copy several files from the directory with the installed program. Go into it. It contains the programming folder, then in remoteApiBindings, from which you need to copy several files into the folder created earlier for the project. Namely files from the python folder (vrep.py, vrepConst.py, simpleTest.py). And files from the lib folder in accordance with the bit width of your OS (it can be remoteApi.so or remoteApi.dll).
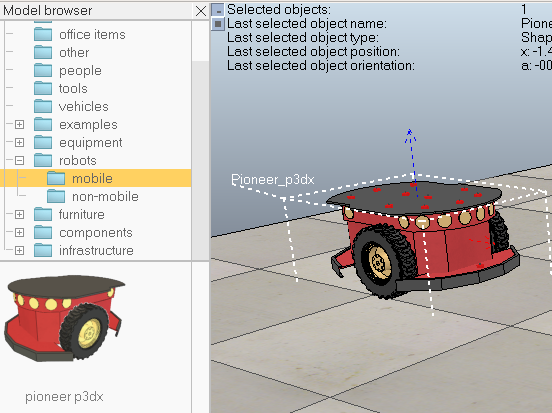
Add a pioneer p3dx robot model to the scene. To do this, select mobile in the model viewer in the robots tree and drag the robot onto the stage.
If you now click on the Play button (Start Scene), the robot will go in the forward direction, the logic of its work is contained in the attached script, which we will soon replace with our Python script.
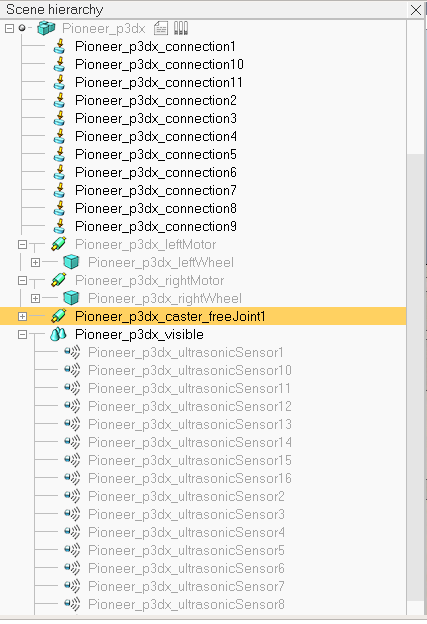
If we carefully examine what is in the model hierarchy in the scene (Scene hierachy), we can see that the robot consists of a pair of wheels (Pioneer_p3dx_leftWheel and Pioneer_p3dx_rightWheel), 16 sensors on the sides (Pioneer_p3dx_ultrasonicSensor1-16) and 11 connectors (Pioneer_p3dx_connection1-11) .
First, let's turn off the script that moves the robot forward. To do this, click on the sidebar button Scripts (Scripts).

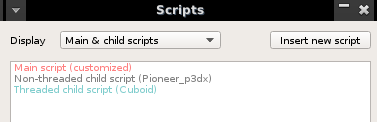
A new window will appear, listing all the scripts available on the scene.

Now select the script of the robot Non-threaded child script (Pioneer_p3dx) and tick the Disabled checkbox.

Now close this window and test. Having turned on the scene, the robot should stand still. The fact that the script is disabled is also indicated by the changed icon in the scene hierarchy.

Now let's understand a little about how our script will interact with the scene using the Remote API.
V-REP provides simulation controls from an external application or external device (for example, from a real robot, remote computer). The API contains hundreds of functions that can be called through communication sockets, with minimal latency and network load. All this happens in a form hidden from the user. Using the remote API, you can interact with the V-REP in synchronous and asynchronous modes (the asynchronous mode is the default), and even remotely control the simulator (remotely load the scene, start and stop the simulation).
Note : Synchronous mode implies that the simulator will wait for a confirmation signal from the client to perform the next step at time t + dt.
To get started with the Remote API, you need to activate it on the server side, that is, in the V-REP environment itself. To do this, you need to activate port listening in any active thread-dependent script (for example, adding a command to an existing Lua-script or adding some primitive, the same cube and attaching a script to it).
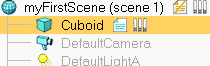
Let's add a cube to the scene as described above, leaving the default dimensions (0.100 x 0.100 x 0.100). Select it on the scene, right-click and select Add | Associated child script | Threaded.
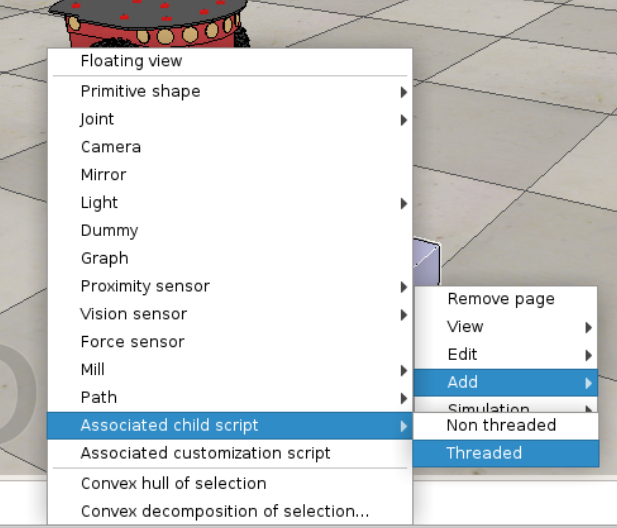
After that, the icon of the dependent script and its settings in the scene hierarchy will appear next to the name of our cube. The corresponding item will also appear in the Scripts panel.
By clicking on the script icon in a text editor, the standard frame of the stream scripts is displayed, in which you should add the line for opening and activating the port in the Lua language.
simExtRemoteApiStart(19999) Add it immediately after the simSetThreadSwitchTiming (2) command, the result will be the following.

If at this stage try to start the scene, then nothing will happen. It remains to write the code affecting the objects of the scene.
To do this, go back to the folder of our project and pay attention to the script simpleTest.py. Let's examine its contents:
import vrep print ('Program started') vrep.simxFinish(-1) # just in case, close all opened connections clientID = vrep.simxStart('127.0.0.1',19999,True,True,5000,5) if clientID != -1: print ('Connected to remote API server') res,objs=vrep.simxGetObjects(clientID,vrep.sim_handle_all,vrep.simx_opmode_oneshot_wait) if res == vrep.simx_return_ok: print ('Number of objects in the scene: ', len(objs)) else: print ('Remote API function call returned with error code: ', res) vrep.simxFinish(clientID) else: print ('Failed connecting to remote API server') print ('Program ended') Try running it. If the scene is not started, you will receive a corresponding notification in the console, otherwise the script will calculate the number of objects on the scene.

We will understand the contents of this script. If you own the IPython tool, you can enter commands line by line and study what the V-REP functions return.
First we import the V-REP module. Do not forget that it must be in the current script directory (for this we copied those files from the programming folder), otherwise Python will not detect it.
import vrep Next, stop the other connections to the scene so that they do not interfere with the logic of our script, if they exist of course. For this, there is a simxFinish function with an argument of -1.
vrep.simxFinish(-1) Next, you need to connect to a remote server on the port that we opened in the cube script. Since V-REP is running locally with us, the address is 127.0.0.1. According to the documentation for Remote Api for Python ( link ), the arguments of this function denote the following:
clientID = vrep.simxStart('127.0.0.1', 19999, True, True, 5000, 5) - connectionAddress : The IP address where the server is located (ie the address of the server with the V-REP).
- connectionPort : The port to connect to.
- waitUntilConnected : If True, then the function is blocked for the duration of the connection or until the time-out period ends.
- doNotReconnectOnceDisconnected : If True, then the communication flow will not attempt to reconnect if the connection is lost.
- timeOutInMs : Connection timeout in milliseconds (for the first connection).
- commThreadCycleInMs : Indicates how often data packets should be exchanged. Reducing this number increases sensitivity, and 5 is recommended as default.
As a return value clientID: the identifier of the client ID, or -1 if connection to the server is not possible (including at the end of the time-out time).
A call to simxStart must always be paired with a call to simxFinish, except in the case where the connection was not completed (ie clientID = -1). What does the following line of code correspond to?
vrep.simxFinish(clientID) After an attempt to establish a connection, a success check is performed, which is reported by the corresponding message.
if clientID != -1: print ('Connected to remote API server') ... else: print ('Failed connecting to remote API server') Then the script requests all objects on the scene through the function vrep.simxGetObjects.
According to the documentation that you can study on the official website ( link ), the function receives handles of objects of a certain type or, as in our case, all types (vrep.sim_handle_all); The last argument means that after sending the command, the function will wait for a response from the server and return it if no errors occur or the time-out time is exceeded (vrep.simx_opmode_oneshot_wait). The remaining modes can be viewed here .
res, objs = vrep.simxGetObjects(clientID, vrep.sim_handle_all, vrep.simx_opmode_oneshot_wait) The function returns 2 errorCode values: an error code and objectHandles : an array of object handles.
This is followed by checking the error code and, if successful, counting the number of objects on the scene:
if res == vrep.simx_return_ok: print ('Number of objects in the scene: ', len(objs)) else: print ('Remote API function call returned with error code: ', res) It should be noted that the constant simx_return_ok corresponds to zero (0).
Fine! After we understand the meaning of the functions, let's finally revive our scene. To do this, we need to perform the following actions in our own script:
- We get clientID and close other connections, if any.
- Check whether it turned out to connect, if not, then display the message and stop working.
- Having searched the documentation, we find the vrep.simxGetObjectHandle function, with which we can get the handle of the object we need (in our case, the left and right wheels).
We set the acceleration (vrep.simxSetJointTargetVelocity) in case of success, which will force our robot to move with the acceleration we need.
As a result, you will get a script like script1.py:
import vrep import sys vrep.simxFinish(-1) clientID = vrep.simxStart('127.0.0.1', 19999, True, True, 5000, 5) if clientID!= -1: print("Connected to remote server") else: print('Connection not successful') sys.exit('Could not connect') errorCode,left_motor_handle=vrep.simxGetObjectHandle(clientID,'Pioneer_p3dx_leftMotor',vrep.simx_opmode_oneshot_wait) errorCode,right_motor_handle=vrep.simxGetObjectHandle(clientID,'Pioneer_p3dx_rightMotor',vrep.simx_opmode_oneshot_wait) if errorCode == -1: print('Can not find left or right motor') sys.exit() errorCode=vrep.simxSetJointTargetVelocity(clientID,left_motor_handle,0.2, vrep.simx_opmode_oneshot_wait) errorCode=vrep.simxSetJointTargetVelocity(clientID,right_motor_handle,0.2, vrep.simx_opmode_oneshot_wait) For the simxGetObjectHandle function, in addition to the clientID, the object name is indicated, which can be viewed in the Scene Hierarchy.

errorCode, left_motor_handle = vrep.simxGetObjectHandle(clientID, 'Pioneer_p3dx_leftMotor', vrep.simx_opmode_oneshot_wait) Now if we start the scene and activate the script, our robot starts moving. Trying different values of speeds, or, for example, setting the speed to only one wheel, you can make the robot spin around its axis.
As you can see, interacting with the V-REP environment using Python is not at all difficult, and due to its great functionality, you can create truly complex scenarios for the interaction of entire groups of robots and much more. For inspiration, you can start by learning about their demo examples.
Source: https://habr.com/ru/post/268313/
All Articles