Home server on Intel Atom platform and Centos 7 OS
In my article, I want to present to the respected haboobshchestvu practical guidance for assembling, configuring and commissioning an inexpensive and cost-effective server on the Intel Atom platform and OS Centos 7. This work does not pretend to be a complete and comprehensive tutorial and is designed, rather, for beginners than professionals. If a person who has not seen Linux in his eyes can configure his first server with the help of this article, I will consider my task accomplished.
The first part of the article (small in volume) is devoted to the hardware component, and the second, the main part - a detailed description of the configuration process on this equipment of the Centos 7 system. Who cares, I ask for cat.
The seventh generation of the Red Hat family of systems (RHEL7, Centos 7 , Sceintific Linux 7 , Fedora 20 ) is still quite new, and, despite very detailed documentation on the official Red Hat website, not all managed to get halfway. That's why I decided to write a detailed how-to on the topic of setting up a general-purpose server using the latest Centos distribution.
')
What I wanted to get in terms of iron:
The software functionality on the first will be:
The SVN server with a browser shell (please do not blame for outdated technologies), the package repository (like Nexus ), the release server (most likely, Hudson , although I have not decided yet) will get in the same place. Although I will not describe these last components.
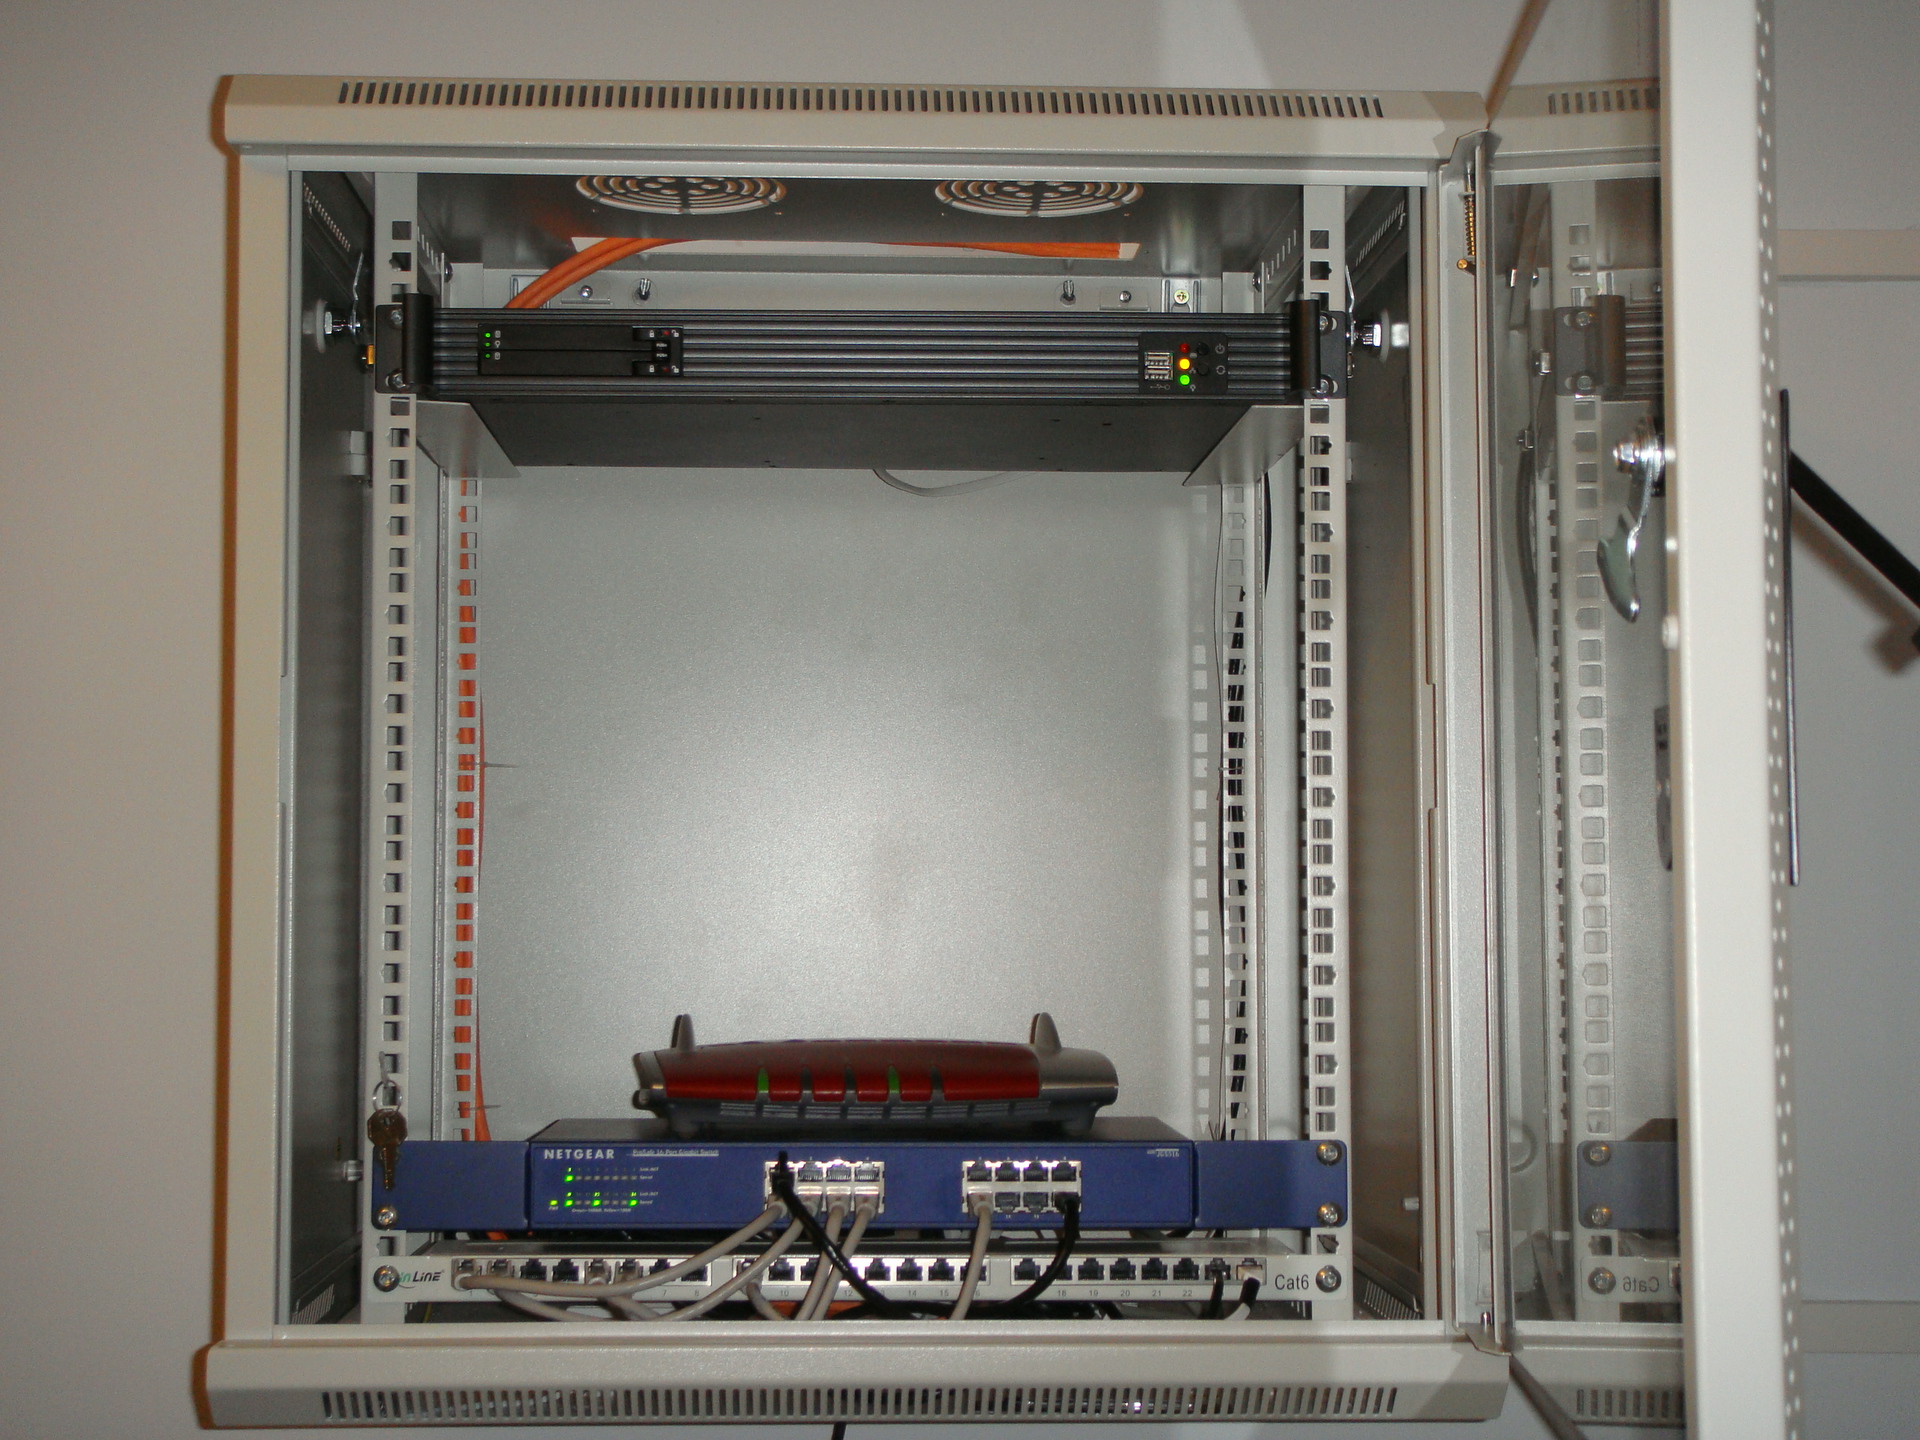
I found the case fairly quickly: It is only 1U in height, 25 cm in depth. From here, restrictions on the motherboard, the Mini-ITX, and on the power supply, 1U FlexATX, immediately occurred.
With the motherboard, everything was not so simple. The Mini-ITX format, two gigabit ports and passive cooling turned out to be serious limitations. At first, I considered the variant from GIGABYTE and almost came to terms with 10 watts of dissipated processor power and, judging by the forums, possible problems with Linux. However, at the very last moment I literally stumbled upon a motherboard from SUPERMICRO with an Intel Atom processor and held it in my hands in a couple of days. In addition to low power consumption, the main factor was that the manufacturer announced full and unconditional support for this Red Hat board, although not the latest version. Looking ahead, I will say that it was justified - when setting up Linux from the hardware side, there were no problems with the word at all.
The board has one memory slot, a maximum of 8GB DDR3-1333 ECC SO-DIMM. The list of certified memory on the manufacturer’s website is rather scant, I had to enter from the other side. Began to look for which of the manufacturers of memory supports this board. Found. The choice fell on Crucial , since on their website there is not only the ability to search by the name of the motherboard, but also the possibility of direct ordering. They also ordered a 250 GB SSD , with almost the same read / write speed of about 500 MB / s.
The last part is the power supply. Unfortunately, the PSU with passive cooling is still exotic, found only one option, and ordered it. It turned out to be FSP150-50TNF. The manufacturer’s website could not be found, but you can buy it in a huge number of online stores.
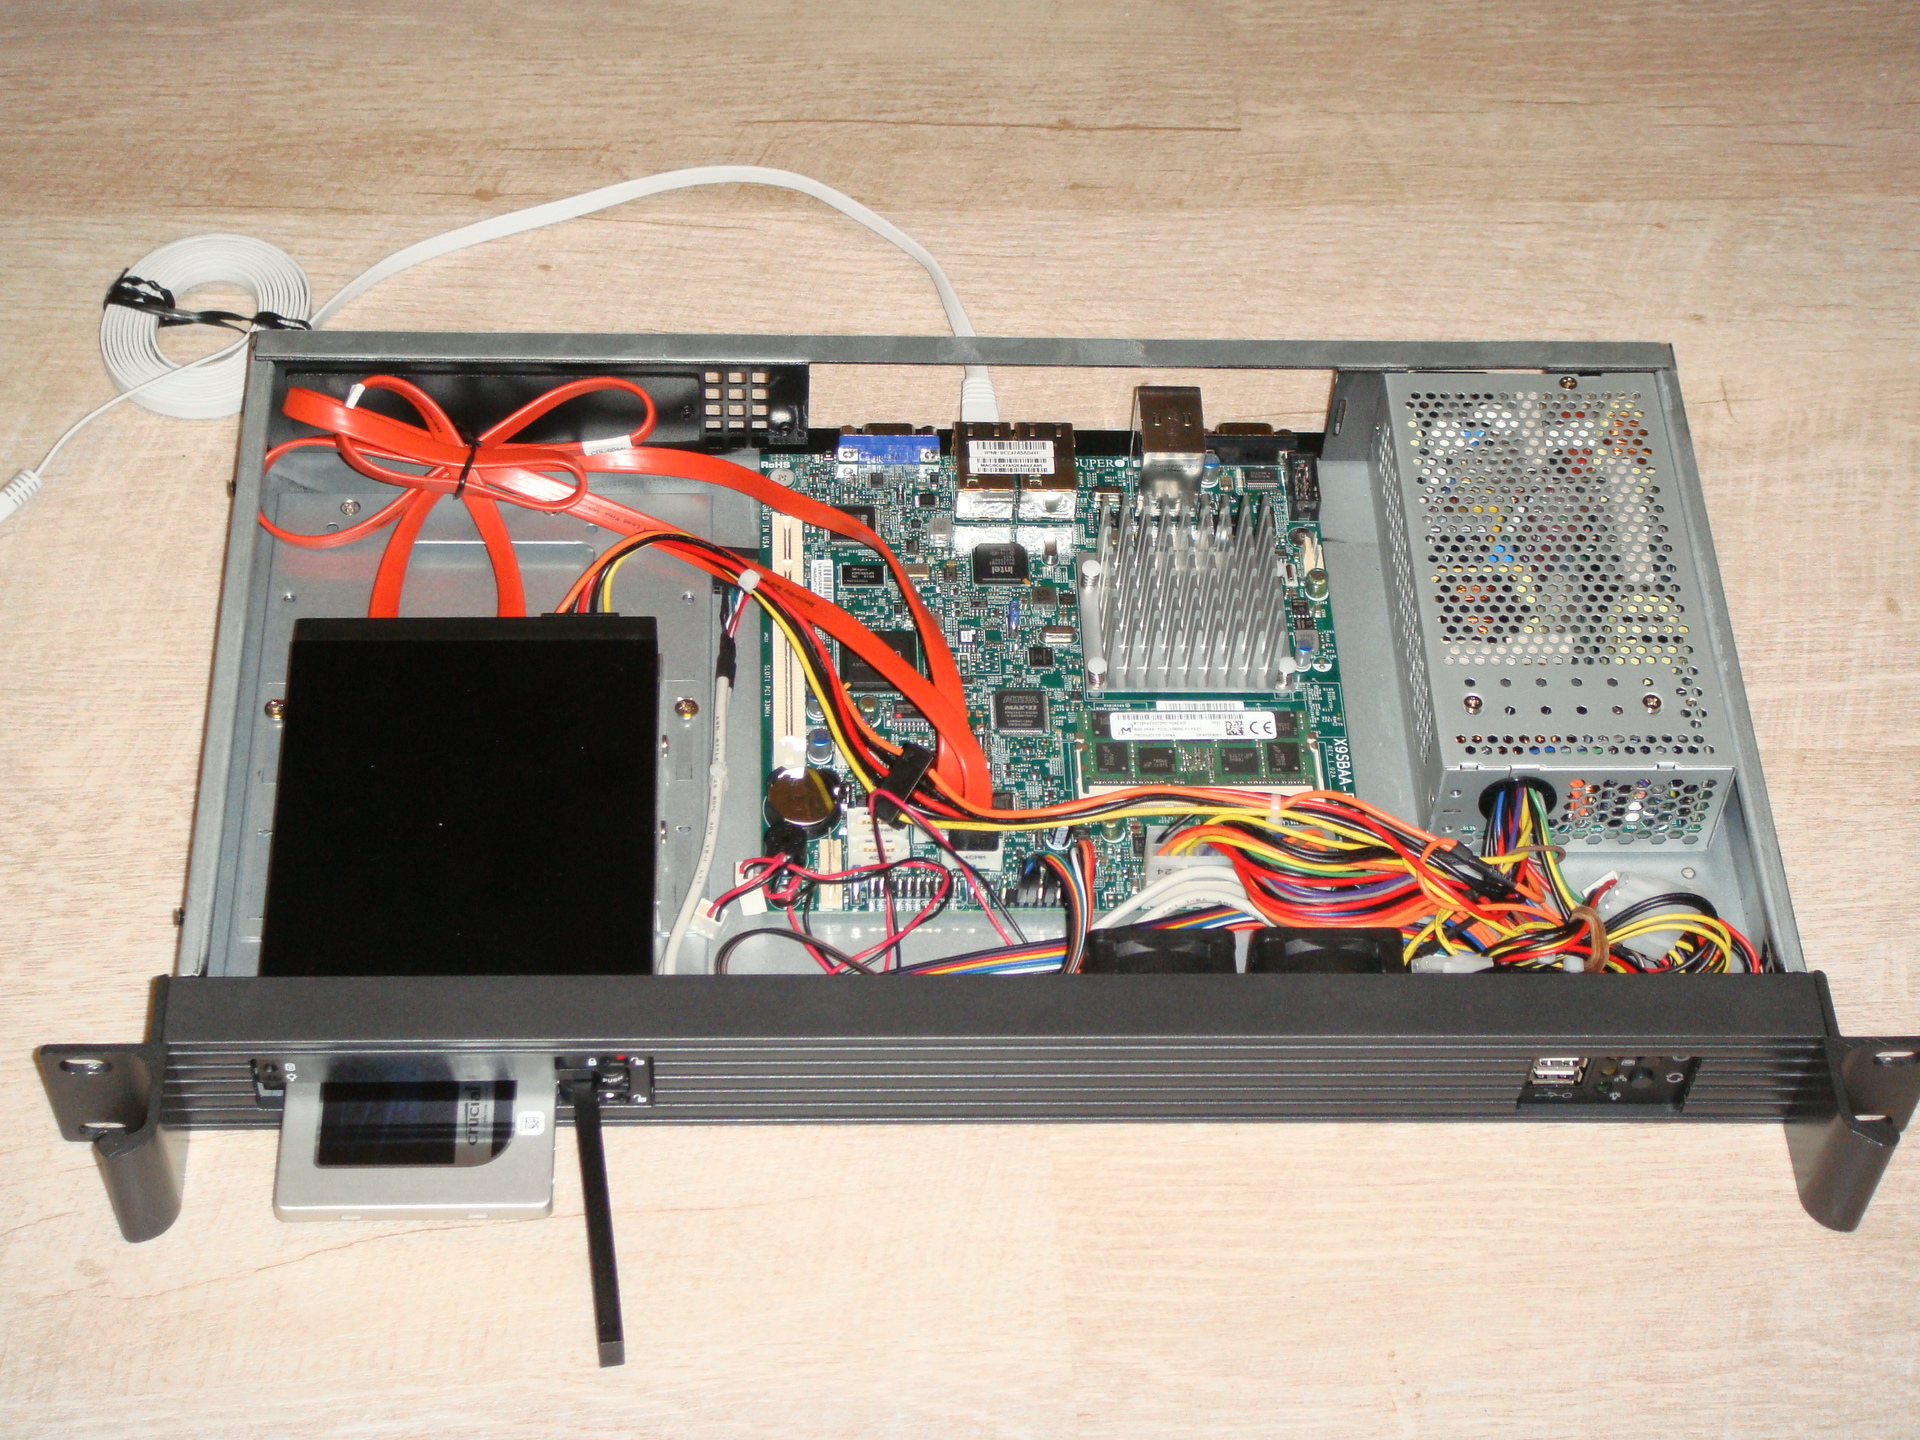
There were no problems with the assembly. Stick, as they say, do not solder. In the case there are two fans, I did not connect them. So, it turned out this design:
The total cost of all components with delivery was 745 euros. Looking ahead, I will say that the power consumption of an assembled and fully configured server is about 14-15 watts.
About program setting of this server the speech further and will go. I chose the Linux distribution on the basis of mercantile considerations. In the company where I work (offtopic: I am a mathematician engineer, I develop application software in the field of air traffic control systems), we use Red Hat or Centos both for development and as a platform for clients to install.
An ISO-optimized distribution for a network installation (CentOS-7-x86_64-NetInstall-1503.iso) can be taken from here . Then from it you need to make a bootable flash drive.
My first mistake was to use the Unetbootin utility for Windows for this purpose. Of course, this utility recorded the flash drive, it was even recognized as bootable, but the installer’s kernel categorically refused to boot, constantly flying out with some kind of left-hand messages like “kernel panic”. Research forums showed that I am not the only one who is crooked. Therefore, as a result, I prepared a flash drive from Linux:
All flash drive is ready. For the next step, you need any monitor with the ability to connect to the VGA connector, since the board has neither DVI nor HDMI, only the good old VGA. Also, there are only two external USB3 ports on the board, there are no internal ports. One port is needed for a bootable USB flash drive, in the second one we plug in a keyboard and a mouse via a USB hub.
We connect the monitor, keyboard, mouse, network cable with Internet access, power cable. The device turns on itself. On the board, the green LED flashes, as I understand it, it is associated with clocking. Enter the BIOS. The goal and end result is to allow booting from USB. All other settings I left unchanged.
We insert the USB flash drive into a free slot, reboot. In my opinion, the graphical installer is intuitive, so for now I’ll manage without pictures. Already in the process of writing this article, I discovered a colorful installation guide , everything was photographed in great detail. I will describe only what needs to be done at this stage, in order to save time and nerves:
After that, click on "Start installation". While the package is being downloaded and installed, it is possible to set a root password and add users to the system. After the installation is complete, we reboot and check ssh access from another computer. Since it is configured by default, everything should work. It's time to unhook the monitor and keyboard and install the server in the place of permanent deployment in the rack, connect to the network and run. Further configuration will be done remotely via the console.
So, we log in from another computer via SSH. If another computer is running Windows, then you can take the good old putty as an ssh client. Naturally, all further operations are done from under the root. Banality, but I note that the transition to root mode is carried out by the command:
1. The first thing to do on a freshly installed system is to update it. The package manager yum is already present in the system. It is accessible from the console (the yum command). Batch repositories are already configured by default, so to update the entire system, the command is enough:
2. Even from the time of DOS, I cannot live without a file manager, preferably in blue, so I immediately put on myself the Linux equivalent of Norton Commander. Although it is a matter of personal preference. Approximately 30 add-on packages are pulled, mostly perl:
3. Then I need monitoring tools for sensors located on the motherboard. Put one additional package:
4. Sensors need to be initialized:
5. You can view the sensor values as follows:
Let me remind you that the fans are disabled. The temperature at three points is somewhat too high, but still far from critical.
I can’t say anything concrete about certain solutions, I chose VNC and GNOME simply because I’ve already used them before. The following components are installed on the server:
About 650 additional packages are pulled (download size is about 660 MB, installation size is about 2 GB).
We will configure the firewall later, but since it is already out of the box and is active, you need to add the newly installed service to its rules.
Since I need a remote desktop sporadically, I didn’t set up to automatically load it. If you need it, you must first log in to the server via ssh (not as root, but as a user, on behalf of whom the session will be launched), and start it manually with the command:
When you first start, you will be asked to set a session password and the terminal number under which the session is available will be given. For all subsequent launches, the session number will be shown again:
This number and password will be required on the client to connect to the desktop using any VNC client.
Many things can be configured via remote desktop in the GUI, not in the console. For example, there are gpk-application applications for install / uninstall and gpk-update-view for updating packages:
To make it easier to customize the desktop, you can also install the configuration utilities and the module that allows you to install extensions for the GNOME shell from the browser (Firefox only):
To install shell extensions, you can visit the official repository using Firefox.
One of the network cards is already configured at the time of installation. This board (interface) with the address 192.168.178.2 will be used to access the world, an external Internet connection will be directly connected to it. The second card with the address 192.168.1.1 will be a gateway for the internal network, the cable from it will go to the network hub of the local network. It is this interface that you need to configure now.
The network is serviced by the NetworkManager module, which is configured from both the console and the graphical configurator. Since the module is already running, the command to check its status is expected to produce the following:
We will use the graphical configurator, for which we will run from the console:

Next, select the network icon:
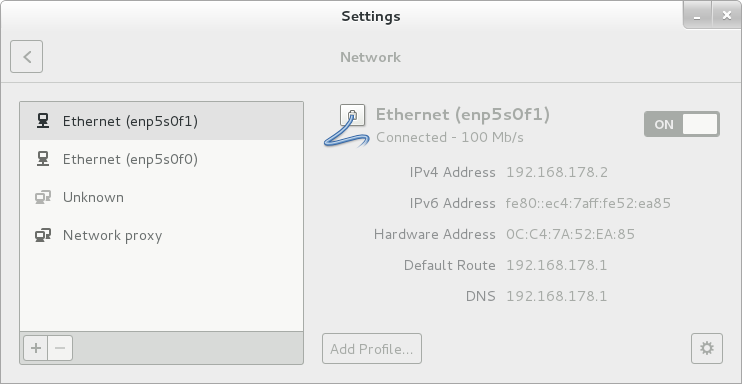
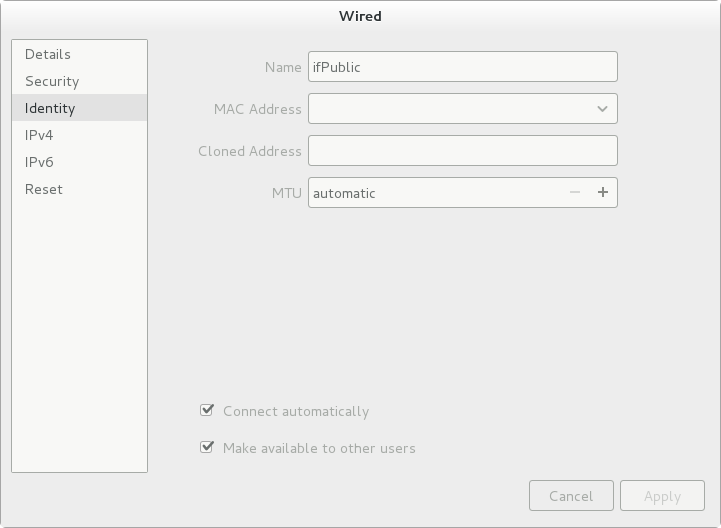
We set the necessary parameters for both network adapters. It is important that the flag “Connect automatically” be surely turned on for each adapter, otherwise after rebooting the network interface will remain off:
For the new parameters to take effect, you must restart the network service with the command:
Adapters configuration is stored in text files / etc / sysconfig / network-scripts / ifcfg-enp5s0f0 and / etc / sysconfig / network-scripts / ifcfg-enp5s0f1, which can be edited manually. Unfortunately, this will have to be done later, since from the graphical interface it is not possible to tie the adapter to the desired zone of the firewall, but more on that below. At this stage, the status of network interfaces is:
Linux allows you to enable or disable packet forwarding between interfaces (forwarding). On workstations and application servers, it can be disabled. Our server plays the role of a router and a firewall. Therefore, routing should obviously be allowed.
Routing is controlled by the net.ipv4.ip_forward parameter from the /etc/sysctl.conf file. To enable it, the parameter must be set to one:
Now you need to update the configuration for the routing settings to take effect:
To check if IP routing is enabled, you can run the following command, which should return a unit:
The firewall is needed to control and filter network packets passing through the server. The goal is to deny access to all services outside the network. The firewall is maintained by the Firewalld module, which is configured both from the console (# firewall-cmd command) and using the graphical interface (# firewall-config command). The FirewallD service uses the iptables (iptables tool) toolkit to interact with the kernel packet filter.
On the official Red Hat website, you can find detailed documentation for this module. Also, the network has detailed guidelines for setting it up, for example this .
Checking the status of the service is quite expected reports that the service is running:
FirewallD uses network zones to determine the level of trust of a network connection, a connection can be part of only one zone, but one zone can define several network connections.
What are the default zones?
A zone is active if at least one network card is attached to it. Filtering rules are defined specifically for active zones. What zones are active from the beginning?
Both network interfaces are tied to the same board, which means that it’s not possible to set your own filtering rules for each interface. The situation needs to be radically changed.
The interface enp5s0f0 with the address 192.168.1.1 will be accessible from the internal network, therefore all services installed on the server must be accessible via this interface. Access on the external interface enp5s0f1 should be cut as much as possible. For the internal network, we choose the internal zone by our will. In it you need to throw the interface enp5s0f0.
The nuance, however: there are two filtering tables - currently active and permanent. When the server is restarted, the active table is restored from permanent. Therefore, you need either stasis to work with a permanent table (the --permanent parameter in commands), or then remember to copy the active table to a permanent one when all changes are made. Changes to the active table are applied instantly: no changes are required or applied. Changes in the permanent table will take effect only after reloading the table (firewall-cmd --reload command), service (systemctl restart firewalld command) or server.
I will immediately edit the permanent table. I delete the interface from the public zone:
I add it to the internal zone:
Checking the result:
This is where an ambush awaits us, namely, a well-known and still not closed bug in Centos 7. The bottom line: when you restart, the interface zone is taken from the interface settings (/ etc / sysconfig / network-scripts / ifcfg-enp5s0f0 file), and she has not changed. You have to do this manually: edit the / etc / sysconfig / network-scripts / ifcfg-enp5s0f0 file and add the line ZONE = internal:
After this, it is better to reboot the server for verification After a reboot, the binding of interfaces to zones should not be lost:
Services are added to the zone by command type
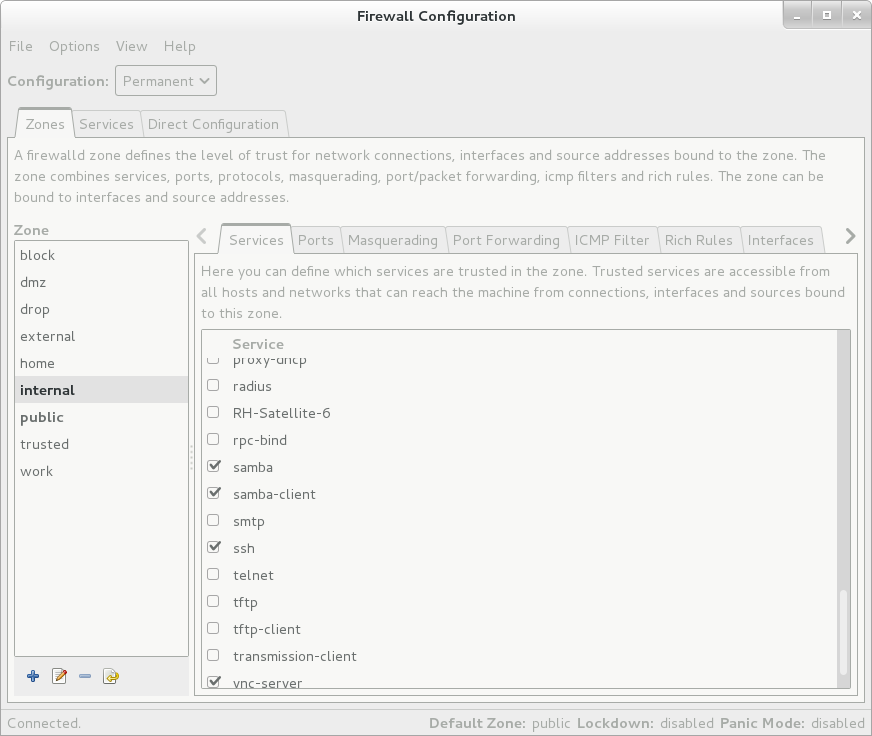
I prefer to do this from the GUI:
Unfortunately, that's not all. There is a nuance associated with masking the IP address (IP masquerading). In packets originating from the internal network, the address of the sender must be replaced with the address of the server itself. If this function is disabled, the computer from the internal network will never wait for a response from the outside, since its address is not known there.
I do not know what it is connected with, but the changes in the masking flag for the adapter enp5s0f1 from the GUI, so through firewall-cmd, did not have any effect. A working solution was found in this article . Its essence: to set an additional direct POSTROUTING rule to the iptables table, the add-on of which FirewallD is:
Reload the table and check the changes:
On this firewall is configured. The current firewall configuration can be checked with such a useful command:
To synchronize the time over the network (both the server time itself and the time on client machines with the server) I will configure the NTP server. In Centos 7, instead of the good old ntpd, the new service is preinstalled and activated - chrony.
Since the option of time synchronization over the network was chosen during installation, the service is already up and running:
If the status command indicates that the service is either not installed or not started, then the procedure is standard :
Automatic time synchronization with a remote server is enabled by the command:
To access the service from the internal network, you must enable the service in the firewall:
Then you can tweak the service settings, which are stored in the /etc/chrony.conf file. In this file, it was enough for me to make only two corrections:
Restart the service:
Check the status and sync:
After replacing the address of the NTP server on client devices (Windows, Linux, Zyxel), they all together picked up the time from the server.
The only purpose for which I decided to raise the DNS service on the server is to block banner networks, statistics sites, and various telemetry servers (for example, Microsoft) on all devices on the local network. The idea is not mine, taken from here . Searching the web, I found several websites that regularly publish black lists of domains in the format of hosts-files.
For example this and this . The peculiarity of the second list is that Microsoft telemetry server is already there.
I chose dnsmasq as the DNS service simply because I found a simple and understandable instruction for its installation and configuration. Dnsmasq implements both a DNS and a DHCP server at the same time, but I don’t need a second one yet, so I will only configure DNS.
Standard start:
Next, in the configuration file of the internal network interface (in my case / etc / sysconfig / network-scripts / ifcfg-enp5s0f0), you need to specify that the DNS server is a local host, i.e. add line:
After turning on or restarting the server, NetworkManager service, based on the settings from this file, updates the /etc/resolv.conf file, which contains the addresses of both the external DNS server (in my case, DSL / FritzBox) and ours:
After downloading the source of the installed version from here , you can pull out an example of the configuration file, correct it and save it as /etc/dnsmasq.d/main.conf. I configured it in the minimum:
The main place here is the addn-hosts = / etc / black_list_hosts.txt parameter, where black_list_hosts.txt is the black list of domains. In my case, I just downloaded it from here for now . As a result, there was almost no banner advertising on all LAN devices (both desktop and mobile). In the future I am going to automate the process of updating this list.
This is the last component, which I will write a little about. Samba - file server for sharing files from all devices on the local network. It is installed simply:
I will share only one folder: / work / nas. To do this, you need to edit the /etc/samba/smb.conf file and specify the access parameters for this folder:
By default, the folder is configured read-only, but a user with the name family has write access. We start the service and check its settings:
Next you need to create a folder and provide access to it. Access will get a group of users files:
Next is a feature. The fact is that Centos has an additional security subsystem that regulates access to resources not only for users, but also for the modules (components) of the system. It is called SELinux. In order for the Samba server itself to access the / work / nas folder, it must have the additional attribute samba_share_t set in addition to the usual read-write rights:
For flag manipulation, there is a standard chcon command. The samba_share_t flag with its help is set as follows:
In order for Windows machines on the local network to see our server and a shared folder, you must also enable the NetBIOS service. It does not require additional configuration, it only needs to be run:
It is often necessary to mount an external drive (disk or USB flash drive) formatted for NTFS to this folder. There is no NTFS driver in the system by default. Also, it is not in the standard repositories. If there is a need to connect NTFS disks to the system, then you need to install the EPEL 3rd-party repository from the Fedora project and from there install the driver:
After that, external disks NTFS disks will be automatically recognized by the system.
The final chord is to create a user who will have write access to the shared folder. As can be seen from the configuration above, this is the user family:
On this, perhaps, come to the end. In general, it turned out economical and versatile machine with great potential. As I have already noted, the power consumption is within 14-15 watts, which is quite acceptable for a home device that is always on. The first month of his life he worked without a single problem.
If you have any questions, comments, or ideas for improvement and further development, I will be glad to comment. Thank!
The first part of the article (small in volume) is devoted to the hardware component, and the second, the main part - a detailed description of the configuration process on this equipment of the Centos 7 system. Who cares, I ask for cat.
The seventh generation of the Red Hat family of systems (RHEL7, Centos 7 , Sceintific Linux 7 , Fedora 20 ) is still quite new, and, despite very detailed documentation on the official Red Hat website, not all managed to get halfway. That's why I decided to write a detailed how-to on the topic of setting up a general-purpose server using the latest Centos distribution.
')
What I wanted to get in terms of iron:
- Energy efficiency
- 19-inch rack-mount case with a height of no more than 1.5U and a depth of no more than 30 cm,
- Front access to the drives
- At least two gigabit network ports,
- Completely passive cooling, that is, the absence of fans on both the processor and the power supply. This requirement is purely aesthetic, since the product will be used at home.
The software functionality on the first will be:
- Router (IP router) and firewall (firewall),
- X server with a modern shell, personally I really like the third Gnome. It will be used both for administration and for the infrequent launch of applications that I deal with by the nature of my professional activity,
- Time server (NTP),
- DNS for the internal network with banner network blocking (the idea is borrowed from here ),
- High-performance file server.
The SVN server with a browser shell (please do not blame for outdated technologies), the package repository (like Nexus ), the release server (most likely, Hudson , although I have not decided yet) will get in the same place. Although I will not describe these last components.
A little about the hardware component
I found the case fairly quickly: It is only 1U in height, 25 cm in depth. From here, restrictions on the motherboard, the Mini-ITX, and on the power supply, 1U FlexATX, immediately occurred.
With the motherboard, everything was not so simple. The Mini-ITX format, two gigabit ports and passive cooling turned out to be serious limitations. At first, I considered the variant from GIGABYTE and almost came to terms with 10 watts of dissipated processor power and, judging by the forums, possible problems with Linux. However, at the very last moment I literally stumbled upon a motherboard from SUPERMICRO with an Intel Atom processor and held it in my hands in a couple of days. In addition to low power consumption, the main factor was that the manufacturer announced full and unconditional support for this Red Hat board, although not the latest version. Looking ahead, I will say that it was justified - when setting up Linux from the hardware side, there were no problems with the word at all.
The board has one memory slot, a maximum of 8GB DDR3-1333 ECC SO-DIMM. The list of certified memory on the manufacturer’s website is rather scant, I had to enter from the other side. Began to look for which of the manufacturers of memory supports this board. Found. The choice fell on Crucial , since on their website there is not only the ability to search by the name of the motherboard, but also the possibility of direct ordering. They also ordered a 250 GB SSD , with almost the same read / write speed of about 500 MB / s.
The last part is the power supply. Unfortunately, the PSU with passive cooling is still exotic, found only one option, and ordered it. It turned out to be FSP150-50TNF. The manufacturer’s website could not be found, but you can buy it in a huge number of online stores.
There were no problems with the assembly. Stick, as they say, do not solder. In the case there are two fans, I did not connect them. So, it turned out this design:
The total cost of all components with delivery was 745 euros. Looking ahead, I will say that the power consumption of an assembled and fully configured server is about 14-15 watts.
A lot about the software component
About program setting of this server the speech further and will go. I chose the Linux distribution on the basis of mercantile considerations. In the company where I work (offtopic: I am a mathematician engineer, I develop application software in the field of air traffic control systems), we use Red Hat or Centos both for development and as a platform for clients to install.
Step one: preparation of the installation flash drive.
An ISO-optimized distribution for a network installation (CentOS-7-x86_64-NetInstall-1503.iso) can be taken from here . Then from it you need to make a bootable flash drive.
My first mistake was to use the Unetbootin utility for Windows for this purpose. Of course, this utility recorded the flash drive, it was even recognized as bootable, but the installer’s kernel categorically refused to boot, constantly flying out with some kind of left-hand messages like “kernel panic”. Research forums showed that I am not the only one who is crooked. Therefore, as a result, I prepared a flash drive from Linux:
- insert an empty USB flash drive larger than the ISO file. The type of file system on it is not important. most importantly, it should not be broken down into volumes.
- We look, how it is mounted and to what device corresponds:
# cat / proc / mounts
- unmount this device, otherwise it will not be available in the mode we need:
# umount / dev / NNN
- go to root mode and go to the directory where the ISO file is saved.
- we use the standard block data copy utility:
# dd bs = 4M if = CentOS-7-x86_64-NetInstall-1503.iso of = / dev / NNN
All flash drive is ready. For the next step, you need any monitor with the ability to connect to the VGA connector, since the board has neither DVI nor HDMI, only the good old VGA. Also, there are only two external USB3 ports on the board, there are no internal ports. One port is needed for a bootable USB flash drive, in the second one we plug in a keyboard and a mouse via a USB hub.
Step two: preparation of the product for loading.
We connect the monitor, keyboard, mouse, network cable with Internet access, power cable. The device turns on itself. On the board, the green LED flashes, as I understand it, it is associated with clocking. Enter the BIOS. The goal and end result is to allow booting from USB. All other settings I left unchanged.
Step three: network installation.
We insert the USB flash drive into a free slot, reboot. In my opinion, the graphical installer is intuitive, so for now I’ll manage without pictures. Already in the process of writing this article, I discovered a colorful installation guide , everything was photographed in great detail. I will describe only what needs to be done at this stage, in order to save time and nerves:
- Set all parameters of the network card to which the cable is connected in order for Internet access to work: ip, gateway, dns, and activate the adapter.
- In the time settings window, select the correct time zone and set the time. I personally always use network time synchronization.
- Break the disk into sections. I usually use the default layout. In it, the home folder is located on its section. Since I have one user (myself), not counting the root, I don’t really need home. Therefore, in this scheme, I will rename the home volume to work, so that in the future the system will create user home directories in the root section of / home.
- Set the server address from where the packages will be pulled during the installation.
- Choose the components that you need. In my case, this is a file server, development tools, hardware monitoring tools, an http server. Everything else can be added later.
After that, click on "Start installation". While the package is being downloaded and installed, it is possible to set a root password and add users to the system. After the installation is complete, we reboot and check ssh access from another computer. Since it is configured by default, everything should work. It's time to unhook the monitor and keyboard and install the server in the place of permanent deployment in the rack, connect to the network and run. Further configuration will be done remotely via the console.
Step four: configure the basic functionality.
So, we log in from another computer via SSH. If another computer is running Windows, then you can take the good old putty as an ssh client. Naturally, all further operations are done from under the root. Banality, but I note that the transition to root mode is carried out by the command:
[user @ supermicro] # su
1. The first thing to do on a freshly installed system is to update it. The package manager yum is already present in the system. It is accessible from the console (the yum command). Batch repositories are already configured by default, so to update the entire system, the command is enough:
[root @ supermicro] # yum update
2. Even from the time of DOS, I cannot live without a file manager, preferably in blue, so I immediately put on myself the Linux equivalent of Norton Commander. Although it is a matter of personal preference. Approximately 30 add-on packages are pulled, mostly perl:
[root @ supermicro] # yum install mc
3. Then I need monitoring tools for sensors located on the motherboard. Put one additional package:
[root @ supermicro] # yum install lm_sensors
4. Sensors need to be initialized:
[root @ supermicro] # sensors-detect
5. You can view the sensor values as follows:
[root @ supermicro] # sensors
Issuing the command of sensors
 acpitz-virtual-0
 Adapter: Virtual device
 temp1: + 26.8 ° C (crit = + 127.0 ° C)
 temp2: + 26.8 ° C (crit = + 175.0 ° C)
 coretemp-isa-0000
 Adapter: ISA adapter
 Core 0: + 48.0 ° C (crit = + 100.0 ° C)
 Core 1: + 49.0 ° C (crit = + 100.0 ° C)

 w83795adg-i2c-3-2f
 Adapter: SMBus iSMT adapter at fe482000
 in0: +0.99 V (min = +0.54 V, max = +1.49 V)
 in3: +1.28 V (min = +1.13 V, max = +1.38 V)
 in4: +1.83 V (min = +1.63 V, max = +2.00 V)
 in5: +1.28 V (min = +1.13 V, max = +1.38 V)
 in6: +1.56 V (min = +1.20 V, max = +1.65 V)
 in11: +1.07 V (min = +0.94 V, max = +1.17 V)
 + 3.3V: +3.26 V (min = +2.96 V, max = +3.63 V)
 3VSB: +3.26 V (min = +2.96 V, max = +3.63 V)
 Vbat: +3.13 V (min = +2.70 V, max = +3.63 V)
 fan1: 0 RPM (min = 709 RPM) ALARM
 fan2: 0 RPM (min = 709 RPM) ALARM
 fan3: 0 RPM (min = 709 RPM) ALARM
 temp1: + 82.2 ° C (high = + 105.0 ° C, hyst = + 100.0 ° C)
                        (crit = + 105.0 ° C, hyst = + 100.0 ° C) sensor = thermistor
 temp2: + 82.5 ° C (high = + 105.0 ° C, hyst = + 100.0 ° C)
                        (crit = + 105.0 ° C, hyst = + 100.0 ° C) sensor = thermistor
 temp3: + 80.8 ° C (high = + 85.0 ° C, hyst = + 105.0 ° C)
                        (crit = + 105.0 ° C, hyst = + 100.0 ° C) sensor = thermistor
 temp5: + 33.8 ° C (high = + 85.0 ° C, hyst = + 80.0 ° C)
                        (crit = + 100.0 ° C, hyst = + 95.0 ° C) sensor = thermistor
 temp6: + 37.5 ° C (high = + 85.0 ° C, hyst = + 80.0 ° C)
                        (crit = + 100.0 ° C, hyst = + 95.0 ° C) sensor = thermistor
 intrusion0: OK
Let me remind you that the fans are disabled. The temperature at three points is somewhat too high, but still far from critical.
Step Five: Remote Desktop
I can’t say anything concrete about certain solutions, I chose VNC and GNOME simply because I’ve already used them before. The following components are installed on the server:
 [root @ supermicro] # yum install vnc-server
 [root @ supermicro] # yum groupinstall "GNOME Desktop"
 [root @ supermicro] # yum install tigervnc-server
About 650 additional packages are pulled (download size is about 660 MB, installation size is about 2 GB).
We will configure the firewall later, but since it is already out of the box and is active, you need to add the newly installed service to its rules.
 [root @ supermicro] # firewall-cmd --permanent --zone = public --add-service vnc-server
 [root @ supermicro] # firewall-cmd --reload
Since I need a remote desktop sporadically, I didn’t set up to automatically load it. If you need it, you must first log in to the server via ssh (not as root, but as a user, on behalf of whom the session will be launched), and start it manually with the command:
[user @ supermicro] # vnc-server
When you first start, you will be asked to set a session password and the terminal number under which the session is available will be given. For all subsequent launches, the session number will be shown again:
 [family @ supermicro] # vnc-server
 New 'supermicro: 1 (family)' desktop is supermicro: 1
 Starting applications specified in /home/family/.vnc/xstartup
 Log file is /home/family/.vnc/supermicro:1.log
This number and password will be required on the client to connect to the desktop using any VNC client.
Many things can be configured via remote desktop in the GUI, not in the console. For example, there are gpk-application applications for install / uninstall and gpk-update-view for updating packages:
To make it easier to customize the desktop, you can also install the configuration utilities and the module that allows you to install extensions for the GNOME shell from the browser (Firefox only):
[root @ supermicro] # yum install dconf-editor gnome-shell-browser-plugin alacarte gnome-tweak-tool
To install shell extensions, you can visit the official repository using Firefox.
Step Six: Configure network interfaces and routing.
One of the network cards is already configured at the time of installation. This board (interface) with the address 192.168.178.2 will be used to access the world, an external Internet connection will be directly connected to it. The second card with the address 192.168.1.1 will be a gateway for the internal network, the cable from it will go to the network hub of the local network. It is this interface that you need to configure now.
The network is serviced by the NetworkManager module, which is configured from both the console and the graphical configurator. Since the module is already running, the command to check its status is expected to produce the following:
 [root @ supermicro] # systemctl NetworkManager status
 NetworkManager.service - Network Manager
    Loaded: loaded (/usr/lib/systemd/system/NetworkManager.service; enabled)
    Active: active (running) since Wed 2015-09-30 20:33:01 CEST;  2h 2min ago
We will use the graphical configurator, for which we will run from the console:
[root @ supermicro] # gnome-control-center
Next, select the network icon:
We set the necessary parameters for both network adapters. It is important that the flag “Connect automatically” be surely turned on for each adapter, otherwise after rebooting the network interface will remain off:
For the new parameters to take effect, you must restart the network service with the command:
 [root @ supermicro] # service network restart
 Restarting network (via systemctl): [OK]
Adapters configuration is stored in text files / etc / sysconfig / network-scripts / ifcfg-enp5s0f0 and / etc / sysconfig / network-scripts / ifcfg-enp5s0f1, which can be edited manually. Unfortunately, this will have to be done later, since from the graphical interface it is not possible to tie the adapter to the desired zone of the firewall, but more on that below. At this stage, the status of network interfaces is:
[root @ supermicro] # ifconfig
Issuing an ifconfig command
 enp5s0f0: flags = 4163 <UP, BROADCAST, RUNNING, MULTICAST> mtu 1500
         inet 192.168.1.1 netmask 255.255.255.0 broadcast 192.168.1.255
         inet6 fe80 :: ec4: 7aff: fe52: ea84 prefixlen 64 scopeid 0x20 <link>
         ether 0c: c4: 7a: 52: ea: 84 txqueuelen 1000 (Ethernet)
         RX packets 154172 bytes 27984732 (26.6 MiB)
         RX errors 0 dropped 0 overruns 0 frame 0
         TX packets 211719 bytes 187981730 (179.2 MiB)
         TX errors 0 dropped 0 overruns 0 carrier 0 collisions 0
         device memory 0xfe120000-fe13ffff

 enp5s0f1: flags = 4163 <UP, BROADCAST, RUNNING, MULTICAST> mtu 1500
         inet 192.168.178.2 netmask 255.255.255.0 broadcast 192.168.178.255
         inet6 fe80 :: ec4: 7aff: fe52: ea85 prefixlen 64 scopeid 0x20 <link>
         ether 0c: c4: 7a: 52: ea: 85 txqueuelen 1000 (Ethernet)
         RX packets 97054 bytes 130894810 (124.8 MiB)
         RX errors 0 dropped 0 overruns 0 frame 0
         TX packets 72249 bytes 6523040 (6.2 MiB)
         TX errors 0 dropped 0 overruns 0 carrier 0 collisions 0
         device memory 0xfe100000-fe11ffff
Linux allows you to enable or disable packet forwarding between interfaces (forwarding). On workstations and application servers, it can be disabled. Our server plays the role of a router and a firewall. Therefore, routing should obviously be allowed.
Routing is controlled by the net.ipv4.ip_forward parameter from the /etc/sysctl.conf file. To enable it, the parameter must be set to one:
 [root @ supermicro] # cat /etc/sysctl.conf
 net.ipv4.ip_forward = 1
Now you need to update the configuration for the routing settings to take effect:
 [root @ supermicro] # sysctl -p
 net.ipv4.ip_forward = 1
To check if IP routing is enabled, you can run the following command, which should return a unit:
 [root @ supermicro] # cat / proc / sys / net / ipv4 / ip_forward
 one
Step Seven: Configuring the firewall.
The firewall is needed to control and filter network packets passing through the server. The goal is to deny access to all services outside the network. The firewall is maintained by the Firewalld module, which is configured both from the console (# firewall-cmd command) and using the graphical interface (# firewall-config command). The FirewallD service uses the iptables (iptables tool) toolkit to interact with the kernel packet filter.
On the official Red Hat website, you can find detailed documentation for this module. Also, the network has detailed guidelines for setting it up, for example this .
Checking the status of the service is quite expected reports that the service is running:
 [root @ supermicro] # firewall-cmd --state
 running
FirewallD uses network zones to determine the level of trust of a network connection, a connection can be part of only one zone, but one zone can define several network connections.
What are the default zones?
 [root @ supermicro] # firewall-cmd --get-zones
 block dmz drop external home internal trusted work
A zone is active if at least one network card is attached to it. Filtering rules are defined specifically for active zones. What zones are active from the beginning?
 [root @ supermicro] # firewall-cmd --get-active-zones
 public
   interfaces: enp5s0f0 enp5s0f1
Both network interfaces are tied to the same board, which means that it’s not possible to set your own filtering rules for each interface. The situation needs to be radically changed.
The interface enp5s0f0 with the address 192.168.1.1 will be accessible from the internal network, therefore all services installed on the server must be accessible via this interface. Access on the external interface enp5s0f1 should be cut as much as possible. For the internal network, we choose the internal zone by our will. In it you need to throw the interface enp5s0f0.
The nuance, however: there are two filtering tables - currently active and permanent. When the server is restarted, the active table is restored from permanent. Therefore, you need either stasis to work with a permanent table (the --permanent parameter in commands), or then remember to copy the active table to a permanent one when all changes are made. Changes to the active table are applied instantly: no changes are required or applied. Changes in the permanent table will take effect only after reloading the table (firewall-cmd --reload command), service (systemctl restart firewalld command) or server.
I will immediately edit the permanent table. I delete the interface from the public zone:
 [root @ supermicro] # firewall-cmd --permanent --zone = public --remove-interface = enp5s0f0
 success
I add it to the internal zone:
 [root @ supermicro] # firewall-cmd --permanent --zone = internal --add-interface = enp5s0f0
 success
Checking the result:
 [root @ supermicro] # firewall-cmd --get-active-zones
 internal
   interfaces: enp5s0f0
 public
   interfaces: enp5s0f1
This is where an ambush awaits us, namely, a well-known and still not closed bug in Centos 7. The bottom line: when you restart, the interface zone is taken from the interface settings (/ etc / sysconfig / network-scripts / ifcfg-enp5s0f0 file), and she has not changed. You have to do this manually: edit the / etc / sysconfig / network-scripts / ifcfg-enp5s0f0 file and add the line ZONE = internal:
[root @ supermicro] # cat / etc / sysconfig / network-scripts / ifcfg-enp5s0f0
Issuing the cat command
 TYPE = Ethernet
 DEVICE = enp5s0f0
 NAME = ifInternal
 BOOTPROTO = none
 NETWORK = 192.168.1.0
 ONBOOT = yes
 DEFROUTE = yes
 IPV4_FAILURE_FATAL = no
 IPV6INIT = no
 IPV6_AUTOCONF = yes
 IPV6_DEFROUTE = yes
 IPV6_FAILURE_FATAL = no
 UUID = 61c21319-6b66-4e4e-adef-4fae7fc3f12b
 IPV6_PEERDNS = yes
 IPV6_PEERROUTES = yes
 IPADDR = 192.168.1.1
 PREFIX = 24
 ZONE = internal
After this, it is better to reboot the server for verification After a reboot, the binding of interfaces to zones should not be lost:
 [root @ supermicro] # firewall-cmd --get-active-zones
 internal
   interfaces: enp5s0f0
 public
   interfaces: enp5s0f1
Services are added to the zone by command type
[root @ supermicro] # firewall-cmd --permanent --zone = internal --add-service vnc-server
I prefer to do this from the GUI:
Unfortunately, that's not all. There is a nuance associated with masking the IP address (IP masquerading). In packets originating from the internal network, the address of the sender must be replaced with the address of the server itself. If this function is disabled, the computer from the internal network will never wait for a response from the outside, since its address is not known there.
I do not know what it is connected with, but the changes in the masking flag for the adapter enp5s0f1 from the GUI, so through firewall-cmd, did not have any effect. A working solution was found in this article . Its essence: to set an additional direct POSTROUTING rule to the iptables table, the add-on of which FirewallD is:
[root @ supermicro] # firewall-cmd --permanent --direct --passthrough ipv4 -t nat -I POSTROUTING -o enp5s0f1 -j MASQUERADE -s 192.168.1.0/24
Reload the table and check the changes:
 [root @ supermicro] # firewall-cmd --reload
 [root @ supermicro] # firewall-cmd --direct --get-all-passthroughs
 ipv4 -t nat -I POSTROUTING -o enp5s0f1 -j MASQUERADE -s 192.168.1.0/24
On this firewall is configured. The current firewall configuration can be checked with such a useful command:
[root @ supermicro family] # firewall-cmd --list-all-zones
Fragment issuing the firewall-cmd command
 internal (active)
   interfaces: enp5s0f0
   sources:
   services: dns http https ntp samba samba-client ssh vnc-server
   ports:
   masquerade: no
   forward-ports:
   icmp-blocks:
   rich rules:

 public (default, active)
   interfaces: enp5s0f1
   sources:
   services:
   ports:
   masquerade: yes
   forward-ports:
   icmp-blocks:
   rich rules:
Step Eight: Time server (NTP).
To synchronize the time over the network (both the server time itself and the time on client machines with the server) I will configure the NTP server. In Centos 7, instead of the good old ntpd, the new service is preinstalled and activated - chrony.
Since the option of time synchronization over the network was chosen during installation, the service is already up and running:
[root @ supermicro] # systemctl status chronyd
Issuing a systemctl command if the service is operating normally
 chronyd.service - NTP client / server
    Loaded: loaded (/usr/lib/systemd/system/chronyd.service; enabled)
    Active: active (running) since Fri 2015-10-02 23:01:57 CEST;  12min ago
   Process: 2949 ExecStartPost = / usr / libexec / chrony-helper add-dhclient-servers (code = exited, status = 0 / SUCCESS)
   Process: 2946 ExecStart = / usr / sbin / chronyd -u chrony $ OPTIONS (code = exited, status = 0 / SUCCESS)
  Main PID: 2948 (chronyd)
    CGroup: /system.slice/chronyd.service
            29─2948 / usr / sbin / chronyd -u chrony

 Oct 02 23:01:57 supermicro chronyd [2948]: chronyd version 1.29.1 starting
 Oct 02 23:01:57 supermicro chronyd [2948]: Linux kernel major = 3 minor = 10 patch = 0
 Oct 02 23:01:57 supermicro chronyd [2948]: hz = 100 shift_hz = 7 freq_scale = 1.00000000 nominal_tick = 10000 slew_delta_tick = 833 max_tick_bias = 1000 shift_pll = 2
 Oct 02 23:01:57 supermicro chronyd [2948]: Frequency -6.239 +/- 1.721 ppm read from / var / lib / chrony / drift
 Oct 02 23:01:57 supermicro systemd [1]: Started NTP client / server.
 Oct 02 23:02:02 supermicro chronyd [2948]: Selected source 129.70.132.32
If the status command indicates that the service is either not installed or not started, then the procedure is standard :
 [root @ supermicro] # yum install chrony
 [root @ supermicro] # systemctl start chronyd
 [root @ supermicro] # systemctl enable chronyd
 [root @ supermicro] # systemctl is-enabled chronyd
 enabled
Automatic time synchronization with a remote server is enabled by the command:
[root @ supermicro] # timedatectl set-ntp yes
To access the service from the internal network, you must enable the service in the firewall:
 [root @ supermicro] # firewall-cmd --permanent --zone = internal --add-service ntp
 [root @ supermicro] # firewall-cmd --reload
Then you can tweak the service settings, which are stored in the /etc/chrony.conf file. In this file, it was enough for me to make only two corrections:
 # Add custom pool servers for those installation in the installation:
 server 0.de.pool.ntp.org iburst
 server 1.de.pool.ntp.org iburst
 server 2.de.pool.ntp.org iburst
 server 3.de.pool.ntp.org iburst
 # Allow NTP client access from local network.
 allow 192.168.1.0/24
Restart the service:
[root @ supermicro] # systemctl restart chronyd
Check the status and sync:
[root @ supermicro] # chronyc sources
Issuing the chronyc sources command
 210 Number of sources = 4
 MS Name / IP Address Stratum Poll Reach LastRx Last sample
 ^ + mizar.pmsf.net 2 8 377 479 + 688us [+ 729us] +/- 54ms
 ^ * stratum2-3.NTP.TechFak.Un 2 8 377 217 -1261us [-1241us] +/- 26ms
 ^ + dns2.teleport-iabg.de 2 9 377 87 + 1102us [+ 1102us] +/- 86ms
 ^ + server2.as2.ch 2 8 377 218 + 631us [+ 651us] +/- 56ms
[root @ supermicro] # chronyc tracking
Issue chronyc tracking command
 Reference ID: 129.70.132.32 (stratum2-3.NTP.TechFak.Uni-Bielefeld.DE)
 Stratum: 3
 Ref time (UTC): Fri Oct 2 21:29:03 2015
 System time: 0.000020543 seconds slow of NTP time
 Last offset: 0.000020316 seconds
 RMS offset: 0.001376700 seconds
 Frequency: 5.580 ppm slow
 Residual freq: 0.011 ppm
 Skew: 0.203 ppm
 Root delay: 0.045198 seconds
 Root dispersion: 0.003463 seconds
 Update interval: 261.1 seconds
 Leap status: Normal
After replacing the address of the NTP server on client devices (Windows, Linux, Zyxel), they all together picked up the time from the server.
Last but one step: DNS service.
The only purpose for which I decided to raise the DNS service on the server is to block banner networks, statistics sites, and various telemetry servers (for example, Microsoft) on all devices on the local network. The idea is not mine, taken from here . Searching the web, I found several websites that regularly publish black lists of domains in the format of hosts-files.
For example this and this . The peculiarity of the second list is that Microsoft telemetry server is already there.
I chose dnsmasq as the DNS service simply because I found a simple and understandable instruction for its installation and configuration. Dnsmasq implements both a DNS and a DHCP server at the same time, but I don’t need a second one yet, so I will only configure DNS.
Standard start:
 [root @ supermicro] # yum install dnsmasq dnsmasq-utils
 [root @ supermicro] # systemctl start dnsmasq
 [root @ supermicro] # systemctl enable dnsmasq
 [root @ supermicro] # firewall-cmd --permanent --zone = internal --add-service = dns
 [root @ supermicro] # firewall-cmd --reload
Next, in the configuration file of the internal network interface (in my case / etc / sysconfig / network-scripts / ifcfg-enp5s0f0), you need to specify that the DNS server is a local host, i.e. add line:
DNS1 = 127.0.0.1
[root @ supermicro] # cat / etc / sysconfig / network-scripts / ifcfg-enp5s0f0
Issuing the cat command
 TYPE = Ethernet
 DEVICE = enp5s0f0
 NAME = ifInternal
 BOOTPROTO = none
 NETWORK = 192.168.1.0
 ONBOOT = yes
 DEFROUTE = yes
 IPV4_FAILURE_FATAL = no
 IPV6INIT = no
 IPV6_AUTOCONF = yes
 IPV6_DEFROUTE = yes
 IPV6_FAILURE_FATAL = no
 UUID = 61c21319-6b66-4e4e-adef-4fae7fc3f12b
 IPV6_PEERDNS = yes
 IPV6_PEERROUTES = yes
 IPADDR = 192.168.1.1
 PREFIX = 24
 ZONE = internal
 DNS1 = 127.0.0.1
After turning on or restarting the server, NetworkManager service, based on the settings from this file, updates the /etc/resolv.conf file, which contains the addresses of both the external DNS server (in my case, DSL / FritzBox) and ours:
 [root @ supermicro] # cat /etc/resolv.conf
 # Generated by NetworkManager
 nameserver 192.168.178.1
 nameserver 127.0.0.1
After downloading the source of the installed version from here , you can pull out an example of the configuration file, correct it and save it as /etc/dnsmasq.d/main.conf. I configured it in the minimum:
Fragment (active parameters) of the /etc/dnsmasq.d/main.conf file
 bogus-priv
 server = / kama / 192.168.1.1
 local = / kama /
 interface = enp5s0f0
 no-dhcp-interface = enp5s0f0
 addn-hosts = / etc / black_list_hosts.txt
 expand-hosts
 domain = kama
The main place here is the addn-hosts = / etc / black_list_hosts.txt parameter, where black_list_hosts.txt is the black list of domains. In my case, I just downloaded it from here for now . As a result, there was almost no banner advertising on all LAN devices (both desktop and mobile). In the future I am going to automate the process of updating this list.
Last step: file server (Samba).
This is the last component, which I will write a little about. Samba - file server for sharing files from all devices on the local network. It is installed simply:
yum install samba * -y
I will share only one folder: / work / nas. To do this, you need to edit the /etc/samba/smb.conf file and specify the access parameters for this folder:
Fragment (active parameters) of the /etc/samba/smb.conf file
workgroup = KAMA
server string = Samba Server Version %v
netbios name = SUPERMICRO
interfaces = lo enp5s0f0
hosts allow = 127. 192.168.1.
max protocol = SMB2
log file = /var/log/samba/log.%m
max log size = 50
[nas]
comment = NAS Working directory
path = /work/nas
public = no
read only = yes
printable = no
write list = family
create mode = 660
directory mode = 770
By default, the folder is configured read-only, but a user with the name family has write access. We start the service and check its settings:
[root @ supermicro] # systemctl start smb
[root @ supermicro] # systemctl enable smb
[root @ supermicro] # firewall-cmd --permanent --zone = internal --add-service = samba
[root @ supermicro] # firewall-cmd --reload
[root @ supermicro] # testparm
Issuing the testparm command
Load smb config files from /etc/samba/smb.conf
rlimit_max: increasing rlimit_max (1024) to minimum Windows limit (16384)
Processing section "[nas]"
Loaded services file OK.
Server role: ROLE_STANDALONE
[global]
	workgroup = KAMA
	server string = Samba Server Version %v
	interfaces = lo, enp5s0f0
	log file = /var/log/samba/log.%m
	max log size = 50
	server max protocol = SMB2
	idmap config * : backend = tdb
	hosts allow = 127., 192.168.1.
	cups options = raw
[nas]
	comment = NAS Working directory
	path = /work/nas
	write list = family
	create mask = 0660
	directory mask = 0770
Next you need to create a folder and provide access to it. Access will get a group of users files:
[root @ supermicro] # cd / work /
[root @ supermicro] # mkdir nas
[root @ supermicro] # groupadd -g 10000 fileshare
[root @ supermicro] # chgrp fileshare / work / nas
[root @ supermicro] # chmod g + w / work / nas
Next is a feature. The fact is that Centos has an additional security subsystem that regulates access to resources not only for users, but also for the modules (components) of the system. It is called SELinux. In order for the Samba server itself to access the / work / nas folder, it must have the additional attribute samba_share_t set in addition to the usual read-write rights:
[root @ supermicro] # ls -Z
drwxrwxr-x. family fileshare unconfined_u: object_r: samba_share_t: s0 nas
drwxr-xr-x. apache apache unconfined_u: object_r: httpd_sys_rw_content_t: s0 svn
drwxr-xr-x. apache apache unconfined_u: object_r: httpd_sys_rw_content_t: s0 www
For flag manipulation, there is a standard chcon command. The samba_share_t flag with its help is set as follows:
[root @ supermicro] # chcon -t samba_share_t / work / nas
In order for Windows machines on the local network to see our server and a shared folder, you must also enable the NetBIOS service. It does not require additional configuration, it only needs to be run:
[root @ supermicro] # systemctl start nmb
[root @ supermicro] # systemctl enable nmb
It is often necessary to mount an external drive (disk or USB flash drive) formatted for NTFS to this folder. There is no NTFS driver in the system by default. Also, it is not in the standard repositories. If there is a need to connect NTFS disks to the system, then you need to install the EPEL 3rd-party repository from the Fedora project and from there install the driver:
[root @ supermicro] # yum install epel-release
[root @ supermicro] # yum install ntfs-3g
After that, external disks NTFS disks will be automatically recognized by the system.
The final chord is to create a user who will have write access to the shared folder. As can be seen from the configuration above, this is the user family:
[root @ supermicro] # usermod -a -G fileshare family
[root @ supermicro] # id family
uid = 1000 (family) gid = 1000 (family) groups = 1000 (family), 10000 (fileshare)
[root @ supermicro] # smbpasswd -a family
New SMB password:
Retype new SMB password:
Added user family.
On this, perhaps, come to the end. In general, it turned out economical and versatile machine with great potential. As I have already noted, the power consumption is within 14-15 watts, which is quite acceptable for a home device that is always on. The first month of his life he worked without a single problem.
If you have any questions, comments, or ideas for improvement and further development, I will be glad to comment. Thank!
Source: https://habr.com/ru/post/268197/
All Articles