Android Studio 1.4 available
A few days ago , Android Studio 1.4 on the Stable Channel became available , bringing a number of handy innovations to the Android developer’s toolkit. Those who have not had time to get acquainted with the innovations, please under the cat.
The first thing that catches your eye is the updated templates of sample layouts available in the New Project Wizard: Android Studio 1.4 brings full support to Material Design already at the stage of creating a new project:

')
Create a demo application based on the Navigation Drawer Activity. Look at the build.gradle for the application module:
The studio kindly took care of us by adding the Android Design Support Library and the AppCompat Support library . There is no need to drag third-party implementations of Floating Action Button, Material Dialogs or Snackbar into the project - all the necessary visual components are available in the connected support libraries. We also added the 4th version of JUnit, so we did not forget to write unit tests.
In the project, we already have DrawerLayout , NavigationView , FloatingActionButton and even CoordinatorLayout (in more detail ), which will take care of raising the FAB when theToast Snackbar appears.

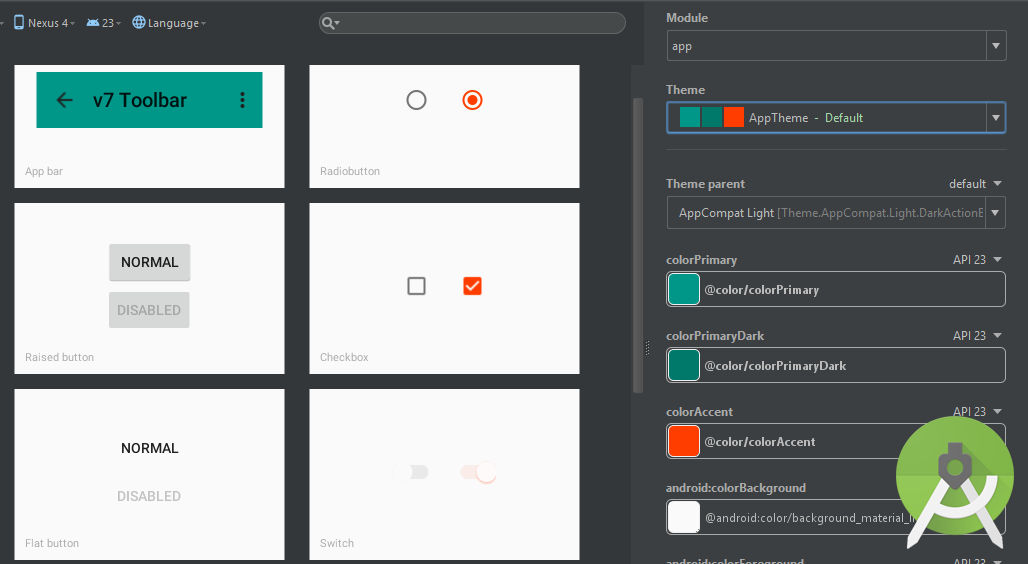
A visual editor appeared, allowing a couple of minutes to improve the appearance of the application, taking into account the specifics of Material Design. You can call it through Tools → Android → Theme Editor or by clicking the Open Editor button for already open styles.xml :

If you have not heard of Vector Drawable , I recommend reading this excellent article. In Android Studio 1.4, there is a visual tool called Vector Assets , which allows you toeasily switch to the vector graphics format in your application, both on Lollipop / Marshmallow and on previous versions of the API. To do this, you need to use the updated version of the Android Gradle plugin (at the time of the article’s release, it’s in beta, but promised “as soon as it’s right”), correcting the build.gradle for the project:
You can call the tool through the dialogue Android Project → New → Vector Assets :

Here we are offered to choose a vector icon from the Material Design Icons Pack or to import a third-party * .svg file.

After this, Vector Assets will generate xml VectorDrawable resources and put it in

Updated project templates
The first thing that catches your eye is the updated templates of sample layouts available in the New Project Wizard: Android Studio 1.4 brings full support to Material Design already at the stage of creating a new project:
')
Create a demo application based on the Navigation Drawer Activity. Look at the build.gradle for the application module:
dependencies { compile fileTree(dir: 'libs', include: ['*.jar']) testCompile 'junit:junit:4.12' compile 'com.android.support:appcompat-v7:23.0.1' compile 'com.android.support:design:23.0.1' } The studio kindly took care of us by adding the Android Design Support Library and the AppCompat Support library . There is no need to drag third-party implementations of Floating Action Button, Material Dialogs or Snackbar into the project - all the necessary visual components are available in the connected support libraries. We also added the 4th version of JUnit, so we did not forget to write unit tests.
Note: I remind you that unit tests live in thesrc\test\<package_name>, not insrc\androidTest\<package_name>. It is also worth remembering that tests on JUnit 4 use the@Testannotation instead ofextends TestCase.
In the project, we already have DrawerLayout , NavigationView , FloatingActionButton and even CoordinatorLayout (in more detail ), which will take care of raising the FAB when the
app_bar_mail.xml
<?xml version="1.0" encoding="utf-8"?> <android.support.design.widget.CoordinatorLayout xmlns:android="http://schemas.android.com/apk/res/android" xmlns:app="http://schemas.android.com/apk/res-auto" xmlns:tools="http://schemas.android.com/tools" android:layout_width="match_parent" android:layout_height="match_parent" android:fitsSystemWindows="true" tools:context=".MainActivity"> <android.support.design.widget.AppBarLayout android:layout_height="wrap_content" android:layout_width="match_parent" android:theme="@style/AppTheme.AppBarOverlay"> <android.support.v7.widget.Toolbar android:id="@+id/toolbar" android:layout_width="match_parent" android:layout_height="?attr/actionBarSize" android:background="?attr/colorPrimary" app:popupTheme="@style/AppTheme.PopupOverlay"/> </android.support.design.widget.AppBarLayout> <include layout="@layout/content_main"/> <android.support.design.widget.FloatingActionButton android:id="@+id/fab" android:layout_width="wrap_content" android:layout_height="wrap_content" android:layout_gravity="bottom|end" android:layout_margin="@dimen/fab_margin" android:src="@android:drawable/ic_dialog_email"/> </android.support.design.widget.CoordinatorLayout> Added Theme Editor
A visual editor appeared, allowing a couple of minutes to improve the appearance of the application, taking into account the specifics of Material Design. You can call it through Tools → Android → Theme Editor or by clicking the Open Editor button for already open styles.xml :
Note: for the full work of Theme Editor with the ability to preview, you must have an SDK Platform for API 23.You no longer need to spend the time on the necessary properties of the theme, select Primary / PrimaryDark / Accent colors - Theme Editor kindly prompts / generates the desired palette. So, PrimaryDark will be selected on the basis of Primary colors - conveniently.
Vector Assets Tool, Vector Drawable Support
If you have not heard of Vector Drawable , I recommend reading this excellent article. In Android Studio 1.4, there is a visual tool called Vector Assets , which allows you to
dependencies { classpath 'com.android.tools.build:gradle:1.4.0-beta3' } You can call the tool through the dialogue Android Project → New → Vector Assets :
Here we are offered to choose a vector icon from the Material Design Icons Pack or to import a third-party * .svg file.
Warning: Imports are under development and do not support the entire SVG specification. Problem items will be listed, you will have to make edits.
After this, Vector Assets will generate xml VectorDrawable resources and put it in
res\drawable
res\drawable
. To ensure backward compatibility with pre-Lollipop devices at the time of the android gradle plugin build, it will generate * .png for all screen densities in the app\build\generated\res\pngsBackward compatibility limitations:
minSdkVersion> = 21 (Lollipop)
- Full support for VectorDrawable API
minSdkVersion <21
- Auto-png generation instead of sml at build time
- Trimmed VectorDrawable API
- Elements
not supported<clip-path><clip-path>
UsingBitmapDrawableinstead ofVectorDrawablein Java code.Two new monitors: GPU Rendering, Network
Two new monitors are available to the developer for analyzing application performance: GPU Rendering Monitor and Network Monitor :To make the GPU Rendering monitor work, you need to enable it on a device or an emulator: Setting → Developer Options → Profile GPU rendering → In adb shell dumpsys gfxinfo
That's all, good to see that the favorite tool of Android developers is developing, thank you for your attention.
Materials used:
Android Studio Blog
Vector Drawable API. Application possibilities
Easily go to the vector image format instead of cutting under different screen densities in Android 4.0+. Part 1 of 2


Source: https://habr.com/ru/post/268143/
All Articles