How-to: The process of creating the layout of html-letters
In our blog, we have repeatedly talked about creating email newsletters using CSS and HTML. Today we will talk about the very approach to creating the layout. Italian designer Massimo Cassandro on SitePoint described his process for developing html letters. There are some interesting points in it, so we decided to make an adapted translation of this note .

Each specialist has his own approach to web development: a favorite editor, certain supporting tools, a specific project course, etc. When working with large and complex tasks, it is very important to have a clear idea of the path from the beginning to the end, this minimizes errors and saves time.
')
In my experience, this is especially important when creating HTML emails. Email requires a large number of repetitive tasks, which themselves are not so difficult, but affect a huge number of different elements, which can lead to errors. This is how I try to avoid it.
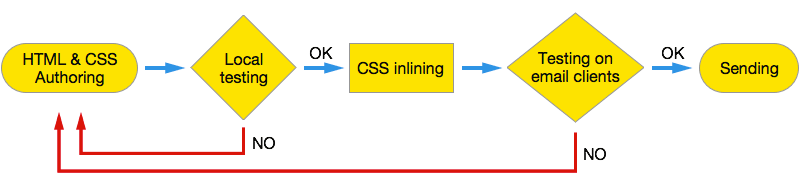
The classic approach to creating the layout of email-letters includes three steps:
Final testing (with inline-CSS) is time consuming, since tests need to be run a few times. Moreover, the steps “inline CSS” and “Testing” require additional work and attention: first, you need to keep the original working layout, in addition to the inline version. In addition, the final tests involve sending the inline version of the template to different email addresses in order to check how everything is displayed in various email programs.
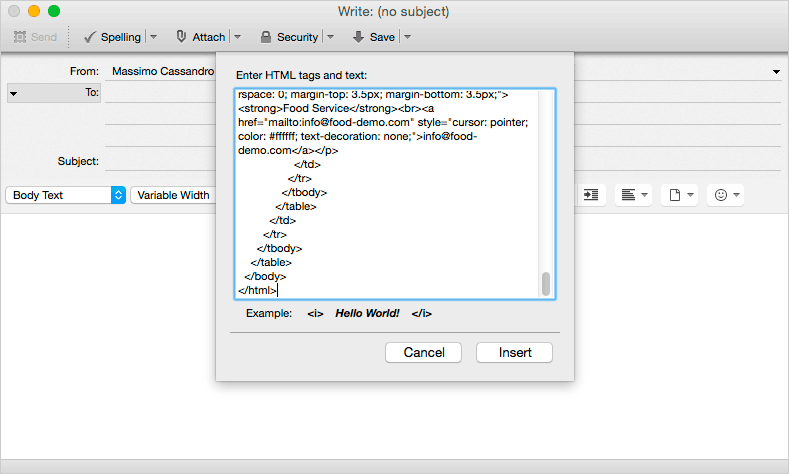
Sending code via email is not such a simple task, as usually clients do not allow creating emails with inserted HTML code (with the exception, perhaps, of Thunderbird ). So every time you have to perform many actions - create a letter, create inline-CSS, insert code, etc.
If you have an account in any of the platforms that allow you to test letters ( Litmus , Campaign Monitor , Pechkin-mail ), then everything becomes easier - you can simply insert the code and see how it will be displayed. However, for more accurate tests, you still have to send the letters manually. You can use scripts to automate this task, but you still cannot completely avoid the routine.
As for CSS, you’ll have to work with two files: one for inline and one for embed (for clients that support media queries).
CSS should be designed so that the inline code is added directly in the HTML file (specialized inliners can be used), and then “zaembed” the second CSS directly into the inline file (even writing is boring about it, not what to do).
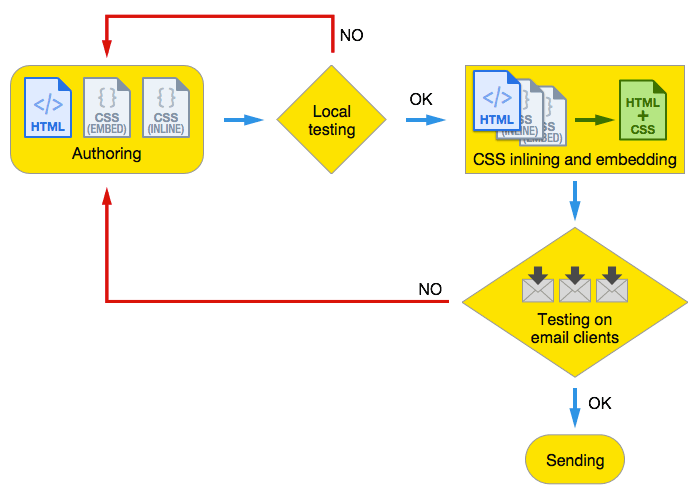
Take a look at a more detailed scheme:
There are many obstacles to a truly productive process, fortunately, it can be improved. We also have preprocessors and task-runners.
Preprocessors can be extremely useful in creating email layouts. They can greatly simplify code for both HTML and CSS.
For HTML, you can use Jade , and for CSS - Less . The first one is especially useful when working with redundant and complex code (for example, nested tables). Take a look at the example code for a three-level nested table:
With Jade, you can simplify things a lot:
Now there are no problems with unclosed tags, and the code has become much more readable. With Jade, you can create complex templates and develop your own snippets library by reusing code in different projects. The same can be done with the help of Less or Sass.
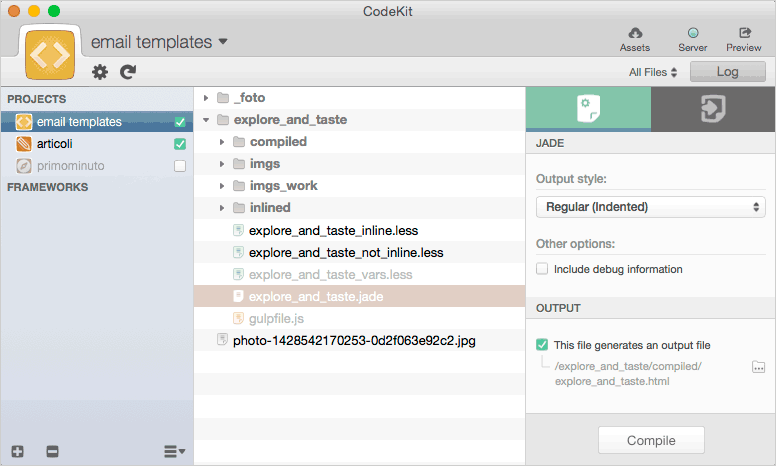
You can use Gulp or Grunt to compile files, and Coda and CodeKit are great for getting quick previews of the work done.
The stage of “local testing” in our development process allows us to receive initial feedback on the work done, plus this does not require any additional actions.
CodeKit compiles the Jade and Less files when saved, so you can see the project display in real time. Coda, in turn, allows you to edit the file and immediately see the updated compiled version in a special window:

All actions are fully automated, which allows you to focus on the design, and not waste time on boring routine tasks.
So, we used Jade and Less for initial development and getting previews of HTML and CSS code. The next step is to bring everything together for final testing.
There are various scripts to automate testing. For example, npm is a good tool, but Gulp Email Builder is even more convenient. This package is part of a larger project ; its Grunt version also exists.
Email Builder allows you to inline or embed CSS files for testing through special platforms, or send test emails.
In order to use Email Builder you will need to install Gulp. How to do this, you can read here . And here you can find another good article on the use of Gulp and Grunt.
In addition, we will use the Gulp-Replace package, so it will also need to be installed.
As usual, for any Gulp task you need to configure
First of all, you need to include all the necessary packages and configure four variables:
In this example, the
The first element -
The
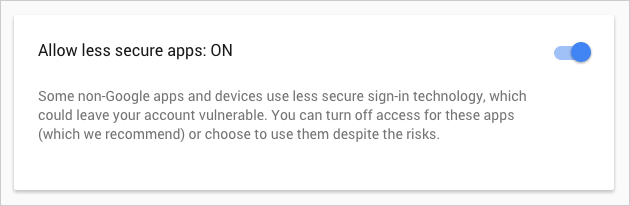
If Gmail is used as a transport, you need to activate the “Allow less secure apps” option in your Google account settings, otherwise the task will not be performed (you don’t need to use a personal account for this purpose):
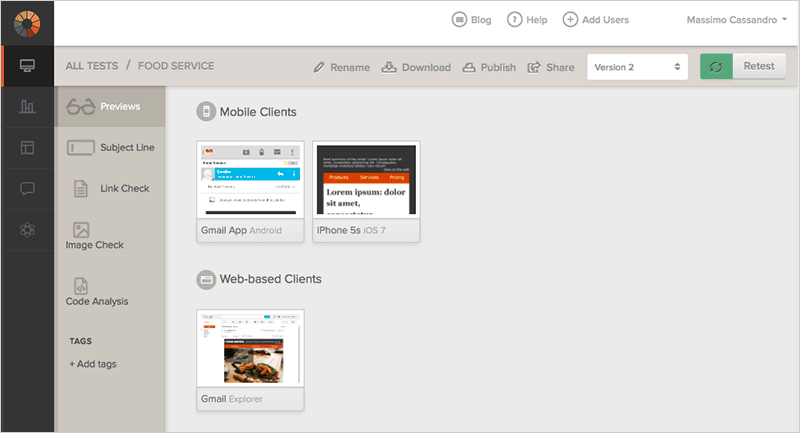
The third parameter allows you to set up testing on the Litmus platform (so you will need an account on this system). It is necessary to list the account parameters, an optional topic (needed for group tests, if they will be carried out more than once), as well as a list of tested email addresses.
To add a client, you need to use its testing application code. You can find it from the application_code field of the https://litmus.com/emails/clients.xml file (to access it, you need to be logged in to the system).
In the example above, the line:
tells Litmus to test a letter in the Gmail app for Anroid, Gmail (Explorer) and on iPhone 5s with iOS7.
If you need to implement only email tests, then the Litmus parameter can be simply removed from
The last lines of the
What about CSS?
Email Builder simplifies this task. You just need to add the
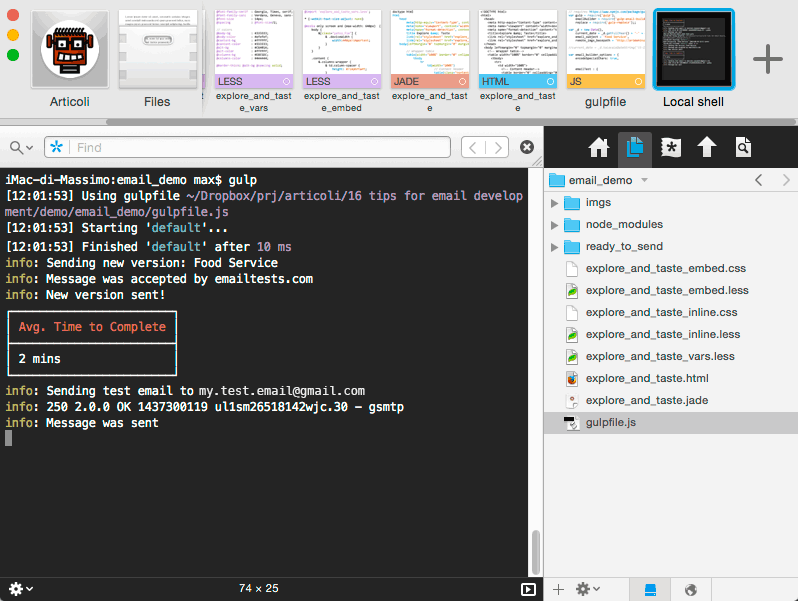
Again, Coda simplifies Gulp processing using an internal terminal application:
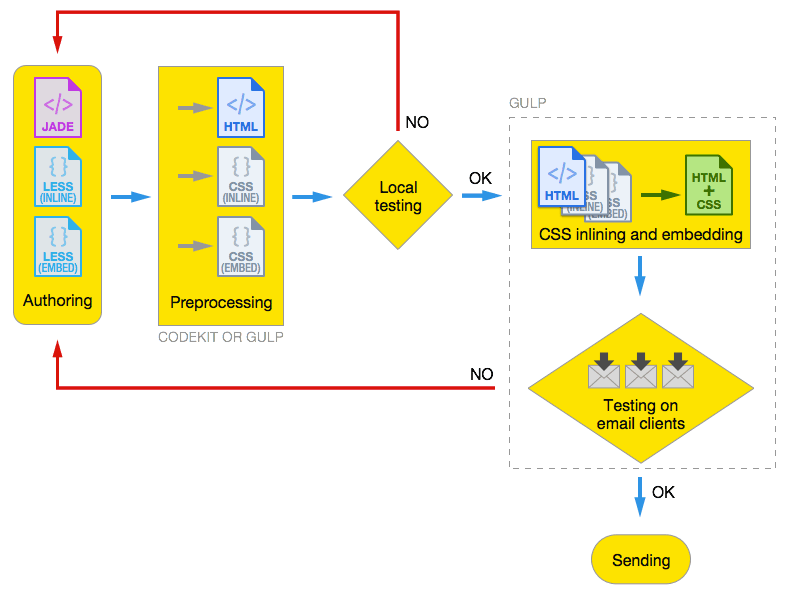
Now the workflow has seriously changed and looks like this:
Each of the steps, of course, can be customized for specific tasks, for example, use another editor, reject CodeKit, or use Grunt instead of Gulp and Sass instead of Less. No matter what technologies you use, the very similar approach to creating an email layout greatly simplifies development.
Each specialist has his own approach to web development: a favorite editor, certain supporting tools, a specific project course, etc. When working with large and complex tasks, it is very important to have a clear idea of the path from the beginning to the end, this minimizes errors and saves time.
')
In my experience, this is especially important when creating HTML emails. Email requires a large number of repetitive tasks, which themselves are not so difficult, but affect a huge number of different elements, which can lead to errors. This is how I try to avoid it.
The usual approach to the development of email-letters
The classic approach to creating the layout of email-letters includes three steps:
- Development (with small local tests);
- Inline CSS;
- Testing.
Final testing (with inline-CSS) is time consuming, since tests need to be run a few times. Moreover, the steps “inline CSS” and “Testing” require additional work and attention: first, you need to keep the original working layout, in addition to the inline version. In addition, the final tests involve sending the inline version of the template to different email addresses in order to check how everything is displayed in various email programs.
Sending code via email is not such a simple task, as usually clients do not allow creating emails with inserted HTML code (with the exception, perhaps, of Thunderbird ). So every time you have to perform many actions - create a letter, create inline-CSS, insert code, etc.
If you have an account in any of the platforms that allow you to test letters ( Litmus , Campaign Monitor , Pechkin-mail ), then everything becomes easier - you can simply insert the code and see how it will be displayed. However, for more accurate tests, you still have to send the letters manually. You can use scripts to automate this task, but you still cannot completely avoid the routine.
As for CSS, you’ll have to work with two files: one for inline and one for embed (for clients that support media queries).
CSS should be designed so that the inline code is added directly in the HTML file (specialized inliners can be used), and then “zaembed” the second CSS directly into the inline file (even writing is boring about it, not what to do).
Take a look at a more detailed scheme:
There are many obstacles to a truly productive process, fortunately, it can be improved. We also have preprocessors and task-runners.
Adding HTML and CSS Preprocessors
Preprocessors can be extremely useful in creating email layouts. They can greatly simplify code for both HTML and CSS.
For HTML, you can use Jade , and for CSS - Less . The first one is especially useful when working with redundant and complex code (for example, nested tables). Take a look at the example code for a three-level nested table:
<table width="100%" id="wrapper"> <tbody> <tr> <td width="100%"> <table align="center" class="header"> <tbody> <tr> <td width="100%"> <table width="100%"> <tbody> <tr> <td>cell 1</td> <td>cell 2</td> <td>cell 3</td> </tr> </tbody> </table> </td> </tr> </tbody> </table> </td> </tr> </tbody> </table> With Jade, you can simplify things a lot:
table(width="100%" id="wrapper") tbody tr td(width="100%") table(class="header" align="center") tbody tr td(width="100%") table(width="100%") tbody tr td cell 1 td cell 2 td cell 3 Now there are no problems with unclosed tags, and the code has become much more readable. With Jade, you can create complex templates and develop your own snippets library by reusing code in different projects. The same can be done with the help of Less or Sass.
You can use Gulp or Grunt to compile files, and Coda and CodeKit are great for getting quick previews of the work done.
The stage of “local testing” in our development process allows us to receive initial feedback on the work done, plus this does not require any additional actions.
CodeKit compiles the Jade and Less files when saved, so you can see the project display in real time. Coda, in turn, allows you to edit the file and immediately see the updated compiled version in a special window:
All actions are fully automated, which allows you to focus on the design, and not waste time on boring routine tasks.
So, we used Jade and Less for initial development and getting previews of HTML and CSS code. The next step is to bring everything together for final testing.
Speed testing with Gulp
There are various scripts to automate testing. For example, npm is a good tool, but Gulp Email Builder is even more convenient. This package is part of a larger project ; its Grunt version also exists.
Email Builder allows you to inline or embed CSS files for testing through special platforms, or send test emails.
In order to use Email Builder you will need to install Gulp. How to do this, you can read here . And here you can find another good article on the use of Gulp and Grunt.
In addition, we will use the Gulp-Replace package, so it will also need to be installed.
As usual, for any Gulp task you need to configure
gulpfile.js : var gulp = require('gulp'), emailBuilder = require('gulp-email-builder'), replace = require('gulp-replace'); var current_date = new Date().toString(), email_subject = 'Food Service', remote_imgs_basepath = 'http://mydomain.com/path/to/remote/imgs/', email_builder_options = { encodeSpecialChars: true, emailTest : { // Your Email email : 'my.test.email@gmail.com,' + 'my.test.email@yahoo.com,' + 'my.test.email@oulook.com', // Your email Subject subject : email_subject + ' [' + current_date + ']', // Optional transport: { type: 'SMTP', options: { service: 'gmail', auth: { user: 'my.gmail.account@gmail.com', pass: 'my_password' } } } }, litmus : { username : 'Litmus_username', password : 'litmus_password', // Url to your Litmus account url : 'https://myaccount.litmus.com', // Optional, defaults to title of email or yyyy-mm-dd if <title> and options.subject not set subject : email_subject, // Email clients to test for. Find them at https://litmus.com/emails/clients.xml // and use the `application_code` field applications : ['androidgmailapp','gmailnew', 'iphone5s'] } }; gulp.task('default', function() { gulp.src(['./explore_and_taste.html']) .pipe(replace(/src="imgs\//g, 'src="' + remote_imgs_basepath)) .pipe(emailBuilder(email_builder_options)) .pipe(gulp.dest('./ready_to_send')); }); First of all, you need to include all the necessary packages and configure four variables:
current_date- the string that represents the current date. We will use it to differentiate the test letters, so it will be easier to find different versions;email_subject;remote_imgs_basepathis the URL of the remote folder that contains the image. It can be used to conduct local tests with setting relative paths to images, the final tests require downloading images to a remote folder, so you need to change the image src attributes toremote_imgs_basepathusing Gulp-Replace;email_builder_options- object for Email-builder configuration.
In this example, the
email_builder_options object contains three elements. All available options are listed on this page .The first element -
encodeSpecialChars needed in order to make sure that all special characters are encoded in numerical form.The
emailTest element emailTest used to set up testing, it also requires several parameters:email- comma-separated email addresses to which you want to send a test letter;subject- the subject of the letter (we also addedcurrent_dateto the subject in order to quickly understand which version is currently being worked on);transport- service to send.
If Gmail is used as a transport, you need to activate the “Allow less secure apps” option in your Google account settings, otherwise the task will not be performed (you don’t need to use a personal account for this purpose):
The third parameter allows you to set up testing on the Litmus platform (so you will need an account on this system). It is necessary to list the account parameters, an optional topic (needed for group tests, if they will be carried out more than once), as well as a list of tested email addresses.
To add a client, you need to use its testing application code. You can find it from the application_code field of the https://litmus.com/emails/clients.xml file (to access it, you need to be logged in to the system).
In the example above, the line:
applications : ['androidgmailapp','gmailnew', 'iphone5s']tells Litmus to test a letter in the Gmail app for Anroid, Gmail (Explorer) and on iPhone 5s with iOS7.
If you need to implement only email tests, then the Litmus parameter can be simply removed from
email_builder_options .The last lines of the
gulpfile do all the work:- First, we tell Gulp to use the
explore_and_taste.htmlfile (this is the HTML created by CodeKit from the jade file that was used for the first preview); - With the replace module, all local paths are replaced with remote paths (
replace(/src="imgs\//g, 'src="' + remote_imgs_basepath)). - Finally, the
EmailBuildertask isEmailBuilder, the tests are sent to Litmus and to the selected email addresses, a file ready for sending is created.
What about CSS?
Email Builder simplifies this task. You just need to add the
data attribute to the link or style tags:linkandstyletags with nodataattributes will be used inline;- If they have a
data-embedattribute, CSS rules will be embedded; - Finally,
data-embed-ignoreallows you to configure CSS rules for development tasks only (they will be ignored during processing).
Again, Coda simplifies Gulp processing using an internal terminal application:
Conclusion
Now the workflow has seriously changed and looks like this:
Each of the steps, of course, can be customized for specific tasks, for example, use another editor, reject CodeKit, or use Grunt instead of Gulp and Sass instead of Less. No matter what technologies you use, the very similar approach to creating an email layout greatly simplifies development.
Source: https://habr.com/ru/post/268025/
All Articles