Installing the Intel RealSense SDK on Macs
To participate in seminars and hackathons on Intel RealSense technology, some developers need to install the Intel RealSense SDK on Mac OS laptops. We noticed that sometimes it takes more time than we would like, so we decided to publish this step-by-step guide showing how to run sample SDK applications with an Intel RealSense camera on a Mac computer using Boot Camp.
Getting started
First of all, the following will be required.
- Mac OS X * Yosemite
- Apple Boot Camp 5.1.4 or later (this program is preinstalled on a Mac)
- Camera Intel RealSense F200 and / or Intel RealSense R200
- Intel RealSense SDK (registration is required to download the SDK)
- USB drive with a capacity of at least 6 GB for loading Windows *
- ISO image with 64-bit version of Microsoft Windows 8.1 operating system (classic mode)
- Microsoft Media Feature Pack
- Microsoft Visual Studio * 2010–2013 Service Pack 1 (SP1) or later
- USB3 port
To determine if your computer has an Intel® Core ™ 4th processor (Haswell family) or later generation, open a terminal and enter the following command.
sysctl -n machdep.cpu.brand_string
')
About such text will appear on the screen.
Intel® Core (TM) i5-5257U CPU @ 2.70GHz
If you don’t know the naming convention for Intel processors, look for a four-digit number after i3 / i5 / i7. If the first digit of this number is 4 or more, then everything is in order. In addition, click the appropriate link to view a list of all 4th and 5th generation processors.
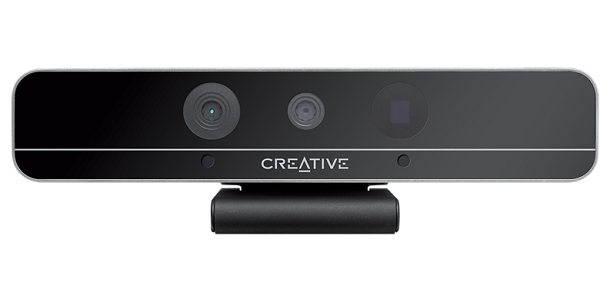
Intel® RealSense ™ F200 Camera
Installing Windows with Boot Camp
Press Cmd + Spacebar or click the magnifying glass in the upper right corner of the desktop to launch Spotlight *, then search for “Boot Camp”. The string “Boot Camp Assistant” should appear in the search results window.
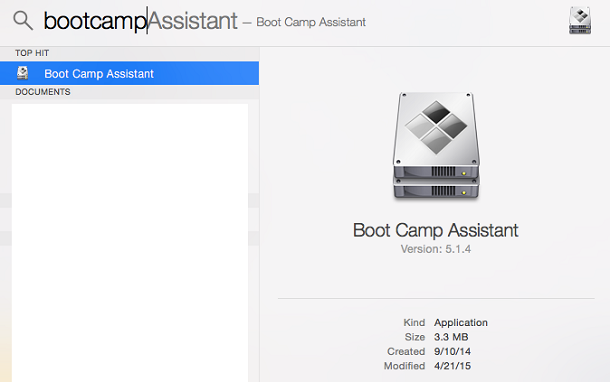
Search Boot Camp * Assistant with Spotlight *
Boot Camp Assistant will transfer the Windows installation files from an ISO file or from a USB drive. At this stage, the Mac computer from the USB drive will install Windows with the latest drivers for Windows. The app will help resize the current system partition on a Mac and create a partition for Windows.
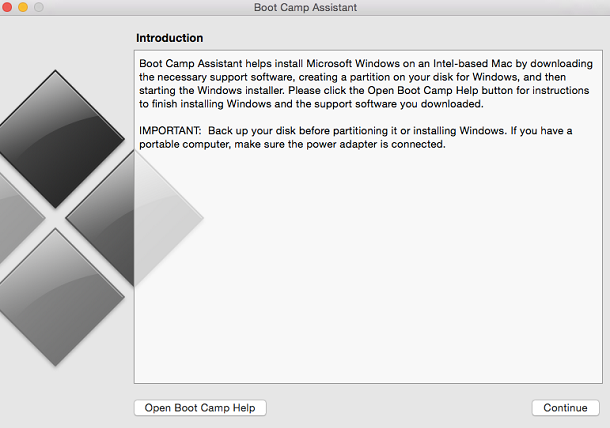
Installing Windows * using Boot Camp * Assistant
First select the tasks you need to complete. It is recommended to check all these boxes. If you have already created a USB drive with Boot Camp or have already divided a computer disk into several partitions, deselect the appropriate checkboxes to speed up the process. This approach is usually used by those who plan to install Windows on several Mac computers and have already prepared a USB drive.

Selection of tasks in the Boot Camp * Assistant
Now select the ISO file or USB flash drive. Insert a USB flash drive and select it. Please note that all the contents of this drive will be deleted, so make copies of all important files.
The installation disk with Windows will now be created, the “Copying Windows files” notification should appear. This process can take a lot of time (depending on the speed of the drive). In this case, the progress indicator may periodically stop moving. In such cases, be patient.
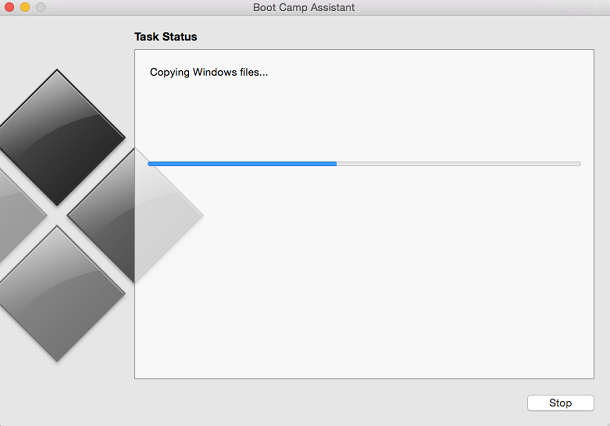
Copying Windows * files to a USB drive
After completing the process and creating the installation USB drive, the “Create a Partition” screen will appear. Now you can divide the system disk of your computer into two sections: one for Mac OS X, the other for Windows. You can specify how much space to allocate for Windows and for OS X. It is recommended to allocate at least 32 GB for the Windows partition. If your computer has multiple hard drives, you can use one of them only for Windows.
Unfortunately, after completing this process, it will not be possible to resize partitions in the Boot Camp Assistant; This will require the use of a third-party program.
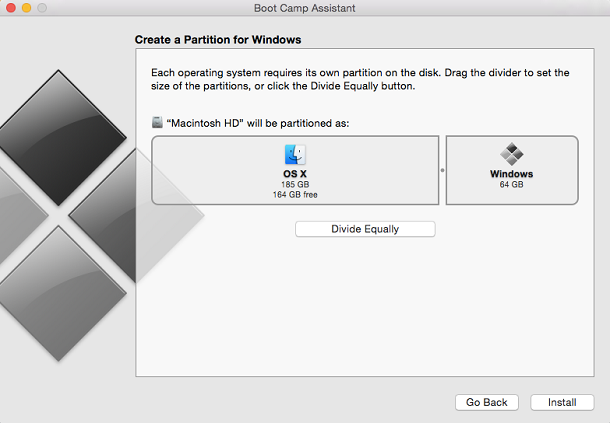
Splitting a Windows * disk into partitions
Now Windows will continue the installation process. Then the Boot Camp installer will start, it will install all the necessary Windows hardware drivers and utility programs.
After the Boot Camp installer has completed all the tasks, you can remove the USB drive from the port. If you do not plan to repeat the installation process on another Mac, this USB drive is no longer needed.
NTFS error
Boot Camp formats the partition on the Windows disk to FAT32 format, and Windows 8.1 only supports NTFS partitions, so the following error message may appear during the installation:
“Windows cannot be installed in this area of the hard disk. You need to install Windows in a partition formatted as NTFS. ”
Select the BOOTCAMP section. Use the format command to reformat this partition to NTFS and continue the installation of Windows.

Installing the Intel® RealSense ™ SDK using Boot Camp
The process of installing the Intel RealSense SDK using Boot Camp is the same as installing on Windows.
Step 1. Connect the Intel RealSense camera to one of the USB3 ports on your Mac.
Step 2. Follow the instructions on the Intel RealSense SDK download page to install the Intel® RealSense ™ Depth Camera Manager (DCM), which includes the virtual camera driver and the Depth Camera Manager service, then install the SDK.
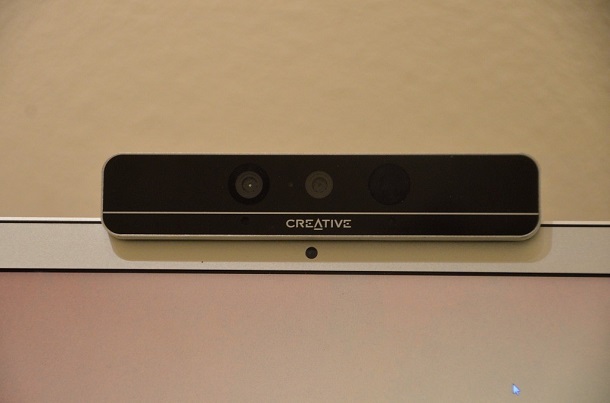
Connecting the F200 camera to a USB3 port on a Macbook * laptop
Step 3. Depending on the version of Windows 8.1, the Media Feature Pack may not be part of the operating system. Simply download this package if necessary and continue the installation. The Media Feature Pack is required to install the Intel RealSense SDK.
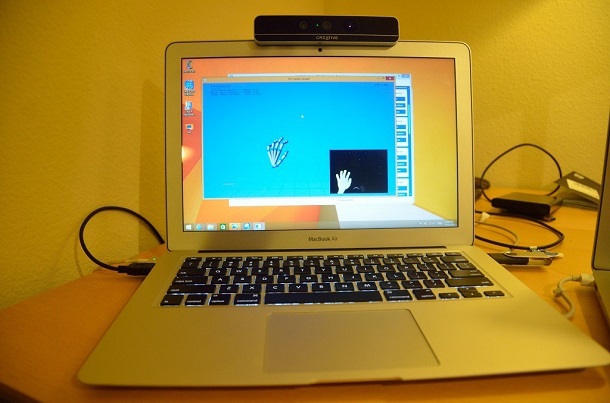
Step 4. After installing the SDK, try running the sample applications. To access them, use the shortcut of the Intel RealSense SDK 2014 folder on the desktop. When installing the SDK in the default location, the folder C: \ Program Files (x86) \ Intel \ RSSDK \ sample is used.
Running a sample from the SDK on a Macbook Air laptop *
Step 5. You can use Visual Studio to use and modify the code samples.
Done! Intel RealSense technology now works on a Mac.
That's all
As you can see, it doesn’t take much effort to successfully use Intel RealSense technology on Macs; all you need is to use the Apple Boot Camp application.
You can use other software to support virtual machines, such as Parallels, VMWare Fusion *, and Virtual Box, but the USB3 simulation is still significantly different from running a real OS on a computer. Simply put, the installation may succeed, but the camera will not boot.
Source: https://habr.com/ru/post/267957/
All Articles