Using NSOperation and NSOperationQueue in Swift
Almost every one of us experienced discomfort when pressing a button or typing in iOS or Mac applications, when the user interface suddenly stopped responding, the application seemed to stop and stop responding to your actions.
On a Mac , users see an hourglass or rotating rainbow cursor until the user interface again resumes. Many users mistakenly assume that the application will immediately work when you touch the screen. Such applications give a feeling of poor performance and seem slow, and, as a rule, receive bad reviews in the AppStore .
But ensuring constant user responsiveness is not so easy. As soon as the application performs many tasks, it starts to slow down. Not much time is allocated to perform a large number of tasks in the main thread and to ensure responsiveness of the interface.
')
What should the "unfortunate" developer do? The solution is, it is to separate the main stream through parallelism. Parallelism is the property of an application to perform tasks in several threads at the same time - and at the same time, the user interface remains responsive as you do your work in different threads.
One of the methods for performing operations in iOS simultaneously is to use the NSOperation and NSOperationQueue classes . In this article you will learn how to use them! You will work with an application that does not use multithreading at all, so it will be very slow and will slow down. When you change the application so that you can add parallel operations and - I hope - this will provide a more responsive user interface!
Let's get started
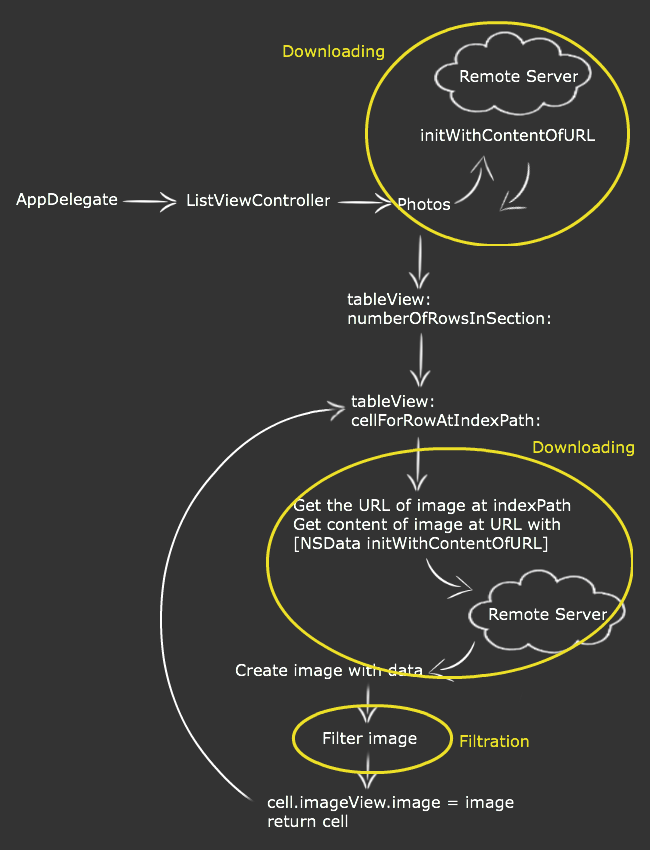
The purpose of this article is to show a table with images to which the filter was applied. The image will be downloaded from the Internet, to which the filter will be applied, and then displayed in the table.
Here is a schematic representation of the application model:

First try
From the author: Since the article was written before 09/09/2015 , Swift 1.2 was used to write the examples. I made some changes to the examples with the release of the new version of the Swift language. The source code for Swift 2.0 can be found at the links: the “starting” project and the “final” version of the project .
Download the “starter” project on Swift 1.2 and Swift 2.0 , which you will be working on as you read this manual.
Note: All images are taken from stock.xchng . Since there are cases when the image cannot be loaded, to perform this failed attempt, some images in the data source are intentionally incorrectly named.
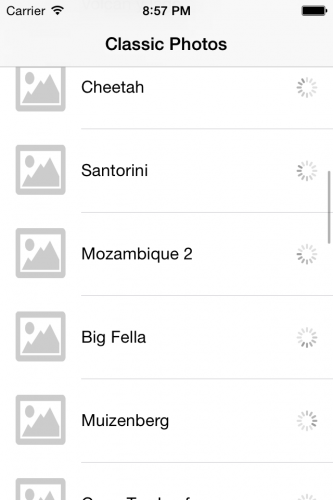
Compile and run the application, and (eventually) you will see that the application displays a list of photos. Try scrolling through the list. Annoying, isn't it?

All the action takes place in the ListViewController.swift file, and most of the actions are inside the delegate method of the tableView (_: cellForRowAtIndexPath :) .
Take a look at this method and notice the two ongoing actions, which are quite voluminous:
In addition, you also upload a list of photos from the network, with the first request:
All this work is happening in the main flow of the application. Since the main thread is also responsible for user interaction, loading and applying a filter to images reduces the ability to respond quickly to user actions. You can verify this by using the indicators tab in the Xcode development environment . You can get to this tab by clicking on the Debug navigator (Command-6) and then selecting the CPU during the execution of the application.

You will see all these peaks in the first thread, which is the main flow of the application. For more information, launch the application using Tools , but that’s another story.
It's time to think about how to improve your user experience! And make the app more responsive.
Tasks, Threads and Processes
Before you dive into the article, there are several technical concepts that need to be considered. I will define several terms:
Note: On iOS and OS X , multithreading functionality is provided by the POSIX Threads API and is part of the operating system. This is a fairly low level job, and you will understand how easy it is to make mistakes; Perhaps the worst in using streams are errors that are incredibly difficult to find!
The Foundation framework contains a class called NSThread , which is much easier to work with, but managing multiple threads with NSThread still causes difficulties. NSOperation and NSOperationQueue are high-level classes that greatly simplify the process of working with multiple threads.
In this diagram, you see the relationship between the process, the threads, and the tasks:
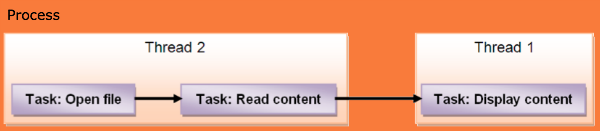
As you can see, a process can contain several threads, and each thread can perform several tasks in turn.
In this scheme, the second thread performs file reads, while the first thread executes code associated with the user interface. This is very similar to how you should structure your code in iOS — the main thread must do any work related to the user interface, and the secondary threads must perform slow or lengthy operations, such as reading files, accessing the network, etc. .
NSOperation vs. Grand Central Dispatch (GCD)
You may have heard of the Grand Central Dispatch (GCD) . In general, GCD consists of language features, runtime libraries and system extensions, which in turn provides system-wide improvements to maintain concurrency on multi-core mobile devices on iOS and OS X. If you want to know more about GCD , you can read the Multithreading and Grand Central Dispatch on iOS for Beginners Tutorial .
NSOperation and NSOperationQueue built on top of GCD . It is worth noting that Apple recommends using a higher level abstraction, and then going down to the lower levels when the measurements indicate that they are necessary.
Here is a brief comparison that will help you decide when and where to use GCD or NSOperation :
In this tutorial, we will use the NSOperation class, because you are dealing with a table view and because of performance and power consumption, you need to cancel the operation for a particular image if the user has scrolled the image off the screen. Even if the operations will be in the background thread, if dozens of such operations will wait for their turn to perform, the performance will still not be at the level we need.
Modification of the application model
It's time to change the application-specific model without a multithreading! If you look more closely at the preliminary model, you will see that there are three problematic areas that can be improved. Sharing these three areas and putting them into a separate thread, the main thread will be released, and will be able to respond quickly to user interaction with the UI .
To get rid of bottlenecks in the application, you will need a stream that will respond to user interaction with the UI, another stream that will be used to load images and another stream to apply the filter to the image. In the new model, the application starts in the main thread and loads an empty table view. At the same time, the application starts a second stream to load data.
As soon as the data is loaded, you need to update the table. This should be done in the main thread, as it includes the user interface. At this stage, the table view knows how many cells it has, and which image URLs should be displayed on the screen, but it still has no actual images! If you immediately start downloading all the images at once, it will be completely ineffective, since you do not need all the images at once!
What can be done to improve?
The enhanced model will begin loading images that correspond to the cells displayed on the screen. In this way, your code will first know which cells are visible, and only then will the download process begin. Also, the process of applying a filter to an image cannot be started before the image is fully loaded. Therefore, the code that is responsible for applying the filter should not run until there is an image to process.
For better responsiveness of the application, we must display the image as soon as it is loaded. Then we will start working with the images, and then update the interface to display the processed image. The diagram below shows the flow of control for this process:
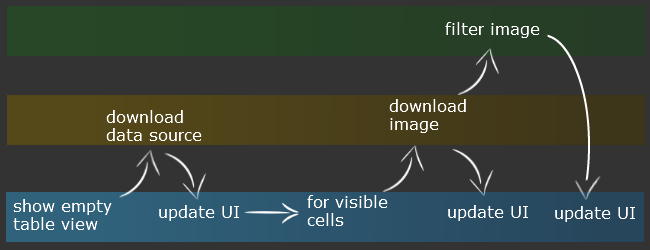
To achieve these goals, you will need to track whether the image is currently being loaded, or already loaded, or whether a filter has been applied to the image. You will also need to track the status of each operation, and whether it is loading or processing an image so that you can cancel, pause or resume it.
Good! Now you can proceed to the most interesting, the implementation of our scheme!
Open the project and add a new Swift File to the project named PhotoOperations.swift . Then add the following code to it:
Note: Be sure to import UIKit to the top of the file. By default, Xcode imports only Foundation in Swift .
This class will represent each photo displayed in the application, along with its current state, which is set by default as .New for newly created records. The default image is a picture called "Placeholder" .
To track the status of each operation, you will need a separate class. Add the following implementation to the end of PhotoOperations.swift:
This class contains two dictionaries to track active and incomplete loading of images and filtering operations for each cell in the table and two operation queues for each type of operation.
All values are created slowly, that is, they cannot be initialized until they have access. This will improve the performance of your application.
Creating an NSOperationQueue class is very simple. Naming your queues makes them easy to find in the Tools or in the debugger. MaxConcurrentOperationCount is set to 1 , but only for this article, so you can see that operations are completed one after another. You can skip this part to let the queue decide how many operations it can process right away - this will further increase performance.
How does the queue decide how many operations it can run at the same time? This is a good question! It depends on the hardware. By default, NSOperationQueue does some computation behind the scenes to decide which is best for the particular platform on which the code is being executed and to run as many threads as possible.
Consider the following example. Suppose the system is inactive, and there are many resources available, so the queue can run approximately eight simultaneous threads. The next time you start the application, the system may be busy with other operations that use resources, and the queue will start only two simultaneous threads. Since you have set the maximum parallel number of operations, only one operation will be performed in this application.
Note: You may wonder why you should keep track of all active and incomplete operations. The queue has a operations method that returns an array of operations, so why not use it? In this project, it does not make sense to use it. You have to track with which operations the associated table cells, which include the process of iterating over an array, every time you need it. Storing them in a dictionary with an index as the main search tool is a quick and effective way.
It's time to take care of the operations of applying the filter to the image and loading the image itself. Add the following code to the end of PhotoOperations.swift :
NSOperation is an abstract class designed to create a derived class. Each derived class represents a specific task, as shown in the figure above.
Here is what happens in each of the numbered comments in the code:
Next, you will create another operation to monitor the application of the filter! Add the following code to the end of PhotoOperations.swift :
It looks like a load operation, except for applying a filter to an image (using a still unimplemented method, hence the compiler error) instead of loading it.
Add the missing ImageFiltration method that will process the image in the class:
Image processing is the same implementation that we used earlier in the ListViewController . She was moved here so that she could be used as a separate operation in the background. Again, you should check for cancellation often; over time, you will do this on an automaton before and after any method call. After the end of the action, you set the values of the photo instance.
Fine! Now you have all the tools and the basics that you need in order to perform operations as background tasks. It's time to go back to the view controller and change it to take advantage of all these new benefits.
Go to the ListViewController and remove the lazy var photos property declarations. Then add the following declarations instead:
They will contain an array of PhotoDetails objects that you created earlier, and a PendingOperations object for managing operations.
Add a new method to the class to upload a list of photos:
, , , . , NSDictionary PhotoRecord . NSOperation , , NSOperationQueue.mainQueue() .
viewDidLoad :
, tableView(_:cellForRowAtIndexPath:) :
:
You can delete the implementation of the applySepiaFilter method , since it will not need to be called again. Add the following method to the class to start operations:
, PhotoRecord . .
: , , , , . , , ; ! !
, . , , PendingOperations , ; ! :
Good! , , , :
The method of applying a filter to images occurs in the same way, except for using ImageFiltration and filtrationsInProgress to track the operation. As an exercise, you can try to get rid of code duplication in this section.
Congratulations! . , ! , , , , .
? – !
! . , . , !
, , , , . , , . , , .
? , — !
Xcode ListViewController . tableView(_:cellForRowAtIndexPath:) , startOperationsForPhotoRecord :
, . , UIScrollView , UITableView UIScrollView , .
UIScrollView :
:
Now add the implementation of these missing methods to ListViewController.swift:
suspendAllOperations and resumeAllOperations have the simplest implementation. NSOperationQueues can be suspended by setting the property suspended to true . It will suspend all operations in the queue, and you will not be able to suspend operations individually.
loadImagesForOnscreenCells is a bit more complex. Here is what happens:
Compile and run the application, and you should be even more responsive and better at managing the resources of the application!

Notice that when you finish scrolling the table, the images on the visible cells are immediately processed.
And what's next?
This is the “final” version of the Swift 1.2 project. b and Swift 2.0.
If you completed this project and took the time to really understand it, then congratulations! You can consider yourself a much more valuable iOS developer than you were at the beginning of this article! Most companies that specialize in hardware design can be proud if they have one or two people who really know about it.
, , . , , , ( ) . , ( ), , .
, , . . , , , . For example:
:
? . , , , , , . .
On a Mac , users see an hourglass or rotating rainbow cursor until the user interface again resumes. Many users mistakenly assume that the application will immediately work when you touch the screen. Such applications give a feeling of poor performance and seem slow, and, as a rule, receive bad reviews in the AppStore .
But ensuring constant user responsiveness is not so easy. As soon as the application performs many tasks, it starts to slow down. Not much time is allocated to perform a large number of tasks in the main thread and to ensure responsiveness of the interface.
')
What should the "unfortunate" developer do? The solution is, it is to separate the main stream through parallelism. Parallelism is the property of an application to perform tasks in several threads at the same time - and at the same time, the user interface remains responsive as you do your work in different threads.
One of the methods for performing operations in iOS simultaneously is to use the NSOperation and NSOperationQueue classes . In this article you will learn how to use them! You will work with an application that does not use multithreading at all, so it will be very slow and will slow down. When you change the application so that you can add parallel operations and - I hope - this will provide a more responsive user interface!
Let's get started
The purpose of this article is to show a table with images to which the filter was applied. The image will be downloaded from the Internet, to which the filter will be applied, and then displayed in the table.
Here is a schematic representation of the application model:
First try
From the author: Since the article was written before 09/09/2015 , Swift 1.2 was used to write the examples. I made some changes to the examples with the release of the new version of the Swift language. The source code for Swift 2.0 can be found at the links: the “starting” project and the “final” version of the project .
Download the “starter” project on Swift 1.2 and Swift 2.0 , which you will be working on as you read this manual.
Note: All images are taken from stock.xchng . Since there are cases when the image cannot be loaded, to perform this failed attempt, some images in the data source are intentionally incorrectly named.
Compile and run the application, and (eventually) you will see that the application displays a list of photos. Try scrolling through the list. Annoying, isn't it?
All the action takes place in the ListViewController.swift file, and most of the actions are inside the delegate method of the tableView (_: cellForRowAtIndexPath :) .
Take a look at this method and notice the two ongoing actions, which are quite voluminous:
- Download images from the network. Even if this is a simple job, the application must wait for the download to complete before it can continue to perform another operation.
- Apply a filter to an image using Core Image. This method applies a sepia filter to the image. If you want to learn more about Core Image filters , read Beginning Core Image in Swift .
In addition, you also upload a list of photos from the network, with the first request:
lazy var photos = NSDictionary(contentsOfURL:dataSourceURL) All this work is happening in the main flow of the application. Since the main thread is also responsible for user interaction, loading and applying a filter to images reduces the ability to respond quickly to user actions. You can verify this by using the indicators tab in the Xcode development environment . You can get to this tab by clicking on the Debug navigator (Command-6) and then selecting the CPU during the execution of the application.
You will see all these peaks in the first thread, which is the main flow of the application. For more information, launch the application using Tools , but that’s another story.
It's time to think about how to improve your user experience! And make the app more responsive.
Tasks, Threads and Processes
Before you dive into the article, there are several technical concepts that need to be considered. I will define several terms:
- Task / Task: a simple unit that needs to be executed.
- Thread / Thread: a mechanism created by the operating system, where several commands are executed simultaneously in a single application.
- Process / Process: an executable code fragment that can consist of several threads.
Note: On iOS and OS X , multithreading functionality is provided by the POSIX Threads API and is part of the operating system. This is a fairly low level job, and you will understand how easy it is to make mistakes; Perhaps the worst in using streams are errors that are incredibly difficult to find!
The Foundation framework contains a class called NSThread , which is much easier to work with, but managing multiple threads with NSThread still causes difficulties. NSOperation and NSOperationQueue are high-level classes that greatly simplify the process of working with multiple threads.
In this diagram, you see the relationship between the process, the threads, and the tasks:
As you can see, a process can contain several threads, and each thread can perform several tasks in turn.
In this scheme, the second thread performs file reads, while the first thread executes code associated with the user interface. This is very similar to how you should structure your code in iOS — the main thread must do any work related to the user interface, and the secondary threads must perform slow or lengthy operations, such as reading files, accessing the network, etc. .
NSOperation vs. Grand Central Dispatch (GCD)
You may have heard of the Grand Central Dispatch (GCD) . In general, GCD consists of language features, runtime libraries and system extensions, which in turn provides system-wide improvements to maintain concurrency on multi-core mobile devices on iOS and OS X. If you want to know more about GCD , you can read the Multithreading and Grand Central Dispatch on iOS for Beginners Tutorial .
NSOperation and NSOperationQueue built on top of GCD . It is worth noting that Apple recommends using a higher level abstraction, and then going down to the lower levels when the measurements indicate that they are necessary.
Here is a brief comparison that will help you decide when and where to use GCD or NSOperation :
- GCD is a lightweight way of representing the units of work that will be performed simultaneously. It is not necessary to list these units of work; the system will take care of this for you. Adding dependencies among blocks may not be an easy task. Canceling or pausing a block creates additional work for you as a developer!
- NSOperation adds little extra cost compared to GCD , but you can add dependencies for various operations, reuse, cancel, or suspend them.
In this tutorial, we will use the NSOperation class, because you are dealing with a table view and because of performance and power consumption, you need to cancel the operation for a particular image if the user has scrolled the image off the screen. Even if the operations will be in the background thread, if dozens of such operations will wait for their turn to perform, the performance will still not be at the level we need.
Modification of the application model
It's time to change the application-specific model without a multithreading! If you look more closely at the preliminary model, you will see that there are three problematic areas that can be improved. Sharing these three areas and putting them into a separate thread, the main thread will be released, and will be able to respond quickly to user interaction with the UI .
To get rid of bottlenecks in the application, you will need a stream that will respond to user interaction with the UI, another stream that will be used to load images and another stream to apply the filter to the image. In the new model, the application starts in the main thread and loads an empty table view. At the same time, the application starts a second stream to load data.
As soon as the data is loaded, you need to update the table. This should be done in the main thread, as it includes the user interface. At this stage, the table view knows how many cells it has, and which image URLs should be displayed on the screen, but it still has no actual images! If you immediately start downloading all the images at once, it will be completely ineffective, since you do not need all the images at once!
What can be done to improve?
The enhanced model will begin loading images that correspond to the cells displayed on the screen. In this way, your code will first know which cells are visible, and only then will the download process begin. Also, the process of applying a filter to an image cannot be started before the image is fully loaded. Therefore, the code that is responsible for applying the filter should not run until there is an image to process.
For better responsiveness of the application, we must display the image as soon as it is loaded. Then we will start working with the images, and then update the interface to display the processed image. The diagram below shows the flow of control for this process:
To achieve these goals, you will need to track whether the image is currently being loaded, or already loaded, or whether a filter has been applied to the image. You will also need to track the status of each operation, and whether it is loading or processing an image so that you can cancel, pause or resume it.
Good! Now you can proceed to the most interesting, the implementation of our scheme!
Open the project and add a new Swift File to the project named PhotoOperations.swift . Then add the following code to it:
import UIKit // This enum contains all the possible states a photo record can be in enum PhotoRecordState { case New, Downloaded, Filtered, Failed } class PhotoRecord { let name:String let url:NSURL var state = PhotoRecordState.New var image = UIImage(named: "Placeholder") init(name:String, url:NSURL) { self.name = name self.url = url } } Note: Be sure to import UIKit to the top of the file. By default, Xcode imports only Foundation in Swift .
This class will represent each photo displayed in the application, along with its current state, which is set by default as .New for newly created records. The default image is a picture called "Placeholder" .
To track the status of each operation, you will need a separate class. Add the following implementation to the end of PhotoOperations.swift:
class PendingOperations { lazy var downloadsInProgress = [NSIndexPath:NSOperation]() lazy var downloadQueue:NSOperationQueue = { var queue = NSOperationQueue() queue.name = "Download queue" queue.maxConcurrentOperationCount = 1 return queue }() lazy var filtrationsInProgress = [NSIndexPath:NSOperation]() lazy var filtrationQueue:NSOperationQueue = { var queue = NSOperationQueue() queue.name = "Image Filtration queue" queue.maxConcurrentOperationCount = 1 return queue }() } This class contains two dictionaries to track active and incomplete loading of images and filtering operations for each cell in the table and two operation queues for each type of operation.
All values are created slowly, that is, they cannot be initialized until they have access. This will improve the performance of your application.
Creating an NSOperationQueue class is very simple. Naming your queues makes them easy to find in the Tools or in the debugger. MaxConcurrentOperationCount is set to 1 , but only for this article, so you can see that operations are completed one after another. You can skip this part to let the queue decide how many operations it can process right away - this will further increase performance.
How does the queue decide how many operations it can run at the same time? This is a good question! It depends on the hardware. By default, NSOperationQueue does some computation behind the scenes to decide which is best for the particular platform on which the code is being executed and to run as many threads as possible.
Consider the following example. Suppose the system is inactive, and there are many resources available, so the queue can run approximately eight simultaneous threads. The next time you start the application, the system may be busy with other operations that use resources, and the queue will start only two simultaneous threads. Since you have set the maximum parallel number of operations, only one operation will be performed in this application.
Note: You may wonder why you should keep track of all active and incomplete operations. The queue has a operations method that returns an array of operations, so why not use it? In this project, it does not make sense to use it. You have to track with which operations the associated table cells, which include the process of iterating over an array, every time you need it. Storing them in a dictionary with an index as the main search tool is a quick and effective way.
It's time to take care of the operations of applying the filter to the image and loading the image itself. Add the following code to the end of PhotoOperations.swift :
class ImageDownloader: NSOperation { //1 let photoRecord: PhotoRecord //2 init(photoRecord: PhotoRecord) { self.photoRecord = photoRecord } //3 override func main() { //4 if self.cancelled { return } //5 let imageData = NSData(contentsOfURL:self.photoRecord.url) //6 if self.cancelled { return } //7 if imageData?.length > 0 { self.photoRecord.image = UIImage(data:imageData!) self.photoRecord.state = .Downloaded } else { self.photoRecord.state = .Failed self.photoRecord.image = UIImage(named: "Failed") } } } NSOperation is an abstract class designed to create a derived class. Each derived class represents a specific task, as shown in the figure above.
Here is what happens in each of the numbered comments in the code:
- Add a permalink to the operation-related PhotoRecord object.
- Create a specified initializer that allows you to transfer photo recordings.
- main is a method that you override in NSOperation derived classes to do work. You are making an autorelease pool since you are working outside the pool created by the main thread.
- Check for cancellation before launch. Operations should regularly check to see if they have been canceled before long and intensive work.
- Upload an image.
- Check for cancellation.
- If there is data, create an image object, and add it to the record and move the state forward. If there is no data, mark the entry as failed and set the appropriate image.
Next, you will create another operation to monitor the application of the filter! Add the following code to the end of PhotoOperations.swift :
class ImageFiltration: NSOperation { let photoRecord: PhotoRecord init(photoRecord: PhotoRecord) { self.photoRecord = photoRecord } override func main () { if self.cancelled { return } if self.photoRecord.state != .Downloaded { return } if let filteredImage = self.applySepiaFilter(self.photoRecord.image!) { self.photoRecord.image = filteredImage self.photoRecord.state = .Filtered } } } It looks like a load operation, except for applying a filter to an image (using a still unimplemented method, hence the compiler error) instead of loading it.
Add the missing ImageFiltration method that will process the image in the class:
func applySepiaFilter(image:UIImage) -> UIImage? { let inputImage = CIImage(data:UIImagePNGRepresentation(image)!) if self.cancelled { return nil } let context = CIContext(options:nil) let filter = CIFilter(name:"CISepiaTone") filter!.setValue(inputImage, forKey: kCIInputImageKey) filter!.setValue(0.8, forKey: "inputIntensity") let outputImage = filter!.outputImage if self.cancelled { return nil } let outImage = context.createCGImage(outputImage!, fromRect: outputImage!.extent) let returnImage = UIImage(CGImage: outImage) return returnImage } Image processing is the same implementation that we used earlier in the ListViewController . She was moved here so that she could be used as a separate operation in the background. Again, you should check for cancellation often; over time, you will do this on an automaton before and after any method call. After the end of the action, you set the values of the photo instance.
Fine! Now you have all the tools and the basics that you need in order to perform operations as background tasks. It's time to go back to the view controller and change it to take advantage of all these new benefits.
Go to the ListViewController and remove the lazy var photos property declarations. Then add the following declarations instead:
var photos = [PhotoRecord]() let pendingOperations = PendingOperations() They will contain an array of PhotoDetails objects that you created earlier, and a PendingOperations object for managing operations.
Add a new method to the class to upload a list of photos:
func fetchPhotoDetails() { let request = NSURLRequest(URL:dataSourceURL!) UIApplication.sharedApplication().networkActivityIndicatorVisible = true NSURLConnection.sendAsynchronousRequest(request, queue: NSOperationQueue.mainQueue()) {response,data,error in if data != nil { let datasourceDictionary = (try! NSPropertyListSerialization.propertyListWithData(data!, options:NSPropertyListMutabilityOptions.MutableContainersAndLeaves, format: nil)) as! NSDictionary for(key, value) in datasourceDictionary { let name = key as? String let url = NSURL(string:value as? String ?? "") if name != nil && url != nil { let photoRecord = PhotoRecord(name:name!, url:url!) self.photos.append(photoRecord) } } self.tableView.reloadData() } if error != nil { let alert = UIAlertView(title:"Oops!",message:error!.localizedDescription, delegate:nil, cancelButtonTitle:"OK") alert.show() } UIApplication.sharedApplication().networkActivityIndicatorVisible = false } } , , , . , NSDictionary PhotoRecord . NSOperation , , NSOperationQueue.mainQueue() .
viewDidLoad :
fetchPhotoDetails () , tableView(_:cellForRowAtIndexPath:) :
override func tableView(tableView: UITableView, cellForRowAtIndexPath indexPath: NSIndexPath) -> UITableViewCell { let cell = tableView.dequeueReusableCellWithIdentifier("CellIdentifier", forIndexPath: indexPath) //1 if cell.accessoryView == nil { let indicator = UIActivityIndicatorView(activityIndicatorStyle: .Gray) cell.accessoryView = indicator } let indicator = cell.accessoryView as! UIActivityIndicatorView //2 let photoDetails = photos[indexPath.row] //3 cell.textLabel?.text = photoDetails.name cell.imageView?.image = photoDetails.image //4 switch (photoDetails.state){ case .Filtered: indicator.stopAnimating() case .Failed: indicator.stopAnimating() cell.textLabel?.text = "Failed to load" case .New, .Downloaded: indicator.startAnimating() if (!tableView.dragging && !tableView.decelerating) { self.startOperationsForPhotoRecord(photoDetails, indexPath: indexPath) } } return cell } :
- , UIActivityIndicatorView .
- PhotoRecord . , indexPath.
- — () , PhotoRecord , , , , .
- . , ( ).
You can delete the implementation of the applySepiaFilter method , since it will not need to be called again. Add the following method to the class to start operations:
func startOperationsForPhotoRecord(photoDetails: PhotoRecord, indexPath: NSIndexPath){ switch (photoDetails.state) { case .New: startDownloadForRecord(photoDetails, indexPath: indexPath) case .Downloaded: startFiltrationForRecord(photoDetails, indexPath: indexPath) default: NSLog("do nothing") } } , PhotoRecord . .
: , , , , . , , ; ! !
, . , , PendingOperations , ; ! :
func startDownloadForRecord(photoDetails: PhotoRecord, indexPath: NSIndexPath){ //1 if let _ = pendingOperations.downloadsInProgress[indexPath] { return } //2 let downloader = ImageDownloader(photoRecord: photoDetails) //3 downloader.completionBlock = { if downloader.cancelled { return } dispatch_async(dispatch_get_main_queue(), { self.pendingOperations.downloadsInProgress.removeValueForKey(indexPath) self.tableView.reloadRowsAtIndexPaths([indexPath], withRowAnimation: .Fade) }) } //4 pendingOperations.downloadsInProgress[indexPath] = downloader //5 pendingOperations.downloadQueue.addOperation(downloader) } func startFiltrationForRecord(photoDetails: PhotoRecord, indexPath: NSIndexPath){ if let _ = pendingOperations.filtrationsInProgress[indexPath]{ return } let filterer = ImageFiltration(photoRecord: photoDetails) filterer.completionBlock = { if filterer.cancelled { return } dispatch_async(dispatch_get_main_queue(), { self.pendingOperations.filtrationsInProgress.removeValueForKey(indexPath) self.tableView.reloadRowsAtIndexPaths([indexPath], withRowAnimation: .Fade) }) } pendingOperations.filtrationsInProgress[indexPath] = filterer pendingOperations.filtrationQueue.addOperation(filterer) } Good! , , , :
- , indexPath , downloadsInProgress . , .
- , ImageDownloader , .
- , , . — , . , , , , . , , , GCD , .
- downloadsInProgress , .
- . , – , .
The method of applying a filter to images occurs in the same way, except for using ImageFiltration and filtrationsInProgress to track the operation. As an exercise, you can try to get rid of code duplication in this section.
Congratulations! . , ! , , , , .
? – !
! . , . , !
, , , , . , , . , , .
? , — !
Xcode ListViewController . tableView(_:cellForRowAtIndexPath:) , startOperationsForPhotoRecord :
if (!tableView.dragging && !tableView.decelerating) { self.startOperationsForPhotoRecord(photoDetails, indexPath: indexPath) } , . , UIScrollView , UITableView UIScrollView , .
UIScrollView :
override func scrollViewWillBeginDragging(scrollView: UIScrollView) { //1 suspendAllOperations() } override func scrollViewDidEndDragging(scrollView: UIScrollView, willDecelerate decelerate: Bool) { // 2 if !decelerate { loadImagesForOnscreenCells() resumeAllOperations() } } override func scrollViewDidEndDecelerating(scrollView: UIScrollView) { // 3 loadImagesForOnscreenCells() resumeAllOperations() } :
- , , . suspendAllOperations .
- If the slowdown value is false, it means that the user has stopped dragging the table view. Therefore, you need to resume paused operations, cancel operations for off-screen cells, and start operations for screen cells. You will implement loadImagesForOnscreenCells and resumeAllOperations after a while as well.
- This delegate method will tell you that the table view has stopped scrolling, so you need to follow point # 2 again.
Now add the implementation of these missing methods to ListViewController.swift:
func suspendAllOperations () { pendingOperations.downloadQueue.suspended = true pendingOperations.filtrationQueue.suspended = true } func resumeAllOperations () { pendingOperations.downloadQueue.suspended = false pendingOperations.filtrationQueue.suspended = false } func loadImagesForOnscreenCells () { //1 if let pathsArray = tableView.indexPathsForVisibleRows { //2 var allPendingOperations = Set(pendingOperations.downloadsInProgress.keys) allPendingOperations.unionInPlace(pendingOperations.filtrationsInProgress.keys) //3 var toBeCancelled = allPendingOperations let visiblePaths = Set(pathsArray) toBeCancelled.subtractInPlace(visiblePaths) //4 var toBeStarted = visiblePaths toBeStarted.subtractInPlace(allPendingOperations) // 5 for indexPath in toBeCancelled { if let pendingDownload = pendingOperations.downloadsInProgress[indexPath] { pendingDownload.cancel() } pendingOperations.downloadsInProgress.removeValueForKey(indexPath) if let pendingFiltration = pendingOperations.filtrationsInProgress[indexPath] { pendingFiltration.cancel() } pendingOperations.filtrationsInProgress.removeValueForKey(indexPath) } // 6 for indexPath in toBeStarted { let indexPath = indexPath as NSIndexPath let recordToProcess = self.photos[indexPath.row] startOperationsForPhotoRecord(recordToProcess, indexPath: indexPath) } } } suspendAllOperations and resumeAllOperations have the simplest implementation. NSOperationQueues can be suspended by setting the property suspended to true . It will suspend all operations in the queue, and you will not be able to suspend operations individually.
loadImagesForOnscreenCells is a bit more complex. Here is what happens:
- Start with an array containing the index paths of all the visible rows currently in the table view.
- Create a series of all pending operations by combining all downloads + all filters.
- Create a series of all index paths with operations that will be undone. Start with all operations, and then delete the index paths of the visible rows. This will leave a set of operations involving off-screen strings.
- , . , ,
- , , , PendingOperations.
- , , startOperationsForPhotoRecord .
Compile and run the application, and you should be even more responsive and better at managing the resources of the application!
Notice that when you finish scrolling the table, the images on the visible cells are immediately processed.
And what's next?
This is the “final” version of the Swift 1.2 project. b and Swift 2.0.
If you completed this project and took the time to really understand it, then congratulations! You can consider yourself a much more valuable iOS developer than you were at the beginning of this article! Most companies that specialize in hardware design can be proud if they have one or two people who really know about it.
, , . , , , ( ) . , ( ), , .
, , . . , , , . For example:
// MyDownloadOperation is a subclass of NSOperation let downloadOperation = MyDownloadOperation() // MyFilterOperation is a subclass of NSOperation let filterOperation = MyFilterOperation() filterOperation.addDependency(downloadOperation) :
filterOperation.removeDependency(downloadOperation) ? . , , , , , . .
Source: https://habr.com/ru/post/267843/
All Articles