Deploying your own OpenVPN
The manual describes the process of installing and configuring the server and client parts of OpenVPN. The solution is designed to connect remote clients to the enterprise network. After connecting, the client maintains its own gateway in silence and does not block access to the Internet. The solution showed simplicity in setting up the client part, it was tested (and is currently in use) on Windows XP, Windows 7, Andriod 3.x, Archlinux, Ububnu. There is information about the successful connection and iPad.
Install the package from the ports. Options can be left as default. The main thing is not to disable 'easy-rsa', as it will be required to configure and generate certificates:
Or:
')
Create directories for configs:
Copy the easy-rsa directory to the OpenVPN configs directory:
Go to the copied directory:
Go to the sh shell:
We execute the command to generate our own certificate:
Fill in the data for the certificate in accordance with the questions.
The 'common name' should match the DNS name of your VPN server, for example: 'vpn0.example.com'. The last questions are answered with 'Y'.
Now we make a certificate for the client named 'client'. Here we also answer the last questions with 'Y'
Exit the sh shell:
Create a key for tls-authentication:
Create a server.conf file (below under the spoiler). Do not forget to specify in it the address of the internal DNS server, which knows the names of your local hosts.
For each client, it will be necessary to create a user config file on the server, indicating the IP address and gateway assigned to the client. For example, for a client named 'client':
To start the OpenVPN daimon when the operating system boots, add the following lines to '/etc/rc.conf':
Start service:
If the task is to provide users via OpenVPN Internet, then NAT will be required. You can enable its support through loadable modules. To do this, add the following lines to the '/boot/loader.conf' file:
An example of setting up IPFW NAT:
That's it, the OpenVPN server is installed, configured and running. Now you can do customers.
The description is given for the server on the FreeBSD operating system with the OpenVPN service installed and configured as described above.
The certificate is generated from the server's system console with superuser rights from the easy-rsa directory:
As a result, client certificate files for connection will be generated. Next, you need to create the file `/ usr / local / etc / openvpn / ccd / USER LOGIN` with one line of the form:
Each pair of addresses in ifconfig-push corresponds to the virtual IP addresses of the endpoints (client and server) - each client is assigned its own subnet at the time of connection. Here you can add additional routes if clients connect to different subnets (branches, technical specialists)
To maintain compatibility with Windows clients and the TAP-Win32 driver, these addresses must be taken from the following subnets with the / 30 mask. For example, for the range `172.17.0.1-172.17.0.254` the last octet of the IP address of each client-server pair should be assigned from the set:
For convenience, I created a text file "/usr/local/etc/openvpn/not_use_ip.txt" which lists the free address pairs that are deleted as they are distributed to clients. Please note that in the configuration file the first one is assigned the IP address assigned to the client (senior), the second is the server address (one less).
After adding a client, it is advisable to restart the OpenVPN service:
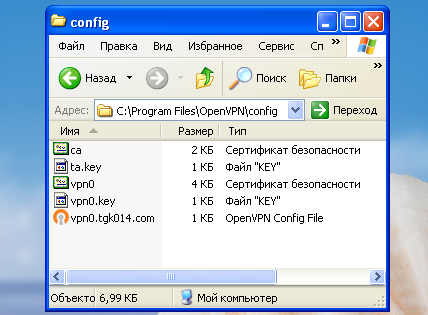
The client must transfer five files (ca.crt, vpn0.crt, vpn0.key, ta.key, vpn0.example.com.ovpn):
The listed files are copied to a separate (temporary) folder named “config”, files of the “USER LOGIN. *” Type are renamed to “vpn0. *” In it, the folder is packed into an archive and sent to the user via OpenVPN (see below).
To install and configure an OpenVPN connection, you must first determine the bit width of your operating system. For 32-bit systems, the OpenVPN client installation file ends with "-i686.exe". If you have a 64-bit MS-Windows, then you need a file with the name "-x86_64.exe" in its name. In addition, for a VPN connection to the network, you will need client certificates and a configuration file, which can be obtained from your system administrator.
For MS-Windows, download and install the appropriate OpenVPN client program (for Android and iOS, there are packages in their own market / store repositories). Go to the OpenVPN program directory (C: \ Program Files \ OpenVPN) and copy into it the
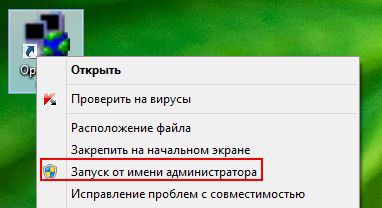
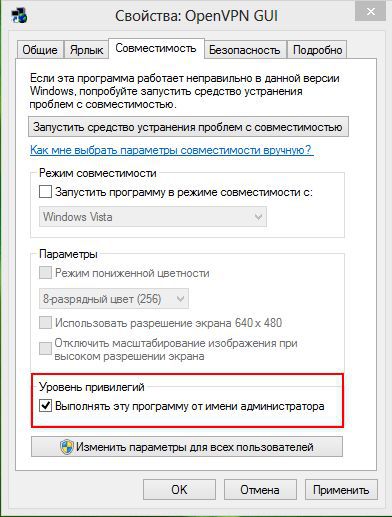
The names of files in the config folder may differ slightly. Run the OpenVPN client on behalf of the Administrator or change the properties of the shortcut on the Desktop (set the checkbox “run as administrator”).
Connection to the local network of an enterprise via the Internet is made through the context menu or by double-clicking on the OpenVPN icon in the system tray. You can connect only from outside the enterprise network. Connections from within the network are not accepted by the OpenVPN server.

After successful completion of the connection procedure, the OpenVPN icon in the taskbar changes color to green and a tooltip appears with the IP address assigned to the VPN client. The address is “attached” to the certificate, therefore, it will not work with the same certificate from two or more workstations at the same time due to the address conflict.
After connection, you will be able to access all services (RDP, FTP , HTTP ...) both by IP address and domain name in the local network segment permitted by the system administrator, except for the option to connect network drives blocked for security reasons.
Documentation and distribution:
- Install OpenVPN server
- Creating an OpenVPN Client Certificate
- Instructions for setting up an OpenVPN client connection
Install OpenVPN server (FreeBSD).
Install the package from the ports. Options can be left as default. The main thing is not to disable 'easy-rsa', as it will be required to configure and generate certificates:
# cd /usr/ports/security/openvpn # make configure-recursiv install clean Or:
')
# make configure-recursiv install clean - /usr/ports/security/openvpn Create directories for configs:
# mkdir /usr/local/etc/openvpn/ # mkdir /usr/local/etc/openvpn/ccd Copy the easy-rsa directory to the OpenVPN configs directory:
# cp -r /usr/local/share/easy-rsa /usr/local/etc/openvpn/ Go to the copied directory:
# cd /usr/local/etc/openvpn/easy-rsa/ Go to the sh shell:
# sh We execute the command to generate our own certificate:
# . ./vars # ./clean-all # ./build-ca Fill in the data for the certificate in accordance with the questions.
# ./build-key-server vpn0.example.com The 'common name' should match the DNS name of your VPN server, for example: 'vpn0.example.com'. The last questions are answered with 'Y'.
# ./build-dh Now we make a certificate for the client named 'client'. Here we also answer the last questions with 'Y'
# ./build-key client Exit the sh shell:
# exit Create a key for tls-authentication:
# /usr/local/sbin/openvpn --genkey --secret /usr/local/etc/openvpn/easy-rsa/keys/ta.key Create a server.conf file (below under the spoiler). Do not forget to specify in it the address of the internal DNS server, which knows the names of your local hosts.
/usr/local/etc/openvpn/server.conf
# cat /usr/local/etc/openvpn/server.conf local vpn0.example.com port 1194 proto udp dev tun ca /usr/local/etc/openvpn/easy-rsa/keys/ca.crt cert /usr/local/etc/openvpn/easy-rsa/keys/vpn0.example.com.crt key /usr/local/etc/openvpn/easy-rsa/keys/vpn0.example.com.key dh /usr/local/etc/openvpn/easy-rsa/keys/dh1024.pem tls-server tls-auth /usr/local/etc/openvpn/easy-rsa/keys/ta.key 0 server 172.17.0.0 255.255.255.0 ifconfig-pool-persist ipp.txt client-config-dir ccd push "route 10.10.210.72 255.255.255.248" push "route 172.27.102.0 255.255.255.0" push "route 172.27.103.0 255.255.255.0" push "route 172.27.105.0 255.255.255.0" push "dhcp-option DNS 192.168.100.1" keepalive 10 120 comp-lzo user nobody group nobody persist-key persist-tun status openvpn-status.log verb 3 For each client, it will be necessary to create a user config file on the server, indicating the IP address and gateway assigned to the client. For example, for a client named 'client':
# cat /usr/local/etc/openvpn/ccd/client ifconfig-push 172.17.0.2 172.17.0.1 To start the OpenVPN daimon when the operating system boots, add the following lines to '/etc/rc.conf':
openvpn_enable="YES" openvpn_if="tun" openvpn_configfile="/usr/local/etc/openvpn/server.conf" openvpn_dir="/usr/local/etc/openvpn" Start service:
# /usr/local/etc/rc.d/openvpn start Starting openvpn. add net 172.17.0.0: gateway 172.17.0.2 If the task is to provide users via OpenVPN Internet, then NAT will be required. You can enable its support through loadable modules. To do this, add the following lines to the '/boot/loader.conf' file:
ipfw_nat_load="YES" libalias_load="YES" An example of setting up IPFW NAT:
${ipfw} nat 1 config if re0 reset same_ports ${ipfw} add nat 1 ip from 172.17.0.0/24 to any via $INT_if ${ipfw} add nat 1 ip from any to $EXT_ip ${ipfw} add allow all from any to any That's it, the OpenVPN server is installed, configured and running. Now you can do customers.
Creating an OpenVPN Client Certificate
The description is given for the server on the FreeBSD operating system with the OpenVPN service installed and configured as described above.
The certificate is generated from the server's system console with superuser rights from the easy-rsa directory:
cd / usr / local / etc / openvpn / easy-rsa /
$ cd /usr/local/etc/openvpn/easy-rsa/ $ sudo /bin/sh # . ./vars NOTE: If you run ./clean-all, I will be doing a rm -rf on /usr/local/etc/openvpn/easy-rsa/keys # ./build-key _ Generating a 1024 bit RSA private key ......++++++ ....++++++ writing new private key to '_.key' ----- You are about to be asked to enter information that will be incorporated into your certificate request. What you are about to enter is what is called a Distinguished Name or a DN. There are quite a few fields but you can leave some blank For some fields there will be a default value, If you enter '.', the field will be left blank. ----- Country Name (2 letter source) [US]:RU State or Province Name (full name) [CA]:ZC Locality Name (eg, city) [SanFrancisco]:Zabubensk Organization Name (eg, company) [Fort-Funston]:JSC Zabuba Organizational Unit Name (eg, section) [changeme]:ITD Common Name (eg, your name or your server's hostname) [_]: !----------------------------------------------------------------------! ! ! . ! !----------------------------------------------------------------------! Name [changeme]: Email Address [mail@host.domain]:_@zabubensk.example.com Please enter the following 'extra' attributes to be sent with your certificate request A challenge password []: An optional company name []: Using configuration from /usr/local/etc/openvpn/easy-rsa/openssl-0.9.8.cnf Check that the request matches the signature Signature ok The Subject's Distinguished Name is as follows countryName :PRINTABLE:'RU' stateOrProvinceName :PRINTABLE:'ZC' localityName :PRINTABLE:'Zabubensk' organizationName :PRINTABLE:'JSC Zabuba' organizationalUnitName:PRINTABLE:'ITD' commonName :PRINTABLE:'_' name :PRINTABLE:' ' emailAddress :IA5STRING:'_@zabubensk.example.com' Certificate is to be certified until Nov 12 06:24:49 2023 GMT (3650 days) Sign the certificate? [y/n]:y 1 out of 1 certificate requests certified, commit? [y/n]y Write out database with 1 new entries Data Base Updated # # exit As a result, client certificate files for connection will be generated. Next, you need to create the file `/ usr / local / etc / openvpn / ccd / USER LOGIN` with one line of the form:
$ sudo ee /usr/local/etc/openvpn/ccd/_ ifconfig-push 172.17.0.118 172.17.0.117 Each pair of addresses in ifconfig-push corresponds to the virtual IP addresses of the endpoints (client and server) - each client is assigned its own subnet at the time of connection. Here you can add additional routes if clients connect to different subnets (branches, technical specialists)
$ sudo ee /usr/local/etc/openvpn/ccd/_ ifconfig-push 172.17.0.118 172.17.0.117 push "route 10.12.1.0 255.255.255.0" push "route 10.12.2.0 255.255.255.0" push "route 192.168.10.0 255.255.255.0" To maintain compatibility with Windows clients and the TAP-Win32 driver, these addresses must be taken from the following subnets with the / 30 mask. For example, for the range `172.17.0.1-172.17.0.254` the last octet of the IP address of each client-server pair should be assigned from the set:
[ 1, 2] [ 5, 6] [ 9, 10] [ 13, 14] [ 17, 18] [ 21, 22] [ 25, 26] [ 29, 30] [ 33, 34] [ 37, 38] [ 41, 42] [ 45, 46] [ 49, 50] [ 53, 54] [ 57, 58] [ 61, 62] [ 65, 66] [ 69, 70] [ 73, 74] [ 77, 78] [ 81, 82] [ 85, 86] [ 89, 90] [ 93, 94] [ 97, 98] [101,102] [105,106] [109,110] [113,114] [117,118] [121,122] [125,126] [129,130] [133,134] [137,138] [141,142] [145,146] [149,150] [153,154] [157,158] [161,162] [165,166] [169,170] [173,174] [177,178] [181,182] [185,186] [189,190] [193,194] [197,198] [201,202] [205,206] [209,210] [213,214] [217,218] [221,222] [225,226] [229,230] [233,234] [237,238] [241,242] [245,246] [249,250] [253,254] For convenience, I created a text file "/usr/local/etc/openvpn/not_use_ip.txt" which lists the free address pairs that are deleted as they are distributed to clients. Please note that in the configuration file the first one is assigned the IP address assigned to the client (senior), the second is the server address (one less).
After adding a client, it is advisable to restart the OpenVPN service:
$ sudo /usr/local/etc/rc.d/openvpn restart Stopping openvpn. Waiting for PIDS: 62293. Starting openvpn. add net 172.17.0.0: gateway 172.17.0.2 The client must transfer five files (ca.crt, vpn0.crt, vpn0.key, ta.key, vpn0.example.com.ovpn):
- /usr/local/share/doc/openvpn/easy-rsa/keys/ca.crt
- /usr/local/share/doc/openvpn/easy-rsa/keys/LOGEN_USER.crt → vpn0.crt
- /usr/local/share/doc/openvpn/easy-rsa/keys/LOGEN_USER.key → vpn0.key
- /usr/local/etc/openvpn/easy-rsa/keys/ta.key
- /usr/local/etc/openvpn/vpn0.example.com.ovpn
The listed files are copied to a separate (temporary) folder named “config”, files of the “USER LOGIN. *” Type are renamed to “vpn0. *” In it, the folder is packed into an archive and sent to the user via OpenVPN (see below).
Instructions for setting up an OpenVPN client connection
(For users without technical training)To install and configure an OpenVPN connection, you must first determine the bit width of your operating system. For 32-bit systems, the OpenVPN client installation file ends with "-i686.exe". If you have a 64-bit MS-Windows, then you need a file with the name "-x86_64.exe" in its name. In addition, for a VPN connection to the network, you will need client certificates and a configuration file, which can be obtained from your system administrator.
For MS-Windows, download and install the appropriate OpenVPN client program (for Android and iOS, there are packages in their own market / store repositories). Go to the OpenVPN program directory (C: \ Program Files \ OpenVPN) and copy into it the
config folder with all the content received from your system administrator. This folder contains your client certificates and VPN server connection settings.The names of files in the config folder may differ slightly. Run the OpenVPN client on behalf of the Administrator or change the properties of the shortcut on the Desktop (set the checkbox “run as administrator”).
Connection to the local network of an enterprise via the Internet is made through the context menu or by double-clicking on the OpenVPN icon in the system tray. You can connect only from outside the enterprise network. Connections from within the network are not accepted by the OpenVPN server.
After successful completion of the connection procedure, the OpenVPN icon in the taskbar changes color to green and a tooltip appears with the IP address assigned to the VPN client. The address is “attached” to the certificate, therefore, it will not work with the same certificate from two or more workstations at the same time due to the address conflict.
After connection, you will be able to access all services (RDP, FTP , HTTP ...) both by IP address and domain name in the local network segment permitted by the system administrator, except for the option to connect network drives blocked for security reasons.
Documentation and distribution:
Source: https://habr.com/ru/post/267841/
All Articles