Putting gnome-screenshot from source to change the format of the screenshot file name
Initial data. Some time ago I encountered the fact that the gnome-screenshot program (also called “Screenshot”) saves screenshots when using hotkeys (PrtScr, Alt + PrtScr) with the view name “Screenshot from 2022-02 10:11: 59.png. I'm used to using the name of the form "2022-02-02_101159.png". In addition, colons in the file name are baffled by Windows. Then I could not find how to set the file name when taking a picture with hot keys and wrote a small bash script that provided me with the desired result.
While searching for a solution, I came across a description of the problem on askubuntu.com . Among the answers, my attention was drawn to the following: “true linux way - build your own gnome-screenshot from source!”. At that moment I thought it was too difficult. And recently decided to try. Next, I will describe the order of their actions. The material is unlikely to be something new for advanced users. Therefore, I believe that it may be interesting:
1) for those who, like me, want to correct the problem with the format of the file name,
2) to those who have not collected anything from the source yet.
So, we proceed to create your own build gnome-screenshot.
')
UPD: Then I went to the goal in a very difficult way. What I indicated in the comments almost immediately after publication. As it turned out, I did so much “not so” that it is easier to describe the correct sequence of actions than to make changes to what has already been written. So, in the terminal:
1) Download the source code:
2) we verify the presence in the system of all the packages required for assembly:
3) go to the source folder:
4) edit the file responsible for the date format - details below, under the spoiler:
5) create a package:
6) install the package:
Make a screenshot using hotkeys. Go to the "Images" folder and look at the file name:
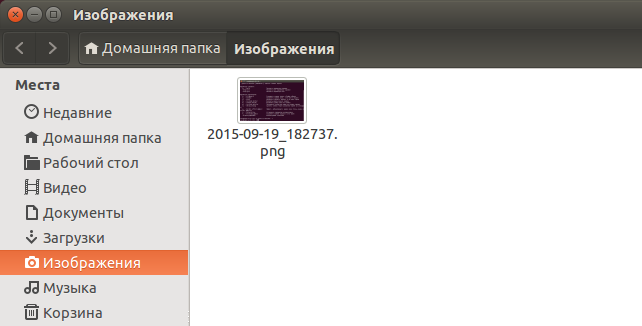
Problem solved!
PS Already when I added text, I came across an article in which it was described in detail why you should not use make install .
While searching for a solution, I came across a description of the problem on askubuntu.com . Among the answers, my attention was drawn to the following: “true linux way - build your own gnome-screenshot from source!”. At that moment I thought it was too difficult. And recently decided to try. Next, I will describe the order of their actions. The material is unlikely to be something new for advanced users. Therefore, I believe that it may be interesting:
1) for those who, like me, want to correct the problem with the format of the file name,
2) to those who have not collected anything from the source yet.
So, we proceed to create your own build gnome-screenshot.
')
UPD: Then I went to the goal in a very difficult way. What I indicated in the comments almost immediately after publication. As it turned out, I did so much “not so” that it is easier to describe the correct sequence of actions than to make changes to what has already been written. So, in the terminal:
1) Download the source code:
apt-get source gnome-screenshot 2) we verify the presence in the system of all the packages required for assembly:
sudo apt-get build-dep gnome-screenshot 3) go to the source folder:
cd gnome-screenshot-3.10.1/ 4) edit the file responsible for the date format - details below, under the spoiler:
gedit src/screenshot-filename-builder.c 5) create a package:
dpkg-buildpackage -b 6) install the package:
sudo dpkg -i ../gnome-screenshot_3.10.1-0ubuntu1_i386.deb and here is my original tangled path with pictures
1) Download the source from the Git repository . For example, I conservatively chose version 3.10.1, which has been with me in Ubuntu 14.04 so far. I think that fans of new products can choose the latest version (now it is 3.16.2).
2) Unpack the archive. Open the file src / screenshot-filename-builder.c. Find line 135 and change the date format in the file name, i.e. line

In the same file, lines 145 and 152, I deleted the “Screenshot from” text when creating the file_name variable. Please note that this text varies depending on the localization of the system. Therefore, if you want to edit it, rather than delete it completely, see the po / ru.po file. Close and save the file.
3) Start the terminal, go to the folder where the sources are unpacked. Make the autogen.sh file executable and run it:
After starting the file, the system will most likely report a shortage of any packages. Install the package, run it again, find out that something else is missing. And so several times. I did not need anything during the assembly, because I previously tried to build 3.16.2 and put all the packages that were needed. Maybe for 3.10.1 something is redundant here, but just in case briefly what packages did the system ask for and with which commands I put them:
>> You must have glib-gettext> = 2.2.0 installed
sudo apt-get install libglib2.0-dev
>> No package 'xext' found
>> No package 'x11' found
sudo apt-get install libxext-dev
sudo apt-get install libxdamage-dev
>> No package 'gtk + -3.0' found
>> No package 'libcanberra-gtk3' found
sudo apt-get install libgtk-3-dev
sudo apt-get install libcanberra-gtk3-dev
4) After that, the system informed me that everything is fine, and I can use make:
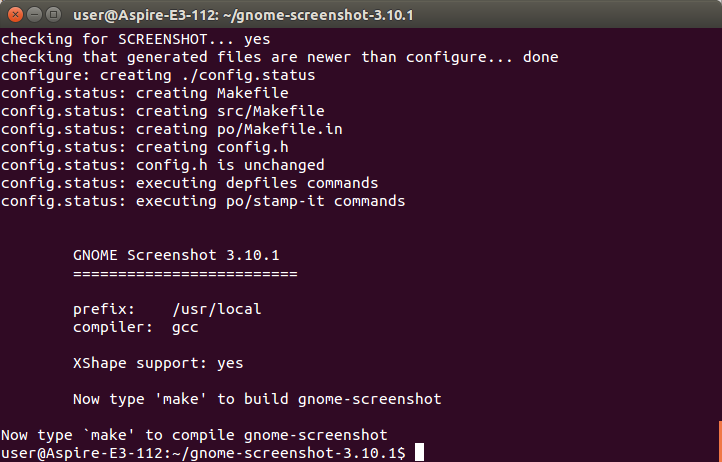
Execute this command. There are no error messages, so everything is ready for installation:

5) Further, in accordance with this manual, it is recommended not to use sudo make install (on the contrary, it is recommended on the contrary), but to assemble the deb package in one of the possible ways.
I chose the option that uses the program checkinstall. Installation:
Next, perform:
What do the keys mean:
-D - create deb package,
--install = no - without installation.
You are prompted to fill out a description of the package being created I just wrote “gnome-screenshot-3.10.1-fixname”. The description may consist of several lines, so to finish, press Enter twice.
A full description appears, which you can edit or go to the next step:

Check the data, press Enter. We receive a message that the package is formed, and we can install it into the system using the command:

6) Install the package.
2) Unpack the archive. Open the file src / screenshot-filename-builder.c. Find line 135 and change the date format in the file name, i.e. line
origin = g_date_time_format (d, "%Y-%m-%d %H:%M:%S") change to origin = g_date_time_format (d, "%Y-%m-%d_%H%M%S") .In the same file, lines 145 and 152, I deleted the “Screenshot from” text when creating the file_name variable. Please note that this text varies depending on the localization of the system. Therefore, if you want to edit it, rather than delete it completely, see the po / ru.po file. Close and save the file.
3) Start the terminal, go to the folder where the sources are unpacked. Make the autogen.sh file executable and run it:
cd /home/user//gnome-screenshot-3.10.1 sudo chmod +x autogen.sh ./autogen.sh After starting the file, the system will most likely report a shortage of any packages. Install the package, run it again, find out that something else is missing. And so several times. I did not need anything during the assembly, because I previously tried to build 3.16.2 and put all the packages that were needed. Maybe for 3.10.1 something is redundant here, but just in case briefly what packages did the system ask for and with which commands I put them:
>> You must have glib-gettext> = 2.2.0 installed
sudo apt-get install libglib2.0-dev
>> No package 'xext' found
>> No package 'x11' found
sudo apt-get install libxext-dev
sudo apt-get install libxdamage-dev
>> No package 'gtk + -3.0' found
>> No package 'libcanberra-gtk3' found
sudo apt-get install libgtk-3-dev
sudo apt-get install libcanberra-gtk3-dev
4) After that, the system informed me that everything is fine, and I can use make:
Execute this command. There are no error messages, so everything is ready for installation:
5) Further, in accordance with this manual, it is recommended not to use sudo make install (on the contrary, it is recommended on the contrary), but to assemble the deb package in one of the possible ways.
I chose the option that uses the program checkinstall. Installation:
sudo apt-get install checkinstall Next, perform:
sudo checkinstall -D --install=no What do the keys mean:
-D - create deb package,
--install = no - without installation.
You are prompted to fill out a description of the package being created I just wrote “gnome-screenshot-3.10.1-fixname”. The description may consist of several lines, so to finish, press Enter twice.
A full description appears, which you can edit or go to the next step:
Check the data, press Enter. We receive a message that the package is formed, and we can install it into the system using the command:
sudo dpkg -i gnome-screenshot_3.10.1-1_i386.deb 6) Install the package.
Make a screenshot using hotkeys. Go to the "Images" folder and look at the file name:
Problem solved!
PS Already when I added text, I came across an article in which it was described in detail why you should not use make install .
Source: https://habr.com/ru/post/267703/
All Articles