Centralized configuration management: Puppet + Foreman. Part I
This article will cover the installation and configuration of the Puppet + Foreman bundle for centralized configuration management.
For the server on which the Puppet + Foreman bundle will be installed, a virtual machine (1 CPU, 2 Gb RAM, 20Gb HDD) will be used, as clients there will be physical PCs on which Ubuntu is installed. The configuration of my virtual server with the above characteristics allows you to easily serve 500 clients (more is possible).
Installing Puppet is quite simple (all subsequent commands run as root):
')
With these commands we download the deb package from the puppet developer site and install it. This package puppetlabs-release-trusty.deb during installation creates the file /etc/apt/sources.list.d/puppetlabs.list which contains the puppet repositories, and also imports the gpg key which signed the puppet repository. We do not install puppetmaster, it will be installed automatically when installing Foreman.
This completes the installation of Puppet, proceed to install the Foreman web interface:
Here we added the /etc/apt/sources.list.d/foreman.list file to which Foreman’s repositories were entered, and also added the key for this repository. After adding the repository, we updated the list of packages and installed foreman-installer - this is the package that allows you to install Foreman.
Next we need to configure the correct computer name. Register in / etc / hosts and / etc / hostname
Reboot our server.
Run our installer with the foreman-installer -i command .
We are asked if we are ready for installation, we answer “y”, then follows a menu where you can select additional Foreman configurations and additional modules. We set the standard configuration, so we select the “Save and run” option and we start the installation (we could have installed the command foreman-installer without the -i option, then we would have a basic installation, -i implies an interactive mode).
It took me about 5 minutes to install, after installation we see a message about successful installation, this message contains our access parameters to Foreman.
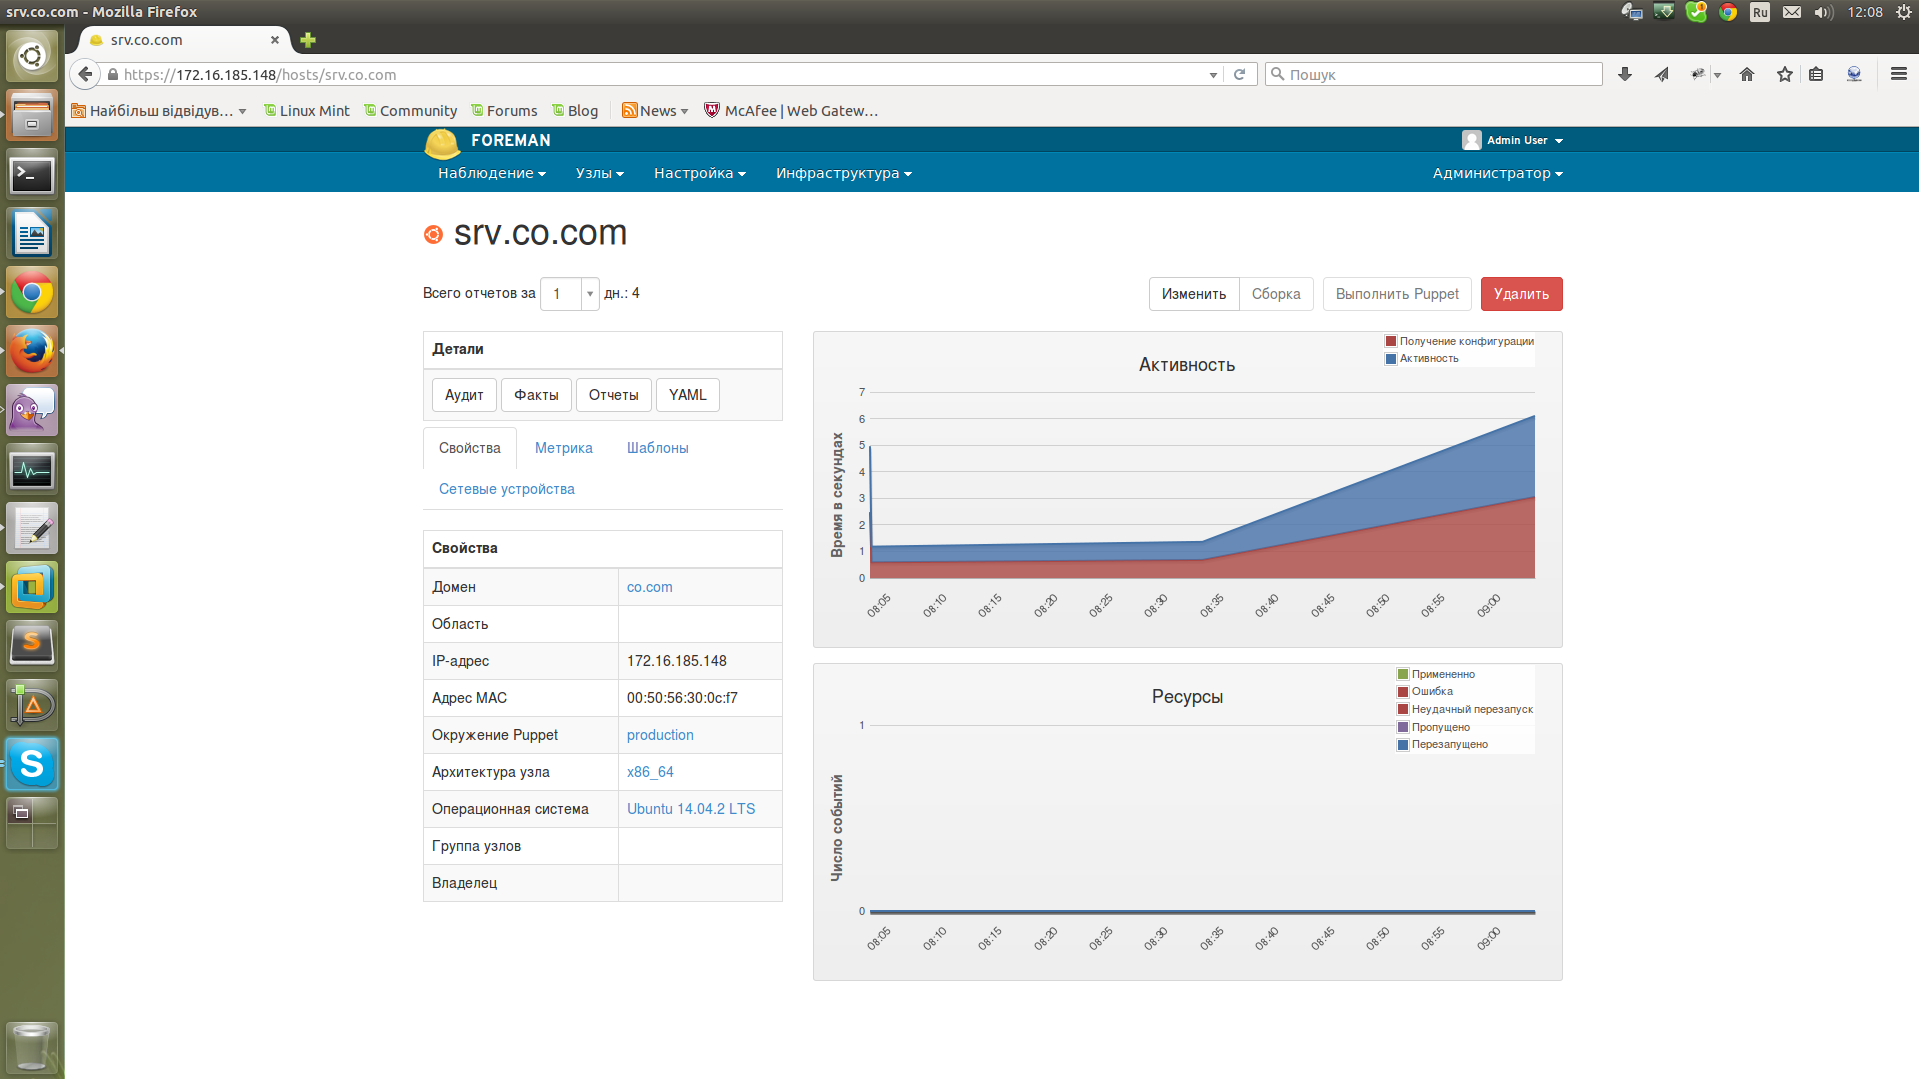
Go to the address srv.co.com and go to the web interface using the access parameters we received during the installation (it is desirable to save them to a file, and after the first login to the control panel, change the password). After logging in, we see a page with a lot of textual information in English, you can go to your account settings and change the language to Russian. Go to the upper right corner, click Admin User, My account, select the required language and save the settings.

When we next log in to Foreman, we’ll get another interface:

Here our clients will be listed.
So we completed the installation of the Puppet + Foreman bundle. Let's try adding a puppet client and see what changes in the web interface.
To install Puppet agents on client PCs, I use the following script:
This script installs the puppet agent, configures the agent autostart at system startup, specifies the address of the Puppet server and starts the agent. We will also comment out the templatedir line in the /etc/puppet/puppet.conf config, if you do not comment out, errors are added (I didn’t figure out how to fix without commenting,although it doesn’t annoy me ).
After installing the agent, we will have a request to sign the certificate on the server, if we do not sign this certificate, then the agent will not be connected to the server.
You can use the puppet cert --list --all command to view certificates on the server:
Here we see that we have 2 certificates, one is not signed with the name zeppelin and the other is signed (+) with the name srv.co.com. A non-signed certificate is a certificate from our new client.
You can use the puppet cert --sign $ client_name command to sign the certificate. We can also use Foreman's web interface to sign certificates. To do this, we need to go to the menu “Infrastructure” - “Capsules” - “Certificates” and here you can sign or delete a certificate.
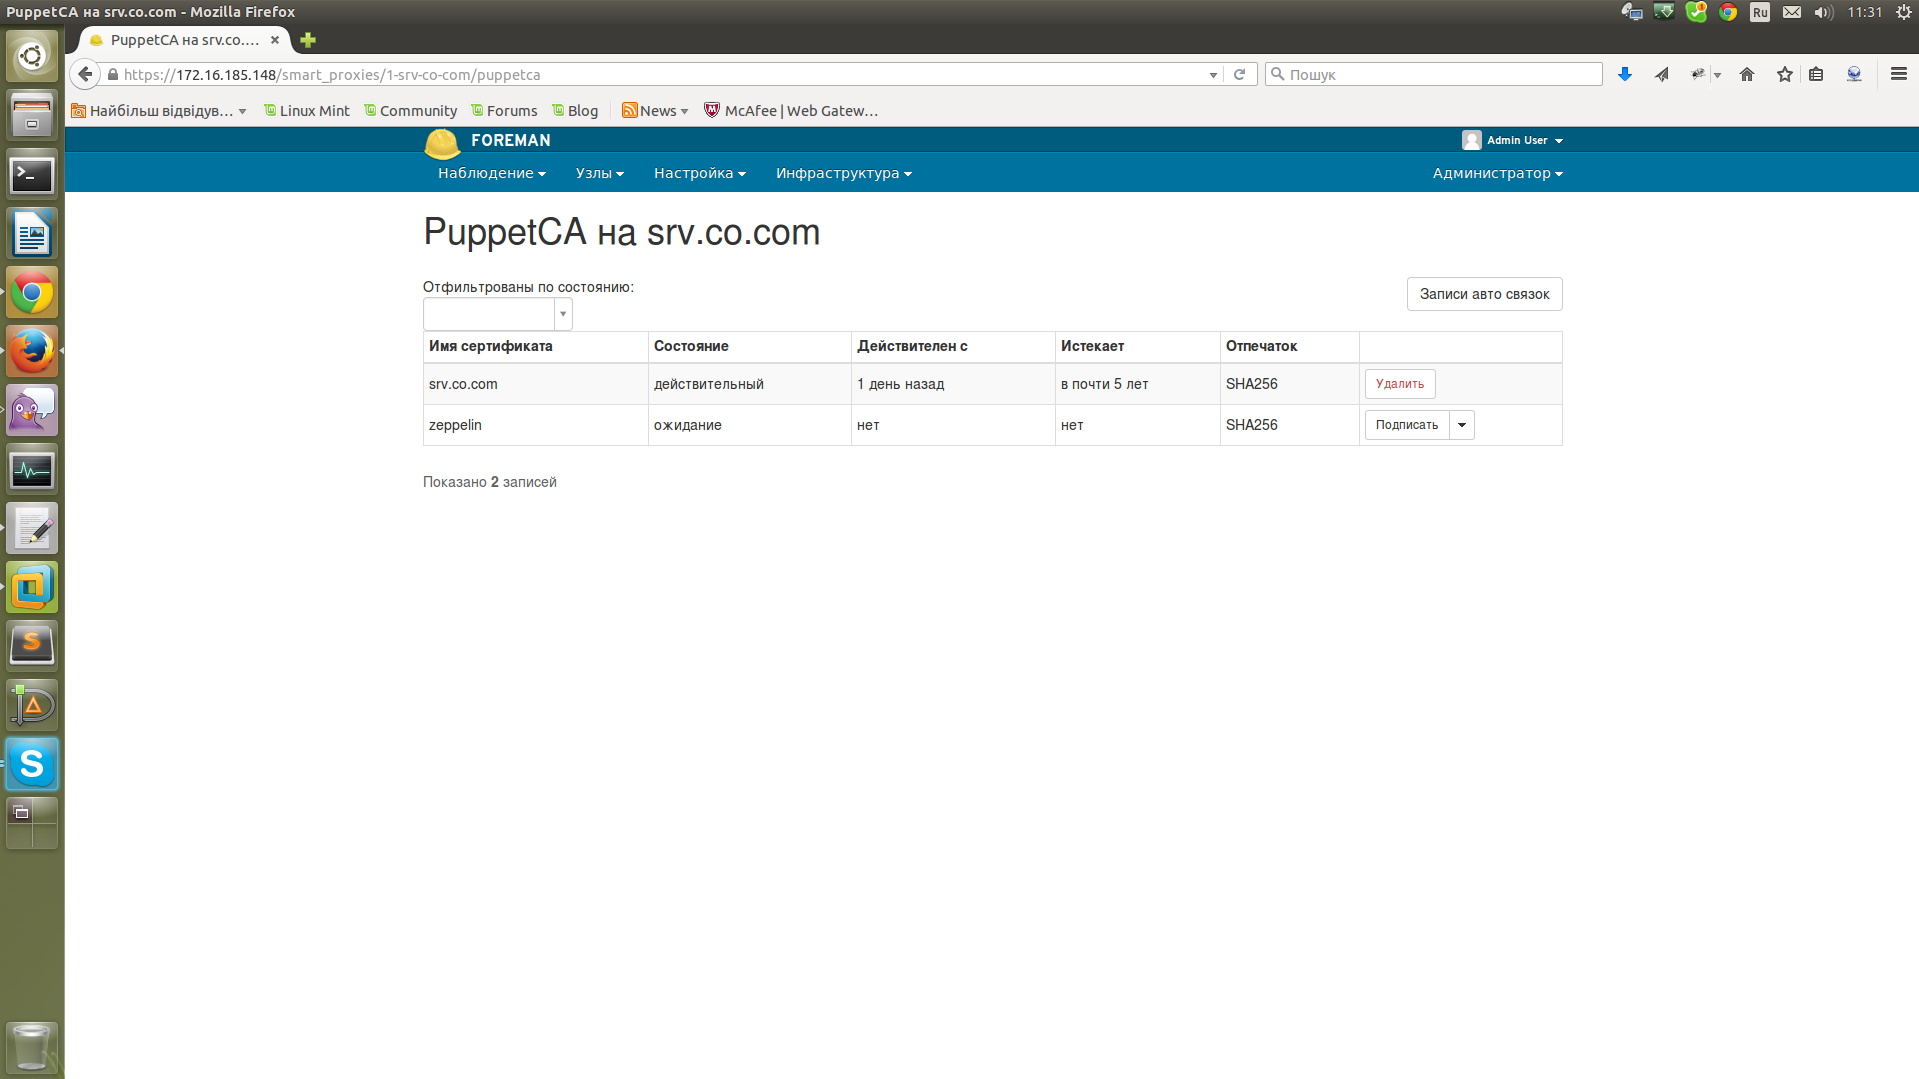
Click "Sign", as a result, when viewing the list of certificates in the console, we will have 2 signed certificates:
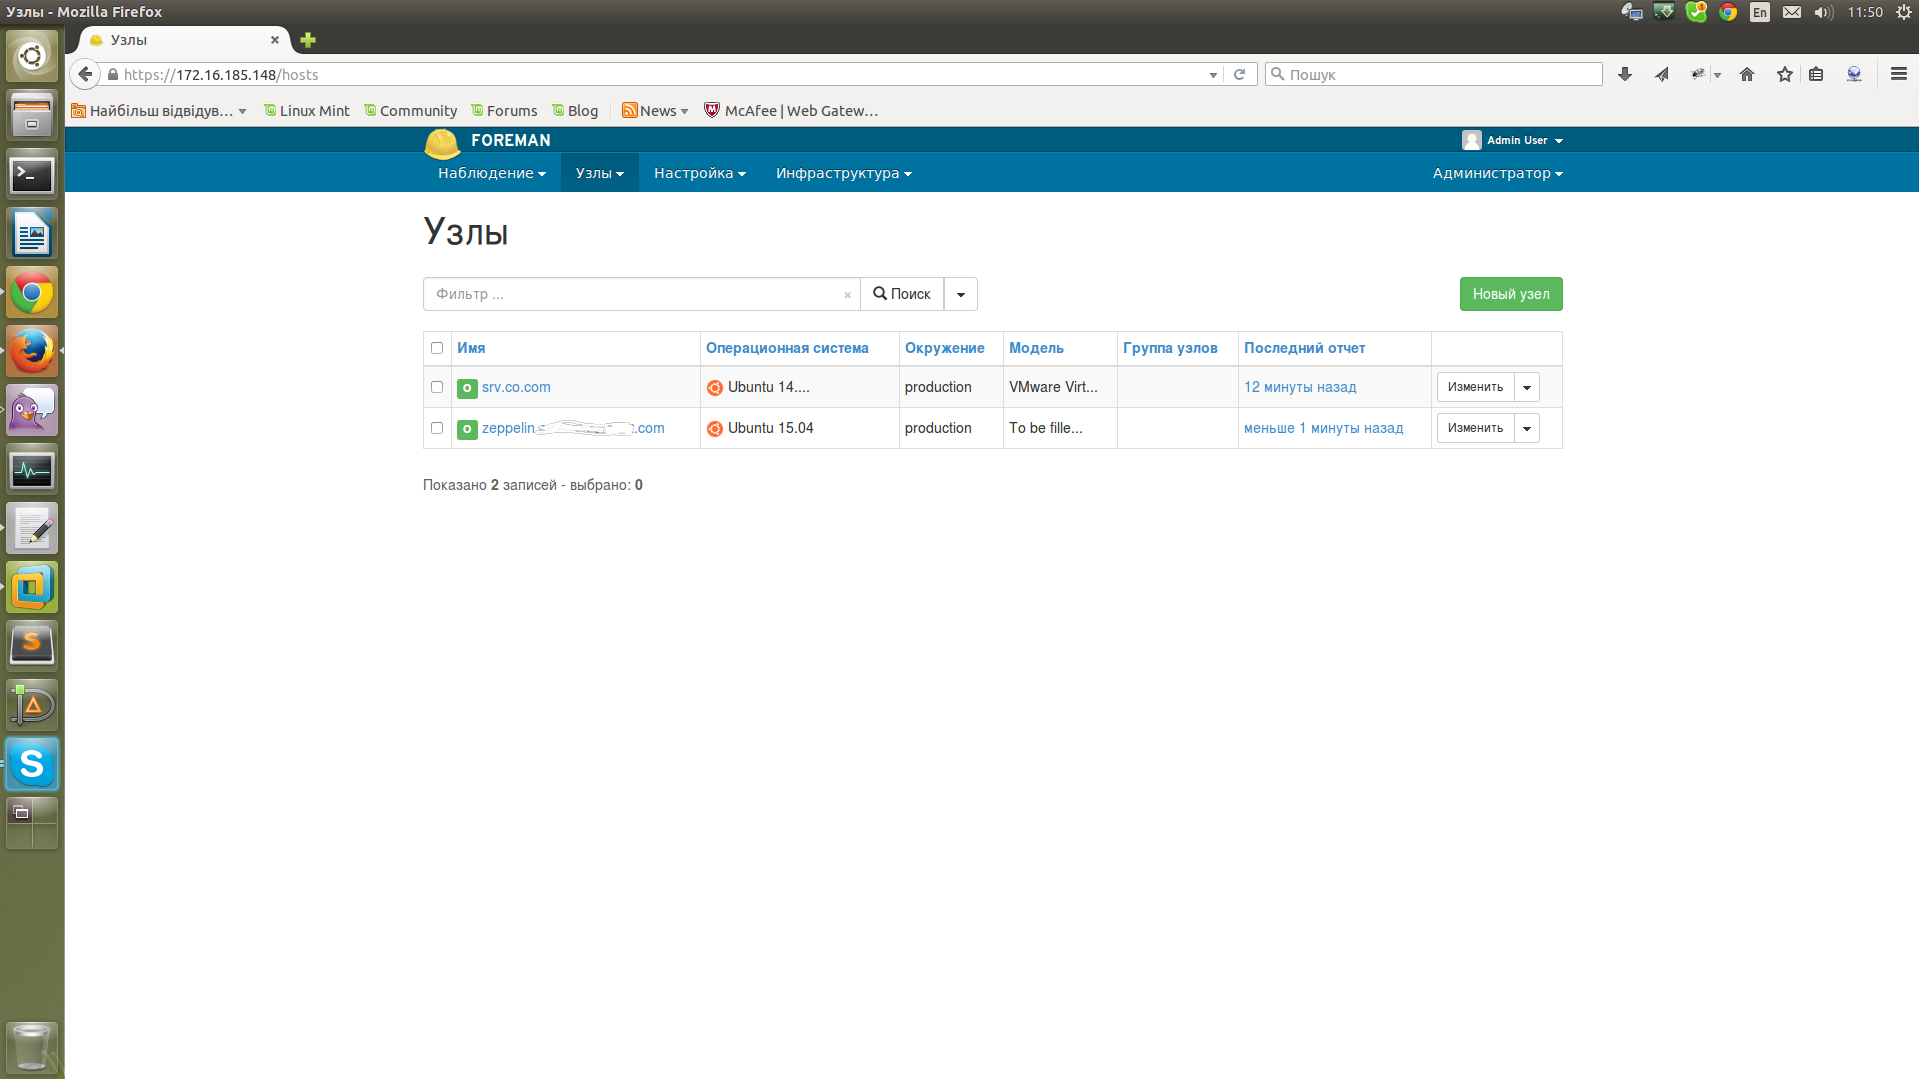
Go to the "Nodes" menu - "All nodes" - here we see 2 servers (a new server may not appear immediately, but after a while, in order for it to appear immediately, you need to execute the puppet agent -t command on the client after signing the certificate) .
By default, Foreman takes manifests from the / etc / puppet / environments folder further, depending on the environment. Now we will add a manifest to Foreman and try to apply it to one of our clients. Create a folder mkdir -p / etc / puppet / environments / production / modules / vsftpd / manifests , in this folder we throw init.pp file:
Now, in order for our module with a manifest to appear in Foreman, you need to go to the “Settings” menu - “Puppet Classes” and click on “Import from srv.co.com”.

Mark the environment we need with a bird and click "Refresh".
As a result, we get a list of available Puppet classes with an indication of the environments, the nodes to which they are applied, etc.
Let's add our manifest to one of our clients. To do this, go to "Nodes" - "All nodes", click on the name of the node we need and we will have a page with a detailed description of the node.
Click the "Change" button, go to another page with the settings of the specified node, then click on the second tab "Puppet Classes" and see our class "vsftpd".
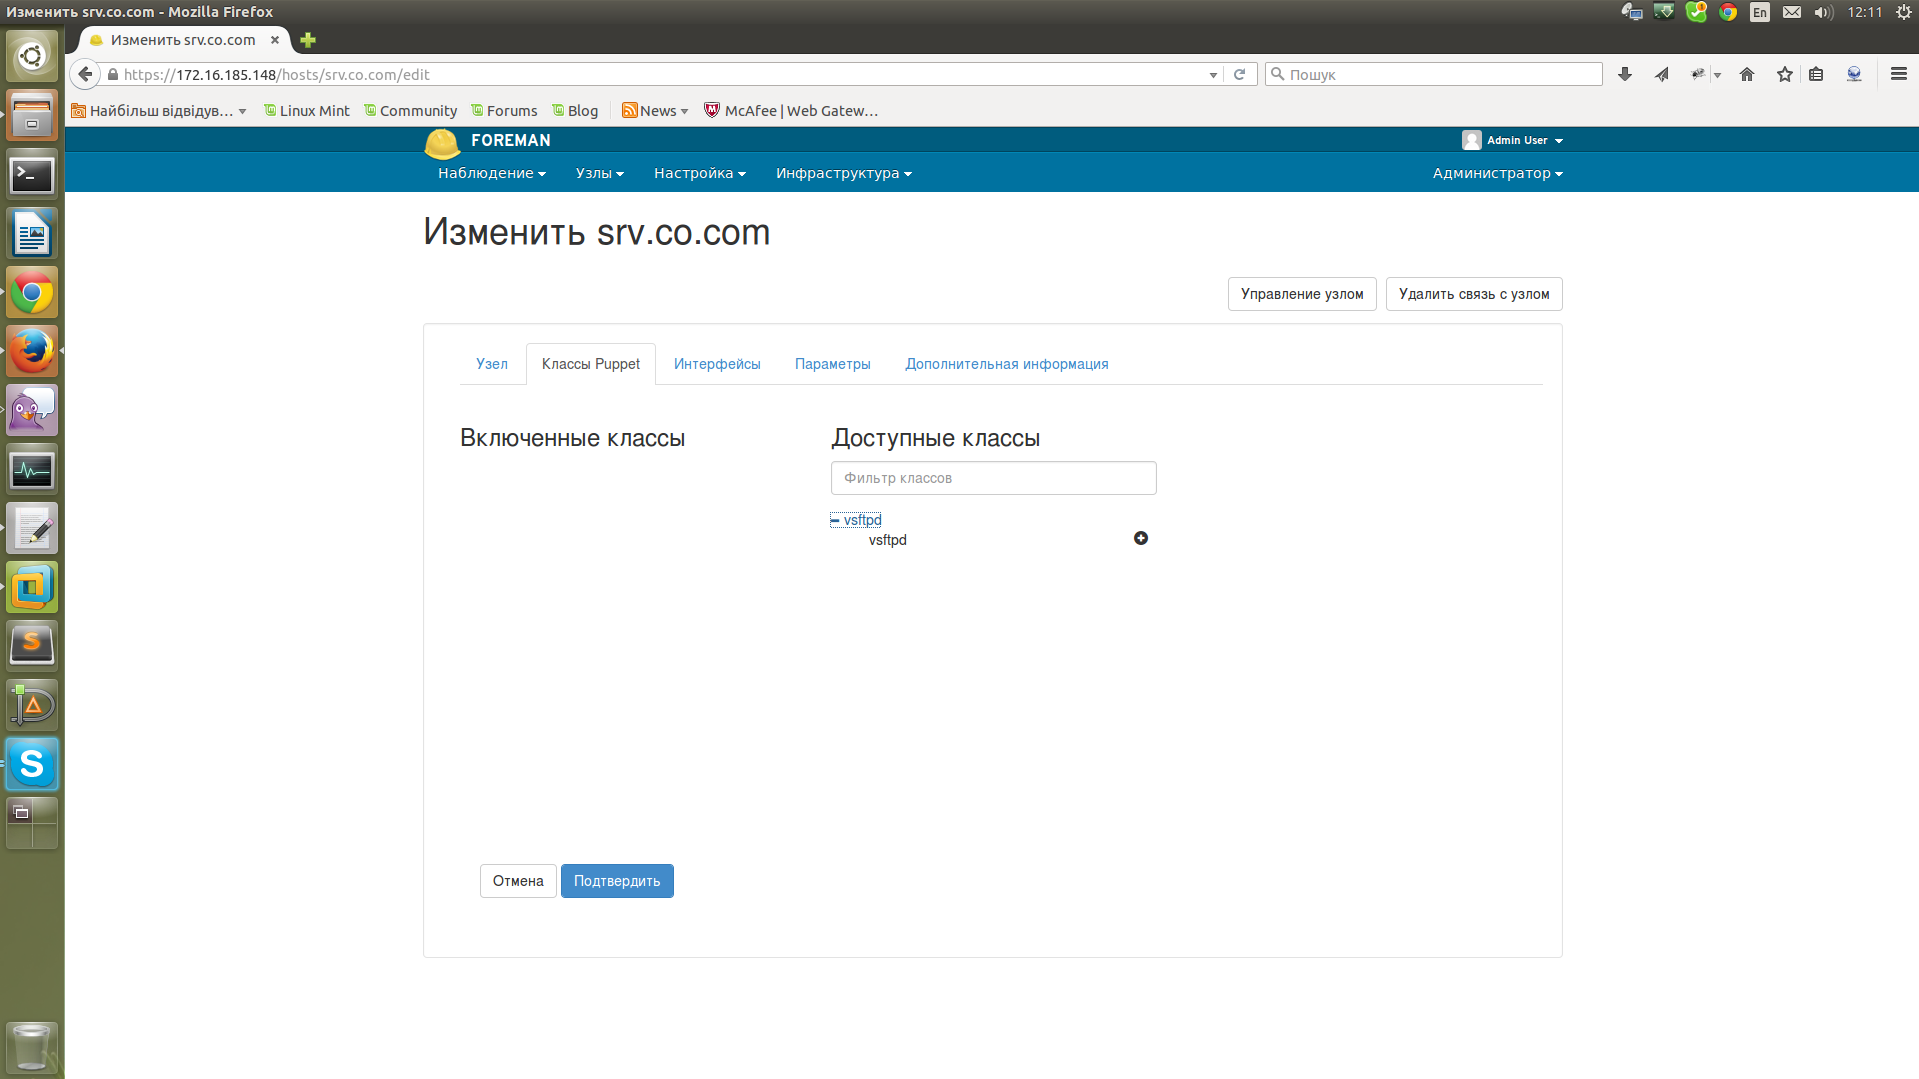
Choose our class (+ icon), it moves to the left side from “Available classes” to “Included classes”, we confirm the changes.
All - our manifest is added for the selected server, it remains to wait until it is applied on the client. If we do not want to wait, you can go to the client and execute the puppet agent -t command, immediately after its execution, the manifest will be applied to the client and vsftpd will be installed on it (in our case).
Foreman also has a lot of additional functionality, hosts can be grouped, manifests can be applied to groups, you can also configure auto-signature of client certificates, rights to client machines for different administrators, equipment audit and much more, which I will discuss in the next article.
Resources used:
docs.puppetlabs.com/puppet/latest/reference/install_pre.html
theforeman.org/manuals/1.9
For the server on which the Puppet + Foreman bundle will be installed, a virtual machine (1 CPU, 2 Gb RAM, 20Gb HDD) will be used, as clients there will be physical PCs on which Ubuntu is installed. The configuration of my virtual server with the above characteristics allows you to easily serve 500 clients (more is possible).
Installing Puppet is quite simple (all subsequent commands run as root):
')
Install Puppet
With these commands we download the deb package from the puppet developer site and install it. This package puppetlabs-release-trusty.deb during installation creates the file /etc/apt/sources.list.d/puppetlabs.list which contains the puppet repositories, and also imports the gpg key which signed the puppet repository. We do not install puppetmaster, it will be installed automatically when installing Foreman.
This completes the installation of Puppet, proceed to install the Foreman web interface:
Install foreman
echo "deb deb.theforeman.org trusty 1.9"> /etc/apt/sources.list.d/foreman.list
echo "deb deb.theforeman.org plugins 1.9" >> /etc/apt/sources.list.d/foreman.list
wget -q deb.theforeman.org/pubkey.gpg -O- | apt-key add - apt-get update && apt-get -y install foreman-installer
echo "deb deb.theforeman.org plugins 1.9" >> /etc/apt/sources.list.d/foreman.list
wget -q deb.theforeman.org/pubkey.gpg -O- | apt-key add - apt-get update && apt-get -y install foreman-installer
Here we added the /etc/apt/sources.list.d/foreman.list file to which Foreman’s repositories were entered, and also added the key for this repository. After adding the repository, we updated the list of packages and installed foreman-installer - this is the package that allows you to install Foreman.
Next we need to configure the correct computer name. Register in / etc / hosts and / etc / hostname
/ etc / hosts
127.0.0.1 localhost
172.16.185.148 srv.co.com srv
172.16.185.148 srv.co.com srv
/ etc / hostname
srv
Reboot our server.
Run our installer with the foreman-installer -i command .
We are asked if we are ready for installation, we answer “y”, then follows a menu where you can select additional Foreman configurations and additional modules. We set the standard configuration, so we select the “Save and run” option and we start the installation (we could have installed the command foreman-installer without the -i option, then we would have a basic installation, -i implies an interactive mode).
It took me about 5 minutes to install, after installation we see a message about successful installation, this message contains our access parameters to Foreman.
Foreman access options
Success!
* Foreman is running at srv.co.com
Initial credentials are admin / AQgtYVSPXfNytRt6
* Foreman Proxy is running at srv.co.com : 8443
* Puppetmaster is running at port 8140
The full log is at /var/log/foreman-installer/foreman-installer.log
* Foreman is running at srv.co.com
Initial credentials are admin / AQgtYVSPXfNytRt6
* Foreman Proxy is running at srv.co.com : 8443
* Puppetmaster is running at port 8140
The full log is at /var/log/foreman-installer/foreman-installer.log
Go to the address srv.co.com and go to the web interface using the access parameters we received during the installation (it is desirable to save them to a file, and after the first login to the control panel, change the password). After logging in, we see a page with a lot of textual information in English, you can go to your account settings and change the language to Russian. Go to the upper right corner, click Admin User, My account, select the required language and save the settings.
When we next log in to Foreman, we’ll get another interface:
Here our clients will be listed.
So we completed the installation of the Puppet + Foreman bundle. Let's try adding a puppet client and see what changes in the web interface.
To install Puppet agents on client PCs, I use the following script:
Installing Puppet on client equipment
#! / bin / bash
wget apt.puppetlabs.com/puppetlabs-release-trusty.deb
dpkg -i puppetlabs-release-trusty.deb
rm puppetlabs-release-trusty.deb
apt-get install -y puppet
sed -is / START = no / START = yes / g / etc / default / puppet
sed -i '/ \ / var \ / log \ / puppet / a \ server = srv.co.com' /etc/puppet/puppet.conf
sed -i 's / templatedir / # templatedir /' /etc/puppet/puppet.conf
puppet agent --test
This script installs the puppet agent, configures the agent autostart at system startup, specifies the address of the Puppet server and starts the agent. We will also comment out the templatedir line in the /etc/puppet/puppet.conf config, if you do not comment out, errors are added (I didn’t figure out how to fix without commenting,
After installing the agent, we will have a request to sign the certificate on the server, if we do not sign this certificate, then the agent will not be connected to the server.
You can use the puppet cert --list --all command to view certificates on the server:
puppet cert --list --all
root @ srv: ~ # puppet cert --list --all
Zeppelin (SHA256) 43: 64: 08: BF: DB: AF: 7C: 17: 5B: DE: 3C: CE: 22: 8B: 40: 6A: 13: 60: B7: F4: 2C: 38: B6: 57: E5: FA: EA: CC: 63: FB: 87: EB
+ Srv.co.com (SHA256) 04: CB: EB: CF: B2: D1: 09: 3C: 74: 00: 20: A9: 87: 24: 4B: CE: 40: CC: 0A: 73 : 1D: F6: E4: 24: 7D: 34: 6E: 4E: 6C: 17: DF: 61 (alt names: "DNS: puppet", "DNS: puppet.co.com", "DNS: srv.co .com ")
Here we see that we have 2 certificates, one is not signed with the name zeppelin and the other is signed (+) with the name srv.co.com. A non-signed certificate is a certificate from our new client.
You can use the puppet cert --sign $ client_name command to sign the certificate. We can also use Foreman's web interface to sign certificates. To do this, we need to go to the menu “Infrastructure” - “Capsules” - “Certificates” and here you can sign or delete a certificate.
Click "Sign", as a result, when viewing the list of certificates in the console, we will have 2 signed certificates:
puppet cert --list --all
root @ srv: ~ # puppet cert --list --all
+ Srv.co.com (SHA256) 04: CB: EB: CF: B2: D1: 09: 3C: 74: 00: 20: A9: 87: 24: 4B: CE: 40: CC: 0A: 73 : 1D: F6: E4: 24: 7D: 34: 6E: 4E: 6C: 17: DF: 61 (alt names: "DNS: puppet", "DNS: puppet.co.com", "DNS: srv.co .com ")
+ Zeppelin (SHA256) 03: C6: FF: F9: 4D: 10: 7C: 7D: 6C: 32: A7: E8: 0C: 9F: DA: FB: DD: 43: B6: E5: 36: 79 : DD: E3: 04: 41: D3: 58: 9F: 6A: C4: 8F
Go to the "Nodes" menu - "All nodes" - here we see 2 servers (a new server may not appear immediately, but after a while, in order for it to appear immediately, you need to execute the puppet agent -t command on the client after signing the certificate) .
By default, Foreman takes manifests from the / etc / puppet / environments folder further, depending on the environment. Now we will add a manifest to Foreman and try to apply it to one of our clients. Create a folder mkdir -p / etc / puppet / environments / production / modules / vsftpd / manifests , in this folder we throw init.pp file:
init.pp from vsftpd
class vsftpd {
package {'vsftpd':
ensure => installed,
}
}
package {'vsftpd':
ensure => installed,
}
}
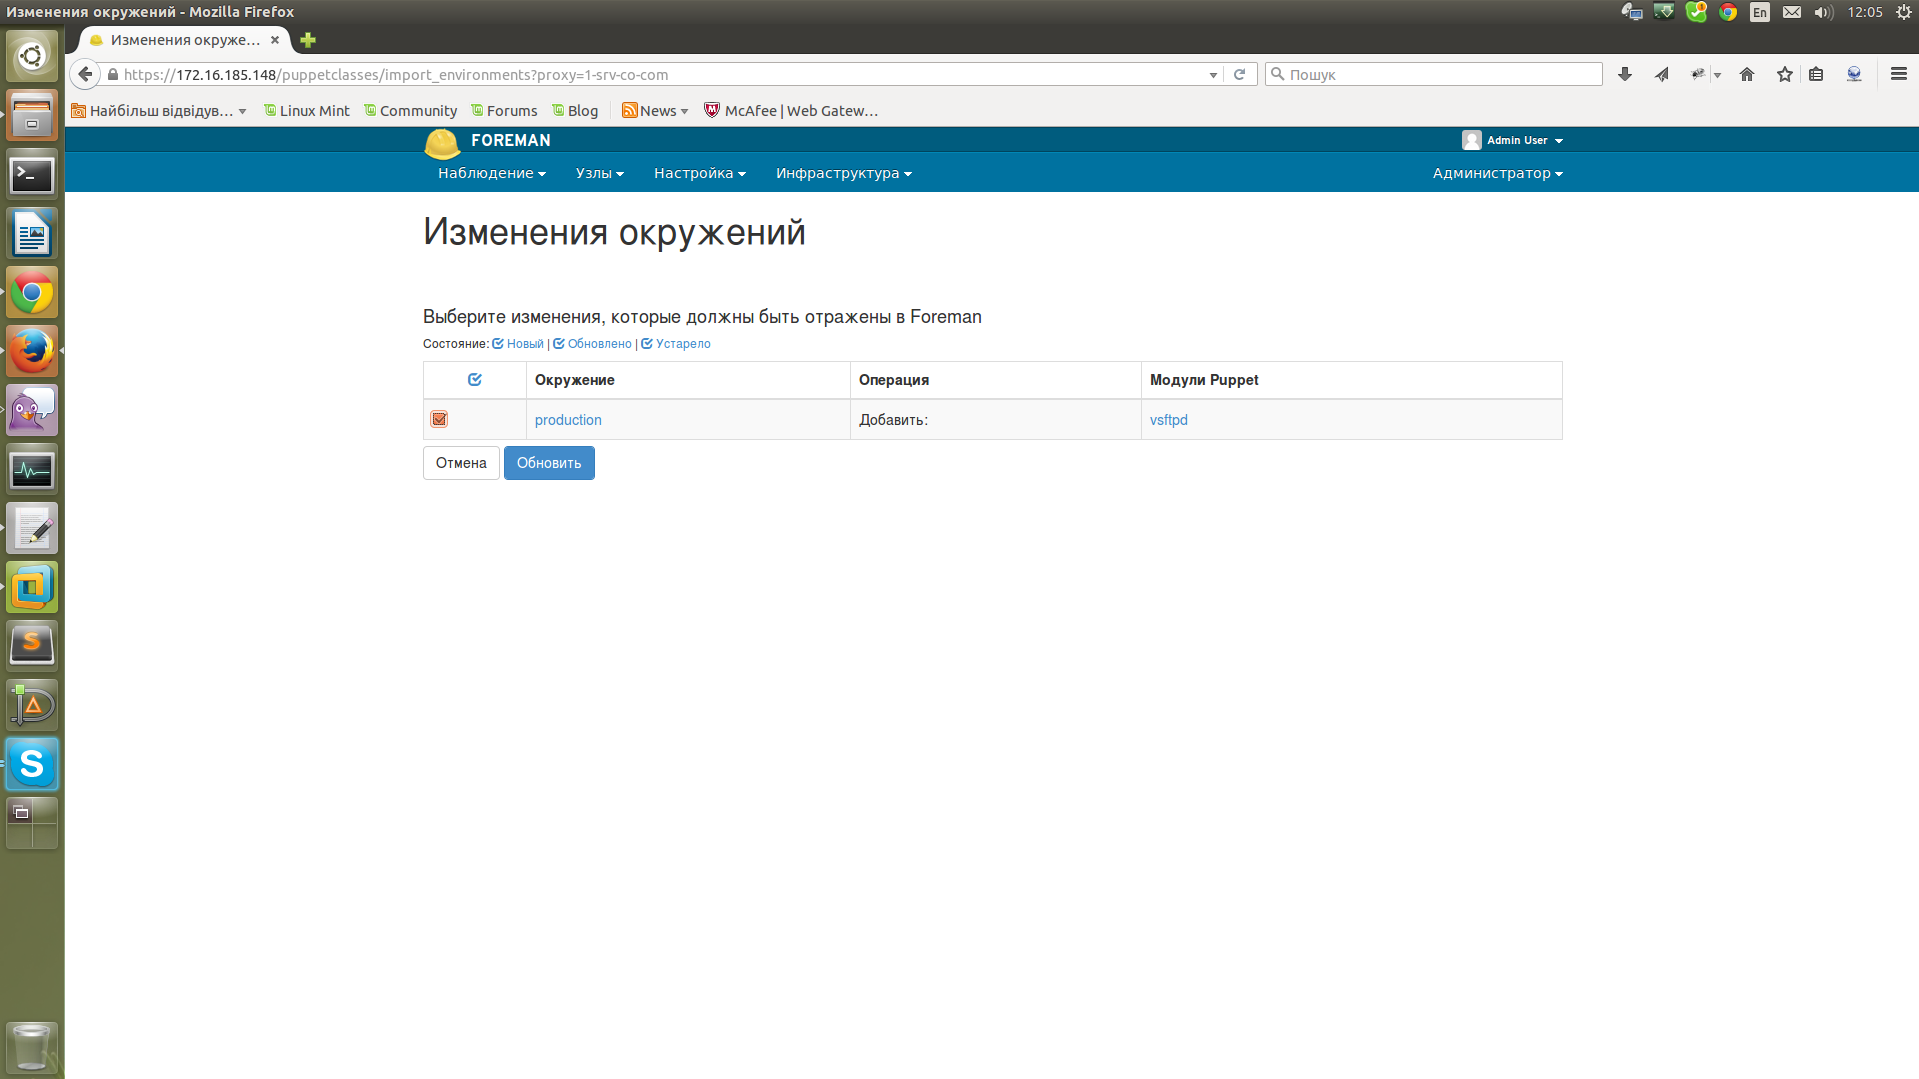
Now, in order for our module with a manifest to appear in Foreman, you need to go to the “Settings” menu - “Puppet Classes” and click on “Import from srv.co.com”.
Mark the environment we need with a bird and click "Refresh".
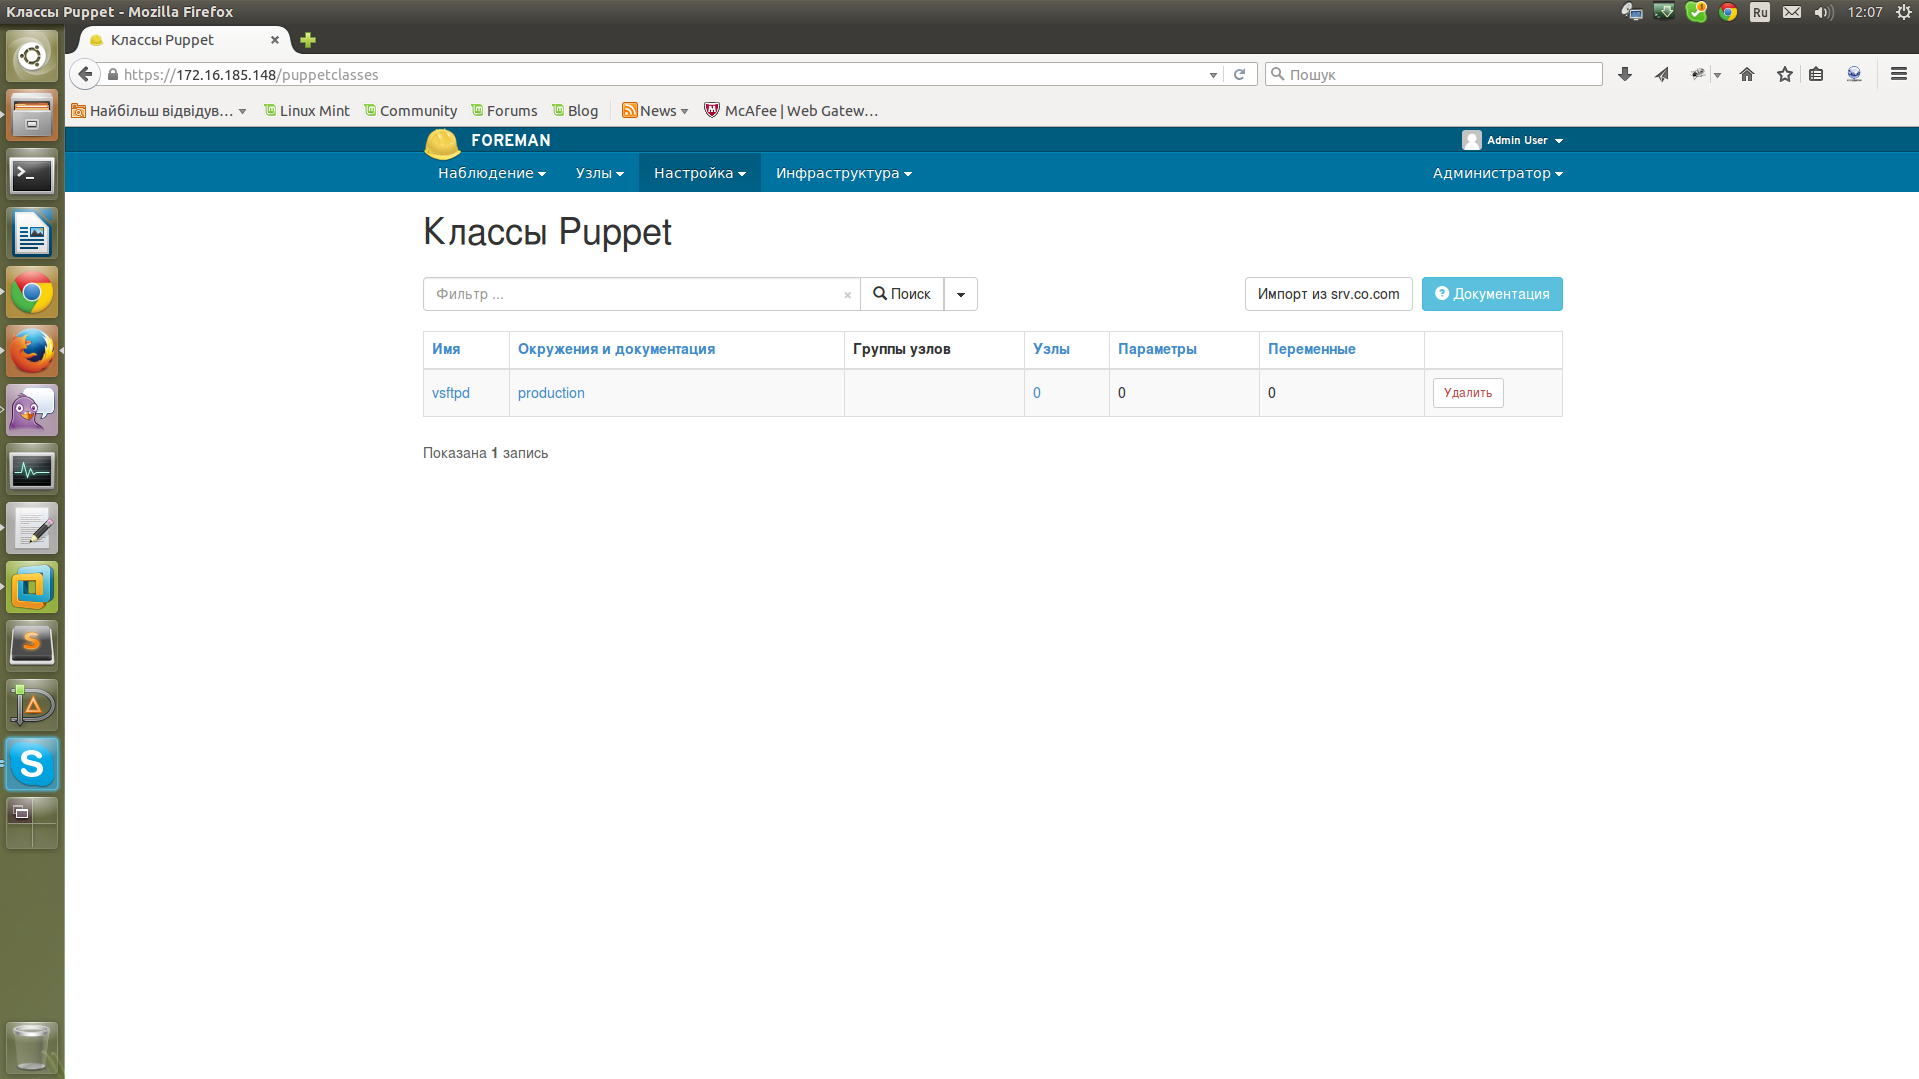
As a result, we get a list of available Puppet classes with an indication of the environments, the nodes to which they are applied, etc.
Let's add our manifest to one of our clients. To do this, go to "Nodes" - "All nodes", click on the name of the node we need and we will have a page with a detailed description of the node.
Click the "Change" button, go to another page with the settings of the specified node, then click on the second tab "Puppet Classes" and see our class "vsftpd".
Choose our class (+ icon), it moves to the left side from “Available classes” to “Included classes”, we confirm the changes.
All - our manifest is added for the selected server, it remains to wait until it is applied on the client. If we do not want to wait, you can go to the client and execute the puppet agent -t command, immediately after its execution, the manifest will be applied to the client and vsftpd will be installed on it (in our case).
Result of running puppet agent -t
Info: Retrieving pluginfacts
Info: Retrieving plugin
Info: Caching catalog for srv.co.com
Info: Applying configuration version '1443086109'
Notice: / Stage [main] / Vsftpd / Package [vsftpd] / ensure: ensure that you have changed 'purged' to 'present'
Notice: Finished catalog run in 2.90 seconds
Info: Retrieving plugin
Info: Caching catalog for srv.co.com
Info: Applying configuration version '1443086109'
Notice: / Stage [main] / Vsftpd / Package [vsftpd] / ensure: ensure that you have changed 'purged' to 'present'
Notice: Finished catalog run in 2.90 seconds
Foreman also has a lot of additional functionality, hosts can be grouped, manifests can be applied to groups, you can also configure auto-signature of client certificates, rights to client machines for different administrators, equipment audit and much more, which I will discuss in the next article.
Resources used:
docs.puppetlabs.com/puppet/latest/reference/install_pre.html
theforeman.org/manuals/1.9
Source: https://habr.com/ru/post/267617/
All Articles