Advertise AdMob in an Android application on the Adobe Air platform
After I developed my first, simplest Android application on Adobe Air , I wanted to add an advertisement to it, if only to know how to do it in the future. I spent a lot of time on this, not finding anything about it on the Internet in Russian. Therefore, I decided to write a brief guide to action, for those who still need it. We will add ads from Google AdMob .
To work with third-party services (AdMob, GameCenter and etc.), as well as with some technical capabilities of devices (gyroscope, vibration, etc.) Adobe suggests using Adobe Native Extensions (ANE) - something similar to external libraries. ANEs are files with the .ane extension that contain Action Script 3 class descriptions with which you can interact after connecting the extension.
The site ( Adobe ) has a list of recommended ANEs, developed by both the company's developers and third-party developers. As for AdMob, Adobe offers only commercial ANE from Milkman Games ($ 29.99 at the time of writing the post) and from distriqt ($ 40 at the time of writing the post) for interaction with this service. Of course, I did not have the desire to pay such a sum and I went on a journey across the expanses of the Internet to search for the free version.
The search ultimately led to Code-Alchemy's AdMobAne. This extension is publicly available in the GitHub repository . We load it with the archive, unpack it, find the anes_builds folder, select the ANE file you need (depending on whether you are writing apps for Android, iOS or for both platforms) and send it to the folder with your project.
Now we connect ANE to the project. If you are using Flash Professional, you need to go to the ActionScript 3.0 settings page, then click on the "Go to file with your own extension (ANE)" button and specify the path to the .ane file:

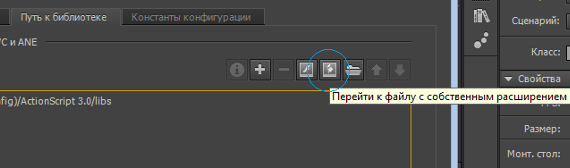
')
Now the extension should appear in the list below.
In order to successfully insert advertising into your application, you must firstly declare in the manifest that the application requires Internet access, and secondly, add new activity. Add the following lines to the manifest:
In order for the manifest to be successfully parsed by the parser, it is necessary to use at least AIR 3.4 , in case of using the older version, you will receive an unpleasant critical error. In addition, you need to periodically make sure that after the next publication of the application, the lines describing the new activity (what you just added) remain in the manifest, because after changing the publish settings, Flash can automatically rewrite the manifest and delete them - and you will be long and hard look for a mistake.
Also verify that the following is in your manifest:
A detailed description of the classes, methods and properties is provided on the ANE page in GitHub . I'll tell you how to create a regular banner:
1. Import the necessary classes.
2. Get the manager.
3. Check if the AdMobManager class is supported.
4. If supported: set the operation mode in PROD_MODE (production - debugging is not available), specify the banner ID, create a banner with the size BANNER and position BOTTON_CENTER (defined in the AdMobSize and AdMobPosition classes). NULL indicates that we are using the previously specified banner ID, you can specify another ID instead of NULL. True indicates that the banner will be displayed as soon as it loads. "BottomBanner" - the banner identifier in our application (we invent ourselves).
Do not forget to change the banner ID to your own.
5. To hide or show a banner, we use the following methods:
Similarly, create a fullscreen ad:
Available banner positions: TOP_LEFT, TOP_CENTER, TOP_RIGHT, MIDDLE_LEFT, MIDDLE_CENTER, MIDDLE_RIGHT, BOTTOM_LEFT, BOTTOM_CENTER, BOTTOM_RIGHT. Available sizes: BANNER, MEDIUM_RECTANGLE, LARGE_BANNER, FULL_BANNER, LEADERBOARD, WIDE_SKYSCRAPER, SMART_BANNER, SMART_BANNER_PORT, SMART_BANNER_LAND.
This extension allows you to customize the age of the target audience, listen to events and much more. All this can be read on GitHub. Thanks for attention.
1. Load ANE
To work with third-party services (AdMob, GameCenter and etc.), as well as with some technical capabilities of devices (gyroscope, vibration, etc.) Adobe suggests using Adobe Native Extensions (ANE) - something similar to external libraries. ANEs are files with the .ane extension that contain Action Script 3 class descriptions with which you can interact after connecting the extension.
The site ( Adobe ) has a list of recommended ANEs, developed by both the company's developers and third-party developers. As for AdMob, Adobe offers only commercial ANE from Milkman Games ($ 29.99 at the time of writing the post) and from distriqt ($ 40 at the time of writing the post) for interaction with this service. Of course, I did not have the desire to pay such a sum and I went on a journey across the expanses of the Internet to search for the free version.
The search ultimately led to Code-Alchemy's AdMobAne. This extension is publicly available in the GitHub repository . We load it with the archive, unpack it, find the anes_builds folder, select the ANE file you need (depending on whether you are writing apps for Android, iOS or for both platforms) and send it to the folder with your project.
2. Connect ANE
Now we connect ANE to the project. If you are using Flash Professional, you need to go to the ActionScript 3.0 settings page, then click on the "Go to file with your own extension (ANE)" button and specify the path to the .ane file:
')
Now the extension should appear in the list below.
3. Edit the application manifest
In order to successfully insert advertising into your application, you must firstly declare in the manifest that the application requires Internet access, and secondly, add new activity. Add the following lines to the manifest:
<manifestAdditions> <![CDATA[<manifest> <uses-permission android:name="android.permission.INTERNET"/> <uses-permission android:name="android.permission.ACCESS_NETWORK_STATE"/> <uses-permission android:name="android.permission.ACCESS_WIFI_STATE"/> <application> <meta-data android:name="com.google.android.gms.version" android:value="4452000"/> <activity android:name="com.google.android.gms.ads.AdActivity" android:configChanges="keyboard|keyboardHidden|orientation|screenLayout|uiMode|screenSize|smallestScreenSize" /> </application> </manifest>]]> </manifestAdditions> In order for the manifest to be successfully parsed by the parser, it is necessary to use at least AIR 3.4 , in case of using the older version, you will receive an unpleasant critical error. In addition, you need to periodically make sure that after the next publication of the application, the lines describing the new activity (what you just added) remain in the manifest, because after changing the publish settings, Flash can automatically rewrite the manifest and delete them - and you will be long and hard look for a mistake.
Also verify that the following is in your manifest:
<extensions> <extensionID>com.codealchemy.ane.admobane</extensionID> </extensions> 4. Write the code
A detailed description of the classes, methods and properties is provided on the ANE page in GitHub . I'll tell you how to create a regular banner:
1. Import the necessary classes.
import com.codealchemy.ane.admobane.AdMobManager; import com.codealchemy.ane.admobane.AdMobPosition; import com.codealchemy.ane.admobane.AdMobSize; 2. Get the manager.
var adMobManager:AdMobManager; adMobManager = AdMobManager.manager; 3. Check if the AdMobManager class is supported.
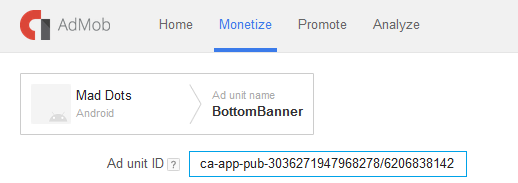
if (adMobManager.isSupported) { ... } 4. If supported: set the operation mode in PROD_MODE (production - debugging is not available), specify the banner ID, create a banner with the size BANNER and position BOTTON_CENTER (defined in the AdMobSize and AdMobPosition classes). NULL indicates that we are using the previously specified banner ID, you can specify another ID instead of NULL. True indicates that the banner will be displayed as soon as it loads. "BottomBanner" - the banner identifier in our application (we invent ourselves).
adMobManager.operationMode = AdMobManager.PROD_MODE; adMobManager.bannersAdMobId = "ca-app-pub-3036271947968278/6206838142"; adMobManager.createBanner(AdMobSize.BANNER,AdMobPosition.BOTTOM_CENTER,"BottomBanner", null, true); Do not forget to change the banner ID to your own.
5. To hide or show a banner, we use the following methods:
adMobManager.showBanner("BottomBanner"); adMobManager.hideBanner("BottomBanner"); Similarly, create a fullscreen ad:
adMobManager.interstitialAdMobId = "ADMOB_INTERSTITIAL_ID"; adMobManager.createInterstitial(null,true); Available banner positions: TOP_LEFT, TOP_CENTER, TOP_RIGHT, MIDDLE_LEFT, MIDDLE_CENTER, MIDDLE_RIGHT, BOTTOM_LEFT, BOTTOM_CENTER, BOTTOM_RIGHT. Available sizes: BANNER, MEDIUM_RECTANGLE, LARGE_BANNER, FULL_BANNER, LEADERBOARD, WIDE_SKYSCRAPER, SMART_BANNER, SMART_BANNER_PORT, SMART_BANNER_LAND.
5. Conclusion
This extension allows you to customize the age of the target audience, listen to events and much more. All this can be read on GitHub. Thanks for attention.
Source: https://habr.com/ru/post/267613/
All Articles