19 daily tips for working with Git

If you use Git regularly, then the practical tips from this article may be helpful. If you are new to this yet, then for a start, you better get acquainted with Git Cheat Sheet . Let's just say this article is intended for those who have experience using Git from three months. Caution: traffic, big pictures!
Contents :
- Parameters for easy viewing of the log
- Output current changes to file
- View changes in specific file lines
- View changes not yet poured into the parent branch
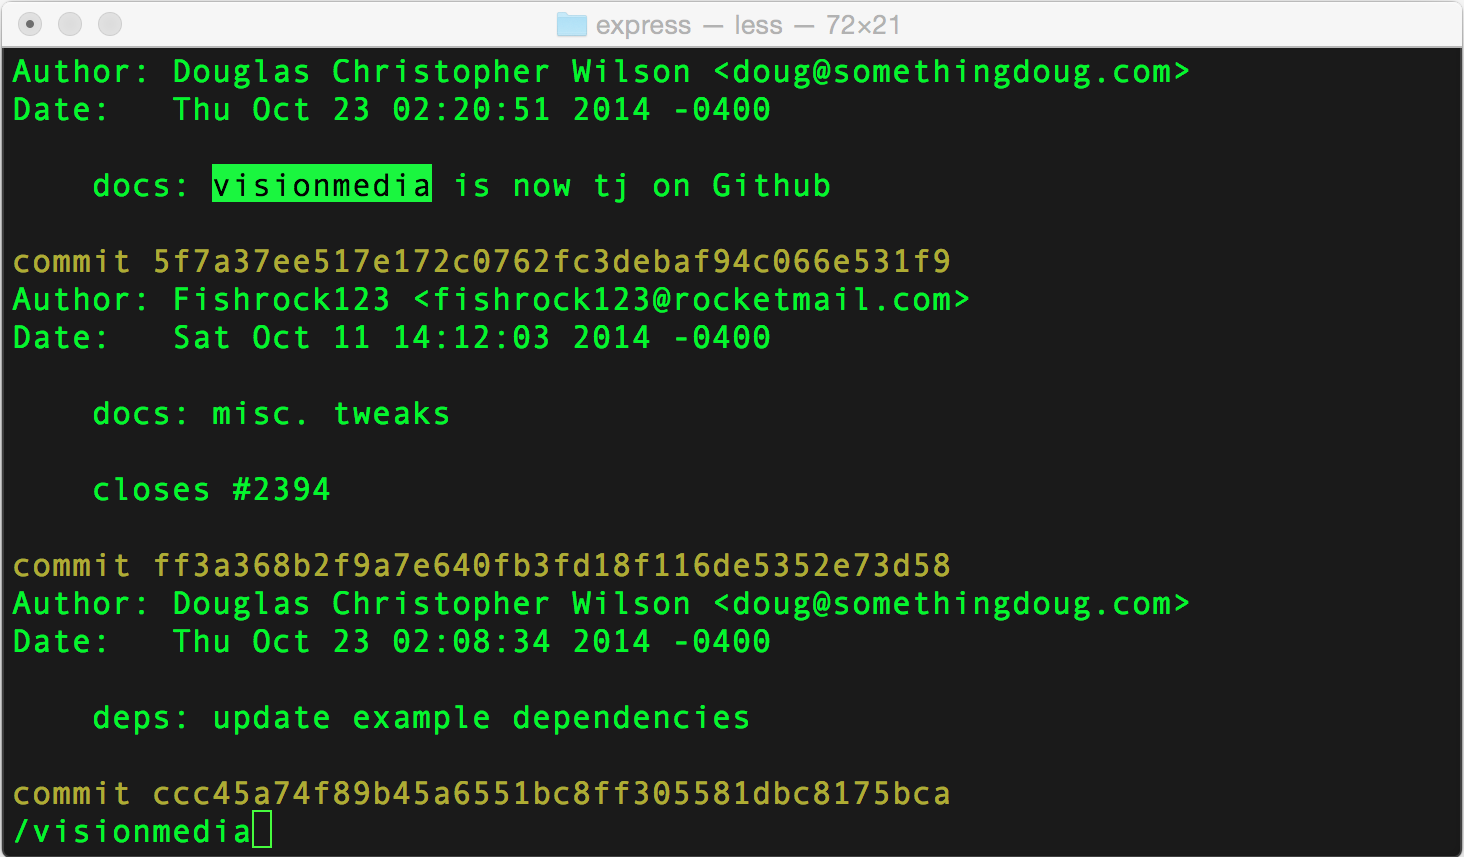
- Extracting a file from another branch
- A couple of words about Rebase
- Preserving branch structure after local merge
- Fix last commit instead of creating a new one
- Three states in Git and switching between them
- Soft cancellation of commits
- View diffs for the entire project (and not one file at a time) using third-party tools
- Ignoring spaces
- Add specific changes from file
- Find and delete old branches
- Postponing changes to certain files
- Good commit notes
- Git command autocompletions
- Creating aliases for frequently used commands
- Quick search for a bad commit
1. Parameters for convenient viewing of the log
Example command: git log --oneline --graph
')
Most likely, you've already used the git log command. It has many useful parameters that can be combined with each other to achieve the best result. Most often I use these:
- --author = "Alex Kras" - displays commits made by a specific person
- --name-only - displays only the names of the changed files.
- --oneline - displays abbreviated data of a commit (in the form of a single line)
- --graph - displays a dependency tree for all commits
- --reverse - output commits in reverse chronological order (old first)
- --after - output commits made after a certain date.
- --before - displays commits made before a certain date.
For example, I once had a manager who asked for weekly reports every Friday. And it was enough for me to write git log --author = "Alex Kras" --after = "1 week ago" --oneline , edit the result a little and send them to the authorities.
In general, there are a lot of useful parameters in Git. Just try man git-log to see all options for viewing history. If none of the suggested options suits you, you can always use the --pretty option , with which you can adjust the output over a wide range.

2. Displaying current changes to the file
Example command: git log -p filename
Using the git log -p or git log -p filename commands, you can view not only the note to the commit, the author and the date, but also the changes made in this commit.
Then you can use the search utility utility less by typing a “slash” and entering a search query: / {{search query}} (use the small " n " to go to the next search result and the large " N " to return to the previous one) :
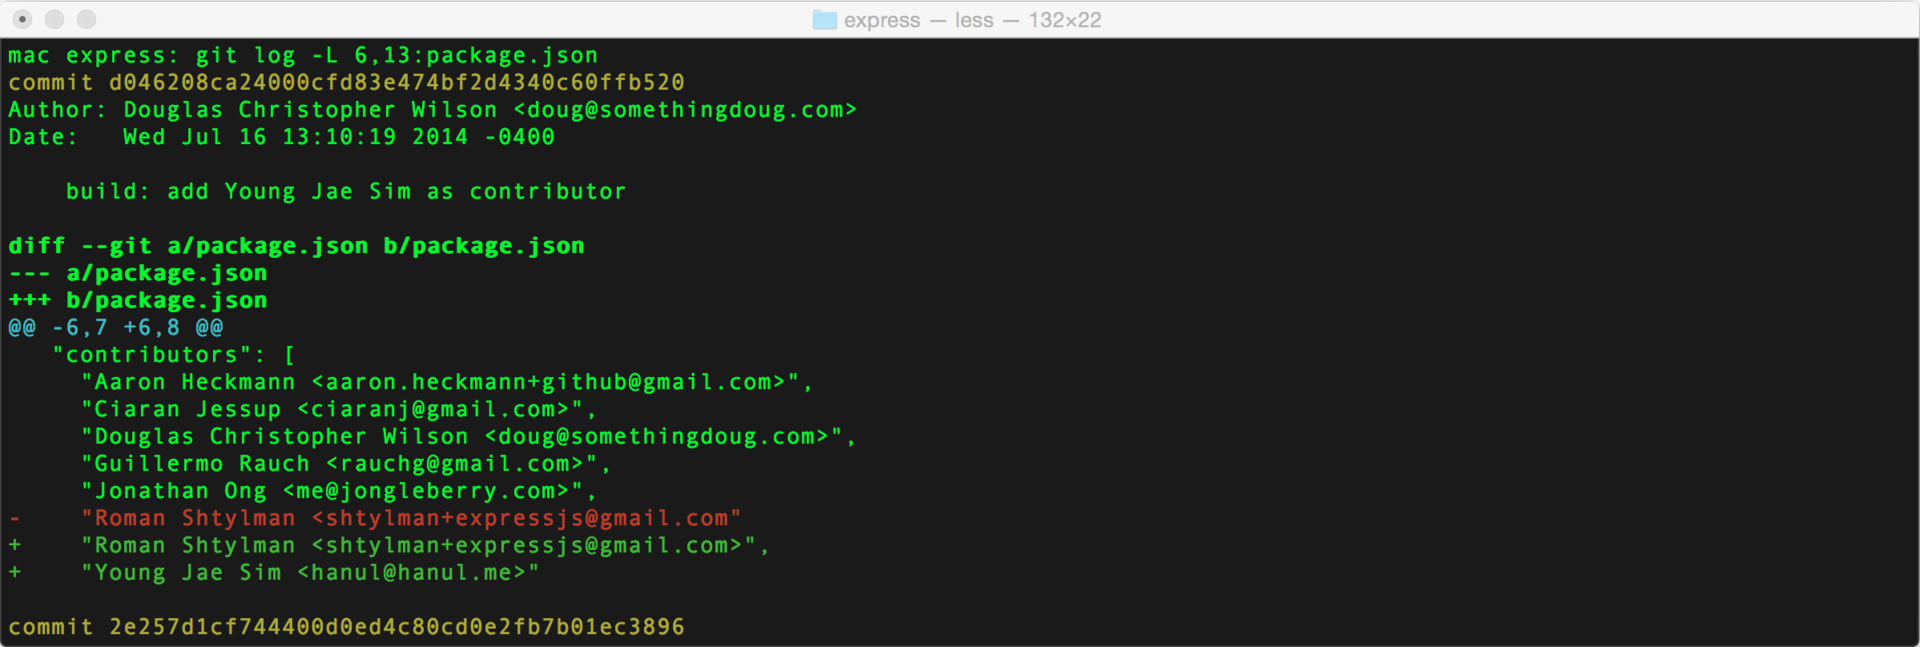
3. View changes to specific lines of a file.
Example command: git log -L 1,1: some-file.txt
Using the git blame filename command, you can identify the authors of the latest changes for each line in the file.

This is a great tool, but sometimes there is not enough information that it provides.
Alternatively, you can use the git log command with the -L flag, which allows you to specify the number of the line of interest in the desired file, and Git will display only those changes that are associated with this line.
In essence, this is an analogue of the git log -p command, only with a focus on specific changes.
4. View changes not yet poured into the parent branch.
Example command: git log --no-merges master ..
If you had to work with long-lived branches, on which many people work, then you probably faced multiple infusions (migrations) of the parent branch (for example, master) into the branch with the developed features. Such snows make it difficult to view the history of changes in the working branch, because it will be difficult to distinguish commits made in the parent branch from the commits of the working branch.
The git log - no-merges master command ... solves this problem: the - no-merges parameter says that you need to show commits that have not yet been frozen somewhere, and the master parameter .. says that only those changes need to be shown which were not yet frozen in the master branch (here it is important to pay attention to two points after the branch name).
To see not only commits, but also the changes that were made to them, you can use the git show - no-merges master .. commands or the git log -p - no-merges master .. commands (their output will be identical).
5. Extracting a file from another branch
Example command: git show some-branch: some-file.js
Sometimes it is convenient to look at any file in another branch, without switching to it. This can be done using the git show some-branch-name: some-file-name.js command , which will output the contents of the file in the specified branch directly to the terminal.
And with the help of output redirection, you can save this file to a specified location on the disk, for example, if you open two files at the same time in your editor: git show some-branch-name: some-file-name.js> deleteme.js .
Note: if you only need to compare two files, you can run this command: git diff some-branch some-filename.js
6. A couple of words about rebeiz
Example command: git pull --rebase
Previously, we talked about the many wizards in the work branch. Some of them can be avoided using the git rebase command . In general, rebase is a very powerful feature, and it would probably be better to leave its detailed description for a separate post. Here, for example, as stated in the book " Pro Git ":
Despite all its advantages, there are drawbacks to the rebus, which can be expressed in one sentence:
Do not do rebase commits outside your repository.
If you follow this advice, everything will be fine. Otherwise, everyone will hate you, and friends and family will despise you.
However, rebuy does not need to be afraid, just be careful when working with him.
Perhaps the best way to do a reboot is to use its interactive mode, launched with the git rebase -i {{some commit hash}} command, which will open the editor with instructions on what to do and how. I will not go further into the details, since this topic is quite voluminous.

Another useful rebuy command: git pull --rebase
For example, you work with a local copy of a branch and make a small commit. At this time, someone else poured the results of his weekly labor into a remote copy of the branch. When you try to push your changes, Git will tell you that it cannot do this, and that you first need to do git pull to resolve the conflict. As a respectable person, you will do this, and after executing the git pull command in the history of your local copy of the branch, you’ll see a commit generated automatically: “Merge remote-tracking branch 'origin / master'”.
This, of course, is not a problem and everything will work as it should, however, such commits litter the history of changes. In such cases, it is better to execute the git pull --rebase command , and Git will first pick up the changes from the remote copy of the branch, and then roll up your unsolicited commits after the most recent commit of the remote branch, as if everything was like that. Thus, the need for the world disappears and we will avoid the ugly commit about the merge in the history of change.
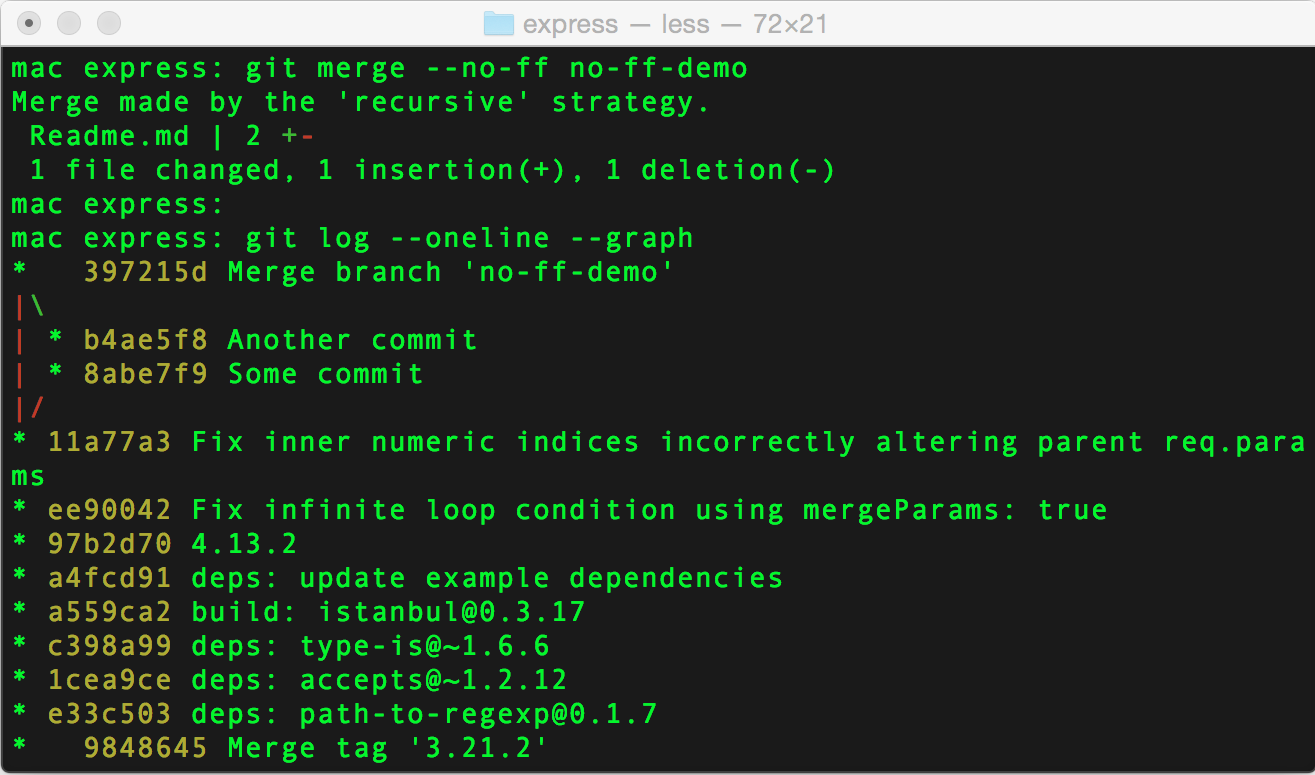
7. Preservation of the branch structure after local merge
Example command: git merge --no-ff
I like to create a new branch for each new bugfix or feature. Among other things, it helps to clearly understand how a series of commits is associated with a specific task. If you ever slept pull requests on a githaba or similar services, you always had the opportunity to see a detailed history of a smug branch using the git log --oneline --graph command .
If you ever left local branches with each other, then you might notice that Git aligns the history of commits by arranging them linearly one after the other. In order to avoid this and leave a history of tree changes (such as after a pull request), you can add the option --no-ff , and you will end up with a detailed tree-like story: git merge --no-ff some-branch- name
8. Correcting the last commit instead of creating a new one.
Example command: git commit --amend
This advice is very simple. Suppose you made changes, commited them, and then discovered a typo. You can make a new commit with the description “typo correction”, but there is a better option.
If you have not yet made changes to the remote branch , you can do it like this:
- Correct the mistake.
- Add changes to the list of files prepared for commit: git add some-fixed-file.js .
- Run the git commit --amend command , which adds these recent changes to the most recent commit. You can also edit the note to the commit.
- When everything is ready, you can push a branch to a remote repository.
If you are working on branch one, then you can correct the changes even after you have launched the branch to the remote repository. Just run git push -f after making changes, and the remote branch will be overwritten. But you DO NOT want to do this with the thread that other people work with (as discussed in the rebeyz council above). In such cases, perhaps the best option is a new commit with the note “typo correction”.
9. Three states in Git and switching between them
Example command: git reset --hard HEAD and git status -s
As you probably already know, a file in Git can be in one of three states:
- unstaged - not added to commit index
- staged - added to index for commit
- commited - commited
(In fact, there is still at least the status of untracked - the file has not been added to the repository - comment. Transl.).
Using the git status command, you can get a detailed description of the files and their states. To add a file to the index for a commit (transfer it from the unstaged state to the staged state), you need to run the git add filename.js command. Git add command adds all files at once.
For faster and easier viewing of the status of files, you can use the git status -s command, the result will look something like this:
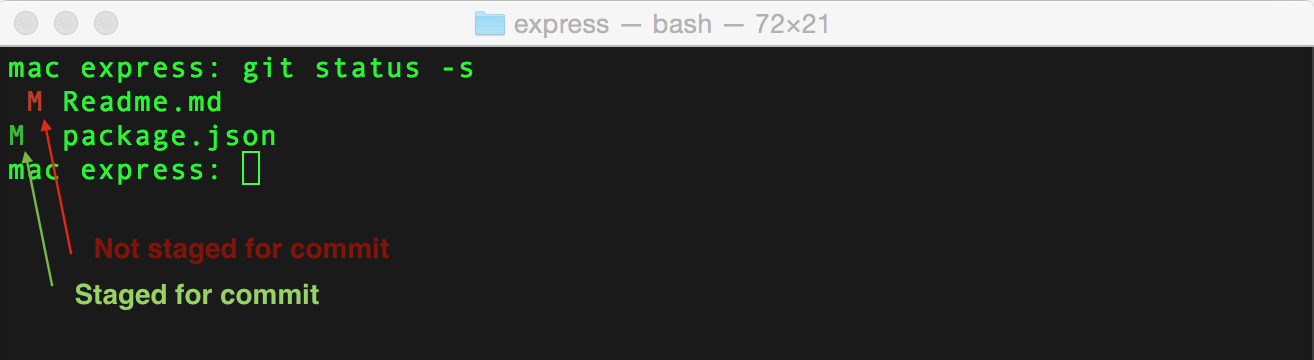
Obviously, the git status command will not show you already committed files, you should use the git log command to view them.
There are a few more commands to switch the status of files.
Reset file status
Reset allows you to roll back to a specific version in the Git change history. There are three types of reset:
- git reset --hard {{some-commit-hash}} - return to a specific commit in history. Any changes made after this commit will be lost.
- git reset {{some-commit-hash}} - return to a specific commit in history. Any changes made after this commit will get the status “Not staged for commit”. To get them back, you need to use the git add and git commit commands.
- git reset --soft {{some-commit-hash}} - return to a specific commit in history. Any changes made after this commit will receive a “Staged for commit” status. To get them back, you need to use the git commit command.
Ponachachu this information may seem useless, however, when you start working with different versions of files, it will be very useful to you. For example, I selected for myself the following scenarios for using these commands:
- If I want to undo all the changes and start work from scratch, I use the git reset --hard HEAD command (the most common case).
- If I want to edit the changes and / or commit the files in a different order, I use git reset {{some-start-point-hash}} .
- If I just want to take the last three commits and merge them into one big commit, I use the git reset --soft {{some-start-point-hash}} command.
Uploading individual files
if you need to undo some local changes for specific files, but you don’t need to touch changes for other files, it is much easier to pick up the committed changes of these files using the git checkout-forget-my-changes.js command . It's like git reset --hard , just for a specific file.
You can also pick up different versions of a file from other commits or branches: git checkout some-branch-name file-name.js and git checkout {{some-commit-hash}} file-name.js .
Please note that the uploaded files will be in the “Staged for commit” state, and to remove them from the index for a commit you will need to use the git reset HEAD file-name.js command . To return to the original state, simply type git checkout file-name.js again.
Please note that the git reset --hard HEAD command file-name.js will not work. In general, the state transition procedure in Git is somewhat confusing and it is not always possible to immediately understand what needs to be done and how. I hope that in this council I have explained everything in an accessible and understandable manner.
10. Soft cancellation of commits.
Example command: git revert -n
This is a very handy command in case you need to roll back the last couple of commits, delve into the changes and find a problem place.
Normal git revert will automatically commit those changes that were rolled back by asking you for a note on the new rollback commit. The " -n " flag tells the gita not to worry about the urgent commit of new changes, because we just want to look at them.
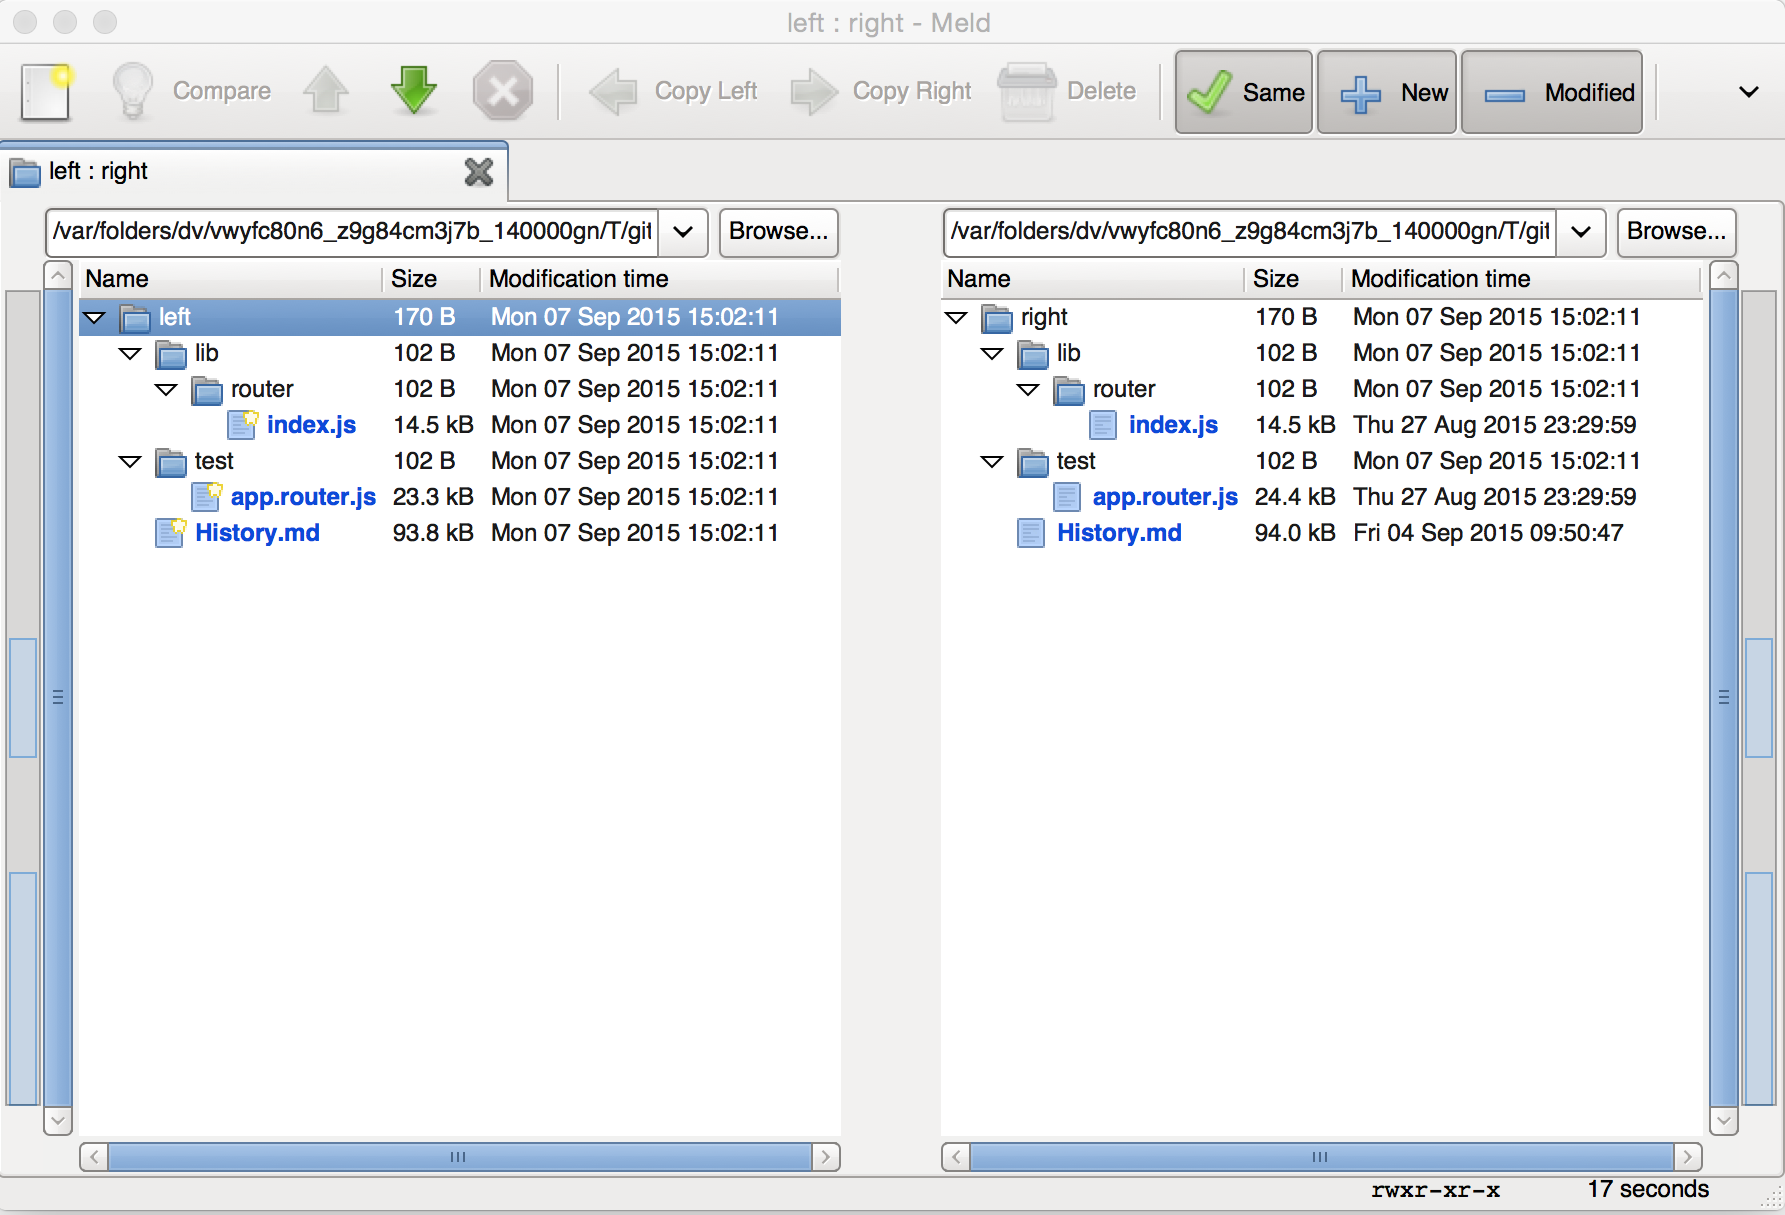
11. Viewing diffs for the entire project (and not one file at a time) using third-party tools
Example command: git difftool -d
My favorite GUI file comparison program is Meld . I have fallen in love with her since the days of Linux, and since then she has always been with me.
By the way, I'm not trying to promote Meld. Most likely, you already have a favorite program for comparing files, and, most likely, it can work with Git, both for comparison and for conflict resolution. Just run the following commands, replacing “meld” with your favorite utility:
git config --global diff.tool meld git config --global merge.tool meld After that, all you need is to run the git difftool command some-file.js to view the changes in the corresponding program instead of the console.
However, some programs (for example, the same meld) support the comparison of not only files, but also directories. If you run the git difftool -d command , you will see diff across the entire project, and sometimes it is useful.
12. Ignoring spaces
Example command: git diff -w or git blame -w
If you have ever had to change indentation or reformat files, then you must have come across the fact that, according to the git blame command, you are now responsible for all changes in these files.
Fortunately, Git is smart enough to understand what's what. You can run many commands (such as git diff , git blame , etc.) with the " -w " flag and Git will simply ignore all the changes associated with whitespace (space, tab, and others).
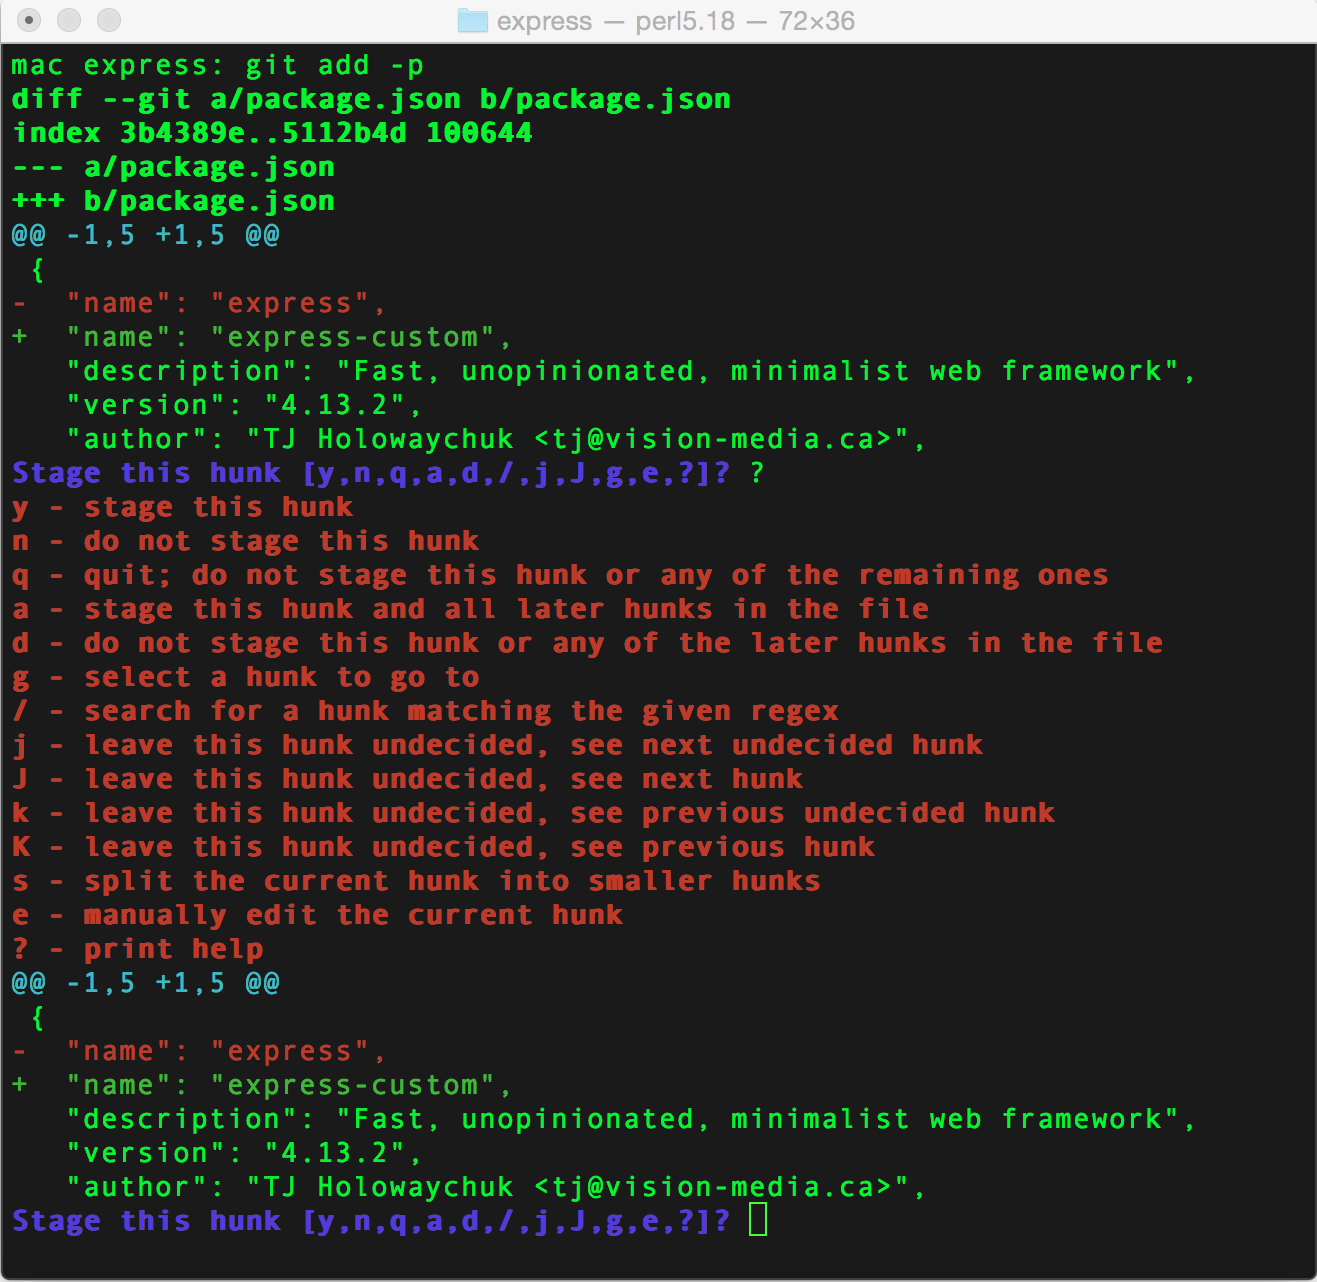
13. Adding certain changes from a file
Example command: git add -p
Someone from the Git developers is obviously not indifferent to the " -p " flag, because it usually adds very handy things to various commands.
In the case of the git add command, this flag allows you to interactively select which changes from the file you want to commit. Thus, you can more logically organize the sequence of your commits to make them easier to watch.
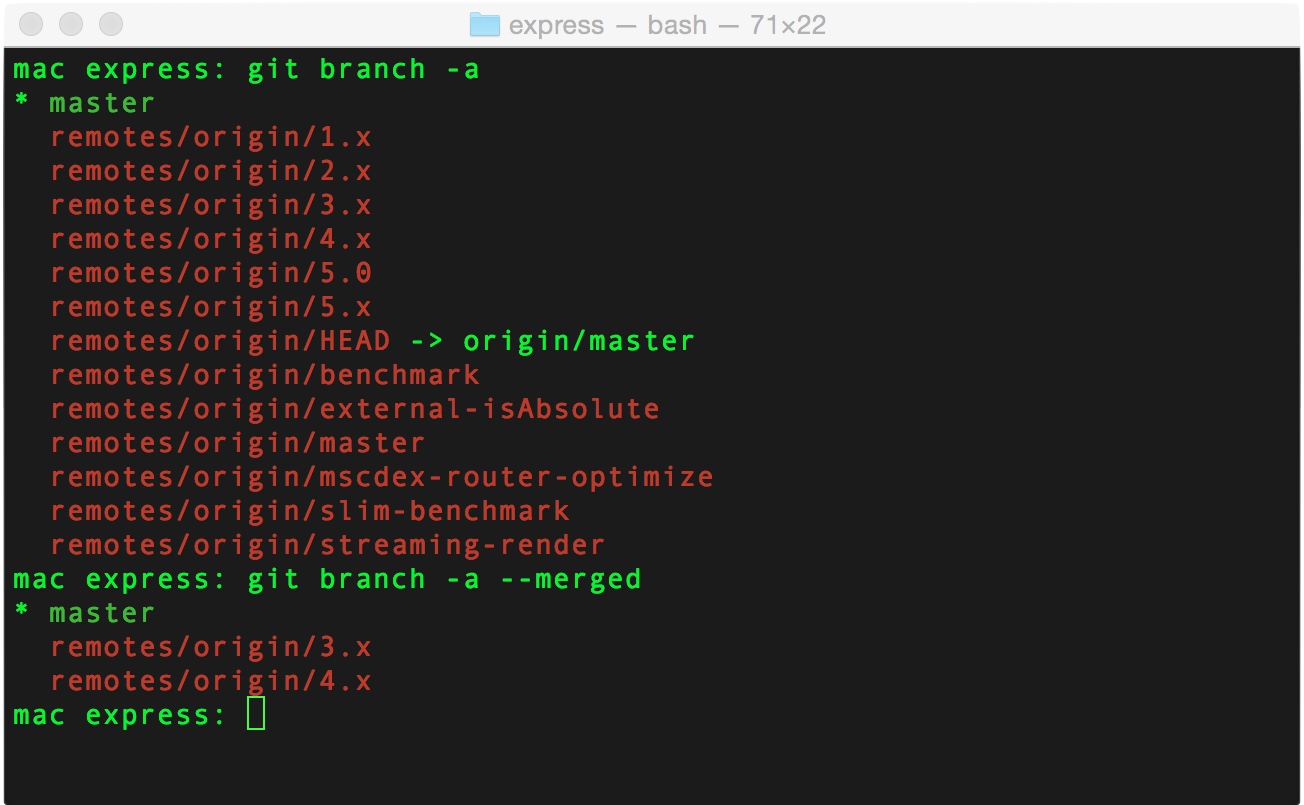
14. Find and remove old branches
Example command: git branch -a
Often projects are overgrown with a large number of branches in a remote repository, some of them remain there even after they have been merged into the main branch (master). If you are a fan of purity (at least in all that relates to the code), like me, you are probably annoyed by the presence of such branches.
All branches of the repository can be viewed using the git branch -a command (the " -a " key will output all branches, including those from the remote repository), and the --merged parameter will show only those branches that were frozen in the master branch.
Most likely, you will want to first run the git fetch -p command (get the changes from the remote repository and remove the irrelevant data) to make sure that you are working with the actual data.
You can refine yourself and display lists of all deleted branches, comments to the latest commits to them and the date of the last changes:
git for-each-ref --sort=committerdate --format='%(refname:short) * %(authorname) * %(committerdate:relative)' refs/remotes/ | column -t -s '*' 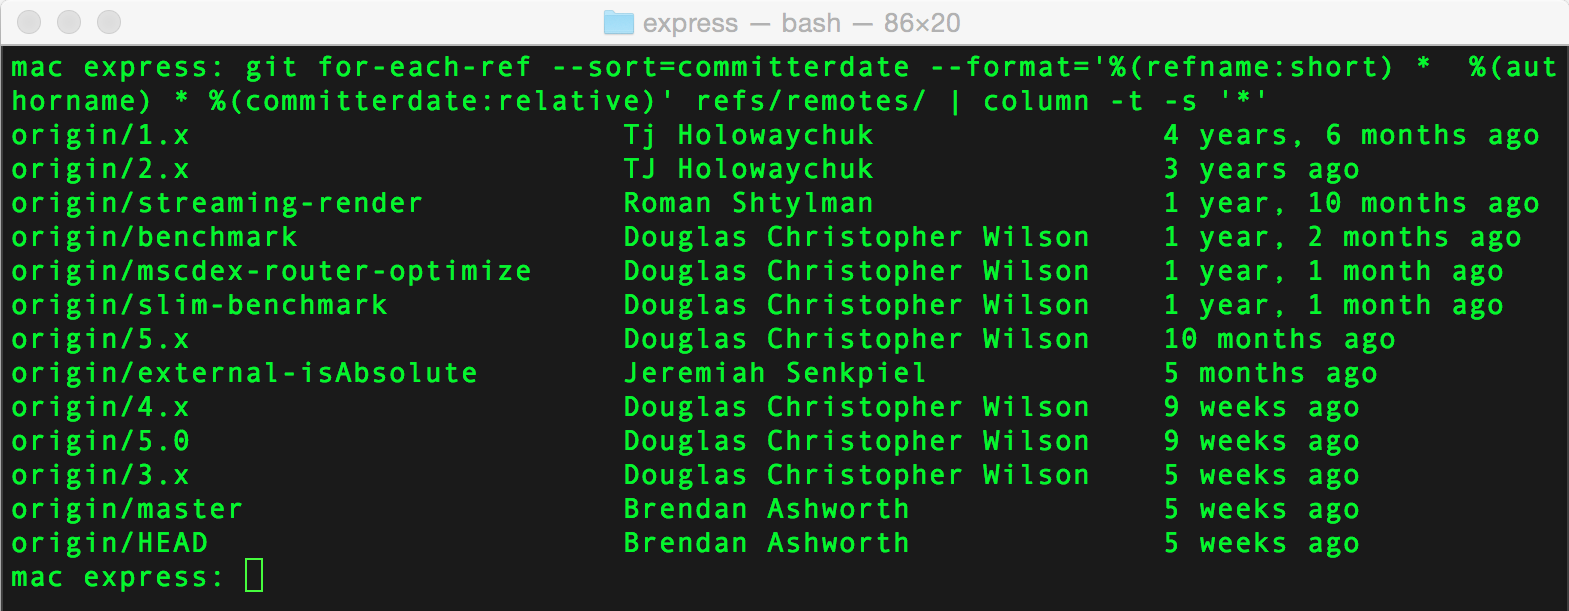
Unfortunately, as far as I know, there is no easier way to get a list of cold branches. So here you have to compare two lists or write a script for this.
15. Postponing changes to certain files
Example command: git stash —keep-index or git stash -p
If you don’t know what the git stash command is doing, then it simply puts all the uncommitted changes into a special Git stack. Then you can at any time perform git stash pop and apply all these changes back. You can also view a list of all saved states on the stack using the git stash list command, for more information, see the man git-stash help.
The git stash command has one flaw: it puts all files off at once, and sometimes it is convenient to put off only some files, and leave the rest and continue working with them.
Remember the magic key " -p "? The git stash command also has it, and, as you may have guessed, this one when using this Git key will prompt you to select the changes you need to postpone.
Be sure to try clicking " ? " To see a list of all possible options.

There is another way to postpone only the files you need:
- Using the git add command, add to the index for a commit those files that you do not want to postpone (for example: git add file1.js, file2.js )
- Run git stash --keep-index , and Git will postpone those files that were not added to the index for commit
- Run git reset to reset the index and continue
16. Good commit notes
On this topic, you can recommend a wonderful article " How to write notes to commits ."
Here I want to emphasize one important rule: a good note to a commit should end the following sentence: “ After applying this commit {{text of your note}} ”. For example:
- After applying this commit, it updates the readme file.
- After applying this commit adds validation of the GET / user /: id API call
- After applying this commit, cancels commit 12345
17. Autocompletion of git commands
For some operating systems (for example, Ubuntu), autocompletion for Git in the shell is enabled by default. If this is not the case on your operating system (and not on Mac OS X), you can easily enable auto-completion .
18. Creating aliases for frequently used commands.
TL; DR: use Git or bash aliases for the most commonly used Git commands.
It is best to work with Git via the command line. And the best way to get comfortable with the command line is to do everything in full (every time you type long commands). However, sooner or later the desire comes to create shorter and more convenient aliases, so as not to enter the same commands each time.
Git has a built-in alias system, for example, if you run the following command:
git config --global alias.l "log --oneline --graph" A new alias will be created for Git with the name " l ", and this will allow you to type git l instead of git log --oneline --graph .
Note: You can also add additional parameters to Git aliases (for example, git l --author = "Alex" ).
An alternative to gita aliases is the good old alias bash. For example, in my .bashrc config there is such a line: alias gil = "git log -online -graph" , which allows me to write gil instead of a full long command, and besides, it is two whole characters less than git l :).
19. Quick search for bad commit
Example command: git bisect
The git bisect command uses the divide and conquer principle to look for a bad commit in a large change history.
Imagine you are back from a long vacation. You pick up the latest version of the project from a remote repository and find that the feature you were working on just before the release is no longer working. You check the last commit you made - everything works there. However, during your vacation, hundreds of other commits appeared in the project, and you have no idea which one turned out to be bad and broke your feature.

Surely you will try to find a bug that broke your feature and with the help of the git blame command on the ill-fated kommit to find a person who can make a complaint. But if the bug is hard to detect, you can try to study the change history, in the hope of finding a bad commit.
Here is the second option - this is exactly the case when the git bisect command comes in handy. It allows you to find a bad commit as soon as possible.
So what does git bisect do?
After you specify a commit in which nothing works (“bad” commit) and a commit in which everything works (“good” commit), git bisect will split all commits that are between them in half, switch to the new (unnamed) ) the branch on this middle commit will allow you to check if your feature works in it.
Suppose in this “middle” commit everything works. Then you talk about this gita with the help of the git bisect good command and you will have only half of all the commits to search for the one that broke everything.
After executing this command, Git will split the remaining commits in half and switch back to the nameless branch on the new middle commit, allowing you to test the performance of your feature. And so on, until you find that “bad” commit.
Due to the fact that each time you divide a group of commits in half, you will need approximately log (n) iterations to find the desired one (see Complexity of the algorithm ).
The list of commands that you will need to work with git bisect :
- git bisect start - we begin separation procedures
- git bisect good {{some-commit-hash}} - mark the commit as good (for example, the last one you made before the release)
- git bisect bad {{some-commit-hash}} - we mark bad kommit (for example, HEAD of a main branch, HEAD means the last kommit)
- At this point, Git finds the middle commit and tells you that you can check
- git bisect bad - we inform Git that our feature does not work in the commit currently checked
- git bisect good - we inform Git that our feature works in the commit currently checked
- When the first bad commit is found, Git will let you know, and git bisect completes.
- git bisect reset - return to the starting point of the git bisect process (for example, to the HEAD of the main branch)
- git bisect log - displays the last successfully executed git bisect
This procedure can be automated using a script .
Translated Dreadatour , text read %% username.
Source: https://habr.com/ru/post/267595/
All Articles